HowTo: Create Custom Labels in Citrix ADC nFactor for Autopost and Redirect
Introduction and Background
Recently I had the opportunity to work with a customer who was attempting to port their basic authentication Citrix Gateway configuration to AAA and nFactor. Fairly common, with admins looking to move away from basic policy expressions to advanced expressions now that Citrix has deprecated them and plans to discontinue their use in 13.1.
There were a few challenges with this customer, however, namely:
- Challenge 1: They use Smart Cards at Gateway for authentication, followed by group extraction, and this flow should require little user intervention beyond entering their PIN
- Challenge 2: They require users without valid Smart Cards to be redirected to an “access denied page” (let’s call it Access Denied 1)
- Challenge 3: They require users who had a valid Smart Card but are not members of the correct authorizing group (as per group extraction) to be redirected to a different “access denied page” (let’s call it Access Denied 2)
In the works of basic policied on a Citrix Gateway, this was relatively simple using responder policies. Unfortunately, responder policies, even if bound globally, tend to not take effect on an AAA vServer.
The following diagram illustrates the functional flow active in basic policies which we needed to replicate in advanced policies via AAA+nFactor:

With some solid tips from my Citrix Consulting colleagues and a touch of perseverance, we were able to meet all objects in nFactor. We were able to resolve Challenge 1 and Challenge 2 via nFactor custom labels and Challenge 3 was resolved with a responder left bound on Citrix Gateway, post-authentication. Custom labels are the core focus of this post, and it relies on the use of a custom portal theme based on the RfWebUI theme. This gets us access to the customization and extensibility engine we’re used to in StoreFront when customizing the UI using that lovely “custom” folder with our javascript and css configs.
Challenge 1 – Certificate Authentication
Certificate authentication followed by LDAP is a very common configuration and its implementation via nFactor is well documented. There are various guides on the subject of client certificates with nFactor from Citrix and the Citrix users community:
- CTX201734 – nfactor – Certificate Authentication Followed by Group Extraction for 401 Enabled LB/TM Virtual Server on NetScaler (Caution on this one; if referencing for Citrix Gateway, you probably want to remove the AuthenticationDomain from the auth profile, leaving it blank or you may find authentication loops back to login page)
- Citrix Docs – nFactor for Gateway Authentication
- Carl Stalhood – nFactor Authentication
- CTX201730 – Certificate Fallback to LDAP in Same Cascade with One Virtual Server for Certificate and LDAP Authentication on Citrix ADC
- CTX201731 – nFactor – SAML in First Factor then Group Extraction Followed by LDAP/Certificate Authentication on NetScaler
- CTX201727 – Prefilling username from Certificate on Citrix ADC nFactor (This really is as simple as cloning the OnlyUserName.xml file on your appliance and adding “${AAA.USER.NAME}” in-between <InitialValue></InitialValue> in the first Requirements string)
The fact this is a Smart Card changes little here; it’s still a certificate being presented and authenticated, just with the added protection of a PIN prompt to validate the private key.
The gotcha, however, is that unlike a standard client certificate authentication workflow with client certificate authenticated and the user is sent through a noschema LDAP group extraction second factor, we were getting hung up. Hung up where?
Post-PrincipalName extraction from the certificate in the first factor, we were being presented automatically with the OnlyUserName.xml login schema. Helpful that it figures out which schema to use without explicitly binding anything, less helpful than it is showing up at all. In non-Smart Card configurations, I was unable to produce this behaviour. And furthermore, this customer did NOT have this issue when using basic authentication policies at Gateway with client certificate as primary and group extraction as secondary. The customer was running 12.1 b55.13 and upgraded to 13.0 41.28 as well, same deal. Tried on four different browsers, same deal. I put the blame on Smart Card but we needed to move this forward.
We first tried cloning the OnlyUserName.xml file and configuring it to prefill the UPN from the certificate factor using ${AAA.USER.NAME}. Binding this to the group extraction got us populating the username field, but no auto-post auto-submit of the page.
The solution, in this case, was a custom label and an associated entry into our custom RfWebUI theme’s script.js file into which we added a snippet of code that would auto-post the page by “clicking” the logon button. Now, that custom script.js file could apply to anything we had bound the theme to, and auto-posting every page with a logon button would be pointless. To work around this, we used a cookie, so that this function only activated on the page (rendered via a custom login schema) it was intended for.
The following provides a breakdown of the steps to get this configuration:
- Create a RfWebUI-based custom theme and bind to your AAA vServer and Gateway.
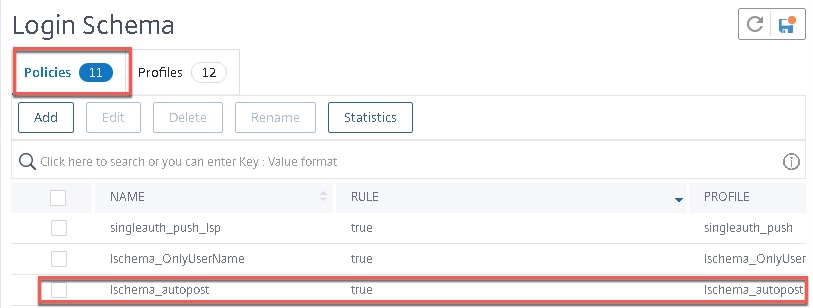
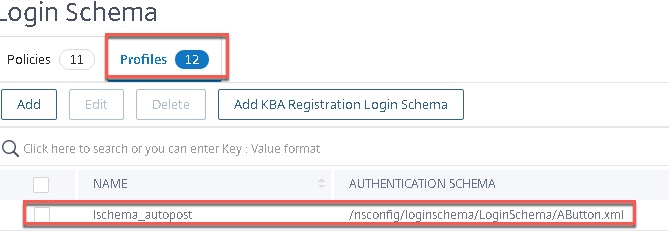
- Create a new Login Schema which has two requirement entries; one is a login button, the other is a cookie we’ll just call nsg_cookie but name it as you please, provided it lines up with the script.js code we will add later. Below is the text to create the XML file you can upload to the appliance. Call it autopost.xml or something.
<?xml version="1.0" encoding="UTF-8"?><br /> <AuthenticateResponse xmlns="http://citrix.com/authentication/response/1"><br /> <Status>success</Status><br /> <Result>more-info</Result><br /> <StateContext></StateContext><br /> <AuthenticationRequirements><br /> <PostBack>/nf/auth/doAuthentication.do</PostBack><br /> <CancelPostBack>/nf/auth/doLogoff.do</CancelPostBack><br /> <CancelButtonText>Cancel</CancelButtonText><br /> <Requirements><br /> <Requirement><Credential><ID>nsg_cookie</ID><Type>nsg_cookie</Type></Credential><Label><Text></Text><Type>plain</Type></Label></Requirement><br /> <Requirement><Credential><ID>loginBtn</ID><Type>none</Type></Credential><Label><Type>none</Type></Label><Input><Button>Continue</Button></Input></Requirement><br /> </Requirements><br /> </AuthenticationRequirements><br /> </AuthenticateResponse><br />
- Fire up WinSCP or similar client and add a code snippet to your script.js file in the RfWebUI-based custom theme
CTXS.ExtensionAPI.addCustomCredentialHandler({<br /> // The name of the credential, must match the type returned by the server<br /> getCredentialTypeName: function () { return "nsg_cookie"; },<br /> // Generate HTML for the custom credential<br /> getCredentialTypeMarkup: function (requirements) {<br /> var div = $("<div></div>");</p> <p> $(document).ready(function() {<br /> //Set cookie<br /> var exdays = 1000;<br /> var d = new Date();<br /> d.setTime(d.getTime() + (exdays*24*60*60*1000));<br /> var expires = "expires="+ d.toUTCString();<br /> document.cookie = "NSC_AUTH_METHOD=CERT;" + expires + ";path=/";</p> <p> //Submit form<br /> document.getElementById('loginBtn').click();<br /> });<br /> return div;<br /> }<br /> });<br /> - Create your Login Schema profile referencing your new XML doc above, and associated policy for it with an expression of “true”.
- Create the policy label for LDAP group extraction, which will act as the second factor after certificate authentication. Use the Login Schema we just made, and bind the LDAP server (in this case an LDAP server with “Authentication” checkbox deselected).
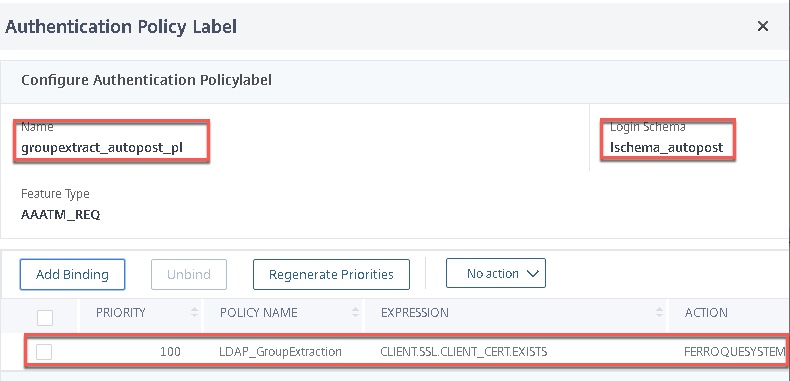
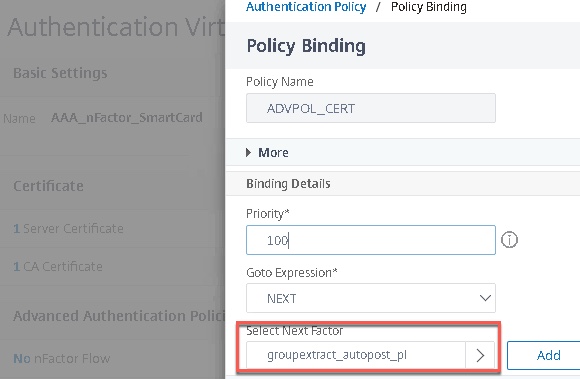
- Bind the group extraction policy label as the second factor to the certificate factor.
- And test. if you were stalling before on the LDAP group extraction factor, this should auto-submit and send you through to StoreFront.
Challenge 2 – No Certificate Denial Page
The next problem was getting users who did not have a valid certificate, over to a publically accessible “denied” website that advised the user precisely why they did not gain entry; they lacked a valid Smart Card. As mentioned, a globally-bound responder policy with an expressing looking to match a client certificate not being present did not work.
Our solution was again, a custom label. In this setup, we created a cascading “noauth” policy on the first factor, second in priority to the client certificate authentication policy. This had a policy label bound as a second factor that used a new custom login schema* paired with another snippet of JavaScript code associated with a cookie, no authentication policy needed to be bound. This time JavaScript redirects the user to the second “denied” website advising users they have a valid Smart Card, but were not authorized to proceed further. Instructions advised the user how to engage support to request access.
*One item of note here, in the lab, we just needed this custom schema bound to the policy label associated with the denial page. In the customer environment, this was insufficient; we had to bind the custom login schema to the AAA vServer itself for it to correctly invoke.
The following provides a breakdown of the steps to get this configuration:
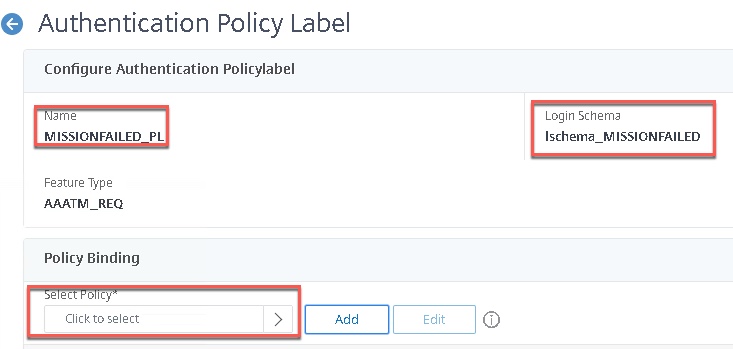
- Create a new Login Schema. In my example, I called it MISSIONFAILED.xml but promise me you’ll name yours something more relevant. The content of this one is similar to the other, however, I call out a different cookie value in the first requirements line and it needs no button.
<?xml version="1.0" encoding="UTF-8"?><br /> <AuthenticateResponse xmlns="http://citrix.com/authentication/response/1"><br /> <Status>success</Status><br /> <Result>more-info</Result><br /> <StateContext></StateContext><br /> <AuthenticationRequirements><br /> <PostBack>/nf/auth/doAuthentication.do</PostBack><br /> <CancelPostBack>/nf/auth/doLogoff.do</CancelPostBack><br /> <CancelButtonText>Cancel</CancelButtonText><br /> <Requirements><br /> <Requirement><Credential><ID>cert_cookie</ID><Type>cert_cookie</Type></Credential><Label><Text></Text><Type>plain</Type></Label></Requirement><br /> </Requirements><br /> </AuthenticationRequirements><br /> </AuthenticateResponse><br />
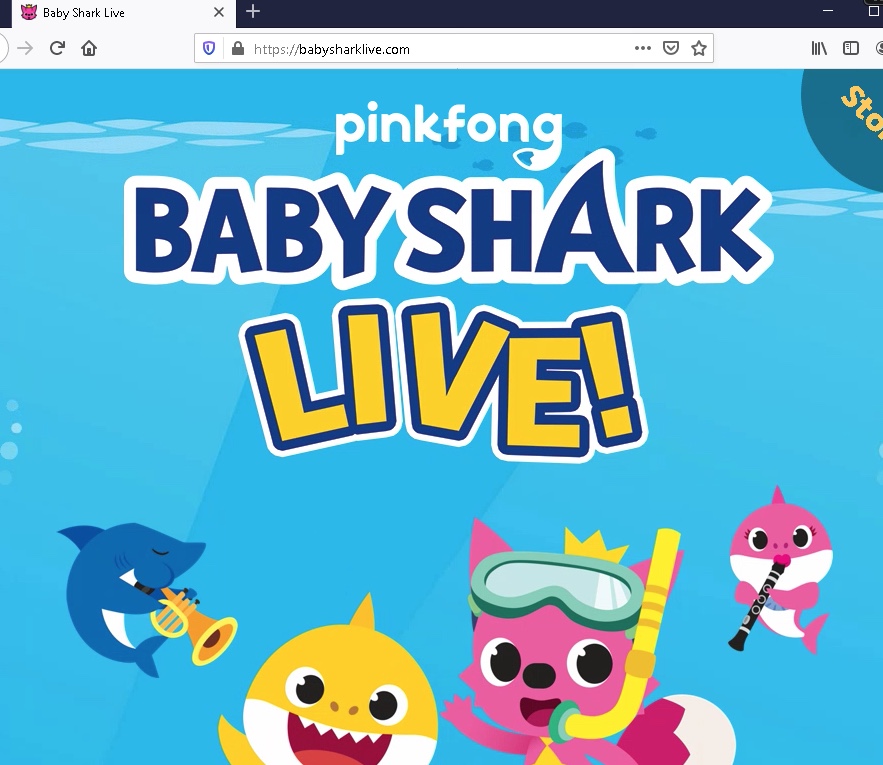
- Go back and edit the script.js file and append this additional snippet of js code after the first one. This will pretty much hook into the cookie value on that Login Schema we just created and do a redirect to a webpage of your choosing. In this example, we’re redirecting to babysharklive.com because I revel in irritating others.
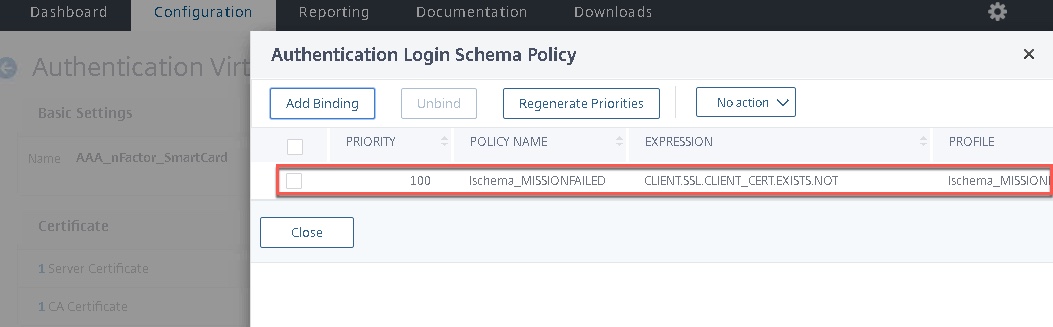
CTXS.ExtensionAPI.addCustomCredentialHandler({<br /> // The name of the credential, must match the type returned by the server<br /> getCredentialTypeName: function () { return "cert_cookie"; },<br /> // Generate HTML for the custom credential<br /> getCredentialTypeMarkup: function (requirements) {<br /> var div = $("<div></div>");</p> <p> $(document).ready(function() {<br /> //Set cookie<br /> var exdays = 1000;<br /> var d = new Date();<br /> d.setTime(d.getTime() + (exdays*24*60*60*1000));<br /> var expires = "expires="+ d.toUTCString();<br /> document.cookie = "NSC_NOCERT=TRUE;" + expires + ";path=/";</p> <p> // Simulate an HTTP redirect:<br /> window.location.replace("https://babysharklive.com");<br /> });<br /> return div;<br /> }<br /> });<br /> - Create your Login Schema profile referencing your new XML doc above, and associated policy for it with an expression of “CLIENT.SSL.CLIENT_CERT.EXISTS.NOT” .
- Create the policy label for this failure factor Use the Login Schema we just made, without an authentication policy bound.
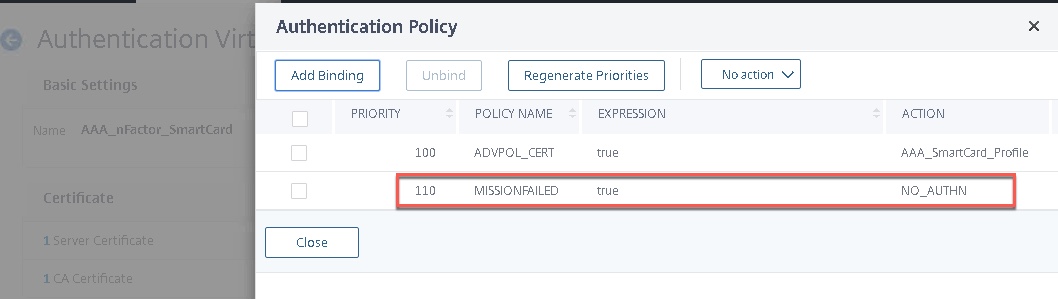
- Create a NO_AUTHN authentication policy and bind it to the AAA vServer as secondary priority to your certificate factor. Leave this as true. It will cascade down if the user fails to present a certificate.
- Bind the “MISSIONFAILED” Login Schema to the AAA vServer itself. This step may be optional, on two different 12.1 b55.13 configs one needed it, one did not.
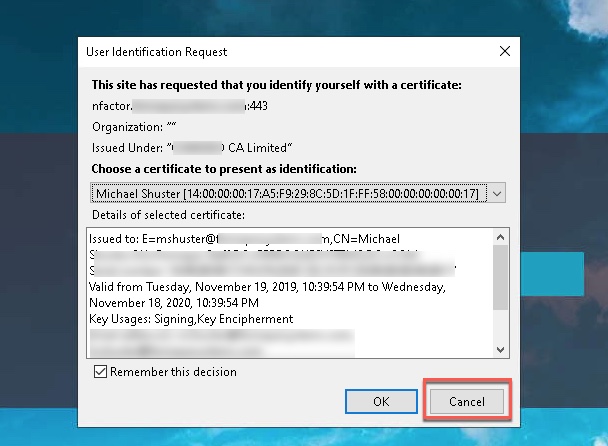
- And test! Hit the website, deny the cert prompt, and you should be redirected accordingly.
Challenge 3 – Not Authorized Denial Page
This one ended up being the easiest, and the customer championed this one. We bound a responder policy to the Citrix Gateway which redirected users to the second denial page. To prevent users from even hitting the Gateway this could likely have been done via a third custom label, however, under time constraints, this method worked fine. As a mitigating control, session policies should activate only for users in the correct group.
The expression for the responder policy was:
HTTP.REQ.USER.IS_MEMBER_OF("placeYourGroupHere").NOT && http.REQ.USER.NAME.NE("")
Note: Probably should swap HTTP.REQ.USER.NAME for AAA.USER
Conclusion
I do hope the info in this post is valuable to some and demonstrates use cases for custom labels for nFactor and the workflow to achieve them. Once the foundation is in place, it’s a lot clearer to see how extensible nFactor with a RfWebUI theme can truly be. Special thanks to Juliano Reckzeigel and Michael Skowronski from Citrix Consulting for their suggestions on this one.


Hi Michael, Thank you for acticle. I have very different use case I have some similar challenges to solve and you can skip custom javascript in general. My login flow is: First factor – any of a) certificate b) RSA c) username/password authentication Second factor – depend on first factor a) and b) as first factor – than user/password/domain authentication (account not possible to map to first factor) c) as first factor – sms code send by web request How I connected nfactor factors Root – noschema cert authentication policy – expression: true +cert passed bind – decission block -cert… Read more »