HowTo: Okta SAML at Citrix Gateway with SSO Without FAS
Introduction and Background
NOTE 1: As of June 8th, 2021, Citrix has identified two vulnerabilities covered in CTX297155. Upon remediation with appropriate firmware, SAML configurations require adjustment as per CTX316577. This article’s examples do not contain those adjustments and readers are encouraged to modify their deployments accordingly to mitigate the security risk.
NOTE 2: This solution does not appear to function well with Okta’s agentless DSSO solution wherein Okta assumes responsibility for Kerberos authentication. Please see workaround notes at bottom of this article for users on a corporate network where DSSO is used.
In one of my recent articles, I walk through a complicated configuration for Azure MFA via SAML at Citrix Gateway without the use of Citrix FAS. That particular configuration was quite complex, required Citrix ADC 13.0, and the Citrix ADC needs to stand in as an IDP during the authentication flow in order to capture credentials so we can re-use them during an LDAP factor.
Other identity solution providers have been hard at work devising their own workarounds to the authentication gap between SAML and Windows OS. In the case of Citrix deployments, such workarounds can be useful if an organization is constrained and unable to deploy Citrix FAS.
The common enabling component regardless of the solution is ensuring there is an LDAP factor for Citrix ADC to use for SSO to StoreFront and Citrix resources once successfully authenticated.
Although not publically documented by Okta (from what I have gathered in brief searching), Okta does actually have the means to allow SAML integration at Citrix Gateway and SSO to Citrix apps without the use of FAS. This is accomplished via an LDAP POST function which calls back to Okta to retrieve the user’s previously entered credentials in order to perform LDAP authentication at Citrix Gateway. Both SAML SP and LDAP authentication are used in this approach. This approach is not documented in Okta’s Citrix NetScaler Gateway SAML Configuration Guide which still acknowledges in its June 10th, 2019 iteration at least, that Citrix FAS is still needed for a full SSO experience using the setup they describe in that guide.
Okta does have an internal document that I believe they may make available to customers on request which outlines the LDAP POST solution mentioned earlier. A similar setup has been documented by Alchemy Technology Group’s article entitled “Integrating Okta with Citrix NetScaler Gateway without Citrix Federated Authentication Service“.
Both Alchemy and Okta’s documented solution uses basic authentication policies, which Citrix has deprecated and plans to discontinue in a future firmware release (presumably 13.1). Citrix wants customers to leverage advanced authentication policies (nFactor) for Citrix Gateway and AAA-TM fronted applications and this guide will illustrate how to accomplish that. Both aforementioned solutions rely on a responder policy bound to the Citrix Gateway to invoke the LDAP POST mechanism. This function retrieves the user’s previously entered credentials at the Okta login screen, and inject and auto-post them into an LDAP factor rendered by the Citrix ADC. Responder policies do not work effectively on AAA-TM servers unfortunately, so an alternative means to calling out to the Okta platform for the final authentication sequence is needed.
This article walks through the end-to-end setup of the Okta applications to support the solution, and how we configure nFactor constructs to successfully invoke the LDAP POST. Together this integration allows users to seamlessly SSO into StoreFront and Citrix apps and desktops without a second login prompt. By moving the authentication logic from basic policies to advanced policies, we also gain access to the highly extensible capabilities of nFactor which we otherwise cannot achieve via basic authentication policies.
Authentication Flow
For the purposes of this article, I have labbed out the solution with gatewayokta.ferroque.dev as the Citrix Gateway. The configuration used relies on sAMAccountName but with sufficient tweaking to Okta and LDAP policies on ADC, it can surely accommodate UPN, etc.
The authentication flow is as follows for our setup:
- User connects to https://gatewayokta.ferroque.dev.
- Citrix ADC evaluates the first authentication policy bound to the authentication vServer in the authentication profile associated with the Citrix Gateway vServer.
- Citrix ADC sends a SAML request to Okta. In this initial sequence, the Citrix ADC is acting as a SAML Service Provider (SP) and Okta is acting as an Identity Provider (IdP).
- The user is redirected to the Okta login page and authenticates with their sAMAccountName.
- Okta applies appropriate access policies and MFA as specified in the Okta configuration.
- If MFA is successful, Okta sends a SAML assertion to Citrix ADC as a response to SAML Request #1.
- The authentication sequence proceeds to LDAP on the Citrix ADC, using a customized policy label which will retrieve credentials from Okta (captured in step #4) for the LDAP POST sequence.
- Citrix ADC evaluates LDAP credentials (using an LDAP server configured for sAMAccountName) such that they are the last credentials checked for SSO.
- User is authenticated to https://gatewayokta.ferroque.dev and passes through to StoreFront.
Pre-Requisites
We do not rely on new features of more current Citrix ADC firmware in this configuration. As such the nFactor configuration for Okta should work on most current firmware (11.1, 12.0. 12.1, 13.0). I can confirm this configuration functions as expected on 13.0 (which happened to be the version of my current lab instance and plan to confirm it functions on 11.1 and 12.1 shortly.
The following assumptions are being made for our configuration:
- An Okta tenant configured and integrated with your Active Directory environment.
- Admin rights to the Okta tenant in order to provision applications.
- Citrix ADC appliances built and configured, with any requisite firewall rules implemented.
- Citrix Gateway vServer already built and integrated into a Citrix Virtual Apps & Desktops (CVAD) environment (StoreFront, Citrix Site).
- A custom theme based on RfWebUI theme on Citrix ADC.
- Functional Windows domain and a service account for LDAP.
- TLS certificate (SAN, named, or wildcard) to cover one AAA-TM vServers and Citrix Gateway vServer.
- Citrix ADC Advanced (formerly Enterprise) or above license.
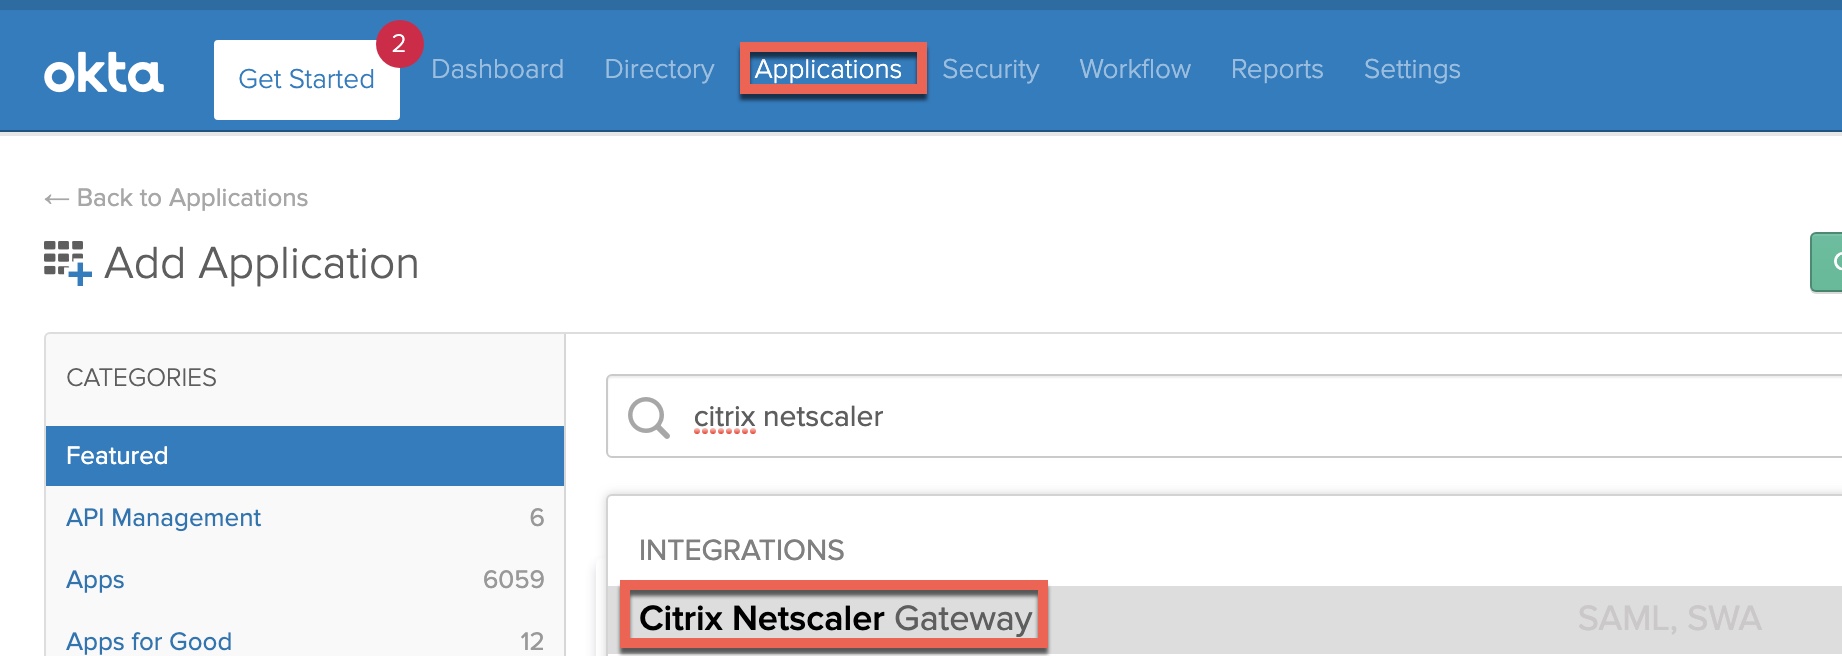
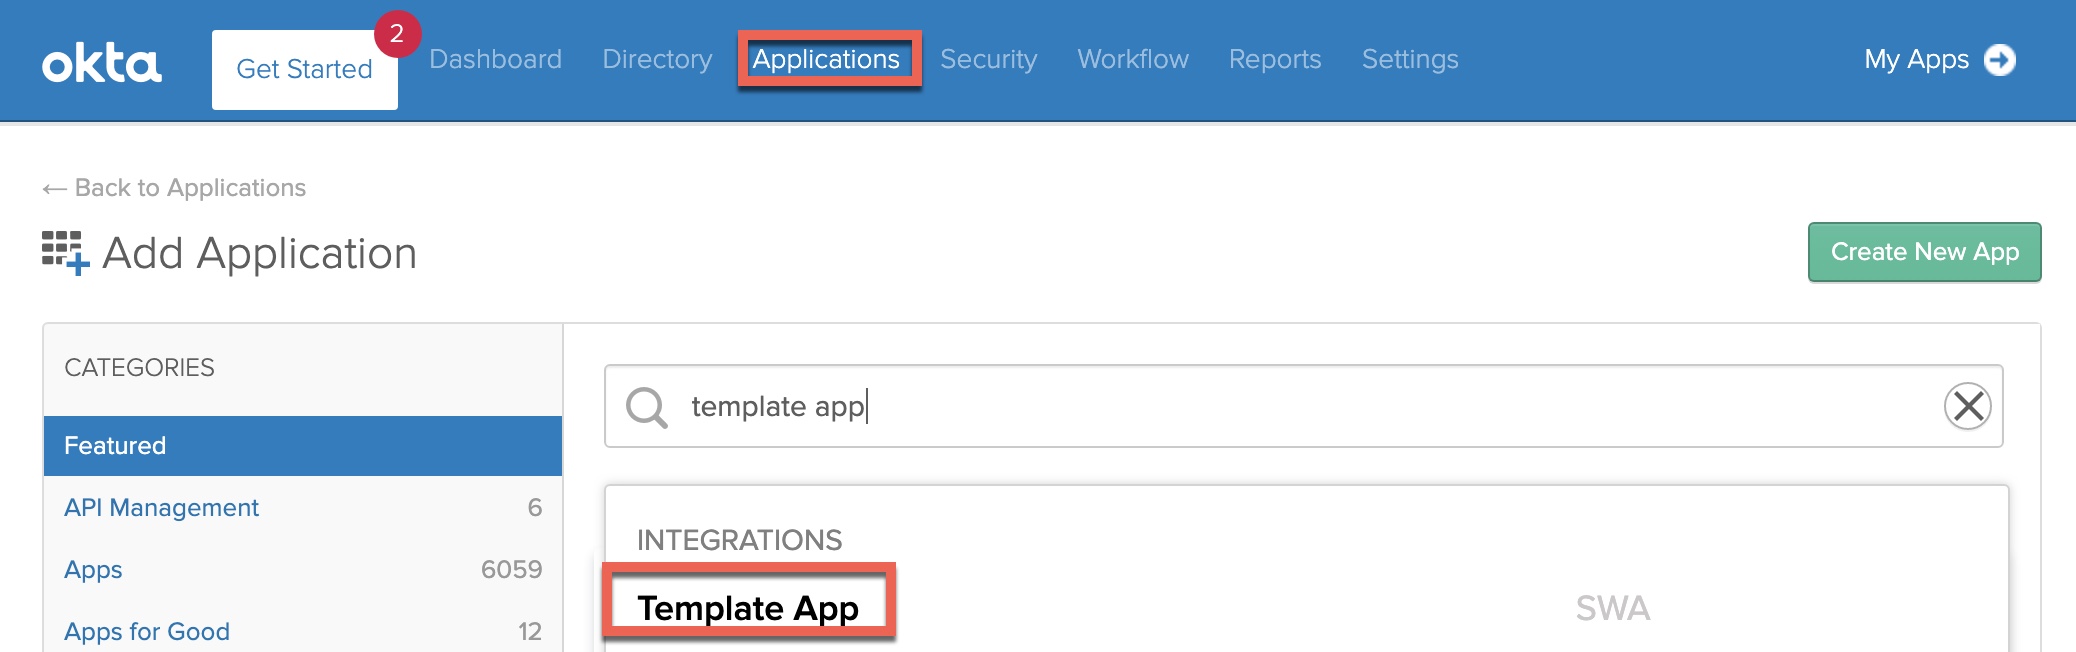
Step 1 – Configure “Citrix NetScaler Gateway” Application in Okta
From within the Okta Admin console, navigate to “Applications” and search up “Citrix”. Select the “Citrix NetScaler Gateway” application.
Click “Add”.
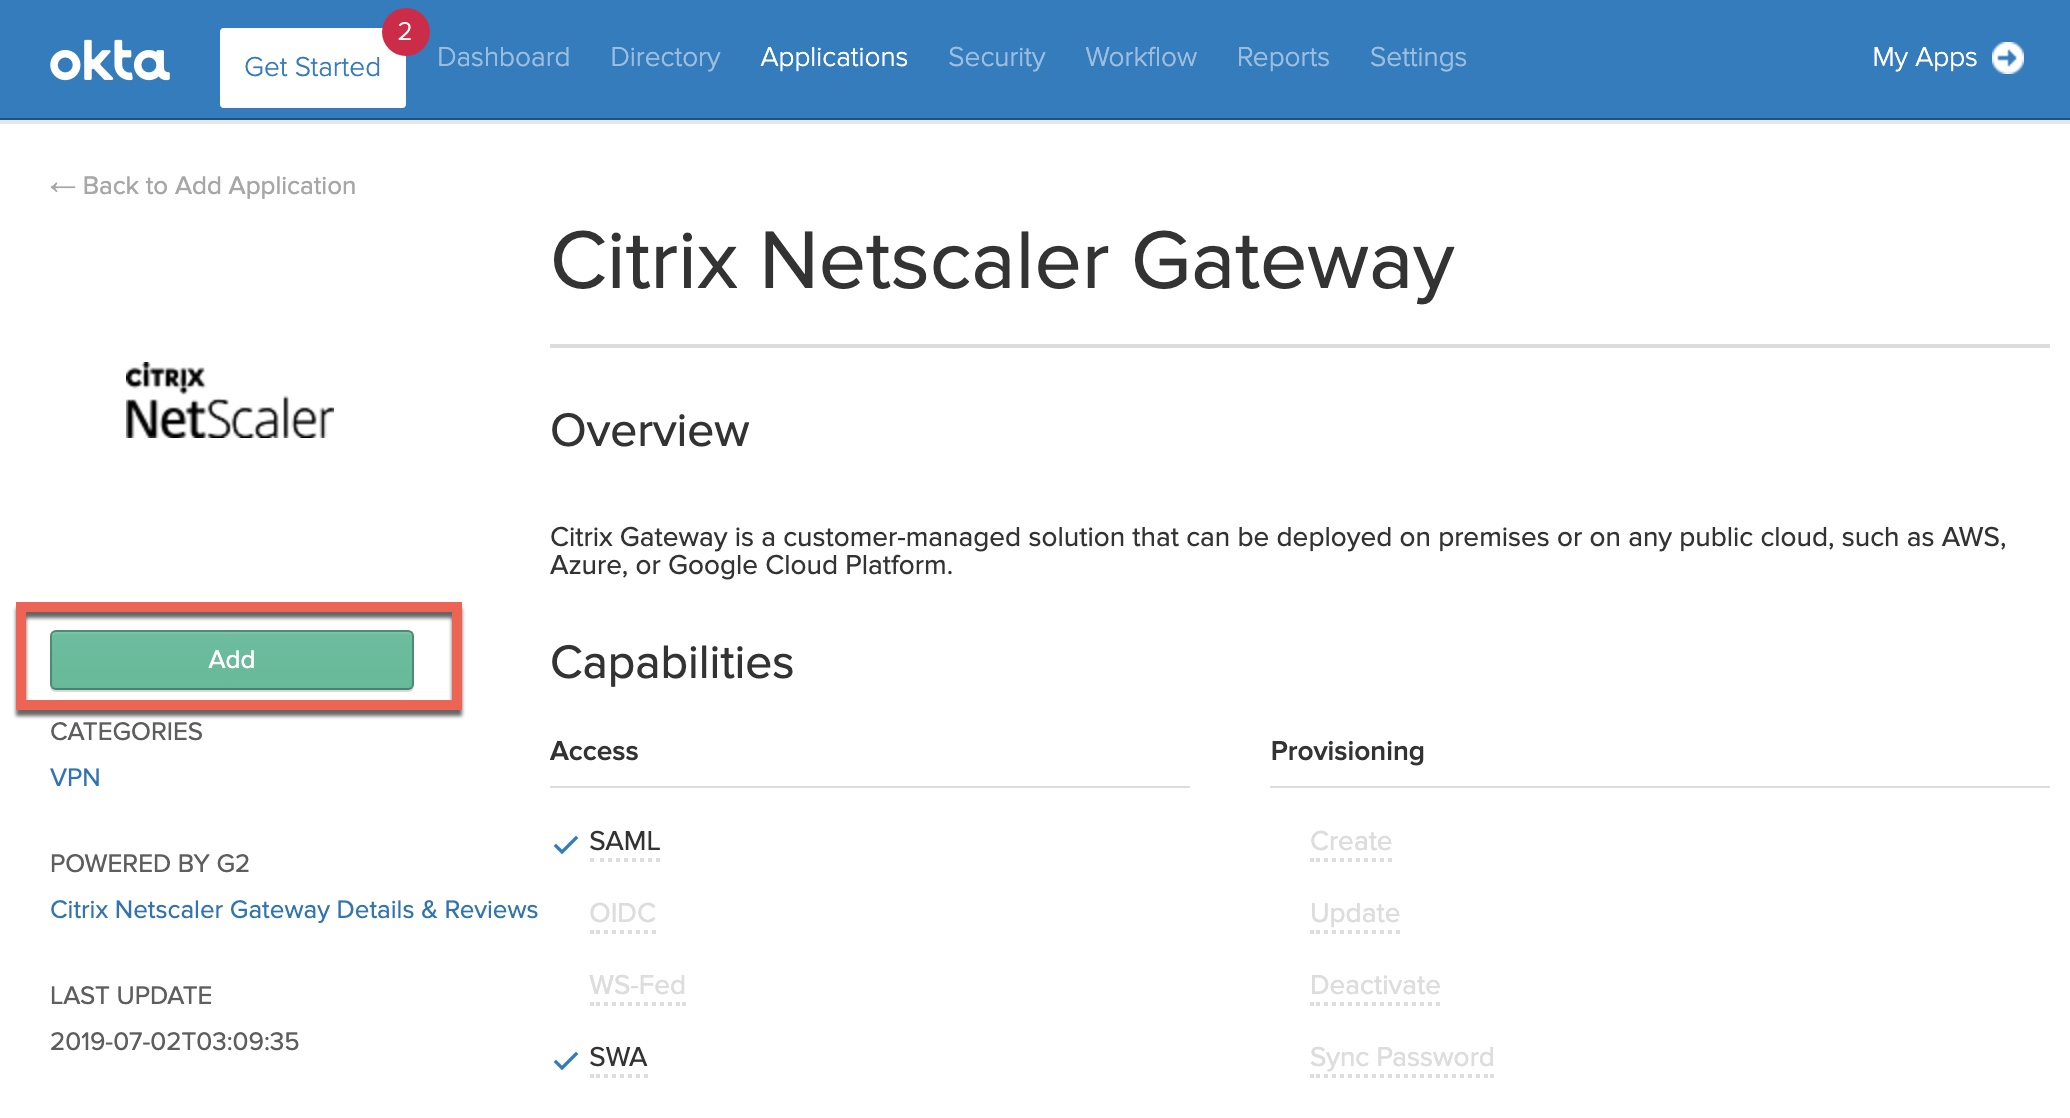
Provide the application a useful label, and input the HTTPS URL for the Citrix Gateway portal. Do not include a trailing slash at the end of the URL. Click ‘next’ to proceed to configure SSO parameters.

On the SSO tab select “SAML 2.0” and define the application username format. This lab config is using sAMAccountName so we’re selecting “AD SAM account name”. Next, click the “View Setup Instructions” button which will open a new tab to walk through configuring the SAML SP configuration.
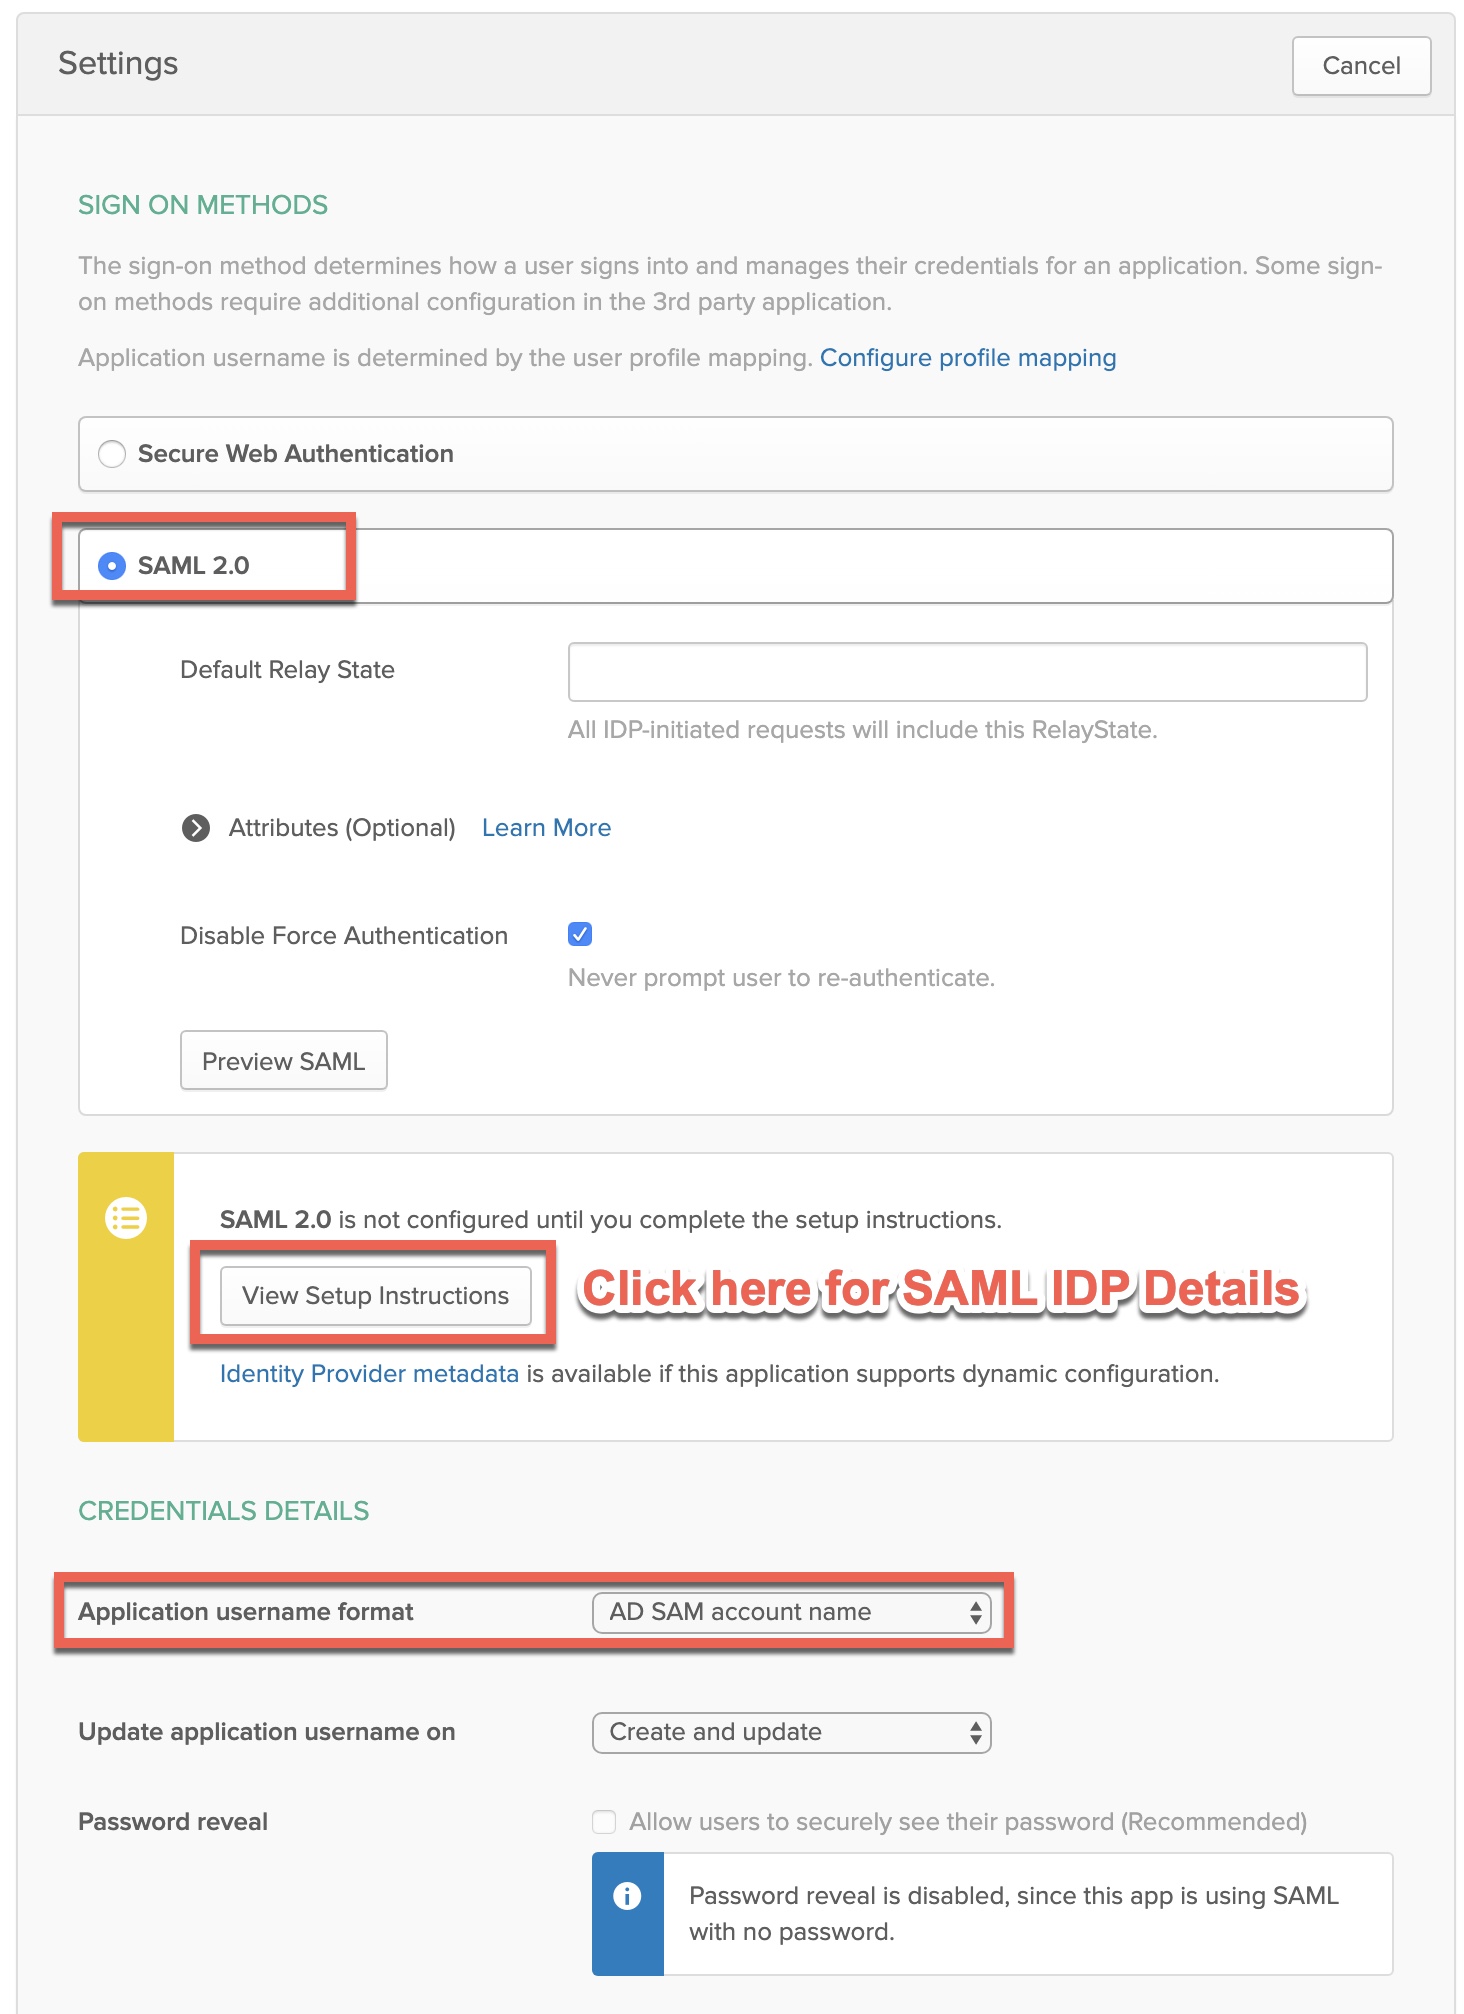
We’ll be grabbing various configurations dynamically generated on this screen. Scroll down to ‘Variables’ and capture each of the displayed parameters into a Notepad file, we’ll reference them for Step 4. Make a point to download the IDP’s public key certificate so we can upload to the ADC later.

Back on the SSO configuration page click ‘Done’ to complete the application configuration. Our Okta-side SAML configuration is now complete.
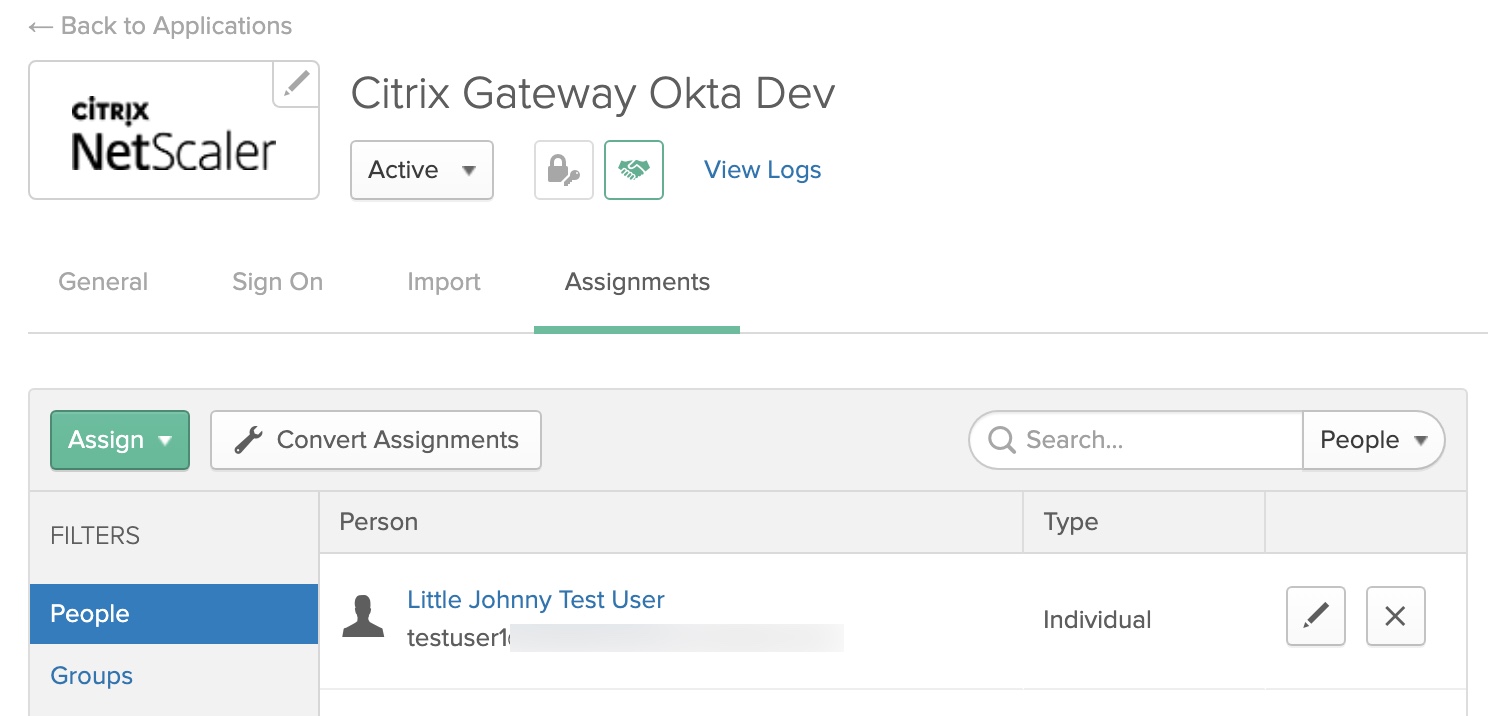
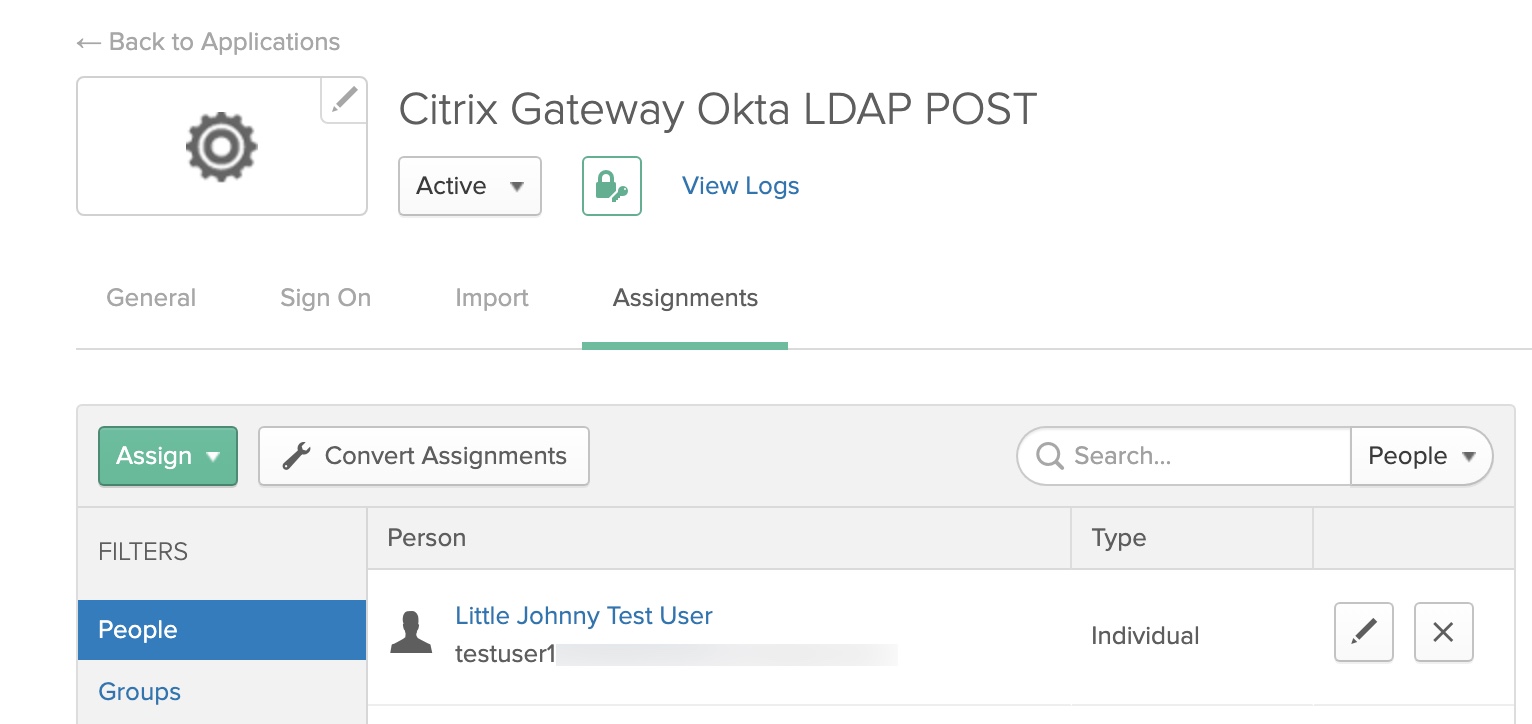
The new application will appear in the Okta admin application view. Click the application and navigate to ‘Assignments’. Assign the application to individual users or AD groups.
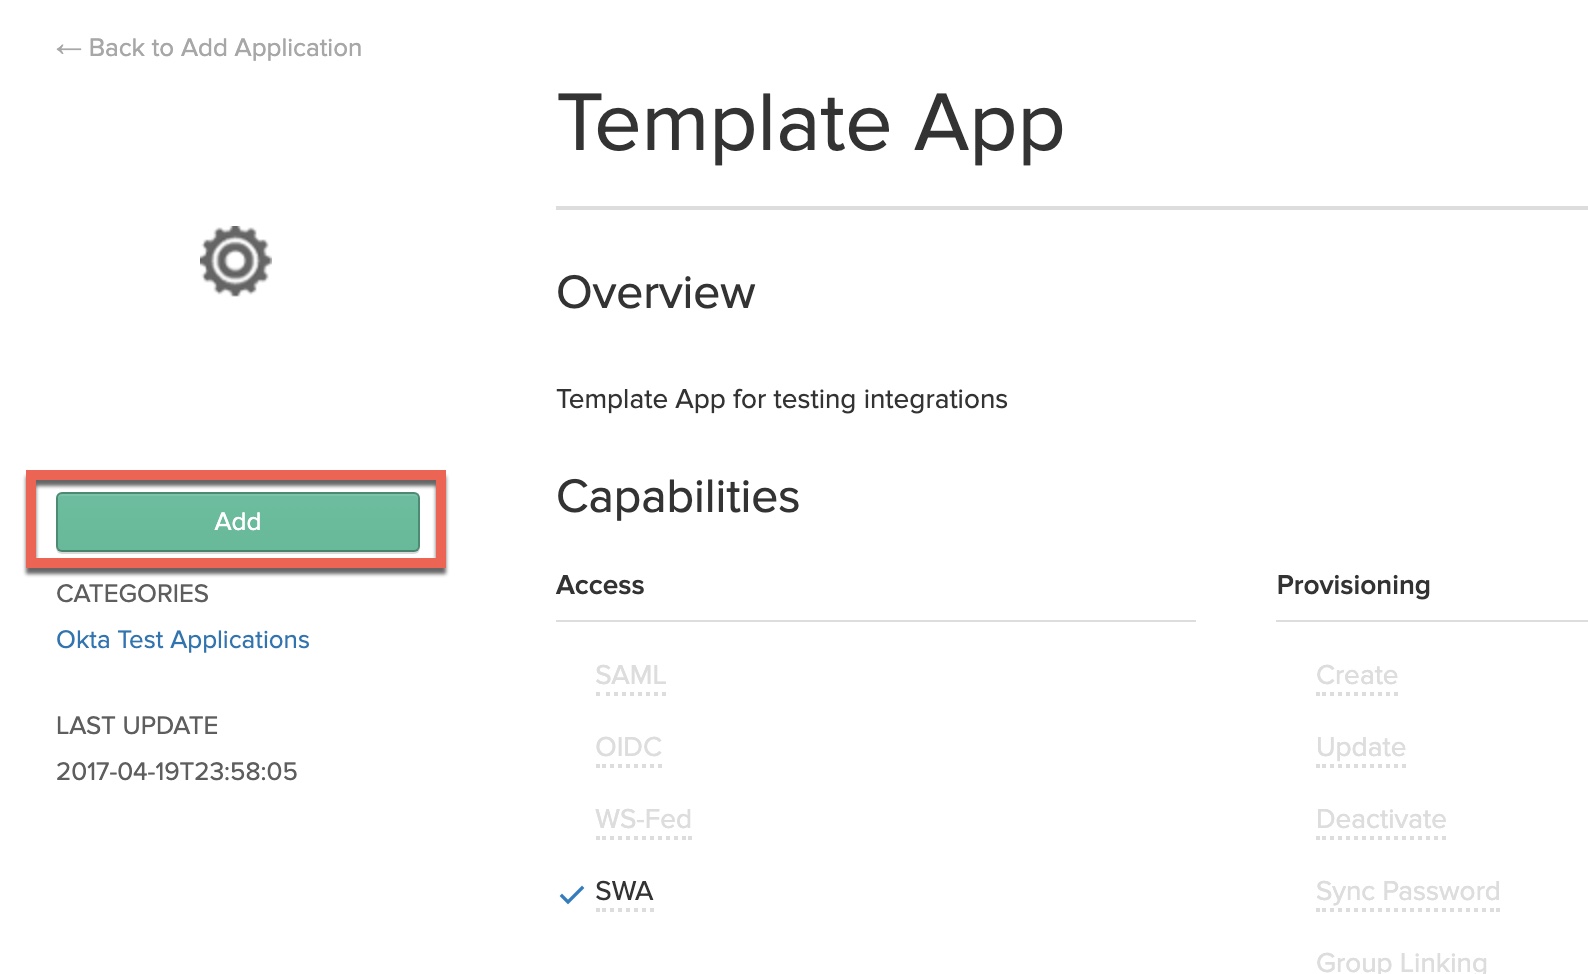
Step 2 – Configure an SWA “Template App” Okta
We need to add a second application in Okta, this time using Okta’s Secure Web Authentication (SWA) protocol. This will be used by the LDAP configuration we’ll be implementing in later steps on the ADC. Users being granted access to the Citrix Gateway via Okta will need to be added to both applications in order for the solution to function successfully.
From within the Okta Admin console, navigate to “Applications” and search up “Citrix”. Select the “Citrix NetScaler Gateway” application.
Click “Add”.
On the “General” tab, enter the following in the fields indicated below, but giving the application a useful name and replacing the FQDN of the “URL” with that of your Citrix Gateway, appending “/cgi/login” to the URL as per the example. These parameters will help Okta locate the input values on the login page the Citrix Gateway will render in a later “LDAP” factor so the user credentials can be auto-inserted and submitted for users.
Ensure the “Application visibility” and “Browser plugin auto-submit” checkboxes are also checked as outlined. We do not want users seeing this application as it is a secondary “hidden” authentication factor for users accessing Citrix Gateway.
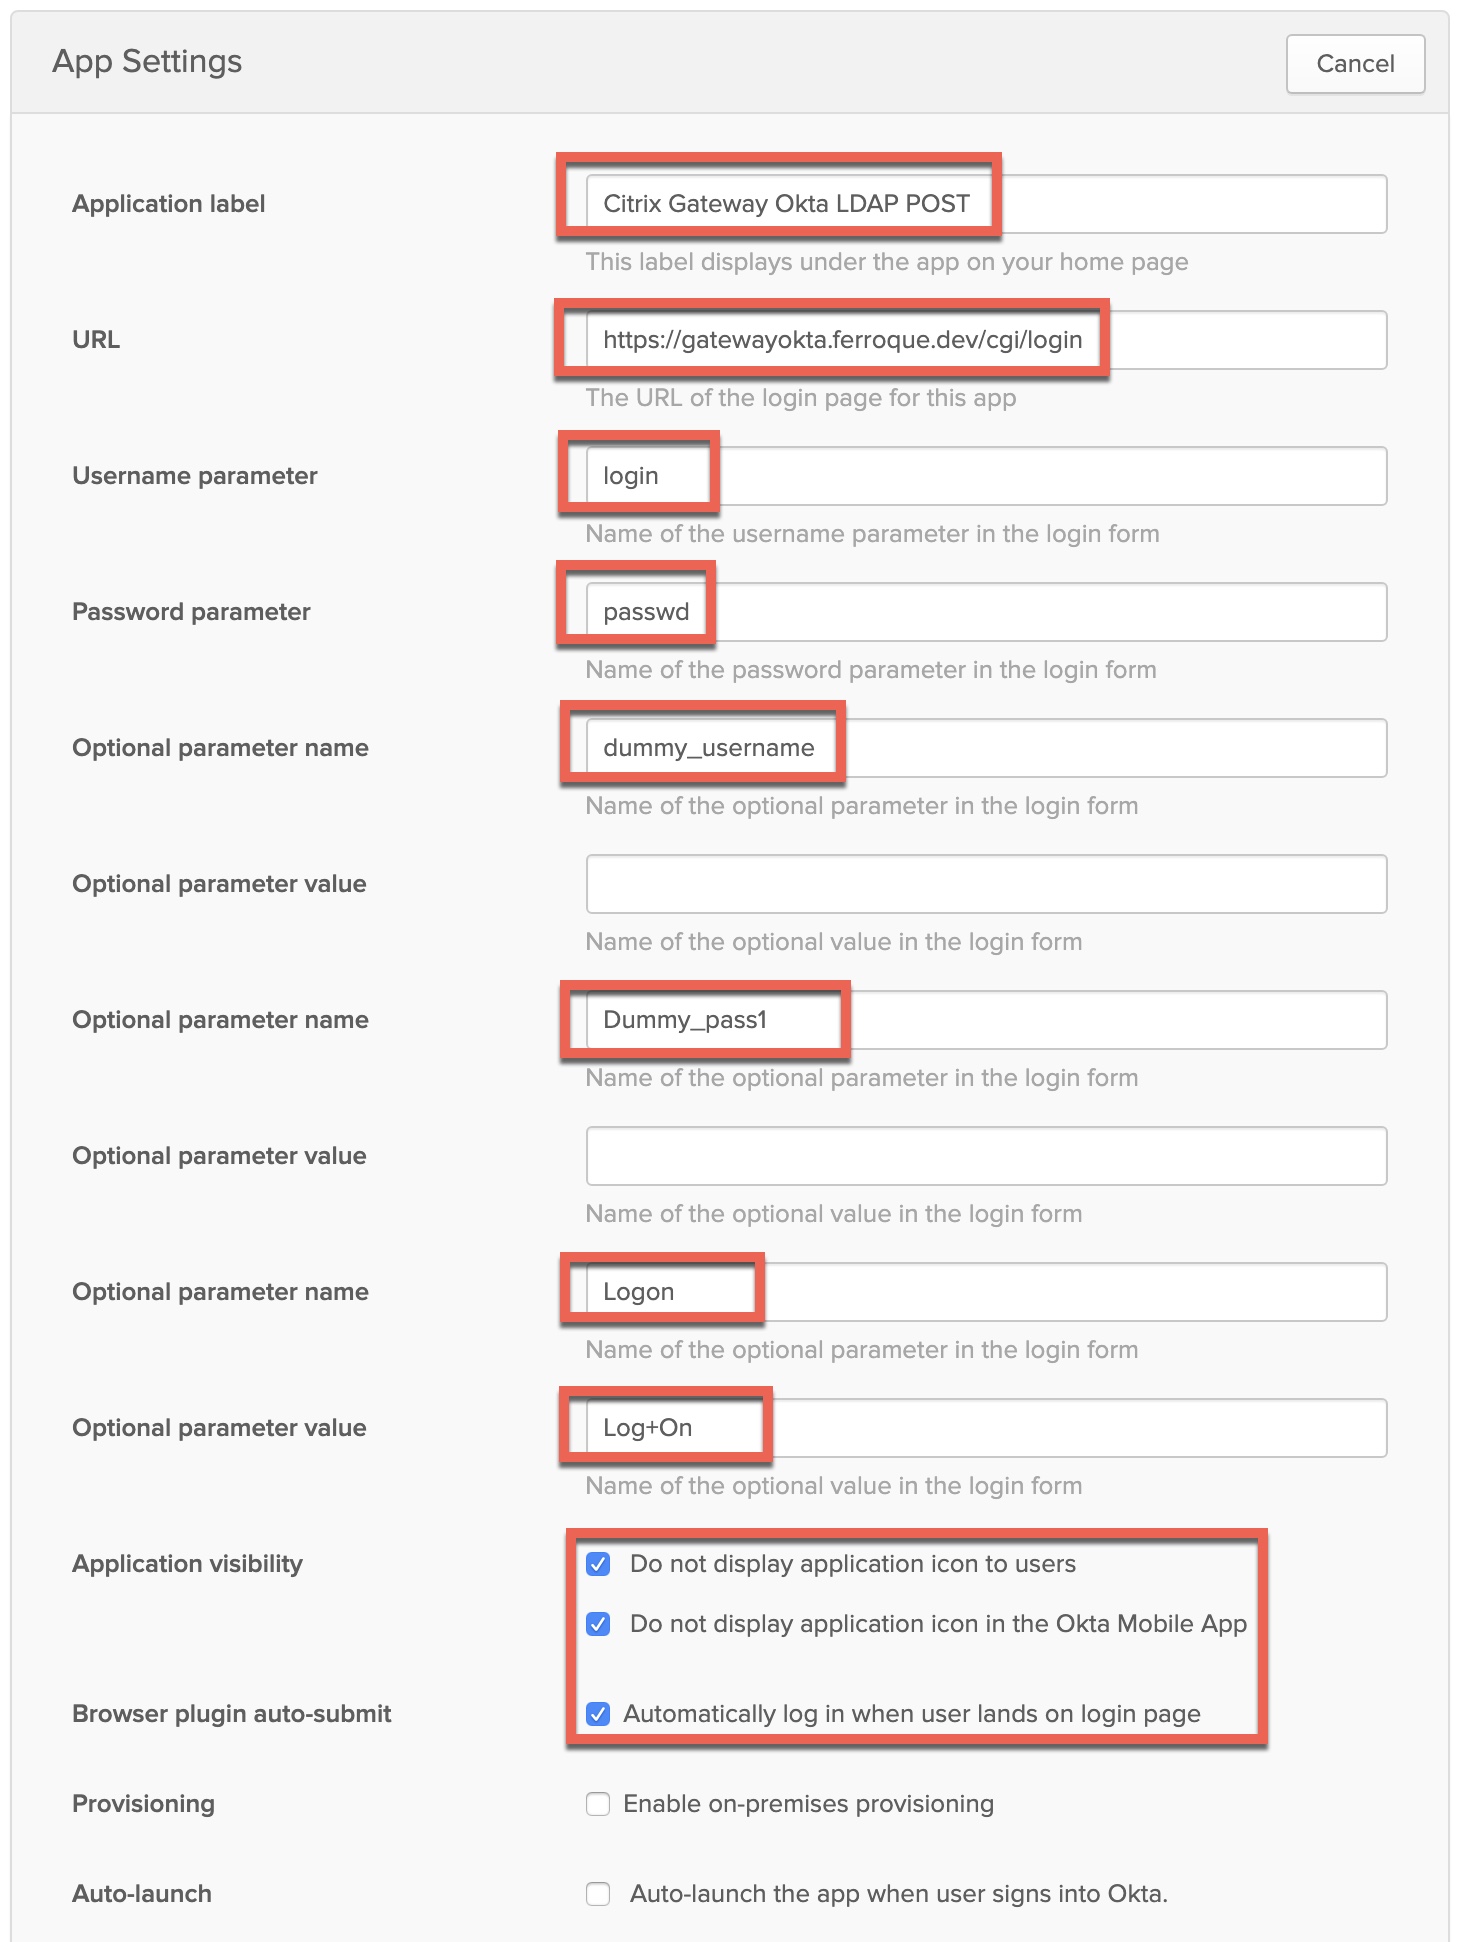
Scroll down to locate the “App Embed Link” section of the page. Copy this URL, as we’ll need to reference it in Step 7. In the basic auth guides referenced earlier, this URL is used in a responder policy tied to the Citrix Gateway vServer. As that will not work with nFactor, we’ll use this URL in a “custom label” in nFactor to invoke the redirect at the appropriate time, for Citrix ADC to retrieve the credentials from Okta and inject it into the LDAP factor.

Click “Next” so we can configure the SSO parameters. On this screen select “Administrator sets username, password is the same as user’s Okta password”. Also, select the appropriate username format.
Important: This must match whatever the LDAP server being defined on Citrix ADC will be. In the case of this example, it’ll be sAMAccountName as our LDAP server configuration, so we’ll select “AD SAM account name” here. If there is a mismatch in username format for what Okta is sending to what Citrix ADC is expecting to receive, it may result in authentication loops or errors. Click “Done” once complete.

Ensure you assign the same users or groups to this application, as you did the “Citrix NetScaler Gateway” application created earlier.
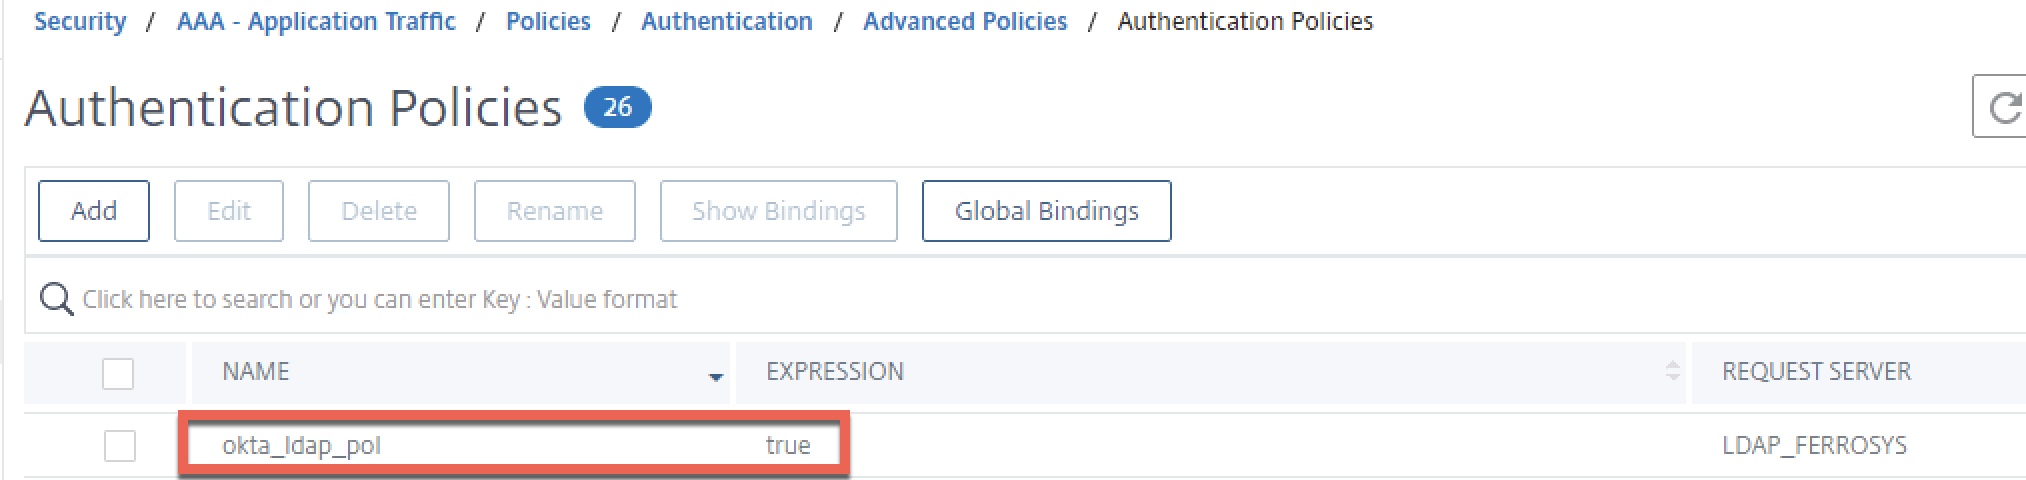
Step 3 – Create LDAP Server and Policy on Citrix ADC
In this example, an LDAP server using a “Server Logon Attribute value of sAMAccountName is being used, matching what Okta will send back per our previous configuration.

Create an advanced authentication policy of type LDAP, and select the previously created authentication server as the action. Use a value of “true” for the expression.
Step 4 – Create Okta SAML SP Server and Policy
Before proceeding, ensure the Okta certificate downloaded at the tail end of step 1 is uploaded to the ADC and added as a certificate. Then create a “SAML” type authentication action.
- Redirect URL is the redirect URL as provided in the “Variables” section of the setup guide found in the SAML-based Citrix NetScaler Gateway application created in Okta earlier.
- Bind the Signing Certificate provided by Okta application config (Variables section again) as “IDP Certificate Name”.
- Although the config will default to NameID for the user field, enter it anyway.
- Select the signing certificate which in this case will be the same TLS certificate you bound to the Citrix Gateway and its non-addressable vServer.
- Input the Issuer Name parameters, which in the case of Okta will be a URL provides during the setup of the SAML application in the Okta porta. As with the other parameters, this was found in the “Variables” section.
- Two-factor must be checked off, as this is needed in this dual authentication configuration.
- Enforce Username should be checked for security (although it is unlikely sufficient time to override username password during the LDAP POST sequence occurs.
- Implement the attributes as shown.


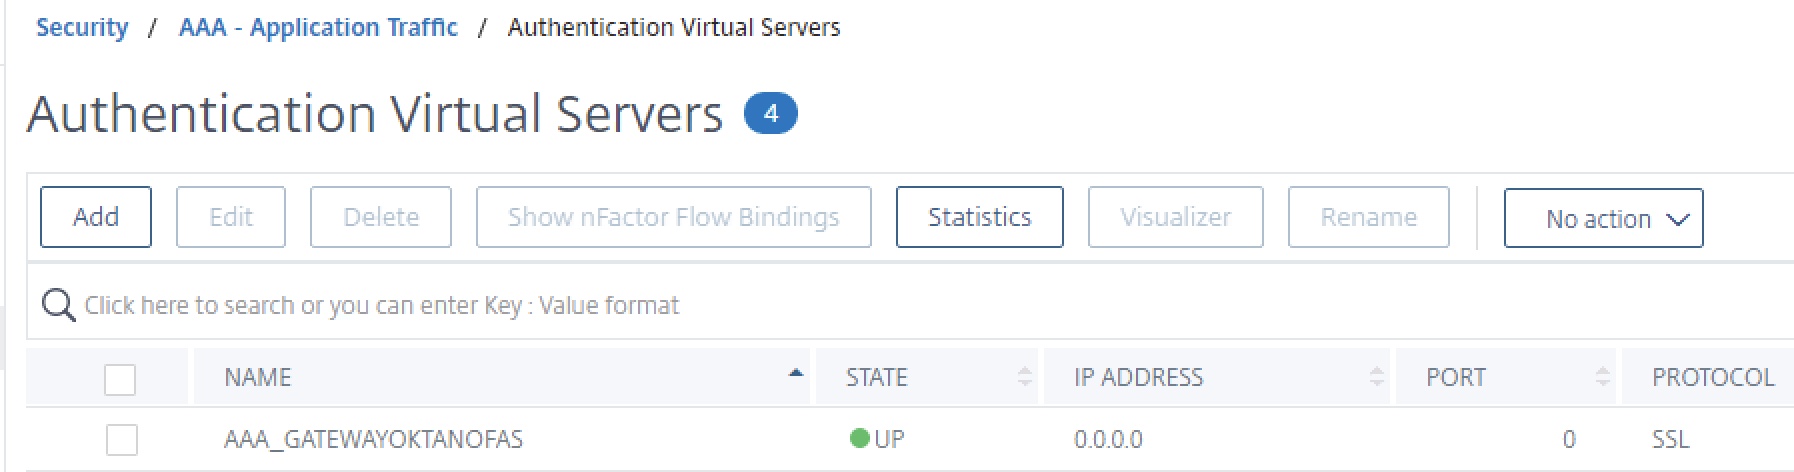
Step 5 – Built AAA-TM vServer and Auth Profile
Create a generic non-addressable AAA vServer as shown below and harden to org. standards. Use the server certificate of the Citrix Gateway on the AAA_GATEWAYOKTANOFAS vServer.
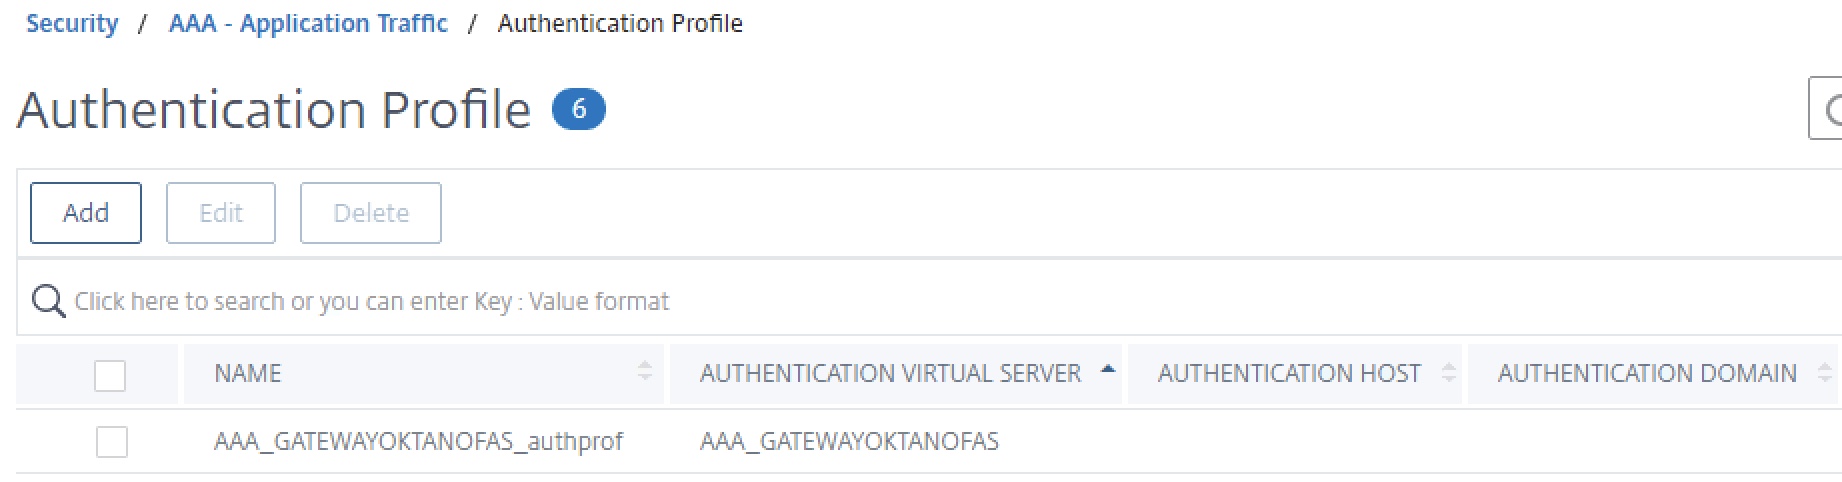
Then create the authentication profile as shown below, linking to our new AAA vServer.
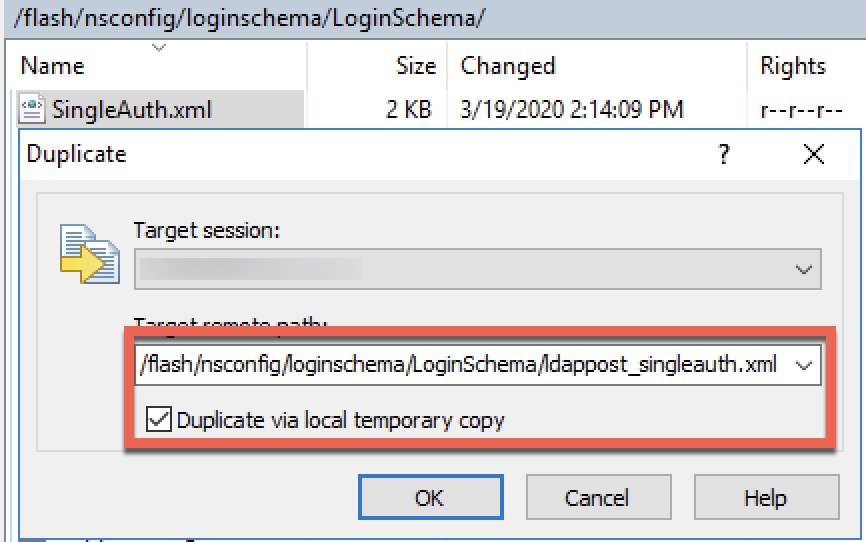
Step 6 – Create Login Schema for LDAP POST
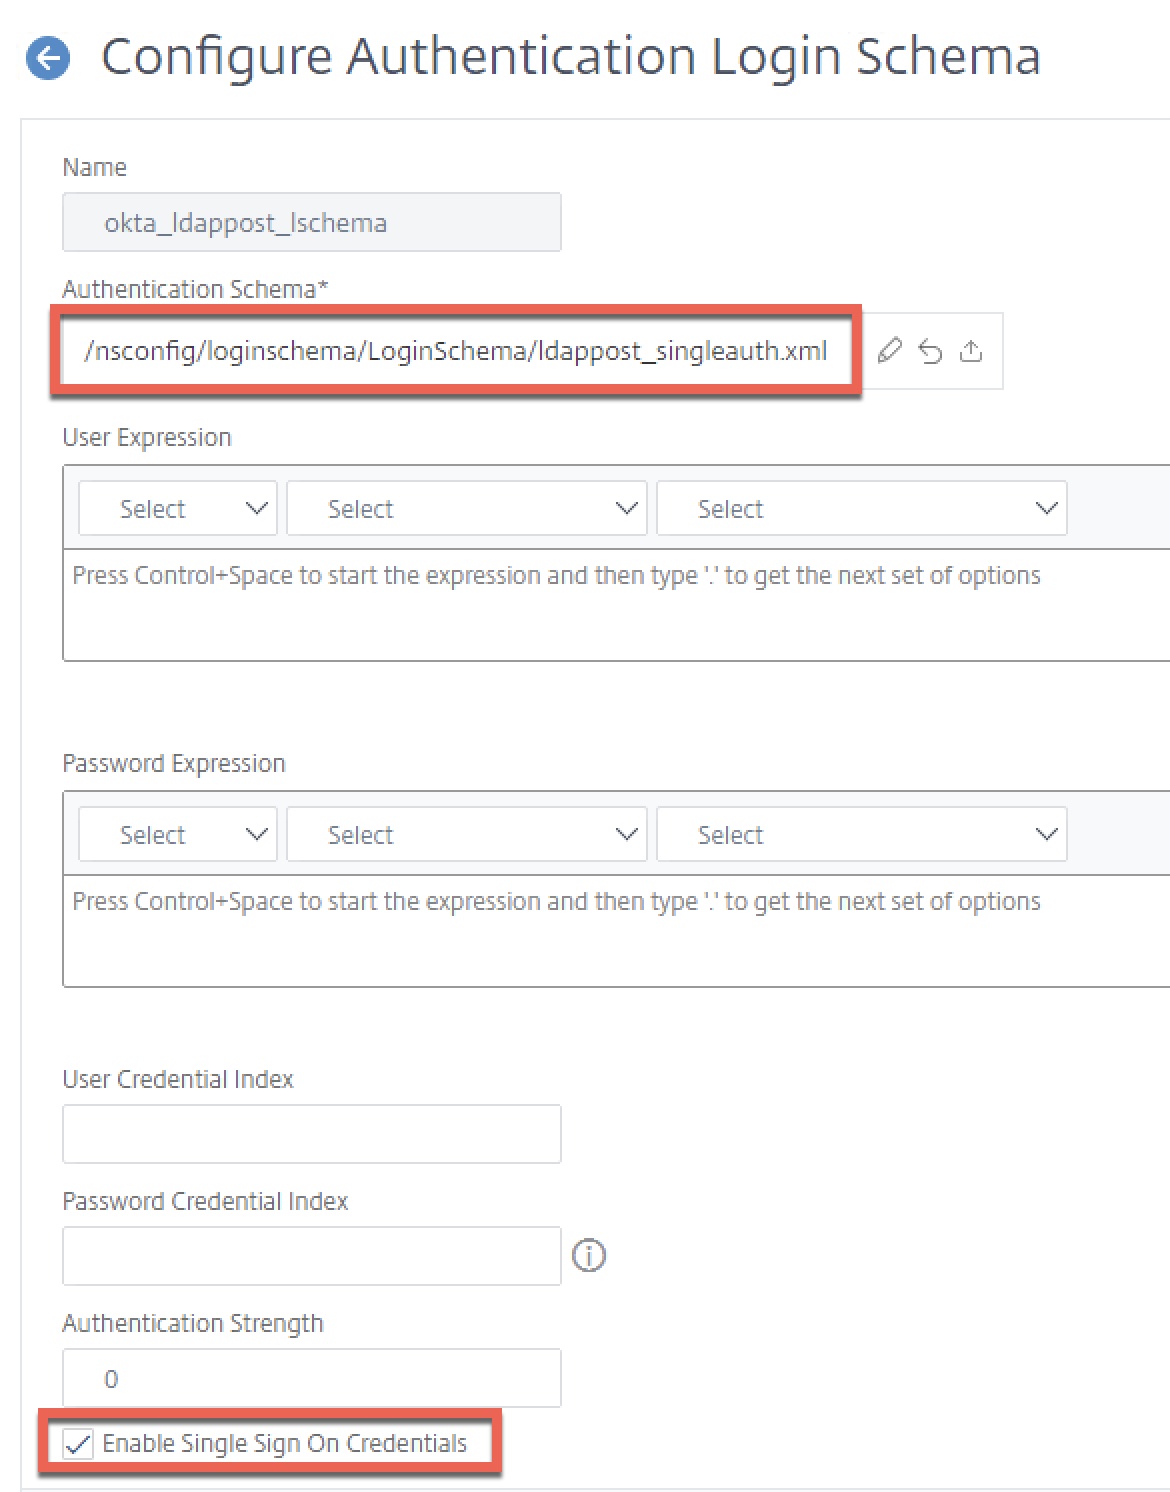
Create one Login Schema profile. This will be a custom XML file we’ll create based on the SingleAuth.xml built-in profile, which we’ll add another line item to in order to create a cookie that will activate our custom label.
Via WinSCP or similar tool, navigate to “/flash/nsconfig/loginschema/LoginSchema” on the Citrix ADC. Locate the SingleAuth.xml schema and duplicate it.
Edit this new policy and inject the following line of code on a new line before “</Requirements>”. This will create a new cookie.
<Requirement><Credential><ID>ldappost_cookie</ID><Type>ldappost_cookie</Type></Credential><Label><Text></Text><Type>plain</Type></Label></Requirement>
The end result of the new login schema should look like this. Save and close. Login schemas will replicate between HA nodes as well.
<?xml version="1.0" encoding="UTF-8"?>
<AuthenticateResponse xmlns="http://citrix.com/authentication/response/1">
<Status>success</Status>
<Result>more-info</Result>
<StateContext></StateContext>
<AuthenticationRequirements>
<PostBack>/nf/auth/doAuthentication.do</PostBack>
<CancelPostBack>/nf/auth/doLogoff.do</CancelPostBack>
<CancelButtonText>Cancel</CancelButtonText>
<Requirements>
<Requirement><Credential><ID>login</ID><SaveID>ExplicitForms-Username</SaveID><Type>username</Type></Credential><Label><Text>singleauth_user_name</Text><Type>nsg-login-label</Type></Label><Input><AssistiveText>singleauth_please_supply_either_domain\username_or_user@fully.qualified.domain</AssistiveText><Text><Secret>false</Secret><ReadOnly>false</ReadOnly><InitialValue/><Constraint>.+</Constraint></Text></Input></Requirement>
<Requirement><Credential><ID>passwd</ID><SaveID>ExplicitForms-Password</SaveID><Type>password</Type></Credential><Label><Text>singleauth_password</Text><Type>nsg-login-label</Type></Label><Input><Text><Secret>true</Secret><ReadOnly>false</ReadOnly><InitialValue/><Constraint>.+</Constraint></Text></Input></Requirement>
<Requirement><Credential><Type>none</Type></Credential><Label><Text>singleauth_first_factor</Text><Type>nsg_confirmation</Type></Label><Input/></Requirement>
<Requirement><Credential><ID>saveCredentials</ID><Type>savecredentials</Type></Credential><Label><Text>singleauth_remember_my_password</Text><Type>nsg-login-label</Type></Label><Input><CheckBox><InitialValue>false</InitialValue></CheckBox></Input></Requirement>
<Requirement><Credential><ID>loginBtn</ID><Type>none</Type></Credential><Label><Type>none</Type></Label><Input><Button>singleauth_log_on</Button></Input></Requirement>
<Requirement><Credential><ID>ldappost_cookie</ID><Type>ldappost_cookie</Type></Credential><Label><Text></Text><Type>plain</Type></Label></Requirement>
</Requirements>
</AuthenticationRequirements>
</AuthenticateResponse>
Next, create the Login Schema profile, selecting the ldappost_singleauth.xml authentication schema we just created. Ensure “Enable Single Sign On Credentials” is checked off. We will use this last schema’s credentials for SSO to StoreFront.
Step 7 – Create Custom Label for LDAP POST
The custom label function of nFactor I covered in an earlier article, and we’re using some of the same logic here as in our “redirect” reference from that post. It requires a custom RfWebUI-based theme and we’ll be editing the script.js file of that custom theme. This custom label will activate and redirect (standing in for the responder policy in the previously mentioned basic auth solutions) when triggered by the presence of the custom cookie created by our custom login schema. in the previous step.
In the example below, my custom RfWebUI-based them is called “Okta” thus its presence in the path. Using WinSCP or similar tool, navigate to “/var/netscaler/logon/themes/Okta” and edit the “script.js” file. Note our modifications will sync between HA nodes.
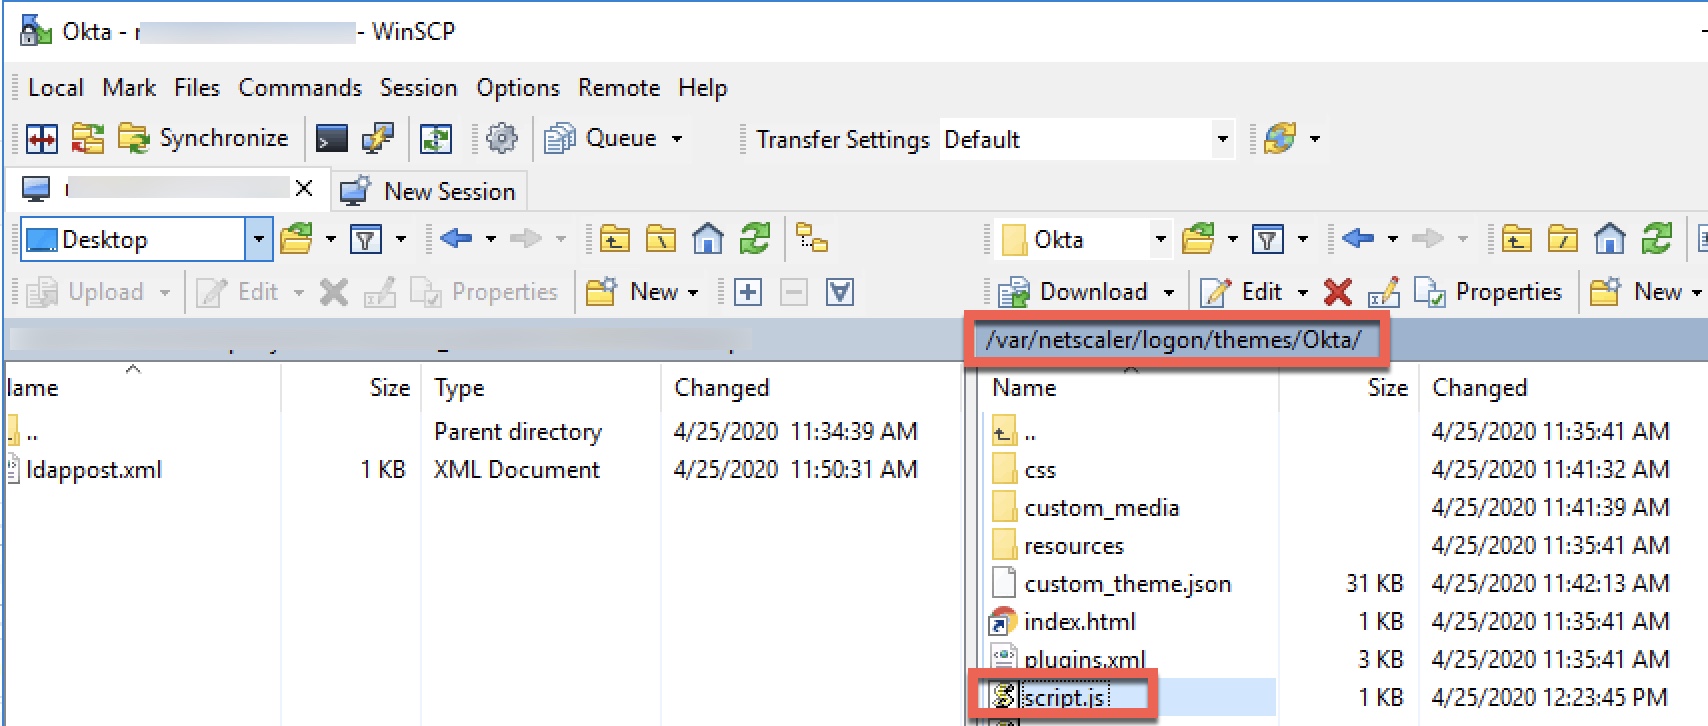
Edit the script.js file and enter the following code, close and save.
Important, the URL following “window.location.replace” in this example must be replaced with the embed URL we received from our LDAP POST “Template App” we created in an earlier step.
CTXS.ExtensionAPI.addCustomCredentialHandler({
    // The name of the credential, must match the type returned by the server
    getCredentialTypeName: function () { return "ldappost_cookie"; },
    // Generate HTML for the custom credential
    getCredentialTypeMarkup: function (requirements) {
        var div = $("<div></div>");

        $(document).ready(function() {
          //Set cookie
          var exdays = 1;
          var d = new Date();
          d.setTime(d.getTime() + (exdays*24*60*60*1000));
          var expires = "expires="+ d.toUTCString();
          document.cookie = "NSC_NOCERT=TRUE;" + expires + ";path=/";

    // Simulate an HTTP redirect:
    window.location.replace("https://ferroquesystemsdev.okta.com/home/template_sps/xxxxxxxxxxxxxxxxxxxx/0000");
        });
        return div;
    }
});
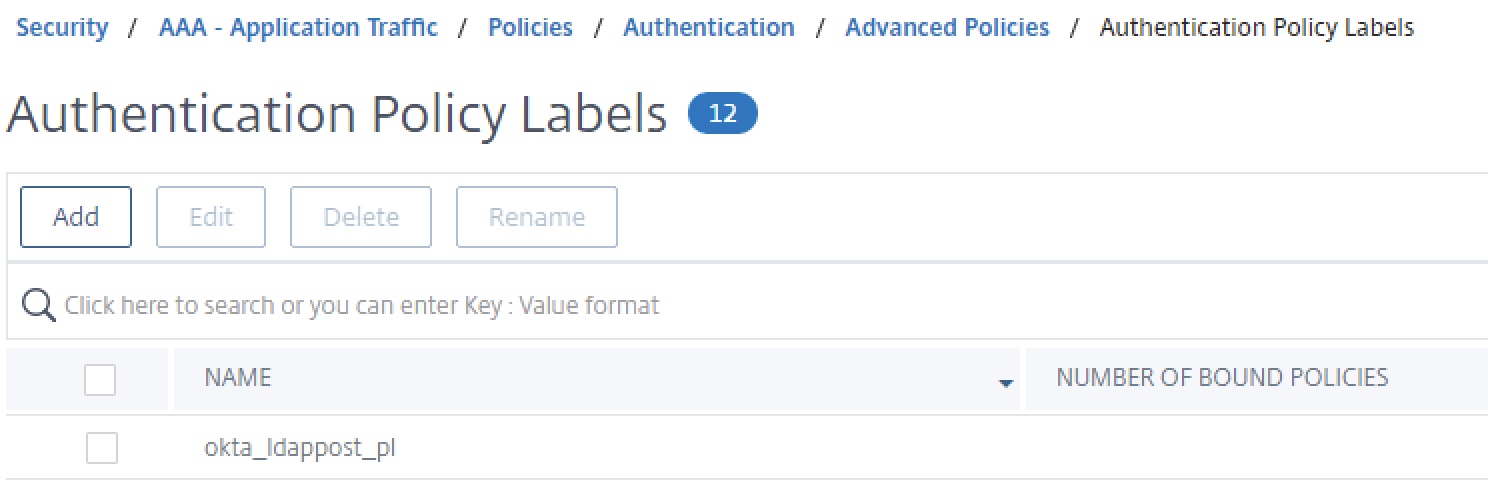
Step 8 – Create LDAP POST Authentication Policy Label
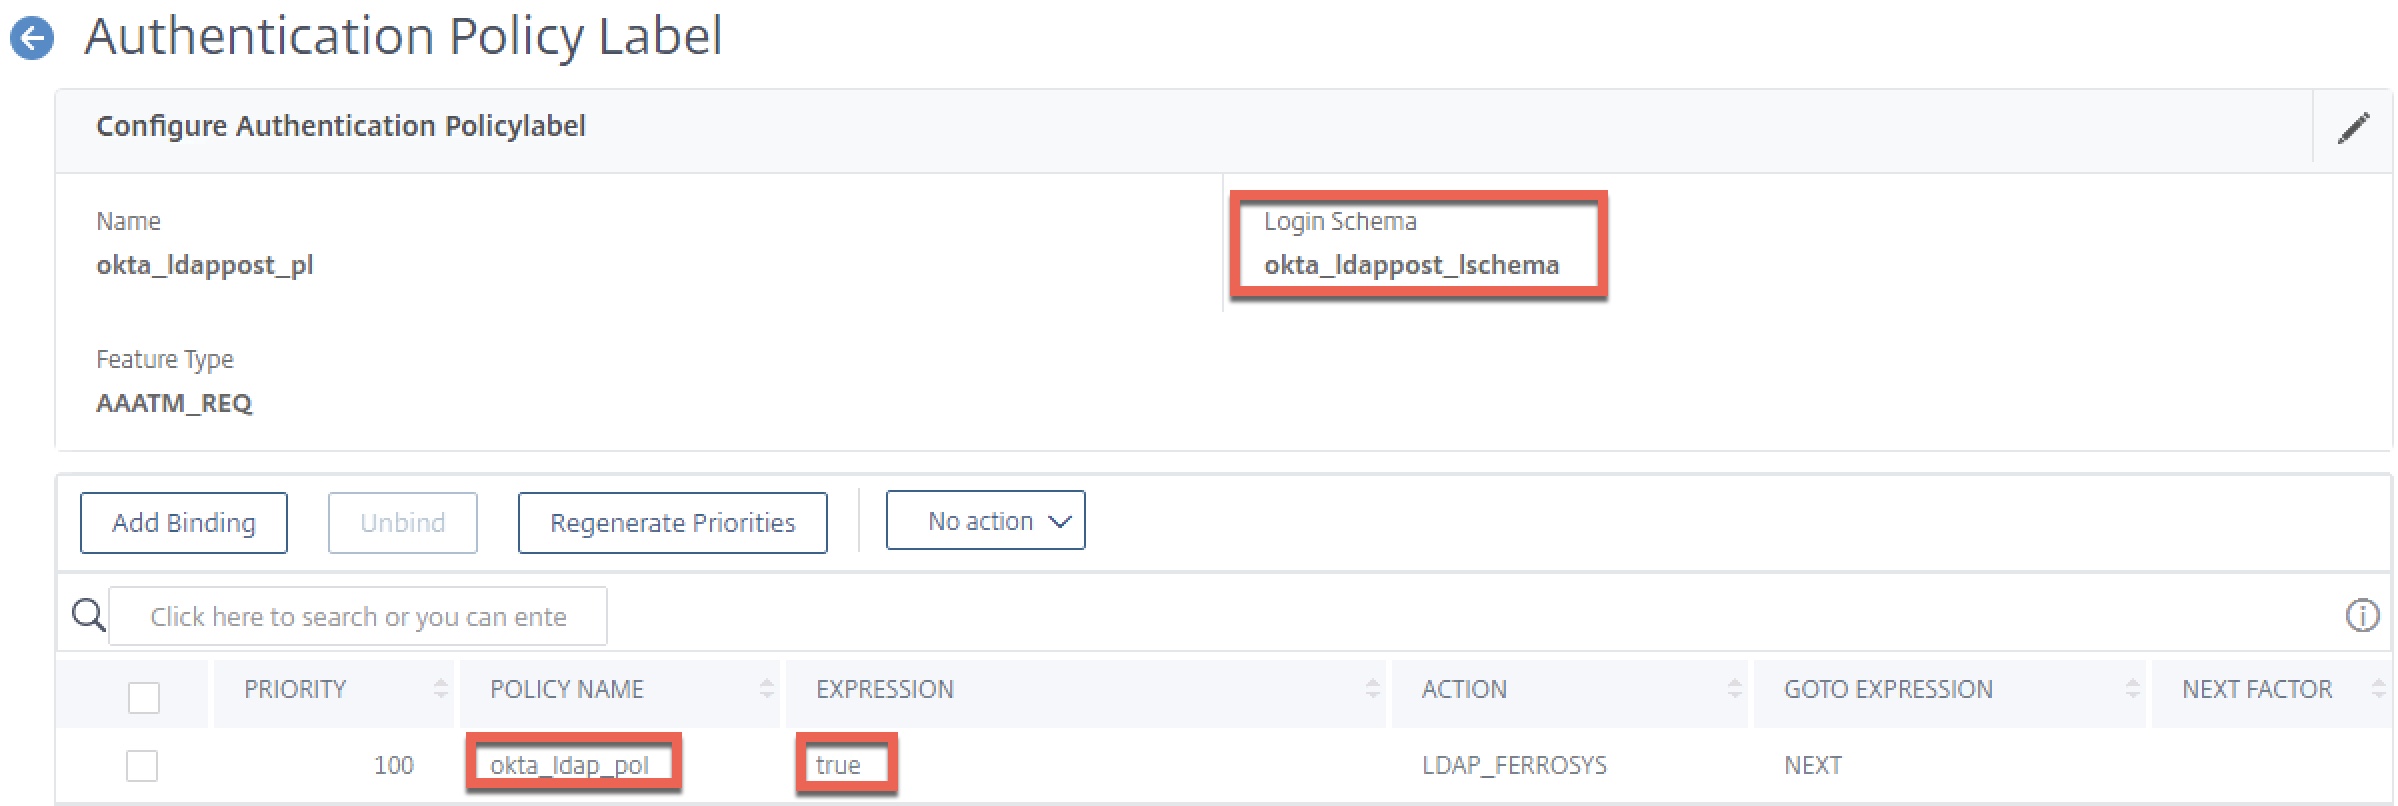
In this step, we’ll link our custom login schema and our LDAP policy into a policy label. This will act as the “next factor” in our authentication low after the SAML SP factor.
Create the policy label and bind our login schema and okta_ldap_pol policy created earlier. No next factor is required.
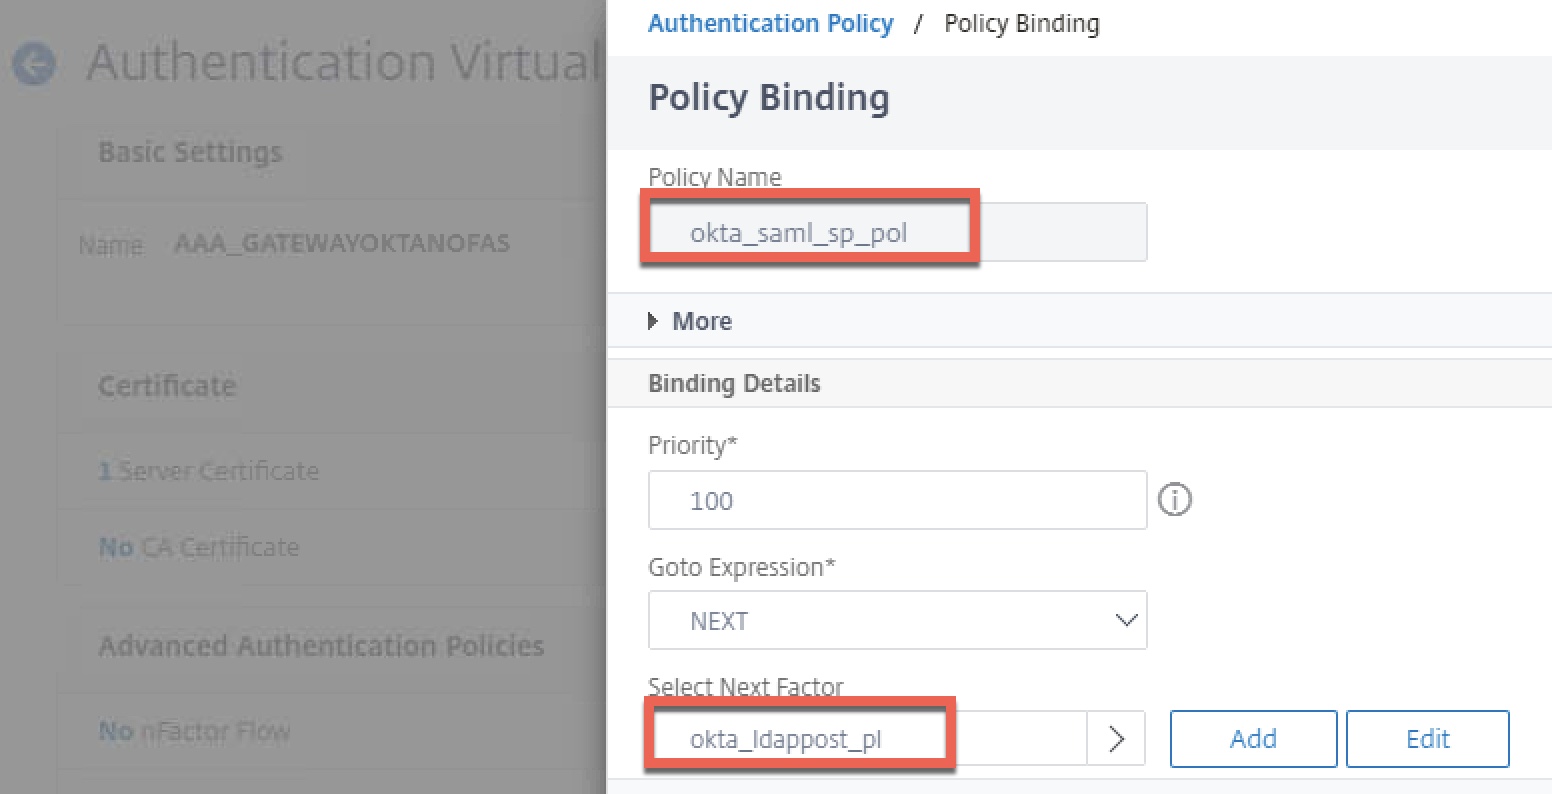
Step 9 – Create nFactor Flow on AAA-TM vServer
Edit the properties of the non-addressable AAA vServer used by Citrix Gateway (AAA_GATEWAYOKTANOFAS). Bind the SAML SP policy created earlier by clicking “Authentication Policy”, and select the okta_ldappost_pl policy label as the next factor. Bind a “noschema” loginschema to the AAA vServer itself. Click “Done” to accept changes and get back to the previous screen.
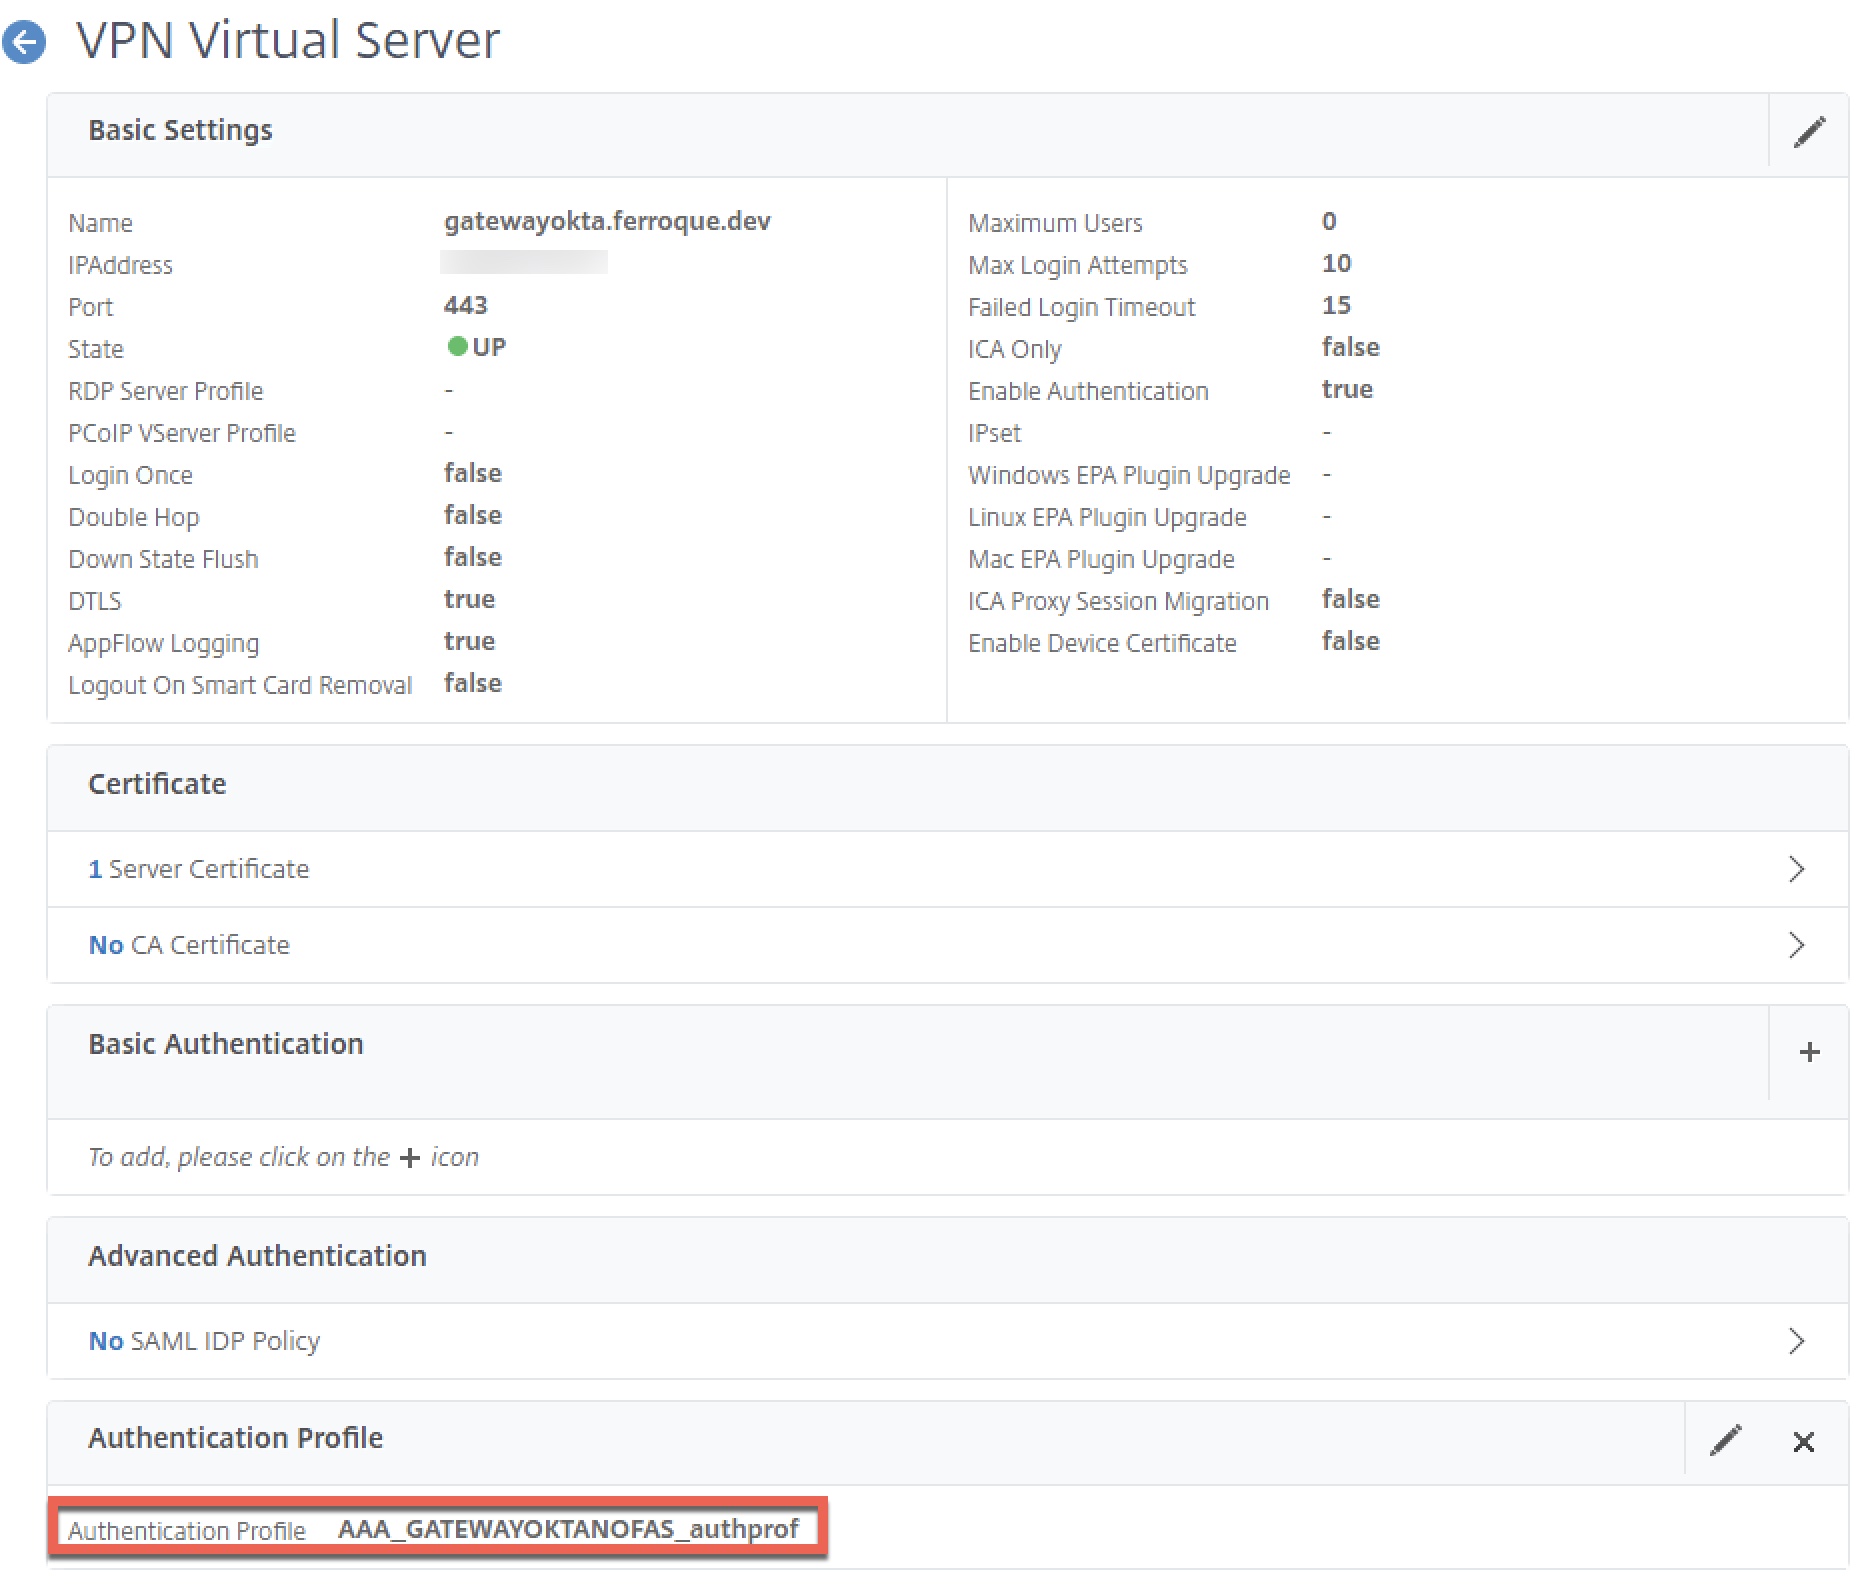
Step 10 – Link Auth Profile and Theme to Citrix Gateway
The easiest step of all, binding the authentication profile we created earlier to the Citrix Gateway vServer. This authentication profile should link to the non-addressable AAA vServer for the Gateway.
Also, link the same modified Portal Theme you bound to the AAA-TM vServer to the Citrix Gateway. If you skip this step, the LDAP auto-post factor will not function and just drop users on a page asking the user to enter their username and password.
Moment of Truth – Validation
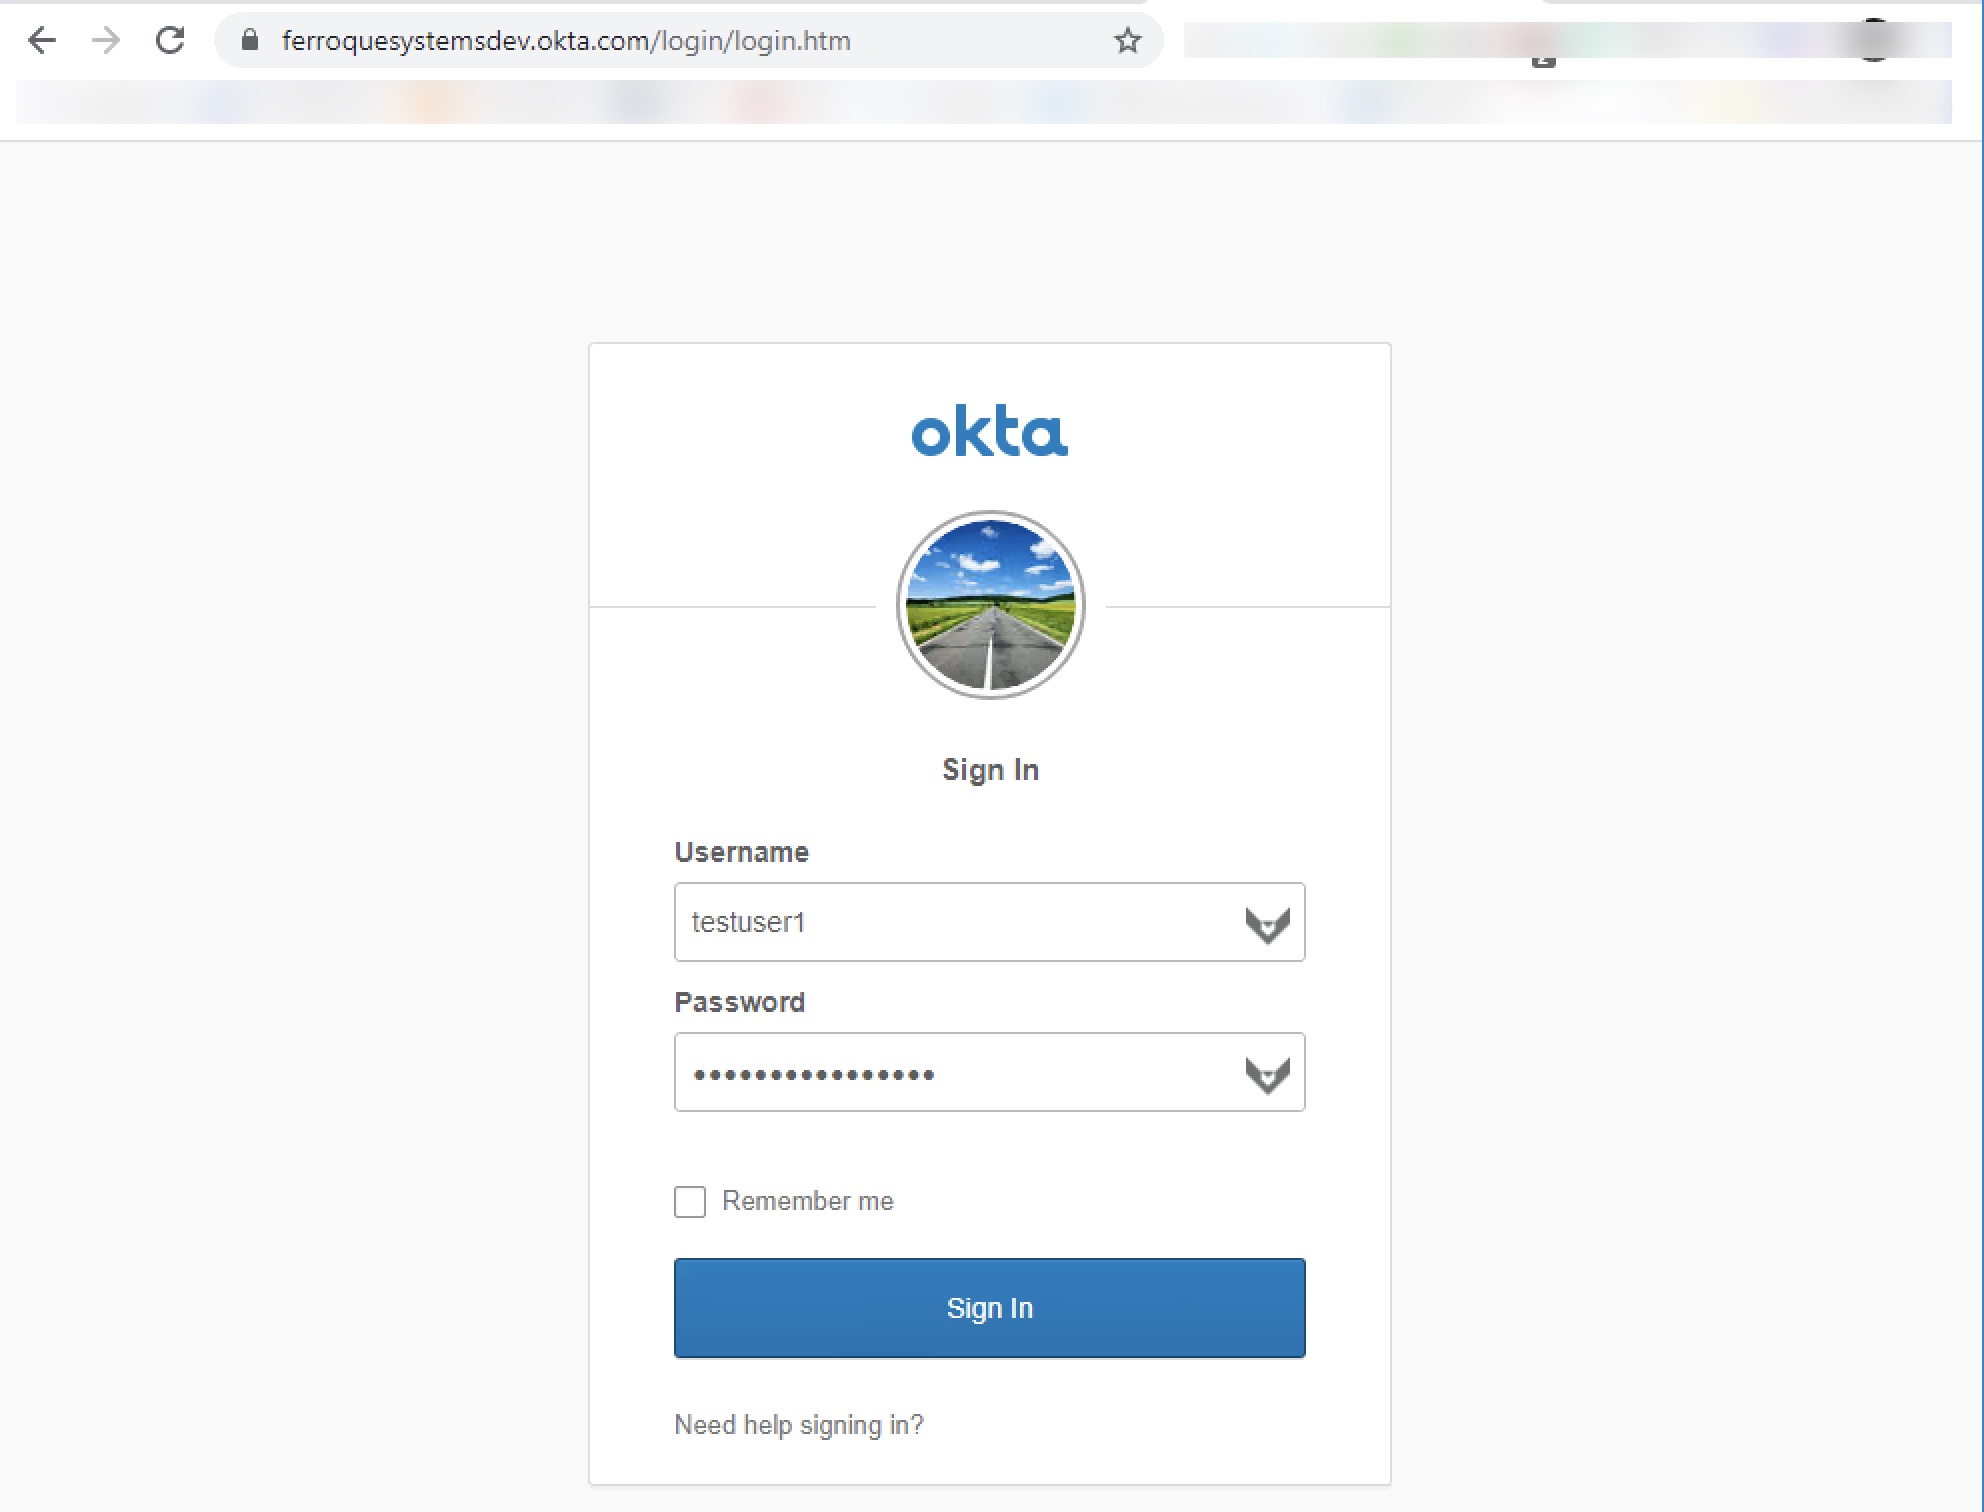
At this point, all necessary configurations should be in place. Attempting to log into the Citrix Gateway should redirect users to Okta for authentication, and then back to Citrix ADC. For a split second the user may see a login screen, which will immediately disappear after the LDAP POST function activates and we’re passed through to StoreFront.
Accessing Gateway Page, Redirected to Okta
Successful Response from Okta, LDAP POST Invoked, SSO to StoreFront
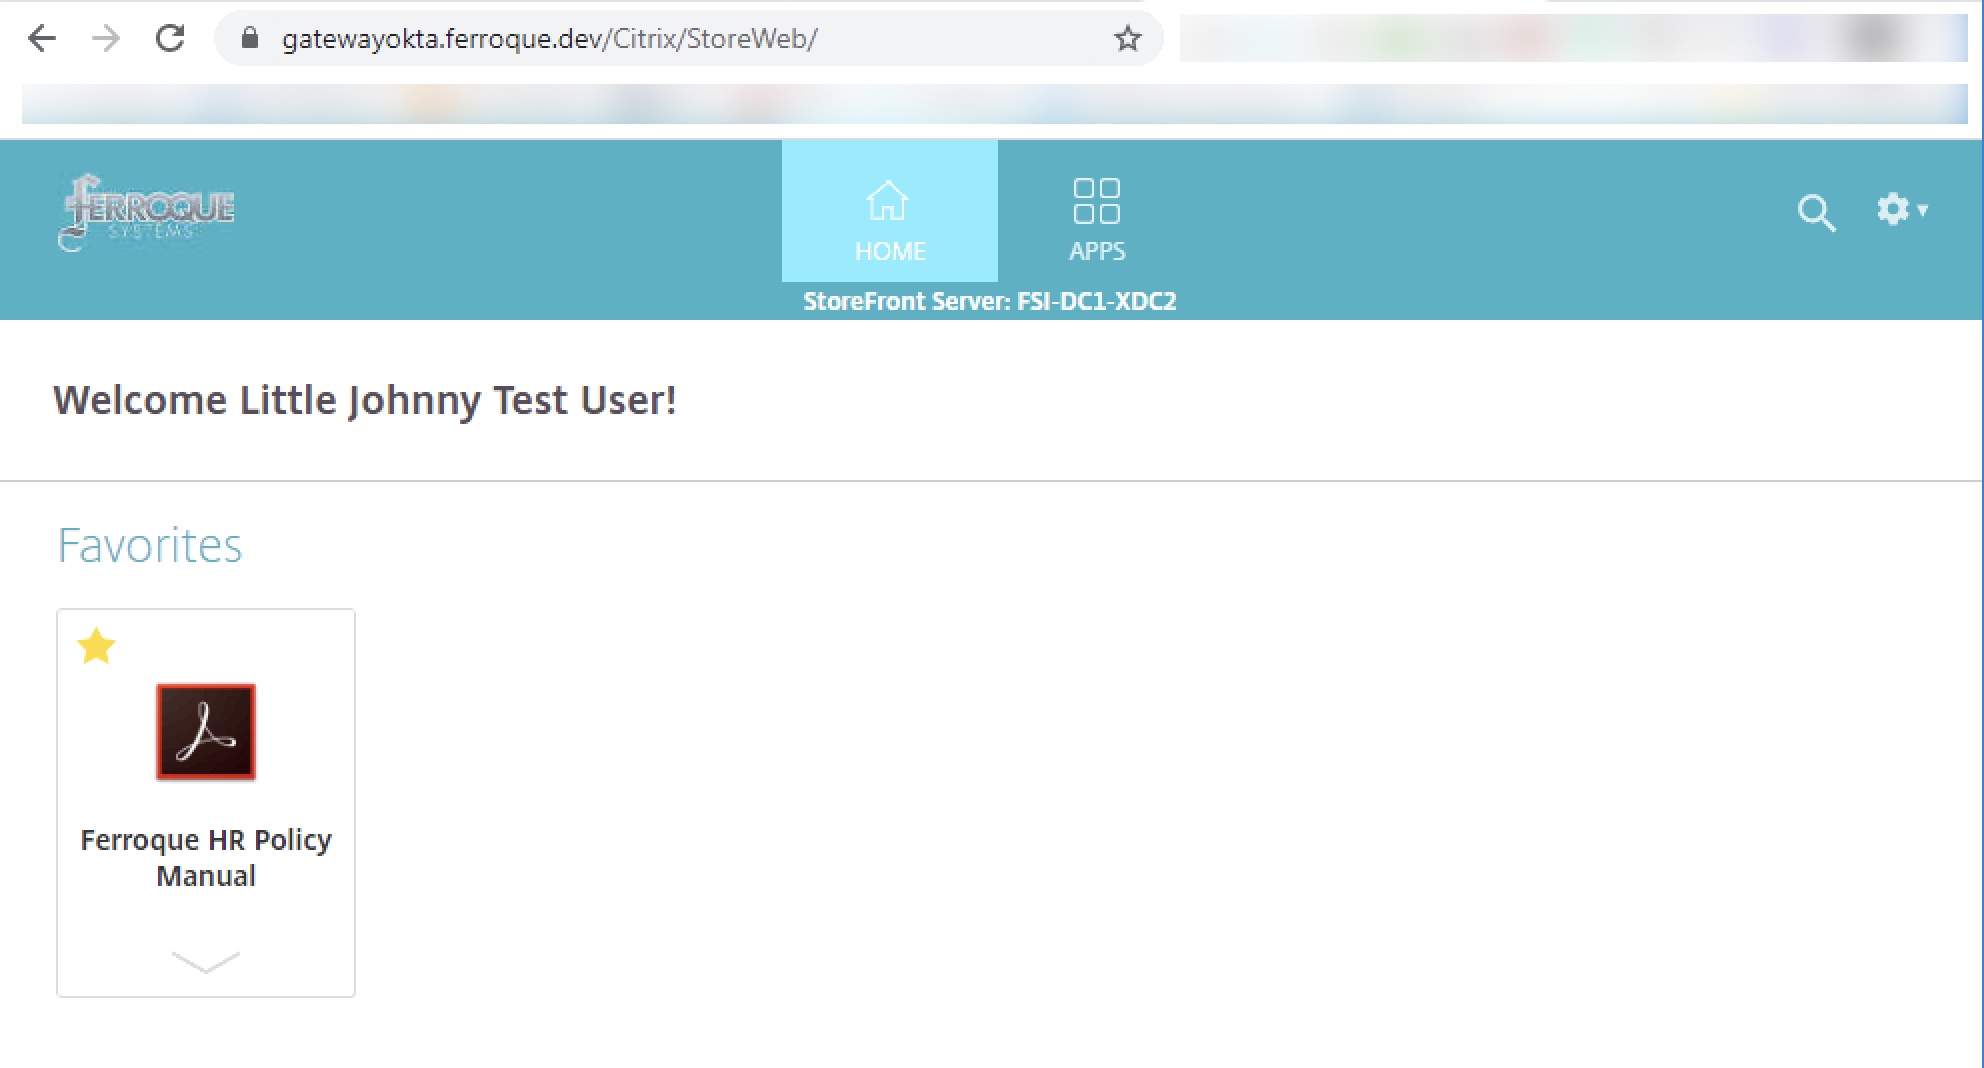
Successful Launch of Citrix App – No Second Authentication Prompt
Citrix ADC Configuration
Below you will find all the necessary config params to build the configs mentioned above on the ADC. You’ll naturally want to adjust object names, certificate names, IPs.
## Certificate Certkeys and Linking ##
add ssl certKey okta -cert okta.cert
add ssl certKey wildcard_ferroque_dev -cert wildcard_ferroque_dev.pfx -key wildcard_ferroque_dev.pfx -inform PFX -passcrypt @@@@@@@@@@@ -encrypted -encryptmethod ENCMTHD_3
add ssl certKey SectigoINTER -cert SectigoINTER.cer -inform DER
add ssl certKey SectigoROOT -cert SectigoROOT.cer -inform DER
link ssl certKey wildcard_ferroque_dev SectigoINTER
link ssl certKey SectigoINTER SectigoROOT


## LDAP, SAML SP Actions ##
add authentication ldapAction LDAP_FERROSYS -serverIP 1.1.1.1 -serverPort 636 -ldapBase "OU=your,DC=domain,DC=DEV" -ldapBindDn yourldap@ferroque.dev -ldapBindDnPassword @@@@@@@@@@@  -encrypted -encryptmethod ENCMTHD_3 -ldapLoginName sAMAccountName -groupAttrName memberOf -subAttributeName cn -secType SSL -passwdChange ENABLED -Attribute1 mail -Attribute2 objectGUID -Attribute9 sAMAccountName -Attribute10 userPrincipalName
add authentication samlAction okta_saml_sp_srv -samlIdPCertName okta -samlSigningCertName wildcard_ferroque_dev -samlRedirectUrl "https://ferroquesystemsdev.okta.com/app/citrixnetscalergateway_saml/@@@@@@@@@@@@@/sso/saml" -samlUserField "Name ID" -samlIssuerName "http://www.okta.com/@@@@@@@@@@@@@@" -samlTwoFactor ON -Attribute1 mail -Attribute2 userPrincipalName -logoutURL "https://ferroquesystemsdev.okta.com"
add authentication authnProfile AAA_GATEWAYOKTANOFAS_authprof -authnVsName AAA_GATEWAYOKTANOFAS


## Login Schemas, Policies, Policy Labels ##
add authentication loginSchema okta_ldappost_lschema -authenticationSchema "/nsconfig/loginschema/LoginSchema/ldappost_singleauth.xml" -SSOCredentials YES
add authentication loginSchemaPolicy noschema -rule true -action LSCHEMA_INT
add authentication Policy okta_saml_sp_pol -rule true -action okta_saml_sp_srv
add authentication Policy okta_ldap_pol -rule true -action LDAP_FERROSYS
add authentication policylabel okta_ldappost_pl -loginSchema okta_ldappost_lschema
bind authentication policylabel okta_ldappost_pl -policyName okta_ldap_pol -priority 100 -gotoPriorityExpression NEXT


## AAA-TM Servers ##
add authentication vserver AAA_GATEWAYOKTANOFAS SSL 0.0.0.0 -maxLoginAttempts 10 -failedLoginTimeout 15
set ssl vserver AAA_GATEWAYOKTANOFAS -ssl3 DISABLED -tls1 DISABLED -tls11 DISABLED -dtls1 DISABLED -HSTS ENABLED -maxage 157680000
bind authentication vserver AAA_GATEWAYOKTANOFAS -portaltheme Okta
bind authentication vserver AAA_GATEWAYOKTANOFAS -policy noschema -priority 100 -gotoPriorityExpression END
bind authentication vserver AAA_GATEWAYOKTANOFAS -policy okta_saml_sp_pol -priority 100 -nextFactor okta_ldappost_pl -gotoPriorityExpression NEXT
bind ssl vserver AAA_GATEWAYOKTANOFAS -certkeyName wildcard_ferroque_dev


## Gateway Server ##
add vpn vserver gatewayokta.ferroque.dev SSL 1.1.1.2 443 -downStateFlush DISABLED -Listenpolicy NONE -tcpProfileName nstcp_default_XA_XD_profile -maxLoginAttempts 10 -failedLoginTimeout 15 -authnProfile AAA_GATEWAYOKTANOFAS_authprof
add vpn sessionAction BASELINE_SESSION_WEB_PROF -sessTimeout 60 -clientSecurityLog ON -splitTunnel OFF -transparentInterception ON -defaultAuthorizationAction ALLOW -ssoCredential PRIMARY -icaProxy ON -wihome "https://storefront.ferroque.dev/Citrix/StoreWeb" -ntDomain ferroque.dev -clientlessVpnMode OFF
add vpn sessionPolicy BASELINE_SESSION_WEB_POL true BASELINE_SESSION_WEB_PROF
bind vpn vserver gatewayokta.ferroque.dev -staServer "https://xdc1.ferroque.dev"
bind vpn vserver gatewayokta.ferroque.dev -staServer "https://xdc2.ferroque.dev"
set ssl vserver gatewayokta.ferroque.dev -ssl3 DISABLED -tls1 DISABLED -tls11 DISABLED -dtls1 DISABLED -HSTS ENABLED -maxage 157680000
bind vpn vserver gatewayokta.ferroque.dev -portaltheme Okta
bind vpn vserver gatewayokta.ferroque.dev -policy BASELINE_SESSION_WEB_POL -priority 100 -gotoPriorityExpression NEXT -type REQUEST
bind ssl vserver gatewayokta.ferroque.dev -certkeyName wildcard_ferroque_dev
Troubleshooting Tools
As this is an elaborate configuration, there are many opportunities for things to go wrong. Having three PuTTy sessions open with the following commands at the ready are quite useful, all executed from shell. Note that it may be worth enabling DEBUG logging on the global internal Syslog configuration of the appliance while troubleshooting, and disabling it afterward. System > Auditing > Settings > Change Auditing Syslog Settings > Log Levels = ALL.
Examining authentication logs:
shell
cat /tmp/aaad.debug
Examining Syslog events during authentication (note you can append ‘| grep -i xxx’ where xxx us a key term such as SAML or AAA to filter on:
shell
tail -f /var/log/ns.log
Examining policy hits on nFactor configuration:
shell
nsconmsg -d current  -g pcb_hits
The SAML-Tracer extension for Chrome or Firefox is also an invaluable tool for debugging SAML authentication.
The most common issue one might encounter setting up this configuration is the constant looping of authentication flow, even without the LDAP POST configuration in the picture. If the LDAP POST configuration is not in place and just SAML authentication is looping between Citrix ADC and Okta, double-check your Okta Citrix Gateway application configuration (in the Okta portal) and ensure there is no trailing slash on the “Login URL”.
If SAML works fine standalone but you experience looping with the LDAP POST aspect, Okta suggests this might be caused by a mismatch between the username format configured in Okta and on the Citrix platform which might need adjustment in your Okta application config or on the LDAP server on Citrix ADC (and potentially session policy and StoreFront trusted domain config). For example, a customer experiencing the auth loop was the result of them using the default “Okta username” on the Okta app as opposed to the desired “AD SAM Account Name”. Fixing that resolved the loops.
Also, do not skip the step of binding the customized Portal Theme to both the Citrix Gateway and the AAA-TM vServer otherwise the automated LDAP POST action will fail. Special thanks to Yan Lafrance, SE at Citrix for pointing this out.
During testing and troubleshooting, I strongly recommend clearing the user’s sessions from Okta between tests, and either testing in private browser sessions or clearing the website’s cookies between tests as well.
![]()
Okta DSSO Considerations
Several individuals have pointed out that Okta’s agentless DSSO solution (which eliminates the need for Integrated Windows Authentication agents) does not work well with this solution. This would likely be found only on endpoints within the corporate WAN.
As a workaround to this issue, we can modify the nFactor flow for internal users to use a regular LDAP server instead of the LDAP POST factor, with a login schema that will pre-fill the username in read-only mode. The user will still need to enter their password, but we are at least saving one data point (username) to be entered. It is not ideal but allows the solution to function and retain some benefits of being fronted by Okta.
In such a configuration, you may omit:
- LDAP POST login schema
- LDAP POST policy label
- LDAP POST custom label in script.js file in the portal theme
Instead, you would add:
- A custom login scheme cloned off the built-in PrefilUserFromExpr.xml schema but edit the username field to be read-only
- An LDAP policy label to which the existing LDAP server can be linked to, and which uses the modified PrefilUserFromExpr.xml schema
A sample login schema is found below for this purpose.
<?xml version="1.0" encoding="UTF-8"?>
<AuthenticateResponse xmlns="http://citrix.com/authentication/response/1">
<Status>success</Status>
<Result>more-info</Result>
<StateContext></StateContext>
<AuthenticationRequirements>
<PostBack>/nf/auth/doAuthentication.do</PostBack>
<CancelPostBack>/nf/auth/doLogoff.do</CancelPostBack>
<CancelButtonText>Cancel</CancelButtonText>
<Requirements>
<Requirement><Credential><ID>login</ID><SaveID>ExplicitForms-Username</SaveID><Type>username</Type></Credential><Label><Text>User name</Text><Type>plain</Type></Label><Input><AssistiveText>Please supply either domain\username or user@fully.qualified.domain</AssistiveText><Text><Secret>false</Secret><ReadOnly>true</ReadOnly><InitialValue>${aaa.user.login_name}</InitialValue><Constraint>.+</Constraint></Text></Input></Requirement>
<Requirement><Credential><ID>passwd</ID><SaveID>ExplicitForms-Password</SaveID><Type>password</Type></Credential><Label><Text>Password:</Text><Type>plain</Type></Label><Input><Text><Secret>true</Secret><ReadOnly>false</ReadOnly><InitialValue></InitialValue><Constraint>.+</Constraint></Text></Input></Requirement>
<Requirement><Credential><Type>none</Type></Credential><Label><Text>Second factor</Text><Type>confirmation</Type></Label><Input /></Requirement>
<Requirement><Credential><ID>saveCredentials</ID><Type>savecredentials</Type></Credential><Label><Text>Remember my password</Text><Type>plain</Type></Label><Input><CheckBox><InitialValue>false</InitialValue></CheckBox></Input></Requirement>
<Requirement><Credential><ID>loginBtn</ID><Type>none</Type></Credential><Label><Type>none</Type></Label><Input><Button>Log On</Button></Input></Requirement>
</Requirements>
</AuthenticationRequirements>
</AuthenticateResponse>
In this setup, a sample authentication flow would occur as follows:
- User goes to Okta page and is signed in automatically with DSSO
- User launches Citrix tile from Okta
- (Optional) user prompted for 2FA if enforced for the app via Okta
- Back on Citrix page, user is promoted for username and password, with username already filed out
- User dropped onto StoreFront as usual
Special thanks to Mark Renouf for his suggested workaround.


Hi Michael,
Would this work if the AD was not on-premise (NetScaler side of things) instead it was an Azure AD (linking back to another businesses Domain) and through OKTA end users consume the Citrix apps in NetScaler side of things?
Like a B2B scenario, where B1 provides the AD+Azure AD+OKTA and wish their users to connect to B2 which has NS/SF/XenApps (No AD!)
Kosta
Hi Kosta, that scenario is unlikely to work for SSO. FAS is probably your best bet there, with shadow accounts in the B2 domain, of the B1 domain’s users. We’ve set that up for CSPs before in fact (they provided a BYO-IdP authentication option to their customers, which other than shadow account creation, eliminated account management burden).
Hi Michael, just out of curiosity, how would that work if you also have apps, mail and file services in the B2 domain in your XenApp sesions? Was the BYO-IdP in the end linked to an AD in the B2 domain? I might face a similar requirement … Cheers!
Hi Ronald,
B2 domain? Sorry not following. Might need a bit more context.
Thank you for publishing this guide. Do you know if this method of integration will publish an OKTA tile for our users to access from their OKTA page? The best user centric benefit OKTA provides is having the users apps located in one convenient location.
Also, what steps could be taken to allow for administrators to test the service before releasing to production?
Hi Silvestre, I’d need to rebuild the config and re-establish another trial to validate, but I would suspect IDP-initiated authentication should work, being that we aren’t hiding the Citrix NetScaler app from Okta’s user view (but we do for the SWA app). As for testing, IPs and certificates permitting, I find it best to build a parallel non-prod config to validate against.
Hi Silvestre, this will work, at least, for me it does ..
Hi Michael,
Well documented article. I am testing this setup and have it all setup as mentioned on your doc. I am getting malformed assertion error after the login. I do see the login screen for a split second then get the malformed error. I know the SAML policy works because if I set my Storefront as delegated to ADC I get through and the second windows login prompt and can access my apps.
Seems to me there may be a mismatch in what SAML IDP is sending and what the ADC’s SAML SP policy is expecting.
Yeah I thought that as well but the same SAML policy works if I change my storefront to delegate the Auth to ADC.
Are you thinking the mismatch is on the attributes ?
I am on v12.1.57.18 on the ADC. Have you tested on the v12.1 ?
Hi Mike,
Firstly thanks for the amazing article. When I thought it is end of world with out having FAS I stumbled on your blog. You are a lifesaver. Coming down to my question I have implemented the exact setup and I receive error after redirecting to logon page for split second. “Matching policy not found while trying to process Assertion; Please contact your administrator” . I am running netscaler version 13.0 build 58.32nc. I am wondering if there is any additional settings that we need to make in storefront for this configuration?
Hi People, very fine article and I would be very happy without needing the FAS component.. I am quite sure I followed every bit of this article, but on the moment of truth I am redirected to Okta, and after filling in the right creds I get a ‘SAML Assertion verification failed; Please contact your administrator’ .. any ideas what might be causing this?
Thanks!
Ronald
Hi Ronald, sounds to me like the IDP cert being used on your ADC SAML SP config may not be the correct one. Sounds like ADC was unable to validate the SAML assertion as authentic.
Hi Michael, it was a pile of things after all. I assigned the wrong cert in my SAML server, did not select the right portal theme in my gateway vserver (forgot to switch to the cloned/adjusted one) and last but not least, from NS 13 onwards you need to assign a traffic policy to your vserver with as only option SSO turned on. Stuff works flawlessly now =) Very good article and funny way of using the script.js for this! Tx for publishing!
I’m running into an issue where it prompts me to download the login file if it fails to find the account in ldap, is there anyway to have it fail a little more gracefully?
It is not uncommon as a first factor to do an LDAP check by having the user enter their email address or username before going down the authentication rabbit hole. From there you could use custom labels to generate a more graceful error page for the user if they’re not found in the directory.
Hi Michael,
Thank you so much for creating this article! It is exactly what I was looking for.
I’m getting prompted to login to my custom ADC page before I get redirected to Okta. Once I’m at the Okta page I sign in again and everything works great.
Do you know how I bypass the initial ADC login and get redirected straight to Okta?
Thanks,
Matt
Hi Matt,
If set up correctly, the moment you hit the Citrix Gateway, it should redirect automatically to Okta. It sounds like the authentication sequence isn’t correctly set up someplace. Can you double-check your nFactor configs? Although they should be overrided in presence of an auth profile bound to the Ctx Gateway, double check no basic auth policies are bound there.
Michael
Hi Michael,
The nFactor config was the thing. I had bound an ldap policy instead of the saml policy I created. Fixed and it’s all working great.
Thank you again for the guidance and great article!
Matt
Hi Michael, excellent blog post! Quick question — how does the ADC store the password? Is it encrypted? Can it be retrieved? Does it flush it after a certain amount of time? Just want to better understand from a security perspective. Thanks!
You could configure the expiry when you configure the variable. And you could use encrypt/decrypt expressions to protect it. Be sure to base64 encode the cipher text
Hey Dileep, the Okta config unlike the Azure AD config you and I worked on, doesn’t use assignments and variables. I suspect they may be asking how in-memory credentials are protected\encrypted when stored in memory as part of say, basic LDAP login to Citrix Gateway such as in this scenario.
Hello Michael
I have a requirement to design a solution that needs OKTA MFA with Citrix workspace cloud. i understand this means ADC’s in azure and using the “Citrix gateway” option in wsc as the IAM auth method. i am having difficulties visualising the user authentication steps from user logon to the delivery of apps in workspace ?
regards
dave
Hi Dave, as you can use Okta natively with Citrix Workspace, it’s best to go that route. If you use a customer-managed Citrix Gateway and then back-end it to Workspace, you’ll be doing so via OAuth which is another modern auth method like SAML, which necessitates FAS. So I’d recommend foregoing this blog post (unless you plan to use StoreFront instead of Workspace) and work through setting up FAS and configuring Okta at Citrix Workspace.
Thanks michael
does the native okta support in wsc provide Okta MFA ?.
dave
Hi Dave, it should. It’s interfacing with Okta as the IdP so it should operate the same.
Hi Michael Great work on this solution, its working really well for us. In our environment we have a trust setup with another domain and our Access Gateway would do 2 LDAP lookup’s one to our domain and one to said trusted domain via a AAA VIP and a a Default Authentication Group pointing to trusted domains LDAP server until the matching username was found and logged in. Is there a way to add a 2nd LDAP server to be queried if no user is found on the 1st? The users in the trusted domain can no longer connect to… Read more »
Do the user emails have a different suffix? If so you could do an expression based on the suffix so you aren’t hammering your AD servers part of the time with bad users or users who might exist in both.
Hi Michael many thanks for the response. I managed so sort this out by adding another okta_ldap_pol_”trusted domain” with an action pointing to their LDAP server and binding that to the okta_ldappost_pl with a lower 110 priority than the 1st okta_ldap_pol 100 and its working great.
Michael, We have non-FAS working on 90% of our users but there are just a few that loop on the LDAP POST part, I can take that same user and access another ICA GW in another location and it works. Of course everything on the ADC’s are the same, only diff is locational services (i.e. DNS, LDAP, STA, SF). I followed another document where responder is used (received from Okta) and I see in your document you eliminated responder, why and could this help with looping? We have removed responder and the user can connect using their password a second… Read more »
Hi Ray, You can’t use responder policies on AAA-TM vServers. This guide and the older Okta guide are very different; Otka’s guide uses basic authentication which is deprecated, this documented solution of this post does not (which was the intent of the guide, provide people with a supportable solution that does not use deprecated configs). Did you review the common troubleshooting steps included in this article by chance? Worst case I have heard of customers having issues with their template apps and they fixed things by deleting and recreating it (and updating the associated ADC config for the LDAP POST… Read more »
Michael, Yes all the looping suggestions were investigated. Some updates; after we switched from Responder to your exact AAA-TM settings this fixed many loopers but some still remained, what we discovered is the user has recently changed their password and this new event was presented in the NSVPN logs as a failed LDAP authentication (the previous responders looping’s did not present this error message). After some analysis we determined this issue started when Okta (and our admins) introduced Passwordless access, this change causes the user not to type in their password during login and only relies on a smartphone verification.… Read more »
Hi Ray, incidentally another organization I’m working with is challenged with this as well if Kerberos is in use for internal use. Setting force authentication in SAML SP does not work, nor does forcing username and password to be entered on the SWA. I have been checking with my folks within Citrix to see if they’ve dealt with this as well (as one or two have used this article). The other organization I am dealing with on this issue has advised that if the user goes first to the explicit login page where Okta prompts them for credentials, the SWA… Read more »
Will this method work if you are using Okta Agentless Desktop SSO to access the Okta Dashboard?
For Reference: https://help.okta.com/en/prod/Content/Topics/Directory/ad-dsso-enable.htm
Unfortunately no, several folks have advised it breaks. Understandable as it’s using Keberos auth so the LDAP Post is unlikely to be effective, in particular when password changes are involved. I do have an admin who developed a workaround for their internal network DSSO use case of having users use IDP initiated auth, auto-filling the username into a non-editable username field, and prompting them to enter their password so it can run over LDAP. It’s not perfect but helps. I have the configs, just short on time to get it posted.
You don’t mention anything about the Storefront side of the configuration.
There isn’t anything special for that with respect to Okta.
Michael, I want to say THANK YOU for this work and sharing it. I put in Okta as an IDP via SAML into Citrix via Gateway. I was having trouble getting creds to pass through from Storefront (ICA Proxy) after getting the token back from Okta. I was able to get it working config without the custom.js, the cookie in the XML schema, the SWA Okta app (I only have the SAML 2.0 one) The only thing I needed to add was a login schema and checking the “Enable Single Sign On Credentials”. I’m using an on prem LDAP server.… Read more »
Very welcome. That sounds pretty interesting. Will need to try that.
Hi Michael,
Thank you very much for the detailed document. I followed your guide to setup a OKTA SAML at NetScaler with SSO without FAS. But when test the Netscaler SAML logon process, after I enter the OKTA user credential, it still pops up an additional window, to ask me enter the first factor user credential. After enter an OKTA netscaler application domain\user and password, it will success logon.
Please help. Thank you.
Best regards,
Kathy
This works great if the user is using a browser to establish a connection through the Citrix Gateway, but what about a VPN connection using the Citrix Secure Access client? This seems to stop after the Okta auth and the user needs to reenter creds to get to the VPN connection to complete. Is there a way to have the Citrix VPN client capture and pass the creds the same way the browser handles it?