Introduction
As today’s workforce transitions to a hybrid work model, employees have the flexibility to work from anywhere—whether it’s in the office, on the go, or at home. Organizations and businesses must deliver their remote employees an efficient onboarding experience for Windows devices. Workspace ONE – Windows Drop Ship Provisioning can help with this.
Windows Drop Ship Provisioning is a method of pre-configuring Windows devices at the manufacturer so the device can be shipped to the end-user, and with no additional setup have access to everything they need to start working. Using Workspace One (WS1, formerly Airwatch) UEM we can create the package of required apps (.ppkg) and the set of setup instructions for Windows OOBE (Unattend.xml). These are both provisioned by the manufacturer, so you don’t have to do any of the installing or OOBE yourself at the IT office.
At Ferroque Systems, we have deployed several dropship solutions. The ability to drop ship devices directly to end-users anywhere in the world eliminates the need for users to be close to the office/distribution centres and can eliminate the need for physical distribution centres entirely. Drop ship provides a seamless zero-touch onboarding experience for all your users, wherever they need to work.
The benefits –
- Efficiency: Windows devices can be shipped directly from the manufacturer to end-users, reducing the time and effort required for central IT teams to physically handle and distribute devices. Once the Windows device is received, it will already be enrolled in Workspace ONE UEM and end-users can set up and configure their devices independently, leading to faster deployment and reducing the time it takes for users to start using their devices.
- Cost Savings: Organizations can potentially reduce operational costs by streamlining the provisioning process and eliminating the need for centralized handling of devices.
- Remote Management: Workspace ONE provides a centralized platform for IT administrators to remotely manage and secure devices, ensuring that they adhere to organizational security policies even when provisioned independently by end-users.
- User Empowerment: Empowering end-users to take control of their device setup can lead to increased satisfaction and a sense of ownership over their work tools.
Two Workspace ONE Drop Ship Provisioning Options
Workspace ONE Drop Ship Provisioning (Offline) – Workspace ONE UEM administrator creates the PPKG and Unattend.xml configuration file within the WS1 UEM admin console and sends them to the manufacturer. At a high level, the PPKG contains all the big core applications the organization wants to pre-load to the Windows devices. The Unattend.xml has all other configuration settings, such as WS1 UEM enrollment details, OOBE settings, local admin account creation & credentials. This method is called “Offline” because the Windows device will be provisioned in the manufacturer’s facilities without the Internet. The manufacturer applies the PPKG to the Windows device which installs the core apps and then the Unattend.xml get staged onto the device. Once the users receive the device and connect it to the internet, the Windows device will then consume the Unattend.xml file, run through the OOBE and perform any configured automation.
Workspace ONE Drop Ship Provisioning (Online) – The difference is that the manufacturer provisions the device at the facilities with an internet connection. This online connection would facilitate the WS1 UEM enrollment and any other resources deployed via WS1 UEM to the devices. This method eliminates the need to create and share PPKGS with the hardware manufacturer. However, it involves the process of WS1 UEM admin to create and assign configuration payloads to a tag in the WS1 UEM admin console and then place an order with the hardware manufacturer using that WS1 UEM tag.
Blog and Use Case Focus
This blog focuses on Workspace ONE Drop Ship Provisioning (Offline). The goal and objectives of this blog are for the WS1 admin to understand the architecture, technical implementation, testing, configuration, and process flow of Workspace ONE Drop Ship Provisioning (Offline). If you want to leverage the “Online” method, please visit the VMware TechZone documentation for further details.
This blog will cover the use case of Workspace ONE Drop Ship Provisioning Offline with Dell as the hardware manufacturer. We will walk through the process of creating the PPKG and the Unattend.xml that must be sent to Dell to pre-load on the machines. Once the device is shipped and in the user’s hand, we will focus on enrolling the device to WS1 UEM, joining the on-prem domain, and final device assignment. The user will be able to sign into the device with their AD credentials, and when they do, the device will be assigned to them in Workspace ONE UEM.
Process Flow
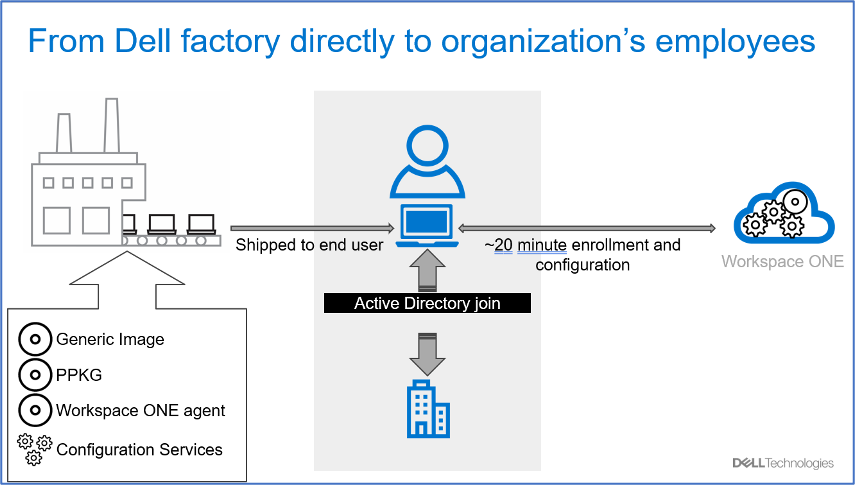
Workspace ONE Drop Ship (Offline) with Dell Technical Process Flow
Understanding the process flow for Workspace ONE Drop Ship (Offline) is critical for successfully implementing & validating it. Below is the high-level process for a Workspace ONE UEM provisioned dropship device:
- Dell Technicians apply the Windows Image to the Windows Device in the Dell Factory.
- The Dell technicians apply the “PPKG” to the device that installs all core apps onto the devices and stages the “Unattend.xml” to the Panther folder. Important – This process is “Offline” meaning Dell technical does not connect the Windows device to the internet.
- The Windows Device is shut down and shipped to the end user by Dell.
- End user receives the device > Powers it on > Connects to the Internet on the OOBE screen.
- The “Unattend.xml” is applied, and Workspace ONE staging enrollment occurs. WS1 UEM also deploys the VMware Tunnel app & the configured tunnel profile for “Pre-log-on VPN” to the device.
- WS1 UEM then actions the “Offline Domain Join” configuration via the ACC component. The Windows device joins the on-prem domain and is added to the configured OU in AD.
- The user completes the OOBE process configured in the Unattend.xml and lands at the sign-in screen, which displays the organization domain. On the device, “Pre-log on VPN” is established.
- The user inputs their AD credentials to log into the machine for the first time. At this step, the device has “Line-of-Sight” via VMware Tunnel to reach out to the on-prem domain for authentication.
- The user successfully logs into the device. The user’s domain username profile is created on the device. Additionally, on the WS1 UEM console, the device is assigned to the same username.
- The user sees all the core apps that need to be on the device. Other apps the user is entitled to from WS1 UEM start deploying to the machine. The user is ready to work on the device.
Prerequisites
Prerequisites for Workspace ONE Drop Ship Provisioning (Offline)
Before diving into the steps to create the Provisioning Package on the Workspace ONE UEM console and start testing it, we want to ensure it meets the following Workspace ONE UEM configuration and architecture requirements.
Workspace ONE UEM MDM – General Requirements
- Workspace ONE UEM v2008 or later.
- Workspace ONE Intelligent Hub for Windows v20.08 or later.
- Software Distribution of Win32 apps release with WS1 UEM v2008 and later.
- Factory Provisioning Service is installed in your WS1 UEM environment if you have the on-prem version. For SaaS WS1 UEM, please ignore this requirement, as VMWare already has it in place for SaaS customers. In this blog’s scenario, we already have WS1 UEM SaaS.
Workspace ONE UEM MDM – Architecture Requirements
- Directory Services has successfully integrated with your WS1 UEM via AirWatch Cloud Connector (ACC). This means you have deployed the ACC within your network, and the WS1 admin can sync directory users and groups into the WS1 UEM console. End users can leverage their AD credentials to enroll devices.
- VMware Tunnel has been deployed. VMware Tunnel is installed as Edge Service on one or more Unified Access Gateways (UAG) and operates with WS1 UEM. The UAG servers must be able to reach the domain controllers to allow the VPN to facilitate user authentication to Active Directory on the laptop for the first time. The specific port requirements are listed in the Pre-logon VPN section.
Workspace ONE Administrator’s Drop Ship Testing Requirements & Tools
- A physical Dell Windows laptop for testing or a Windows Virtual Machine. This blog will use a Dell laptop with Windows 11 image 23H2.
- Two (2) USB devices:
- One USB device will be used to store Windows Images. The testing process might require you to re-image the Windows machine a couple of times until meeting your desired result. Hence, having a USB with the desired Windows Image will be handy.
- One USB device will store the Provisioning Package, AirWatch Provisioning tool (download the latest version here and stage it on the USB), and other relevant information.
Implementation & Configuration
Workspace ONE Drop Ship (Offline) Implementation & Configuration
As the Workspace ONE Drop Ship (Offline) technical process outlines above, navigating through the intricacies of the Workspace ONE Drop Ship (Offline) process reveals its complexity, with various Workspace ONE components playing crucial roles in the workflow. Regrettably, VMWare lacks a comprehensive Knowledge Base tailored to address the specific use case outlined in this blog. Hence, a strategic approach involves implementing and configuring each component individually, validating its functionality before progressing to the next is needed. This ensures a methodical deployment and empowers administrators to grasp the nuances fully. Taking the time to master each component proves invaluable when troubleshooting issues effectively.
Implementation, Configuration, and Validation Flow & Strategy
- Offline Domain Join Implementation & Configuration: Configure WS1 UEM’s offline domain join & AirWatch Cloud Connector to join a Drop Ship device to an on-prem domain.
- “Pre-Log-On VPN” and “Line-of-Sight” Implementation: Configure and deploy VMware Tunnel for Drop Ship devices to facilitate user authentication the first time into the laptop and against the domain.
- Determine what to include in the PPKG & Unattend.xml: Analyze & predetermine the sets of business core applications, applications that are important to the Drop Ship process, device policies, scripts, and OOBE settings that will be needed to be installed and configured on the Drop Ship Windows devices.
- Configure the PPKG and Unattend.xml: Configure the PPKG and unattend.xml according to the information from part 3.
- Test and validate the complete Drop Ship workflow: by leveraging the procedure from part 5 and the created PPKG & unattend.xml from part 6 to conduct the Drop Ship’s test & validation.
- Send the PPKG & Unattend.xml to Dell: along with the information Dell needs that you can collect from part 5.
Offline Domain Join Implementation & Configuration
Before the user can leverage their AD credentials to sign into the laptop, the device must join the on-prem domain first. For Drop Ship devices to join the on-prem domain remotely, Workspace UEM’s domain join configuration relies on the AirWatch Cloud Connector (ACC) service, which resides within the organization’s network, and uses this service to add computer objects in your on-prem AD by using a service account that has the permission to do so in AD.
Tasks
- In Active Directory Users and Computers (ADUC), create and configure a service account to have permission to add a computer object in AD.
- Configure the ACC service to run using the service account from step one on the ACC Server(s).
- In (ADUC), set up a new Organization Unit (OU) that the Drop Ship device can be added into.
- In WS1 UEM, create and assign the domain join configuration.
Part One
Create and configure a service account to have permission to add a computer object in AD.
If you already have an existing service account that can add devices to AD, you can skip this part and leverage your existing service account for the configuration in part two.
- In ADUC, create a user account.
- Right-click the container or folder where you want to add devices and select Delegate Control. This selection displays the Delegation of Control Wizard.
- Select Next in the Delegation of Control Wizard.
- On the Users or Groups window, input the user from step one with Windows Server delegate permissions from the list, select Add, and then select Next. If this user account is not a member of the Domain Administrators group, increase the computer account creation limit (ms-ds-machine-account-quota) from the default value of 10 to prevent failures after joining 10 devices to the domain.
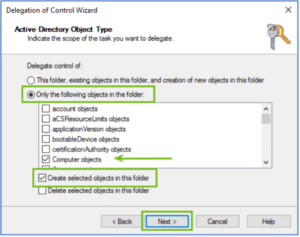
- On the Tasks to Delegate window, select Create a custom task to delegate >
- On the Active Directory Object Type window, select Only the following objects in the folder > Computer Objects > Create selected objects in this folder menu items >
- On the Permissions window, select General and Creation/deletion of specific child objects > Write, and Create All Child Objects >


Part Two
Configure the ACC service to run with the service account.
This is an important step you will need to do on all ACC servers in your Workspace ONE environment. Overlooking any of them could lead to occasional offline domain join failures during testing, validation, and production deployment.
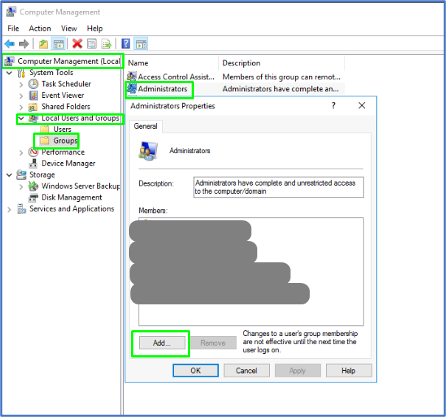
- Access the ACC server(s) > Launch Computer Management > Add the service account from part one to the local admin group or privileges so that this service account can successfully start the service.
- Launch Services and locate the AirWatch Cloud Connector Service > Right-click and choose Properties > Choose Log On tab > Choose This account > Input the service account and password > Hit OK and ensure AirWatch Cloud Connector service is in running status. Restart the service if needed.
- Notes:
- If you input incorrect credentials, the error will be thrown and won’t let you hit OK.
- Ensure the password of this service account never expires and keep it safe. If the password expires, drop ship devices will fail to join the domain.
- When WS1 admins manually upgrade the ACC in the environment, the AirWatch Cloud Connector service is reversed back to using a local system account that can no longer perform the domain join. Ensure you always update the “log on as” field for the service whenever performing a manual ACC update.

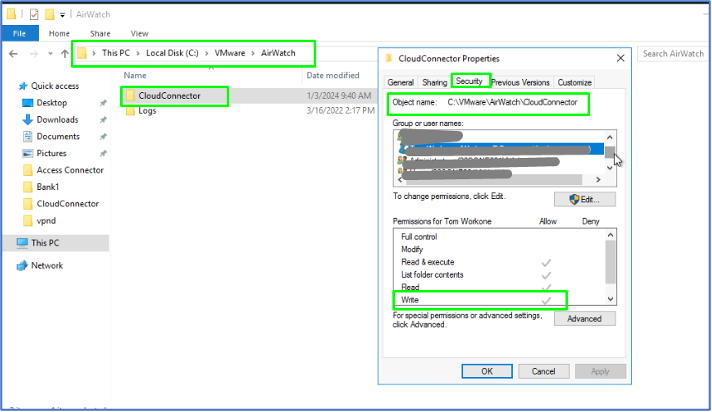
- Notes:
- In the ACC Advanced Security Settings area, give the user WRITE permissions for the ACC folder at <Drive>:VMWareAirWatchCloudConnector.
Part Three
In (ADUC), set up a new Organization Unit (OU) that the Drop Ship device can be created into.
Moving on to the third part, we establish a dedicated Organizational Unit (OU) in AD specifically designated for Drop Ship machines to land. In our example, we’ve labeled this OU as “Workspace ONE.” If you already have an existing OU you want to add the machines to, you can use that OU and later provide the OU name to WS1 UEM’s domain join configuration in a subsequent part.
In the specific scenario outlined in this blog, we’ve implemented crucial Group Policies within the designated Workspace ONE OU, where the domain-joined machine is situated. While a comprehensive discussion of each Group Policy’s function is beyond the scope of this post, our objective is to highlight the impact when the laptop seamlessly integrates into the domain. It’s important to note that this section hasn’t yet delved into the configuration of VMware Tunnel for “Line-of-Sight” connectivity.
If you have Group Policies applied to this OU then we should be able to see them applied when the laptop has joined the domain and communicated with the Active Directory (AD).
Part Four
In WS1 UEM, create & assign a domain join configuration.
The initial three parts above involve configuring the AirWatch Cloud Connector to utilize a service account capable of generating machines in AD and where to create them. Despite this setup, the AirWatch Cloud Connector requires an ‘MDM command’ initiated by its master, Workspace ONE UEM, to execute the assigned task. This MDM command is crucial, specifying the location in AD where the machine should be created and the desired format for the machine name as preferred by the administrator.
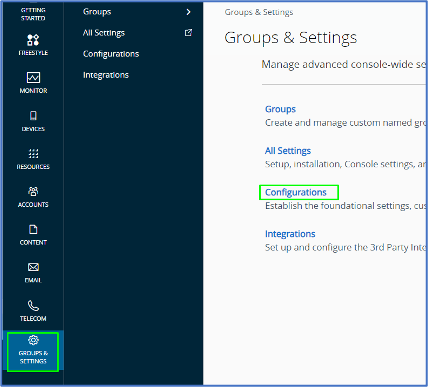
- Access Workspace ONE UEM admin console > Group & Settings > Configurations.
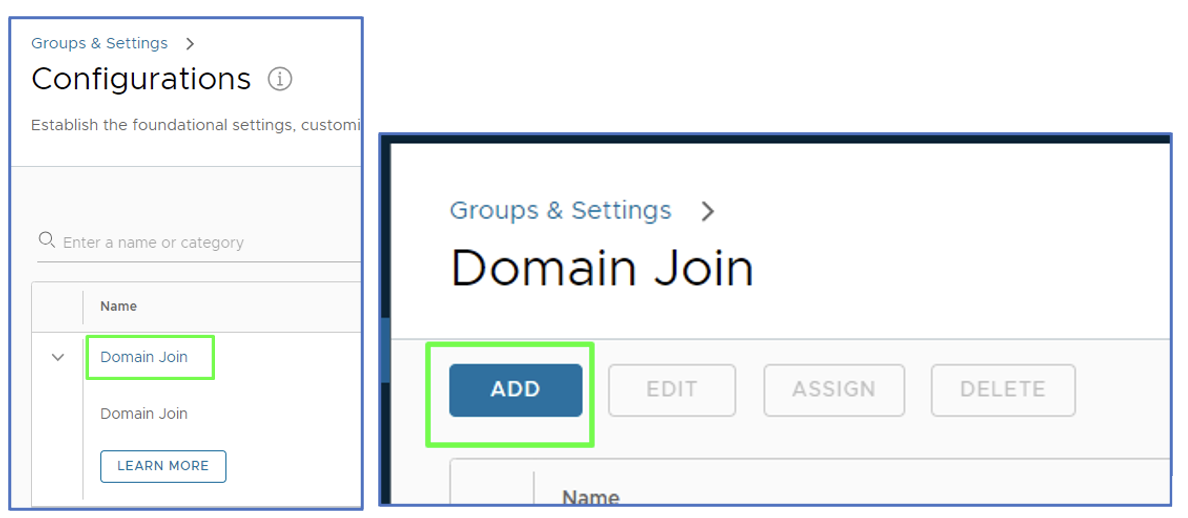
- Within the Configurations page, search for domain join > Click on Domain Join > Hit Add to create a domain join configuration.
- We specified the below for our domain join configuration >

- Name – Enter a meaningful friendly entry in the Name field so you (as a WS1 admin) can recognize the domain join. We named it “Offline Domain Join.”
- Domain Join Type – You can select On-Premises Active Directory or Workgroup. Since this blog’s use case is to join the machine to on-prem AD, we choose the On-Premises Active Directory.
- Domain Name – once you choose On-Premises Active Directory, you can only view this Domain Name field as it is auto-populated with the Server you configured for your Directory Services with your WS1 UEM tenant. This is why I mentioned in the prerequisite section that a Directory Services has been configured.
- Domain Friendly Name – same as the domain name field, it is auto-populated with the domain you configured for your Directory Services with your WS1 UEM tenant.
- Machine Name Format – Specify the identification record for the machine once it is created in AD under the Workspace ONE OU. We specify %SERIAL% to see the machine’s Serial Number once it joins the domain.
- Before assigning the domain join configuration, set up an assignment group.
- Once we get to creating the Unattend.xml, watch for a crucial detail – the WS1 UEM’s staging enrollment information. These details are pivotal in seamlessly enrolling Drop Ship machines into WS1 UEM. The magic happens during the Drop Ship Process, where the provided details, including the WS1 UEM tenant URL, the specific WS1 UEM’s organization group for the machine to land in, and, notably, the credentials for the staging enrollment user account, work their charm.
- As soon as the device is enrolled using staging account credentials, Workspace ONE UEM takes charge, deploying the domain join configuration and seamlessly guiding the machine through the domain joining process. It’s a crucial step in ensuring a smooth and efficient onboarding experience into the WS1 UEM ecosystem.
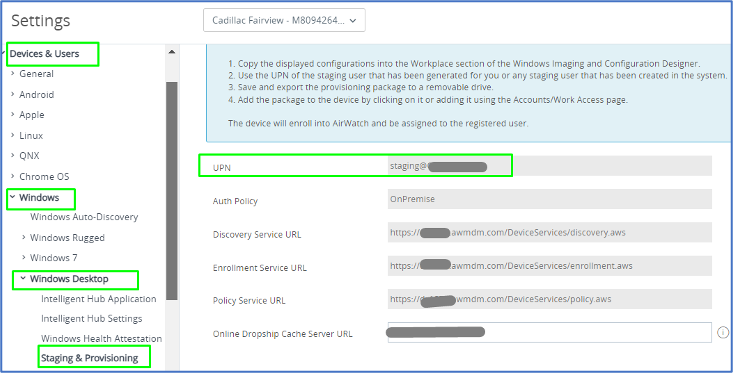
- To start, log into the WS1 UEM console and click on Groups & Settings > All Settings > Devices & Users > Windows > Windows Desktop > Staging & Provisioning. You will notice a staging account that can be used for staging enrollment. Take note of this account’s UPN.
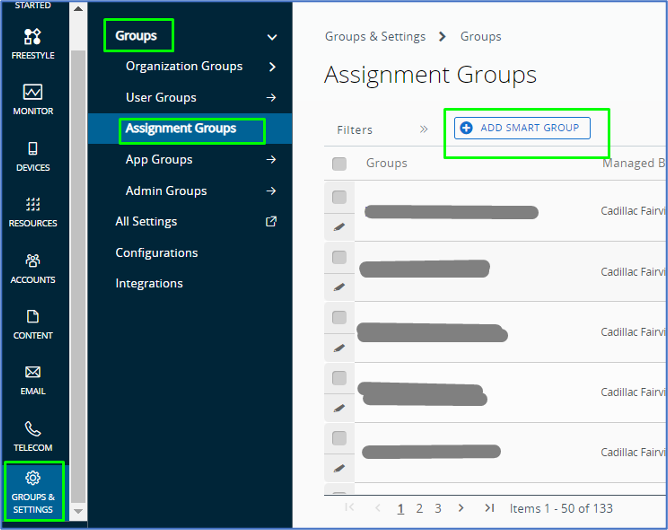
- Go back to Groups & Settings > Groups > Assignment Groups > Add Smart Group
- Create New Smart Group page appears > For the Name, we put “Offline Domain Join Provisioning” > under Choose Type, click on Device or Users > under Users search box, search, and choose the staging account above > ensure to hit Add > Save.
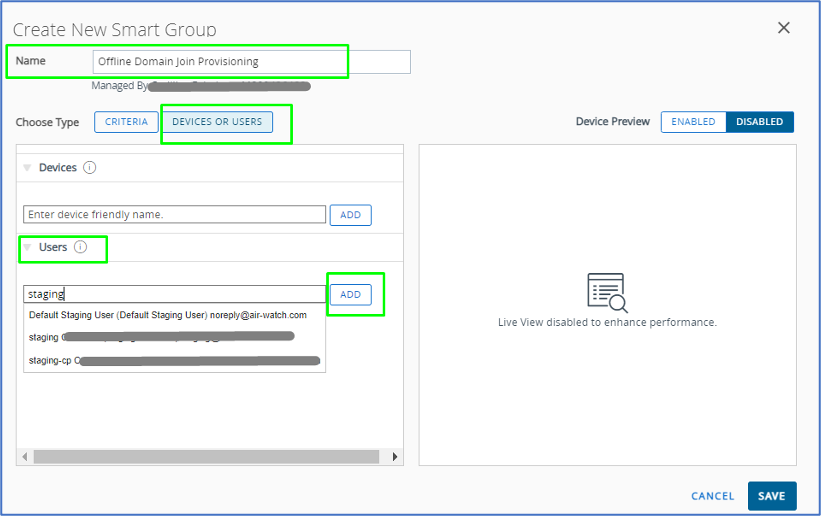
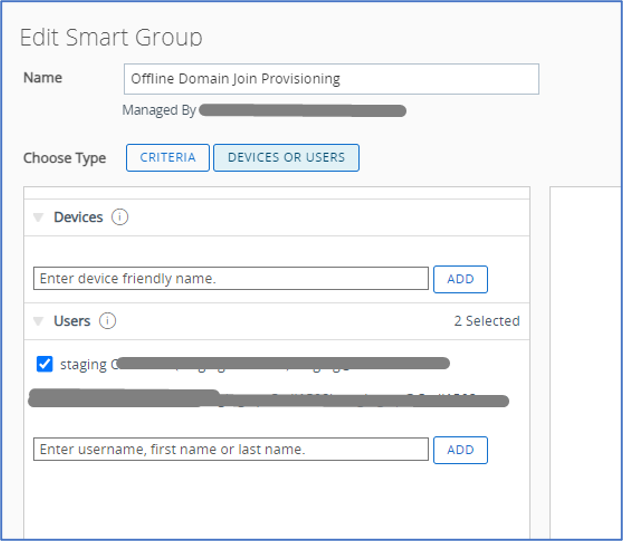
- Note: if you intend to use more than one staging account to perform Drop Ship device staging enrollment, ensure to include all staging accounts you will be using.
- Assign the domain join configuration.
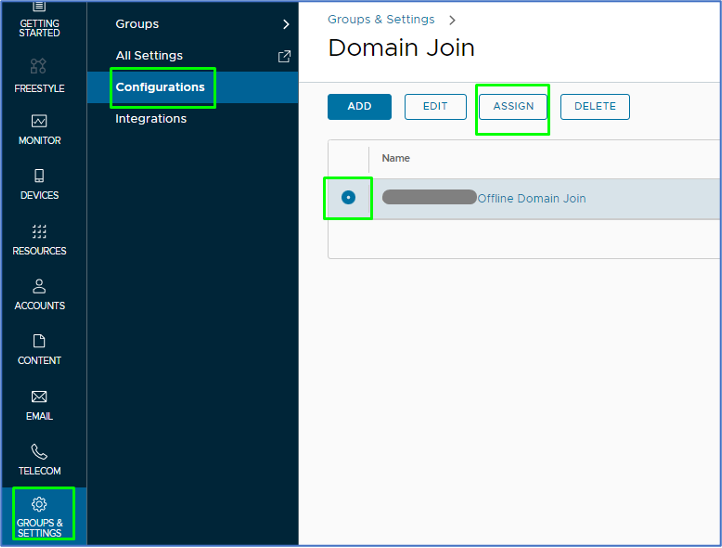
- Now that you have created the assignment group, head back to Groups & Settings > Configurations > Search for Domain Join and click on it > Check mark the name of the domain join configuration you created in step three > Click on the Assign button.
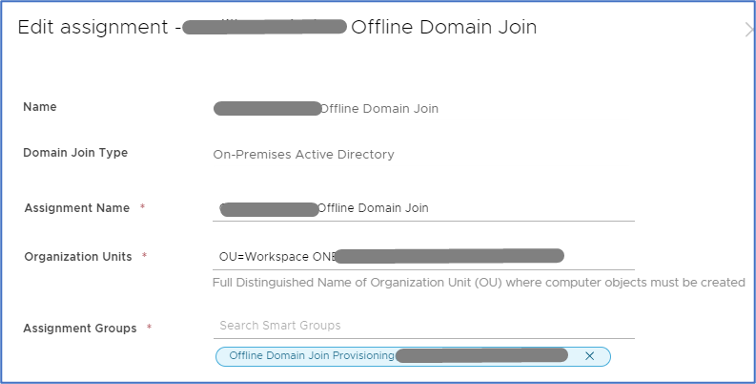
- Under the Assignments page, click on New > Provide Assignment Name > under Organization Units, input the name of the OU we created in part three, which is called Workspace ONE > choose the OU.
- Notes: When you input the name of the OU, WS1 UEM will perform a dynamic search within your AD and provide back the full distinguished name of the OU > Ensure choosing the proper OU by validating its distinguished name in AD. With one of the previous WS1 UEM versions, we ran into an issue where the OU field did not perform a dynamic search for the OU. This issue caused a failure in our domain join assignment. We had to work with VMware R&D to fix it, and changes were made to the cloud tenant. If you encounter the same issue, please submit a ticket to VMware.

- Under Assignment Groups, input the assignment group you created above in step four > Create.
The configuration of Offline Domain Join is complete. Next Step – Domain user authentication – As a “domain user,” I cannot authenticate into the machine just yet because the machine does not have “Line-of-Sight” to the domain to perform the authentication. But that is another deployment – we will discuss the “Pre-Log-On VPN” & “Line-Of-Sight” in the section below. So don’t try authenticating just yet, it will fail.
Pre-Log-On VPN” and “Line-of-Sight” Implementation
As mentioned earlier, two main ways exist to join your machine to an on-prem AD domain. There is online domain join, which requires the machine to be on the same network as the domain controller, and offline domain join, which allows a machine to join the domain without being on the same network as the domain controller.
When using offline domain join, the machine itself can join the domain in the factory during Dell provisioning, but we require a VPN to establish line-of-sight to the domain controller during the first login. Pretty much any VPN can work for this, but we will use the VMware Tunnel for the VPN since it is part of the Workspace ONE platform.
While VMware Tunnel can work as a per-app VPN or a full device tunnel, we have opted to use it as a full device tunnel. We will also need to configure the tunnel profile to run before the user logs on and set up device traffic rules for the tunnel.
Since the tunnel is already deployed, the first step is creating device traffic rules for the VMware Tunnel. Since we are using a full device VPN, we do not need to add specific device traffic rules, but we will elaborate on the services and ports used by the tunnel.
Lsass.exe is the process responsible for User logon. It maintains a secure channel between the computer and the domain controller to authenticate users and services. In Windows Services, you will see it listed as the Netlogon service, and is the service Windows uses for domain authentication when using the VMware Tunnel. It uses the following network communication flow:
| Application protocol | Protocol | Ports |
| NetBIOS Datagram Service | UDP | 138 (Optional, used for WINS resolution) |
| NetBIOS Name Resolution | UDP | 137 (Optional, used for WINS resolution) |
| NetBIOS Session Service | TCP | 139 (Optional, used for WINS resolution) |
| SMB | TCP | 445 |
| LDAP | UDP | 389 |
| RPC¹ | TCP | 135, random port number between 49152 – 65535 |
The Netlogon service also uses Kerberos for the authentication.
| Application protocol | Protocol | Ports |
| Kerberos | TCP | 88 |
| Kerberos | UDP | 88 |
| DC Locator | UDP | 389 |
Your UAG server will need to have the above traffic allowed, to create the necessary line-of-sight to the domain controller for the first login.
This blog will create the device traffic rules using Full Device VPN. Create a new device traffic rules with the following settings:
Assignment Name: [Full Device Tunnel Name]
Tunnel Mode: Full Device
| Rule | Action | Destination |
| 1 | Tunnel | *.yourAD domain
The IP Addresses for your domain controllers |
| 2 | Bypass | * |

Note: Initially, we did not have to add the IP Address for our domain controllers, but we found some odd behavior on Rogers Ignite Routers (common in Canada) without the IPs.
Note: For more information regarding configuring via a per-app VPN, you can reference the below table from Camille Debay
| Application | Action | Destination | Purpose |
| C:WINDOWSsystem32lsass.exe | TUNNEL | Active Directory Domain. e,g: *.addomain.tld | User Logon Process. Service Name: NETLOGON |
| System | TUNNEL | Active Directory Domain. e,g: *.addomain.tld | Share access for GPO. i.e: SYSVOL |
| C:Windowsexplorer.exe | TUNNEL | Active Directory Domain. e,g: *.addomain.tld | Multi |
| C:WINDOWSsystem32svchost.exe | TUNNEL | Active Directory Domain. e,g: *.addomain.tld | GPO Process. Service Name: Group Policy Client |
Reference: https://digitalworkspace.one/2021/01/28/domain-authentication-with-tunnel-perapp-vpn/
Once the full device traffic rules are created, we can create the VPN profile. The profile will need to point the device to connect to the configured VMware Tunnel, use the correct device traffic rules, and have the correct custom configuration XML. As mentioned before, the custom XML is critical for the device to have line-of-sight during the first login.
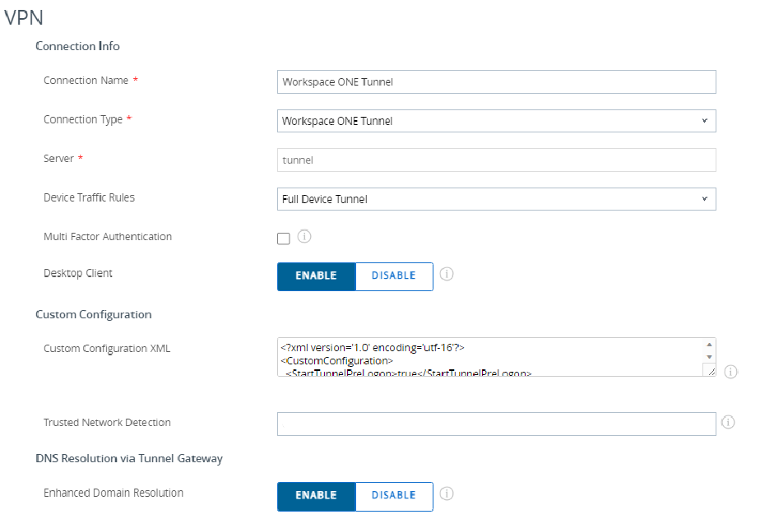
Use the following settings for your VPN profile:
- Connection Name: [Display name of VPN Connection]
- Connection Type: Workspace ONE Tunnel
- Server: filled automatically
- Default Traffic Rule Sets: Select the Device Traffic Rules created before
- Desktop Client: Enabled
- Trusted Network Detection: enter the FQDN of the AD Domain of the user, this setting allow Tunnel to detect if the machine is already on the corp network.
- Domain: FQDN of the AD Domain and any other domain that needs resolution via VPN
<?xml version='1.0' encoding='utf-16'?>
<CustomConfiguration>
  <StartTunnelPreLogon>true</StartTunnelPreLogon>
</CustomConfiguration>
Trusted Network Detection: enter the FQDN of the AD Domain of the user, this setting allows the Tunnel to detect if the machine is already on the corp network.
Once both the profile and the device traffic rules are created, everything is ready for pre-logon VPN and the Initial user authentication to the domain.
Preparing the PPKG and Configure the Unattend.xml File
Two important components will be needed for the PPKG. The first component is the apps that will be loaded in the Dell factory. This is typically any large apps you want on the user’s device before it is shipped to them to save the user time and bandwidth. Since we are covering an offline dropship experience, all apps will also need to be able to be fully installed without any internet connectivity. You will be able to add any apps to the PPKG that you have added to your WS1 console, and since every implementation uses different apps, we won’t cover adding individual apps.
The second essential component is to include supporting scripts in the PPKG to ensure a smooth dropship experience. We will review two important scripts for the dropship process: a script to facilitate automatically logging in to the device the first time, waiting for domain join and restarting, and a script to automatically restart the device once to ensure that domain join is successful.
The first script was created by Grischa Ernst and can be found here. When using offline dropship, we run into an issue where the VPN is not able to initiate during the OOBE process, and once the user is presented with their first login screen, there is no direct connection to the domain controller, and the user is not able to log in with their domain credentials. This script combines with the Unattend.xml to solve this issue by automatically logging onto the local admin, locking user input to prevent the user from interacting during the local admin login, waiting for domain join configuration, and then restarting the machine automatically.
More information on the script can be found on Grischa Ernst’s blog here, but the way the script works is that it uses a few custom scripts and some external tools/scripts to block the keyboard, create a splash screen overlay, confirm that the device joins the domain and then restart the device. To use the script, we will need to upload it to the WS1 UEM console. Grischa’s zip file for the script already contains the dummy.exe necessary to add a script as an application, so all that is needed is to upload the script as an internal application. To upload the script, you need to go to Resources > Apps > Native > Add Application and upload the zip file. You must manually add the uninstall command, installation command, and install detection method.
Uninstall Command:
cmd.exe /c rmdir C:TempODJsource /S/Q
Install Command:
powershell -executionpolicy bypass -file install.ps1
Install Detection:
File exists: C:TempODJSourceDomainJoinTest.ps1
Besides logging onto the local admin and locking down the device, the script also performs several checks before proceeding, such as “Wait for the ODJ blob gets applied”, “Check if all apps are installed”, etc. I didn’t want to wait for these steps and I found remediating any issues after the device was provisioned was a lot easier and removed these lines. To make sure that there was enough time for the VPN to establish and connect to the domain, though, I did add a 10-minute wait. For my purposes, I found removing the following useful, but it is up to your environment to make any changes to Grischa’s great script.
#Wait for the ODJ blob gets applied - Skipped this step
#Check if the Queue is filled - Skipped this step
#Check if SFD getting installed - Skipped this step
#Only for for DSM enabled clients - Skipped this step
#Check if all apps are installed - this step

Start-Sleep -Seconds 600 – Added this step, before removing the last logged on user.
Once you have the script edited to your preference and added to the WS1 UEM console, you will need to edit your Unattend.xml to perform the first login. Configuring the Unattend.xml will be covered a bit more in a later section, but the Unattend.xml will have the username and password of the local account added to it so that it performs an automatic login.
The second script we use is automatically restarting the device the first time a user logs in. We need to restart the device once the user has already logged in to ensure that all the apps that require restarts are ready for the user. There are a lot of ways you can restart a computer automatically, and I’m sure that my way is far from the most graceful way to do it, but I will add my method.
This method requires a few files, but the method works by performing the following:
- Create a text file in c:temp with a value of 1.
- Add a bat file into C:ProgramDataMicrosoftWindowsStart MenuProgramsStartUp that launches a PowerShell script.
- The PowerShell reads the text file, and if it detects a value of 1 it clears the login information and restarts the computer, changes the value of the text file to 2, and restarts the computer.
- If a value of 2 is detected in the text file the PowerShell script deletes all three files(ps1,bat,txt)
Step 1: Create the text file
The first step to creating the test file is straightforward. We need to create the text file before the user logs in. The easiest way is to piggyback on the script we added earlier. We can just add the following to the end of the DomainJoinTest.ps1:
#remove the autologon count
Set-ItemProperty -Path 'HKLM:SOFTWAREMicrosoftWindows NTCurrentVersionWinlogon' -Name AutoAdminLogon  -Value "1"
Set-ItemProperty -Path "HKLM:SOFTWAREMicrosoftWindows NTCurrentVersionWinlogon" -Name DefaultUserName -Value "ADMINACCOUNT"
Set-ItemProperty -Path "HKLM:SOFTWAREMicrosoftWindows NTCurrentVersionWinlogon" -Name DefaultPassword -Value "PASSWORD"
Set-ItemProperty -Path "HKLM:SOFTWAREMicrosoftWindows NTCurrentVersionWinlogon" -Name ForceAutoLogon -Value "1"

#Create a restart text file
New-Item -Path 'c:TempRestart.txt' -ItemType File
Add-Content -Path 'c:tempRestart.txt' -Force -Value "1"
The AdminAccount and Password should align with the admin account and password you create in the Unattend.xml.
Step 2: Add a bat file.
The bat file is the easiest part since it only needs to call the PowerShell script.
Create a bat file named Restart.bat with the following:
Powershell.exe -executionpolicy bypass -File c:TempAutoRestart.ps1
Create a ps1 named Install.ps1 file with the following:
Copy-Item "$PSScriptRootRestart.bat" -Destination 'C:ProgramDataMicrosoftWindowsStart MenuProgramsStartUp' -Force
Create a dummy.exe and zip the whole thing up. You should have dummy.exe, Install.ps1, and Restart.bat in the zip file. Upload the zip file as an application into the WS1 console and use the following install parameters:
Uninstall Command:
nul
Install Command:
powershell -executionpolicy bypass -file install.ps1
Install Detection:
File Exists: C:ProgramDataMicrosoftWindowsStart MenuProgramsStartUpRestart.bat
Step 3: Create the PowerShell script
The last piece is to create the PowerShell script to restart the computer and remove the login configurations.
Create a ps1 named install.ps1 with the following:
$Destination = "C:Temp"

if(!(Test-Path $Destination))
{
    New-Item $Destination -ItemType Directory -Force
}
Copy-Item "$PSScriptRootAutoRestart.ps1" -Destination 'C:Temp' -Force -Recurse
Create another ps1 named AutoRestart.ps1 with the following:
$exists = Test-Path -Path 'C:tempRestart.txt' -PathType Leaf

if($exists)
{
    $file_data = Get-Content 'c:tempRestart.txt'

    if($file_data -eq "1")
    {

        Clear-Content -Path 'c:tempRestart.txt'
        Add-Content -Path 'c:tempRestart.txt' -Force -Value "2"
        Set-ItemProperty 'HKLM:SOFTWAREMicrosoftWindowsCurrentVersionAuthenticationLogonUI' -Name LastLoggedOnUser -Value ""
        Set-ItemProperty 'HKLM:SOFTWAREMicrosoftWindowsCurrentVersionAuthenticationLogonUI' -Name LastLoggedOnSAMUser -Value ""
        Set-ItemProperty 'HKLM:SOFTWAREMicrosoftWindows NTCurrentVersionWinlogon' -Name AutoAdminLogon  -Value "0"
        Set-ItemProperty -Path "HKLM:SOFTWAREMicrosoftWindows NTCurrentVersionWinlogon" -Name ForceAutoLogon -Value "0"
        restart-computer -force
    }
    elseif ($file_data -eq "2")
    {
        Remove-Item -Path 'c:TempRestart.txt'
        Remove-Item -Path 'C:ProgramDataMicrosoftWindowsStart MenuProgramsStartUpRestart.bat'
        Remove-Item -Path 'c:TempAutoRestart.ps1'
    }
}
Create a dummy.exe and zip the whole thing up again. You should have dummy.exe, install.ps1, and AutoRestart.ps1 in the zip file. Upload the zip file as an application into the WS1 console and use the following install parameters:
Uninstall Command:
nul
Install Command:
powershell -executionpolicy bypass -file install.ps1
Install Detection:
File Exists: C:TempAutoRestart.ps1
The two apps can then be added to the PPKG, allowing us to automatically restart the device after the first login. Once both scripts are ready and you have decided on which apps to add to your package, you are ready to configure the package.
Configure the PPKG and Unattend.xml File
Once the scripts are created and you have decided on the applications you want in your dropship package, you are ready to create the PPKG and the Unattend.xml. The PPKG contains the installers and installation instructions for the applications, and the Unattend.xml is the instructions for how the device will perform the Windows OOBE (Out Of Box Experience).
Creating the PPKG
The Workspace One console does all the work of creating the PPKG and Unattend.xml for us. We need to choose what to put in it and configure the OOBE parameters. To create the package, log into the WS1 console and go to Devices > Lifecycle > Provisioning > Windows > NEW.
You can also edit any existing dropship packages on this screen as well.
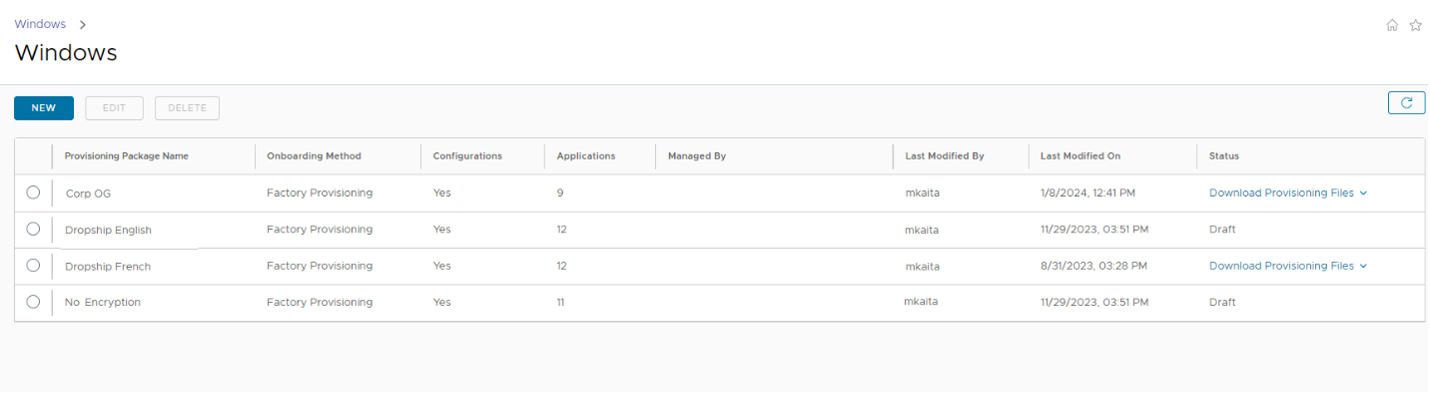
You will then be presented with the New Provisioning Package screen. Create a name and description for your package and click on next.

Select “Dropship provisioning – Offline” The offline package is used for factory provisioning, while the encrypted package is used for your 2nd touch facility.

We configure all the settings for the Unattend.xml on this next screen.
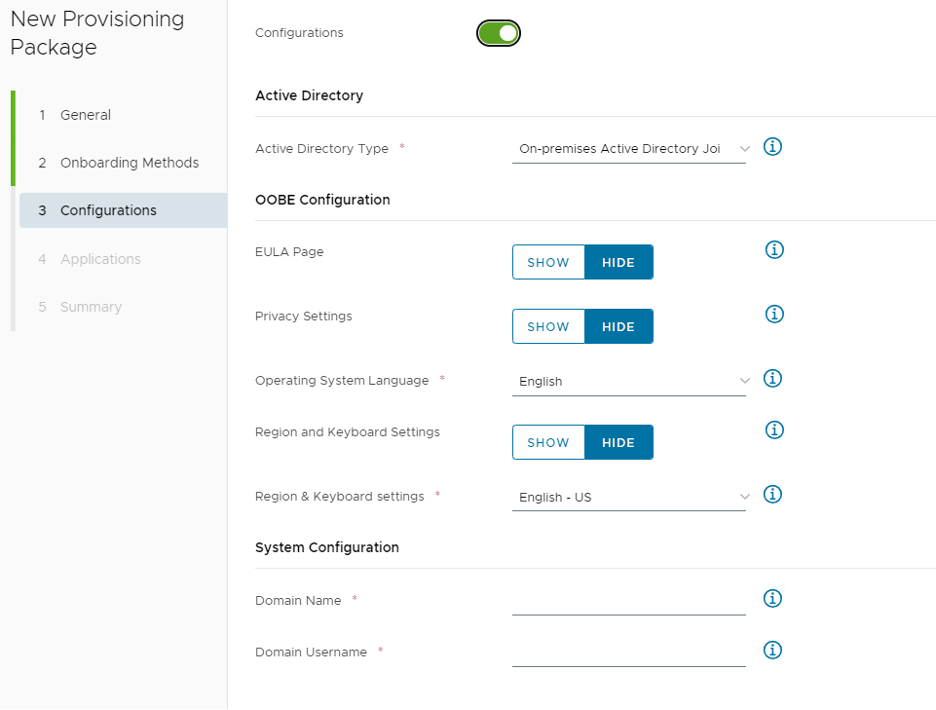
I used the following options, but only some are really important.
| Configurations | Enabled |
| Active Directory | |
| Active Directory Type | Workgroup |
| OOBE Configuration | |
| EULA Page | Hide |
| Privacy Settings | Hide |
| Online Account Settings | Hide |
| Operating System Language | Your install language |
| Region and Keyboard Settings | Hide |
| Region & Keyboard settings | Your install language |
| System Configuration | |
| Workgroup | Your Domain |
| Registered Owner | (optional) |
| Registered Organization | (optional) |
| Computer Name | Computer Name (Random) |
| Remove Windows 10 Consumer Apps | NO |
| Product Key | (blank) |
| Create Local User | YES |
| Local Username | (Admin Name) |
| Local User Password | (Admin password) |
| Make Administrator | YES |
| Enable Administrator Account | NO |
| Administrator Password | (blank) |
| User Account Control | Disabled |
| Additional Synchronous Commands | (blank) |
| First Logon Commands | %SystemRoot%System32WindowsPowershellv1.0powershell.exe -NoProfile -WindowStyle Hidden -ExecutionPolicy Bypass -File C:TempODJSourceDomainJoinTest.ps1 |
| Workspace ONE Enrollment | |
| Enrollment Server | https://YourWS1Server.com/ |
| Enrollment OG | The OG you want to enroll these devices into |
| Staging Account | (Staging Name) |
| Staging Password | (Staging password) |
We choose Workgroup as our active directory type since these are dropship devices and they will not be on the corporate network.
The OOBE options are entirely up to you, but I find it best to hide all the options unless you really need them, to eliminate as much unnecessary user interaction as possible.
We need to create a local user for the first logon. This user will be used for the script we created earlier. The first logon commands are also important, as this is the command that will initiate the auto logon script that allows the domain join and VPN to install.
Once the Unattend.xml is finished you can go to the next screen and configure the apps.
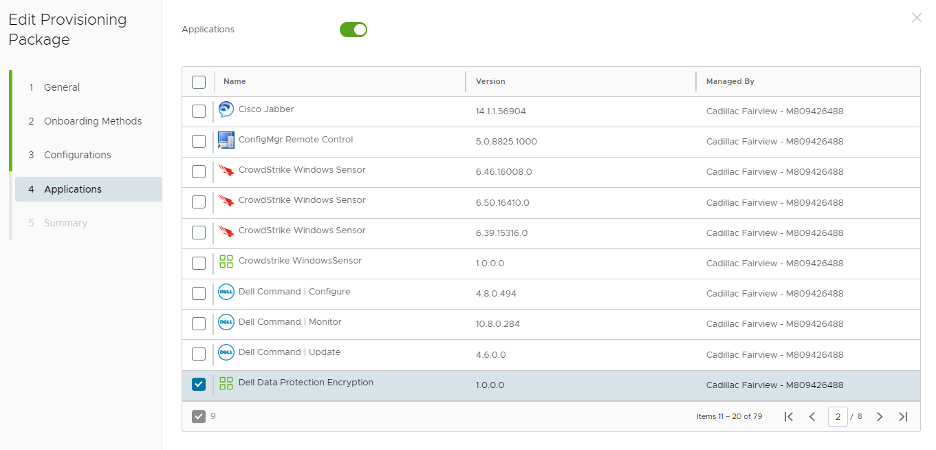
Here all you need to do is select the applications that you want in the PPKG file. You will need to make sure that the auto restart and autologin scripts are selected, but any other apps are up to you. Once you have selected your apps, you are ready to save and download the PPKG and Unattend.
Note: All apps in the PPKG must be OFFLINE installers.
The last step of creating the PPKG and the Unattend is to edit the Unattend.xml so that it will automatically log in to the created local user the first time the machine is powered on. As we discussed in the previous steps, we will need to add a few lines in the Unattend.xml with the username and password.
Right near the top of the Unattend.xml, you will see the following:
<unattend >
   <settings pass="specialize">
<component name="Microsoft-Windows-Shell-Setup" processorArchitecture="amd64" publicKeyToken="31bf3856ad364e35" language="neutral" versionScope="nonSxS" xmlns_wcm="http://schemas.microsoft.com/WMIConfig/2002/State" xmlns_xsi="http://www.w3.org/2001/XMLSchema-instance">
    <ComputerName>COMPUTERNAME</ComputerName>
    <RegisteredOrganization>YOURORGANIZATION</RegisteredOrganization>
</component>
In between the Computername and the Registered Organization, add the following:
<AutoLogon>
                <Username>LocalUSERNAME</Username>
                <Enabled>true</Enabled>
                <LogonCount>1</LogonCount>
                <Password>
                    <Value>LocalPASSWORD</Value>
                    <PlainText>true</PlainText>
                </Password>
            </AutoLogon>
Use the Username and password that you set when creating the Unattend.xml.
When it’s complete, it should look like this:
<unattend >
    <settings pass="specialize">
<component name="Microsoft-Windows-Shell-Setup" processorArchitecture="amd64" publicKeyToken="31bf3856ad364e35" language="neutral" versionScope="nonSxS" xmlns_wcm="http://schemas.microsoft.com/WMIConfig/2002/State" xmlns_xsi="http://www.w3.org/2001/XMLSchema-instance">
    <ComputerName>*</ComputerName>
    <AutoLogon>
                <Username>LocalAdmin</Username>
                <Enabled>true</Enabled>
                <LogonCount>1</LogonCount>
                <Password>
                    <Value>Password1</Value>
                    <PlainText>true</PlainText>
                </Password>
            </AutoLogon>
            <RegisteredOrganization>TestOrganization</RegisteredOrganization>
</component>
        <component name="Microsoft-Windows-UnattendedJoin" processorArchitecture="amd64" publicKeyToken="31bf3856ad364e35" language="neutral" versionScope="nonSxS" xmlns_wcm="http://schemas.microsoft.com/WMIConfig/2002/State" xmlns_xsi="http://www.w3.org/2001/XMLSchema-instance">
You now have your completed Unattend.xml and PPKG files and are ready to test the deployment!
Test and Validate the Complete Drop Ship Workflow
Before conducting the complete Drop Ship workflow, we need to test “Offline Domain Join”, “Line-of-Sight” using the ACC and “Pre-log-on VPN” using VMware Tunnel independently. They are core components in the workflows. Nothing else matters if the machine fails to join the domain nor has “Line-of-Sight” to facilitate the end user’s authentication into the laptop. To guarantee the accuracy of our configuration, let’s delve into the testing phase and witness the offline domain join functionality and the deployment of VMware Tunnel for “Line-of-Sight” and “Pre-log-on VPN” in action.
Step 1 – Offline Domain Join
Test and Validate the WS1 UEM’s Offline Domain Join functionality independently.
In our specific scenario, we operate with two ACC servers, namely ACC1A and ACC1B. To streamline the Offline Domain Join process, it is advisable to temporarily halt the AirWatch Cloud Connector service on the ACC1B server. This ensures that the ACC1A server exclusively executes the Offline Domain Join operation.
Regarding a test device, we use a Dell Latitude 7430 with the serial number 8Y0LTQ3. This device has a Windows 11 OS 22H2 image. Under Access work or school setting, the device is not being managed by any MDM nor joined into our domain at this point.

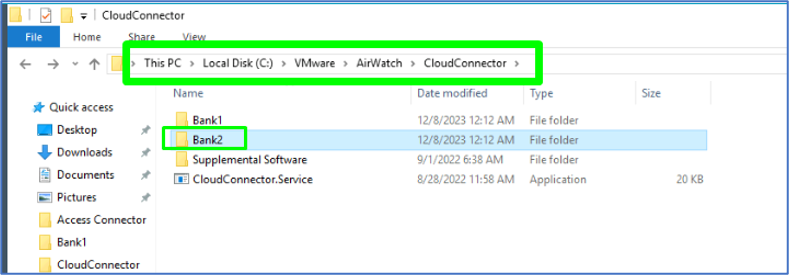
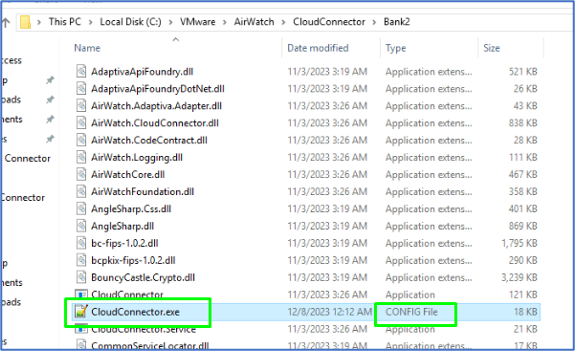
By default, the log level for the ACC is set to Information, the Domain Join actions are only captured in the ACC’s Debug log mode. Hence, on the ACC1A server, enable the AirWatch Cloud Connector service’s debug log by navigating to C:VMWareAirWatchCloudConnectorBank2.
Then locate and open the file called CloudConnector.exe > Open it with Notepad++.
Locate the line (<loggingConfiguration ….level=”Information”).
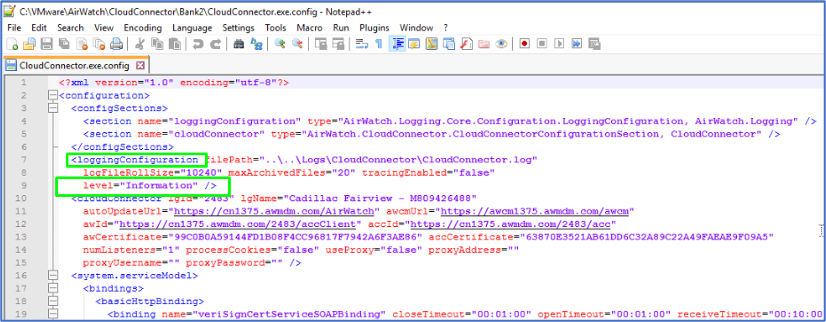
Change “Information” to “Verbose” > Save. Allow a few minutes for the service to pick up the change.

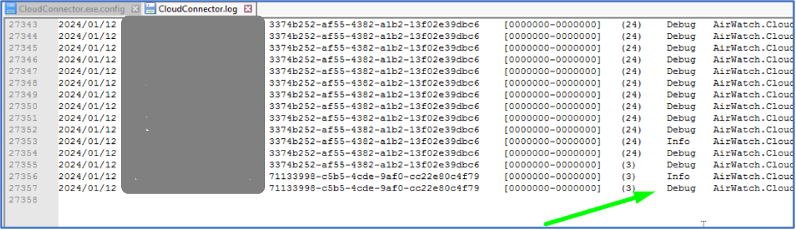
Open the latest Cloud Connector log by navigating to C:VMWareAirWatchLogsCloudConnector.
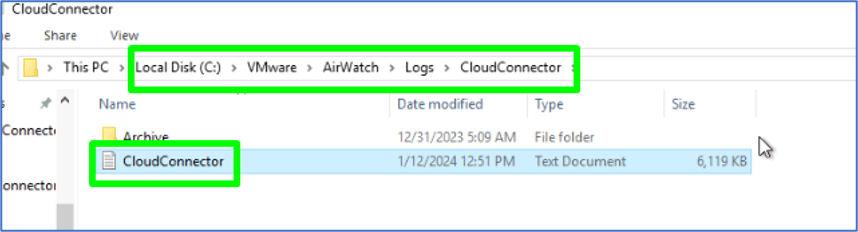
Confirm “Debug” is shown on a few latest log lines.
Now we’re ready to test! On the Dell device, open a browser and go to com. Click on Download Hub for Windows x86/x64 > Install the Hub client on the test machine.
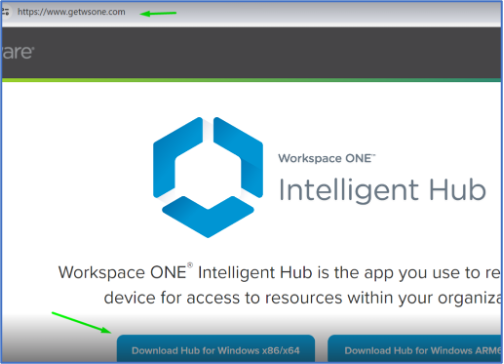
Once the Hub app is installed and launched, input the staging enrollment details that we intend to use in the xml later to perform the WS1 UEM enrollment.
Email or Server Address – enter the Workspace ONE UEM tenant URL > Next.
Group ID – enter the group ID where you want the Drop Ship device to land > Next.
Username and Password – enter the staging account and username and complete the enrollment.
Hop onto WS1 UEM and confirm the test device is enrolled with the staging account.
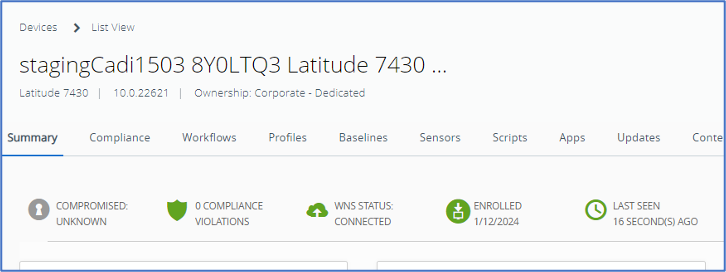
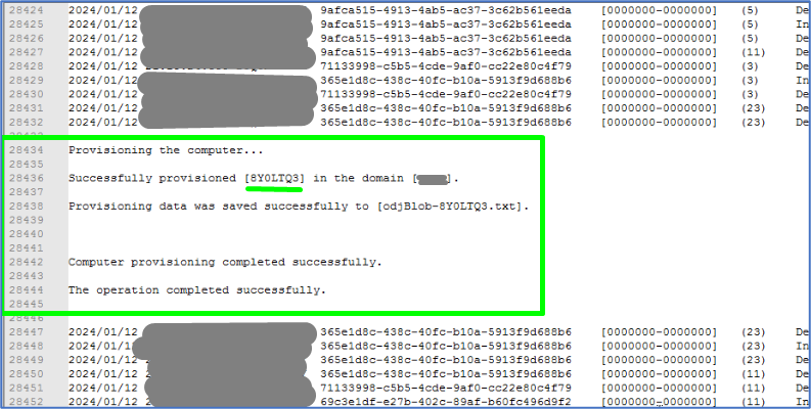
Hop back onto the ACC1A server and open the CloudConnector log, and I see the offline domain join executed successfully in the log. Hop onto in AD, the machine’s serial number created under the Workspace ONE OU. If any failures are indicated in the log, troubleshoot accordingly to the error.
On the test device, we can see under Access Work or School, the device is now enrolled with WS1 UEM as well as domain joined. Offline!

Notable Issue: While operating as a domain user, the “Switch User” function doesn’t display the domain on the initial Sign-In screen for the first domain sign-in attempt. The resolution involves performing a machine reboot, after which the domain becomes available for Sign-In.
This occurrence has been consistently replicable through testing, underscoring the necessity for a machine reboot after joining a domain. To streamline this process, we must implement a solution. Through scripting, we will deploy this requirement via WS1 UEM to machines during the Drop Ship process, ensuring a seamless onboarding experience. It was discussed in the section “Preparing the PPKG and Configure the Unattend.xml File”.
Access the exe config file on ACC1A and modify the log back down to Information > Save.
Head over to ACC1B, turn on the ACC service, and repeat all the steps above If you achieve the same successful result, ensure both logs are turned back down to Information and the ACC service is running on both servers.
Offline Domain Joined Testing and Validation is complete! A significant milestone in our WS1 deployment testing – the machine is successfully joined to the domain remotely.
Step 2 – Line of Sight
Test and Validate the VMware Tunnel deployment for “Line-of-Sight” to facilitate user authentication into the laptop.
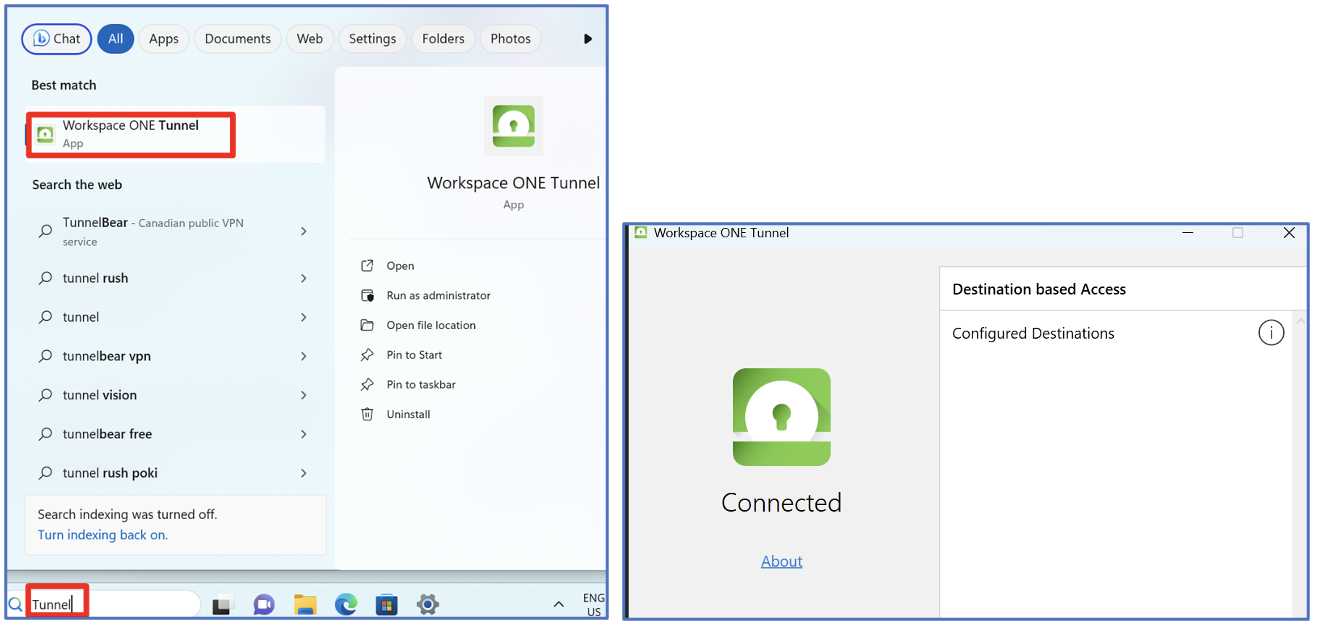
As my test machine is now enrolled with WS1 UEM using the staging account, the device belongs to the “Offline Domain Join Provisioning” assignment group, which should have the VMware Tunnel client and Full Device Tunnel profile To confirm this, I log into the device using the local admin account > Search and launch the Tunnel client>. It shows “Connected” status. This confirms that the Tunnel app is on my device and functioning correctly.
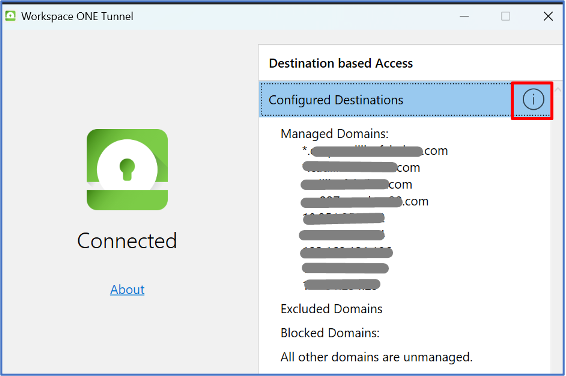
And with “Configured destinations” to my domain respectively to what I configured in the Full Tunnel Profile for “Pre-log-on VPN” and “Device Traffic Rules” for “Line-of-Sight”. This confirmed the Full Tunnel Profile was also deployed to my test device.
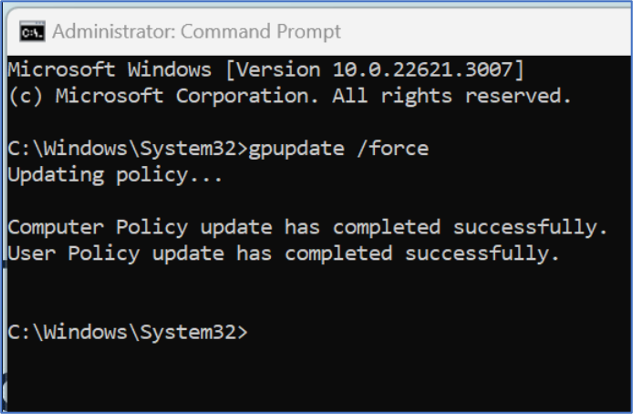
Next, I perform “gpupdate /force” in cmd, and the GPO update is successful. The device then got a core GPO applied to the machine as well. This indicates that the device has “Line-Of-Sight” to the domain.
Now, let’s see if I can sign into the laptop for the first time using my domain account by performing Switch User > Ensure injecting my domain account and password at the sign-in screen > authenticate.
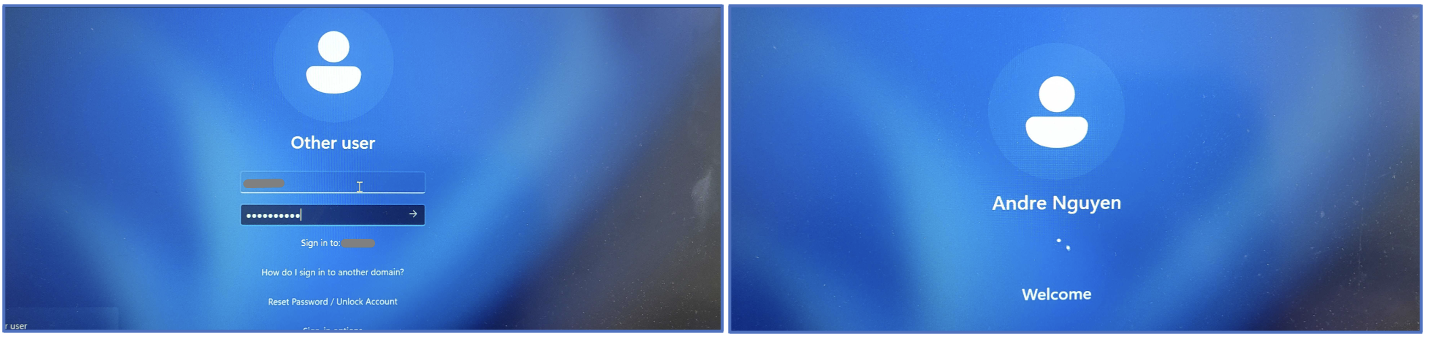
And Whoolah! I am signed into the laptop with my domain account. This test result also confirms the device has “Pre-log-on VPN” functionality using VMWare Tunnel to facilitate user authentication to the domain.
We are ready to perform the complete Drop Ship Workflow!
Step 3 – Complete Drop Ship Workflow Testing and Validation
Now that you have confirmed that domain join and tunnel will work, it’s time to test the entire process. For this, you will need a few things:
- Two blank USB drives.
- Download the Windows install media creation tool here.
- Download the VMware Provisioning Tool here.
- Download your PPKG and Unattend.xml.
- A test machine that you can wipe all data from.
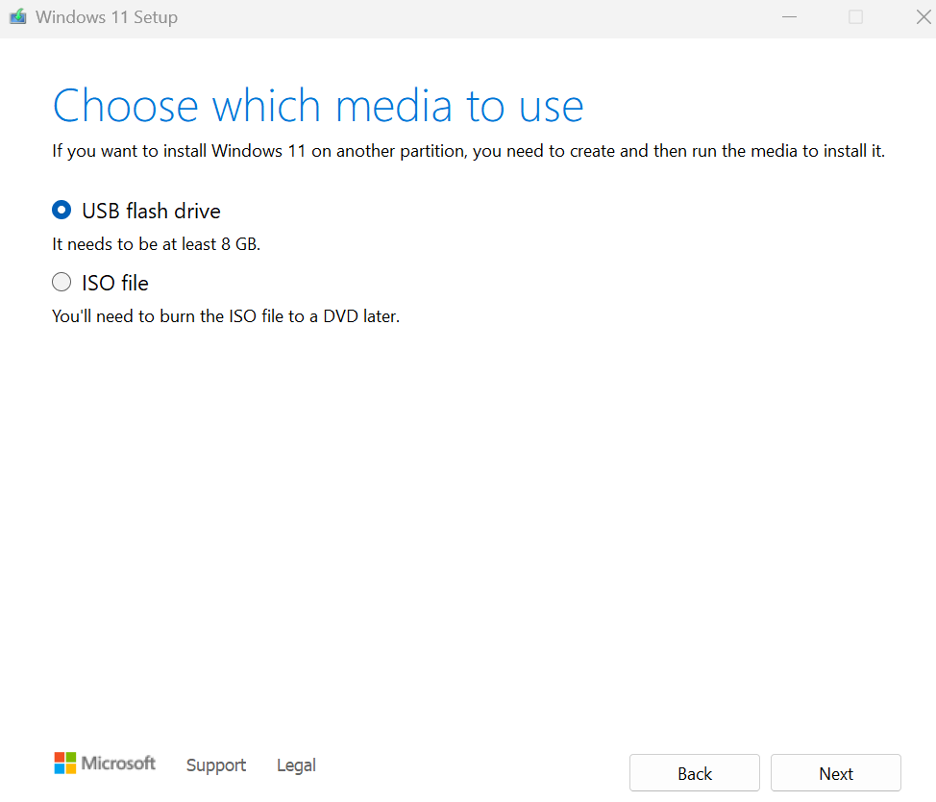
Once the files are downloaded, we need to prepare the USB drives for testing. Run the Windows Install media creation and create an install USB flash drive by performing the following:
Note: The flash drive will be formatted, and all previous data will be lost.
Drive 1 Preparation Steps
- Open the MediaCreationTool_Win11_23H2.exe.
- Accept the license agreement.
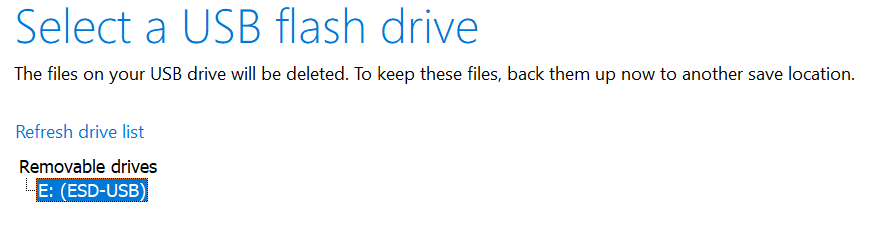
- Choose a USB Flash Drive.
- Select your flash drive.
- Windows will be downloaded and installed onto your flash drive.
Drive 2 Preparation Steps
On the second flash drive copy the VMware Provisioning Tool, the PPKG file, and the Unattend.xml.
Once your flash drives are ready, you must format your test device. I found the easiest method is to plug in your Windows Install USB and then boot your device to bios. Then boot from your Windows Install USB, and delete all drives so that you can start the Windows install. Complete the OOBE as normal except that you should install Windows without a Microsoft Account since we are testing offline provisioning. During the initial installation of Windows, you will be prompted to connect to a network and add/create a Microsoft account. To bypass this, use Shift+F10 to open the CMD prompt in the OOBE and type “OOBEBYPASSNRO”. This will cause the machine to restart but will allow you to complete the OOBE without connecting to a network, and if you don’t connect to a network, you can skip adding a Microsoft Account.
After completing the OOBE, the next step is to copy the VMware Provisioning Tool, the PPKG file, and the Unattend.xml to the device. You can copy them right into the download folder or the desktop, but I will use the downloads folder for the examples. We will then need to prepare the Provisioning Tool and prepare the machine to run it. To do this, follow these steps:
- To install the Provisioning Tool. Open CMD prompt and type:” msiexec /a C:Users{yourcurrentUser}DownloadsVMwareWS1ProvisioningTool.msi /qb TARGETDIR=”C:ProgramDataVMwareVMwareWS1ProvisioningTool”. You will see a blank CMD prompt pop up for a second, that means it worked.
- Make sure BitLocker is OFF.
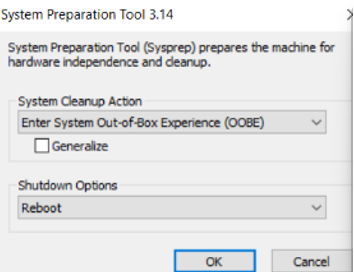
- To boot the device into Audit mode run the following command in CMD: %WINDIR%system32sysprepsysprep.exe /generalize /reboot /audit
- If you encounter any errors, review the log. The Sysprep log usually has good actionable error messages.
- If there are no errors, the device will restart into Audit mode. You can ignore the sysprep window. Do not close it

Drop Ship Provisioning and Testing Steps
- Open Windows Explorer and show hidden files.
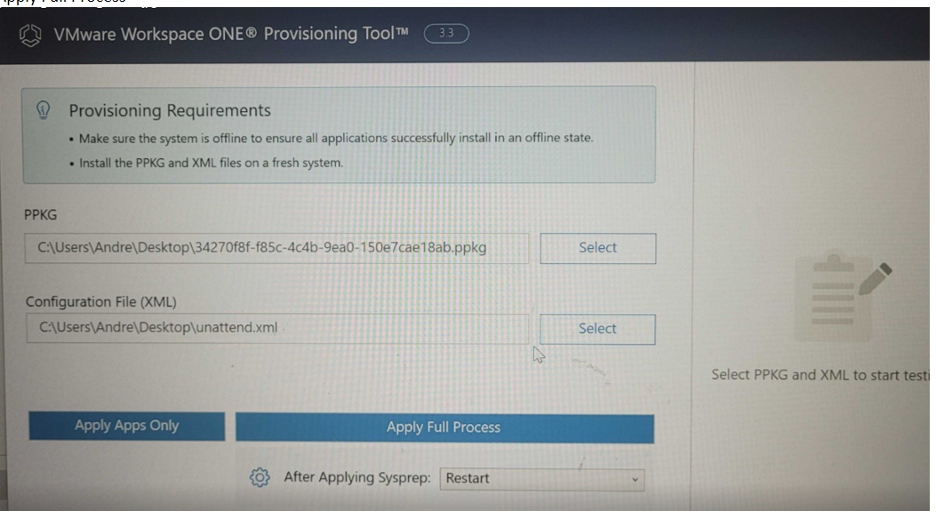
- Find the Provisioning Tool in C:ProgramDataVMwareVMwareWS1ProvisioningTool and run as administrator.
- Select the PPKG and Unattend.xml you saved to the machine earlier.
- Select Shutdown for the option of “after applying Sysprep” and then Apply Full Process.
- You will see the apps in your PPKG install, and then the device will restart into OOBE using your Unattend file.
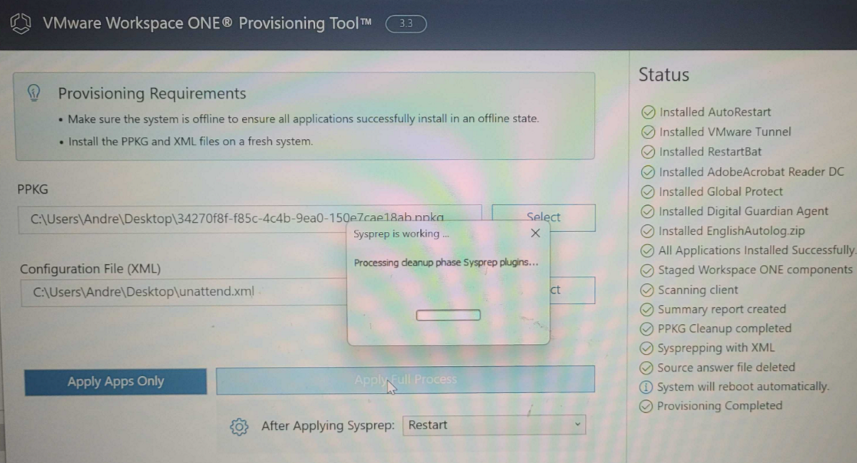
The VMware Provisioning Tool replicates what happens in the Dell factory. The apps install using the installers from your PPKG and the Unattend file is staged and ready to go for when the end-user first powers on the machine. Once you power on the machine, it will complete the OOBE according to your configured Unattend file, automatically log into the local user account, and run the first login script to allow the tunnel to fully install and run. It will then automatically restart and present the user with the domain login screen.
Send the PPKG & unattend.xml to Dell
Before initiating the procurement of WS1 Drop Ship Dell devices for end users, a crucial step involves sending essential documents such as the PPKG, Unattend.xml, and other pertinent information to Dell. In my experience, Dell’s engineering and quality assurance processes spanned a duration of 8 weeks. We want to make sure all the information we send to Dell is accurate to make sure we don’t have to restart the Dell testing process, which will take even longer than the normal 8-week process.
Below, you’ll find the requisite information and a streamlined process flow for submitting the PPKG and unattend.xml to Dell.
Prerequisites
- Complete the export compliance form (if applicable) here. Provide it back to Dell.
- Acquire the Dell Transfer App here. This app will be used to upload the required information to Dell.
Note: If you don’t already have a Dell My Account, you must have your email registered here to use the File Transfer Application successfully.
- Acquire the project code(s) from Dell.
Note: In cases where multiple PPKGs and unattend.xml files are required, each set will be associated with its designated project code. It is imperative to exercise diligence when uploading these files, ensuring that the correct project code is accurately attached to the corresponding PPKGs and unattend.xml files.
- Send Dell the Local Admin Account Credentials, which would be created by the unattend.xml for the Drop Ship devices.
- Gold Image for Drop Ship devices that we wish to use, including Windows OS versions and Bloatware free or not.
- End User Guide or Drop-in-box instruction part of the Drop Ship device’s shipment to the end user.
Send/Upload Drop Ship Information to Dell Using the Dell Transfer App
- PPKG(s)
- xml
Reminder Notes: Ensure to upload the edited version with the Autologin command and not the default version exported from the Workspace ONE UEM console).
- Validation logs
Note: validation logs can be found on the test Drop Ship deviceC:ProgramDataAirwatchUnifiedAgentLogsPPKGFinalSummary.log). - End User Guide or Drop-in-box instruction.