
One of the cardinal sins of anyone implementing a Citrix virtualization platform is not enabling SSL\TLS and securing XML traffic and STA services on the Delivery Controllers (aka brokers). Although passwords are hashed in transit over HTTP, the encoding is very weak and easily decrypted through basic tools. Beyond that, user names, app entitlements, and group memberships can all go cleartext if left to the default HTTP TCP 80 configuration.
I won’t mince words, not securing XML is lazy and irresponsible in this day and age. I come down hard on customers who do not secure their XML traffic and sadly 7/10 times I’d wager it’s logged as a high-risk item on our infrastructure assessments.
If you’re interested in the rationale of this stance, I’d recommend reading this excellent blog Securing the XenApp/XenDesktop XML Service – Important Steps to Prevent Theft of User Passwords that gives a good deep-dive into the architecture and traffic flows of XML along with which scenarios put environments at risk (namely explicit authentication).
In the partial defense of the consultants and admins who have left this unsecured but at least investigated it, Citrix’s documentation hasn’t exactly been great, and the instructions have been tedious.
These days when searching enabling SSL on controllers, you often come up with this KB:
https://support.citrix.com/article/CTX200415
Which then links over to this collection of Microsoft links, effectively passing the buck on instruction to Microsoft, at which point without clear direction and steps in context of Citrix, many may forego the process:
https://docs.citrix.com/en-us/citrix-virtual-apps-desktops/secure/tls.html
There is a much older Citrix KB which details the process steps (albeit very manual and lengthy) and although it lists it as being for XenDesktop 5.x, it works with all current versions of the FMA architecture (IMA used SSL Relay for this):
https://support.citrix.com/article/CTX130213
I’d love Citrix to make this easier to do and build in a feature to facilitate this which may increase adoption of this security measure. In the meantime, here’s some steps to get through the process in a shorter timeframe. This blog assumes:
- You do not have IIS installed on the Delivery Controllers (i.e. not collocated with StoreFront or Director) which would be the recommended practices for enterprise deployments, where one doesn’t collocate different roles on the same server, to minimize attack surface among other virtues.
- Delivery Controller software is installed.
- You already have a certificate installed with private key on your controllers and the FQDN of the server is listed in the certificate.
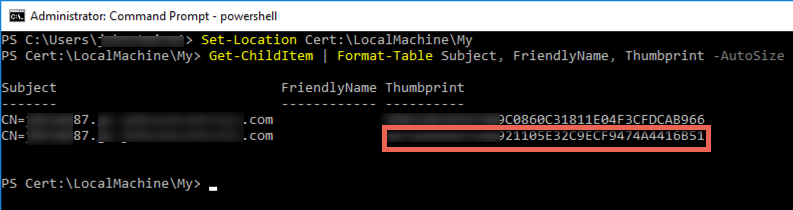
Step 1 – Grab your certificate thumbprint.
Load up MMC snap-in, and add Certificates (computer), locate the personal store certificate to be used, and check its thumbprint in its properties. Note that it has a space every couple characters which is a problem for us. If only one cert is on the server, move to the next step. Otherwise, note the first few characters of the thumbprint to locate the proper cert in the step.
Load up PowerShell as an admin and run these commands:
Set-Location Cert:\LocalMachine\My
Get-ChildItem | Format-Table Subject, FriendlyName, Thumbprint -AutoSize
This will pump out the certs and the thumbprints without the spaces, making for easy copying of the thumbprint. Now you have data point 1 (certhash).
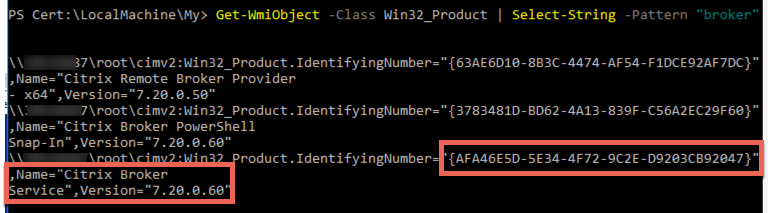
Step 2 – Locate the App ID of the Citrix Broker Service
The old Citrix document would have you wade through the registry finding this, and then have you add in dashes at random. Easier method while still in PowerShell is to run this:
Get-WmiObject -Class Win32_Product | Select-String -Pattern "broker"
This will pump out a few values. We care about the “Citrix Broker Service” line, and as you’ll see already has the dashes injected for us, as Windows wants for the next step. Now you have data point 2 (appid).
Step 3 – Bind the certificate to the Citrix Broker Service via it’s App ID
Now we use Windows’ netsh command to bind the cert to the Citrix service. Note this can’t be done via PoSH as you’ll see below, so just type cmd to get back down to a standard prompt and use the following syntax:
netsh http add sslcert ipport=0.0.0.0:443 certhash=<hash number> appid={Citrix Broker Service GUID}
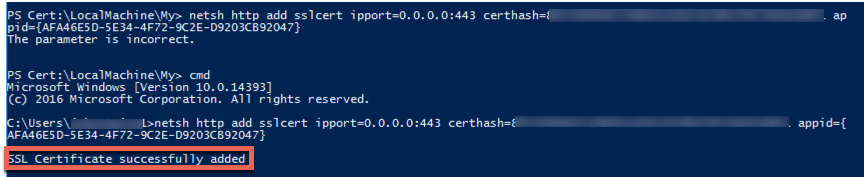
Done! Should have this down to less than 5 minutes per server with these steps.
Next Steps:
- Be sure to track your certificate expiry to avoid the failure of XML and STA capabilities.
- Replace STAs on your Citrix Gateway vServers with https equivalents. Ensure firewall rules are open first.
- Update your StoreFront’s NetScaler Gateway objects to use the updated STAs, to match what was updated on the Citrix Gateways
- Reconfigure your StoreFront Controller configurations to use HTTPS if a VIP is used to load balance XML (strong recommendation) ensure it’s been re-created to use HTTPS vs HTTP.
Update November 5th 2019: A commenter has astutely indicated that this process uses the Product ID vs. the App ID. However, it would appear the Product ID still allows the certificate to work with the Citrix Broker Service as evidenced by XML services being successfully secured. We are not aware of any issues with this process as described and it continues to work on LTSR and CR versions from both our testing and that of the Citrix community.


Excellent article, yes, we should use or as you say: Citrix should change the installation or GUI so its easier to select HTTPS for connections.
Couldn’t agree more. Product missing basic functionality.
Excellent article. I would change this:
Select-String -Pattern “broker”
To
Select-String -Pattern “citrix broker service”
to get just one item returned.
I am working on a script to automate this process. You will get credit for giving me the idea.
Thanks Carl!
One thing we’d noted is the returned service name may not be entirely exact depending on version. I’d need to cross check LTSR and CR versions again to be sure. Pending that I’d agree with you on using the more complete name.
The script sounds like an great idea, provided the user is prompted to select from multiple certs (listing common name). Would be happy to test it out.
Question about the Cert and the Trusted Root cert.
Most internet documentation says the end client needs the trusted root cert installed for this to work. But a home user with a personal device will never have the Corporate Trusted Root Cert (TRC). Will this work by just installing the TRC on the NetScaler? If not, does that mean I need a public cert (Go Daddy, etc) for my XML Servers?
Hi Mark, end-users never interface directly with XML services. Only Gateway\ADC and StoreFront will. Those services should trust the certificate bound to the XML services by ensuring the intermediate and root CA certs are present on them. Moreso important for StoreFront; ADC won’t validate certs by default usually.
I have seen where the “citrix broker service” exists but over time with updates the right key and different GUID might be required. 7.15 CU4 for example shows a different APP ID GUID and lists “Broker_Service_x64”
The method to get the App ID is INCORRECT.
Open Registry Editor and select Find.
Search for “Citrix Broker Service”.
The key (folder)’s name is the App ID.
DO NOT USE Get-WmiObject -Class Win32_Product | Select-String -Pattern “Citrix broker service” THAT IS THE PRODUCT ID, NOT THE APP ID.
Source: https://support.citrix.com/article/CTX130213
James, you are correct that the IDs are different, but it still achieves the same goal. If you read the blog in its entirety, the point is to streamline the process of getting a certificate bound as the article you reference is both hard to come by, misleading as it does not reflect current versions of the product (and Citrix’ guidance for current versions effectively defers to Microsoft which is of little use), and is very onerous to complete. This blog continues to be one of the most popular on the subject of securing XML and has a proven track… Read more »
The reason I mention this, Michael, is because the method I wrote is the same that you yourself linked to a (older) Citrix blog post. Carl Stallhood had this method on his site as well (which he got from Citrix back in the day): https://web.archive.org/web/20181206191200/https://www.carlstalhood.com/delivery-controller-7-15-ltsr-and-licensing/#ssl I can see he now uses your method 🙂 Could you explain the difference between yours and Citrix’s older method? Is there any difference? We would like to write it down in our documentation if for some reason yours is better. In order comments I have read that with updates, the string you get using… Read more »
Happy to serve, appreciate the feedback. The main difference truly is automation. Other than the ID, things are relatively the same, this process just automates it partially (I have seen some scripts in the user community that allegedly fully automate the process) and reduces the human error element a bit.
Thank you very much for adding the comment at the end. Ive tried changing from the App ID to the Product ID (your method) and it SEEMS to be working correctly (quick test).
Hello Michael, this is a great and simple article, saved me a lot of trouble. Thank you. One note is that we can run netsh without switching to the Command Prompt. When copy-pasting the GUID, simply add quotes around the braces and the command will work. Cheers.
Excellent article from a top notch architect! Thanks Michael!
You are much too kind my old friend 🙂
Hi,
Tanks for the article.
Does this process equivalents to secure the STA to use https?
Hi Igal, yes! Absolutely. They’re different functions (STA and XML) but securing the broker service secures them both.
Even if the certificate expires, XML with SSL still work for STA, Storefront, no impact. It just needs to be done once time and that’s it. I’ve got this running in production and my certs are expires (7.15).
That’s pretty irresponsible. Please update your certs.
When I try to do it I obtain:
A specified logon session does not exist. It may already have been terminated.
For those that want to do the whole thing in PowerShell
Add-NetIPHttpsCertBinding -IpPort “0.0.0.0:443” -CertificateHash “YourCertificateThumbprint” -CertificateStoreName “My” -ApplicationId “{CitrixBrokerApplicationId}” -NullEncryption $false