
In many Citrix DaaS environments, session traffic and access control are handled in ways that do not always align with how users access the environment. Internal users routed through the Gateway service unnecessarily introduce latency, while external users may lack the access controls needed to enforce stricter security policies. These challenges consistently arise in real-world environments and can affect both performance and security.
This blog focuses on two Citrix DaaS capabilities that directly address these issues: HDX Direct and Adaptive Access. HDX Direct improves session performance by allowing internal users to establish direct connections to the VDA when network conditions allow, reducing dependency on the Gateway service. Adaptive Access introduces context-aware controls that enable organizations to apply different policies based on how and where users are connecting. Together, these features provide a more balanced approach to performance and security. The sections below walk through how each feature works and outline the key configuration steps for implementing them in a Citrix DaaS environment.
Overview
HDX Direct
Citrix HDX Direct is a performance-enhancing connectivity feature in Citrix DaaS (and Citrix Virtual Apps and Desktops) that enables Citrix Workspace app clients to establish a secure, direct HDX connection to the Virtual Delivery Agent (VDA)/session host when direct network communication is possible. This bypasses the Citrix Gateway Service (or on-premises Gateway) for the main user session traffic after initial authentication and brokering.
It reduces latency, minimizes network hops, lowers bandwidth usage through the cloud gateway infrastructure, and improves overall session responsiveness—especially beneficial for on-premises hosted workloads in hybrid DaaS setups, high-bandwidth applications, or users on direct network routes.
Adaptive Access
Citrix DaaS Adaptive Access is a security capability that provides contextual, conditional, and granular control over user access to virtual apps and desktops. Rather than granting access to VDAs based on static permissions, it enables access decisions to be influenced by real-time context, helping organizations apply more appropriate controls based on how and where a user is connecting from. This aligns well with modern zero-trust access principles.
Pre-Requisites & Assumptions
Prior to enabling HDX Direct and Adaptive Access, confirm the following:
- Citrix DaaS environment using Workspace with Gateway Service
- Virtual Delivery Agent (VDA) – Windows VDA: version 2503 or later
- Workspace App:
- Citrix Workspace app (Client) – Windows: version 2503 or later
- Linux: version 2411 or later
- Mac: version 2411 or later
- Network Requirement: Citrix Workspace with Citrix Gateway Service
- Direct client-to-VDA communication must be possible for internal users
See Citrix online documentation for any additional information on the latest components, network and port ranges with updates here: https://docs.citrix.com/en-us/citrix-virtual-apps-desktops/hdx-transport/hdx-direct.html
Configuration Summary
Before configuring these features, ensure that your Citrix DaaS environment, Workspace app versions, and VDA versions support HDX Direct, and that direct client-to-VDA network communication is possible for internal users. For our configuration walk through, please note that the IP addresses displayed in the screenshots are fictional and are used to illustrate the different access scenarios, i.e., external vs. internal users.
HDX Direct Configuration
HDX Direct is disabled by default. To enable it, configure the appropriate Citrix policy in Studio or the Citrix DaaS management console, depending on your deployment model. For the scenario covered in this article, enable HDX Direct for internal users and apply the policy to the Delivery Groups and VDAs in scope:
- HDX Direct policy setting: Enabled
- HDX Direct mode: Internal (clients on the internal network)
- Apply the policy to relevant Delivery Groups and in scope VDAs.
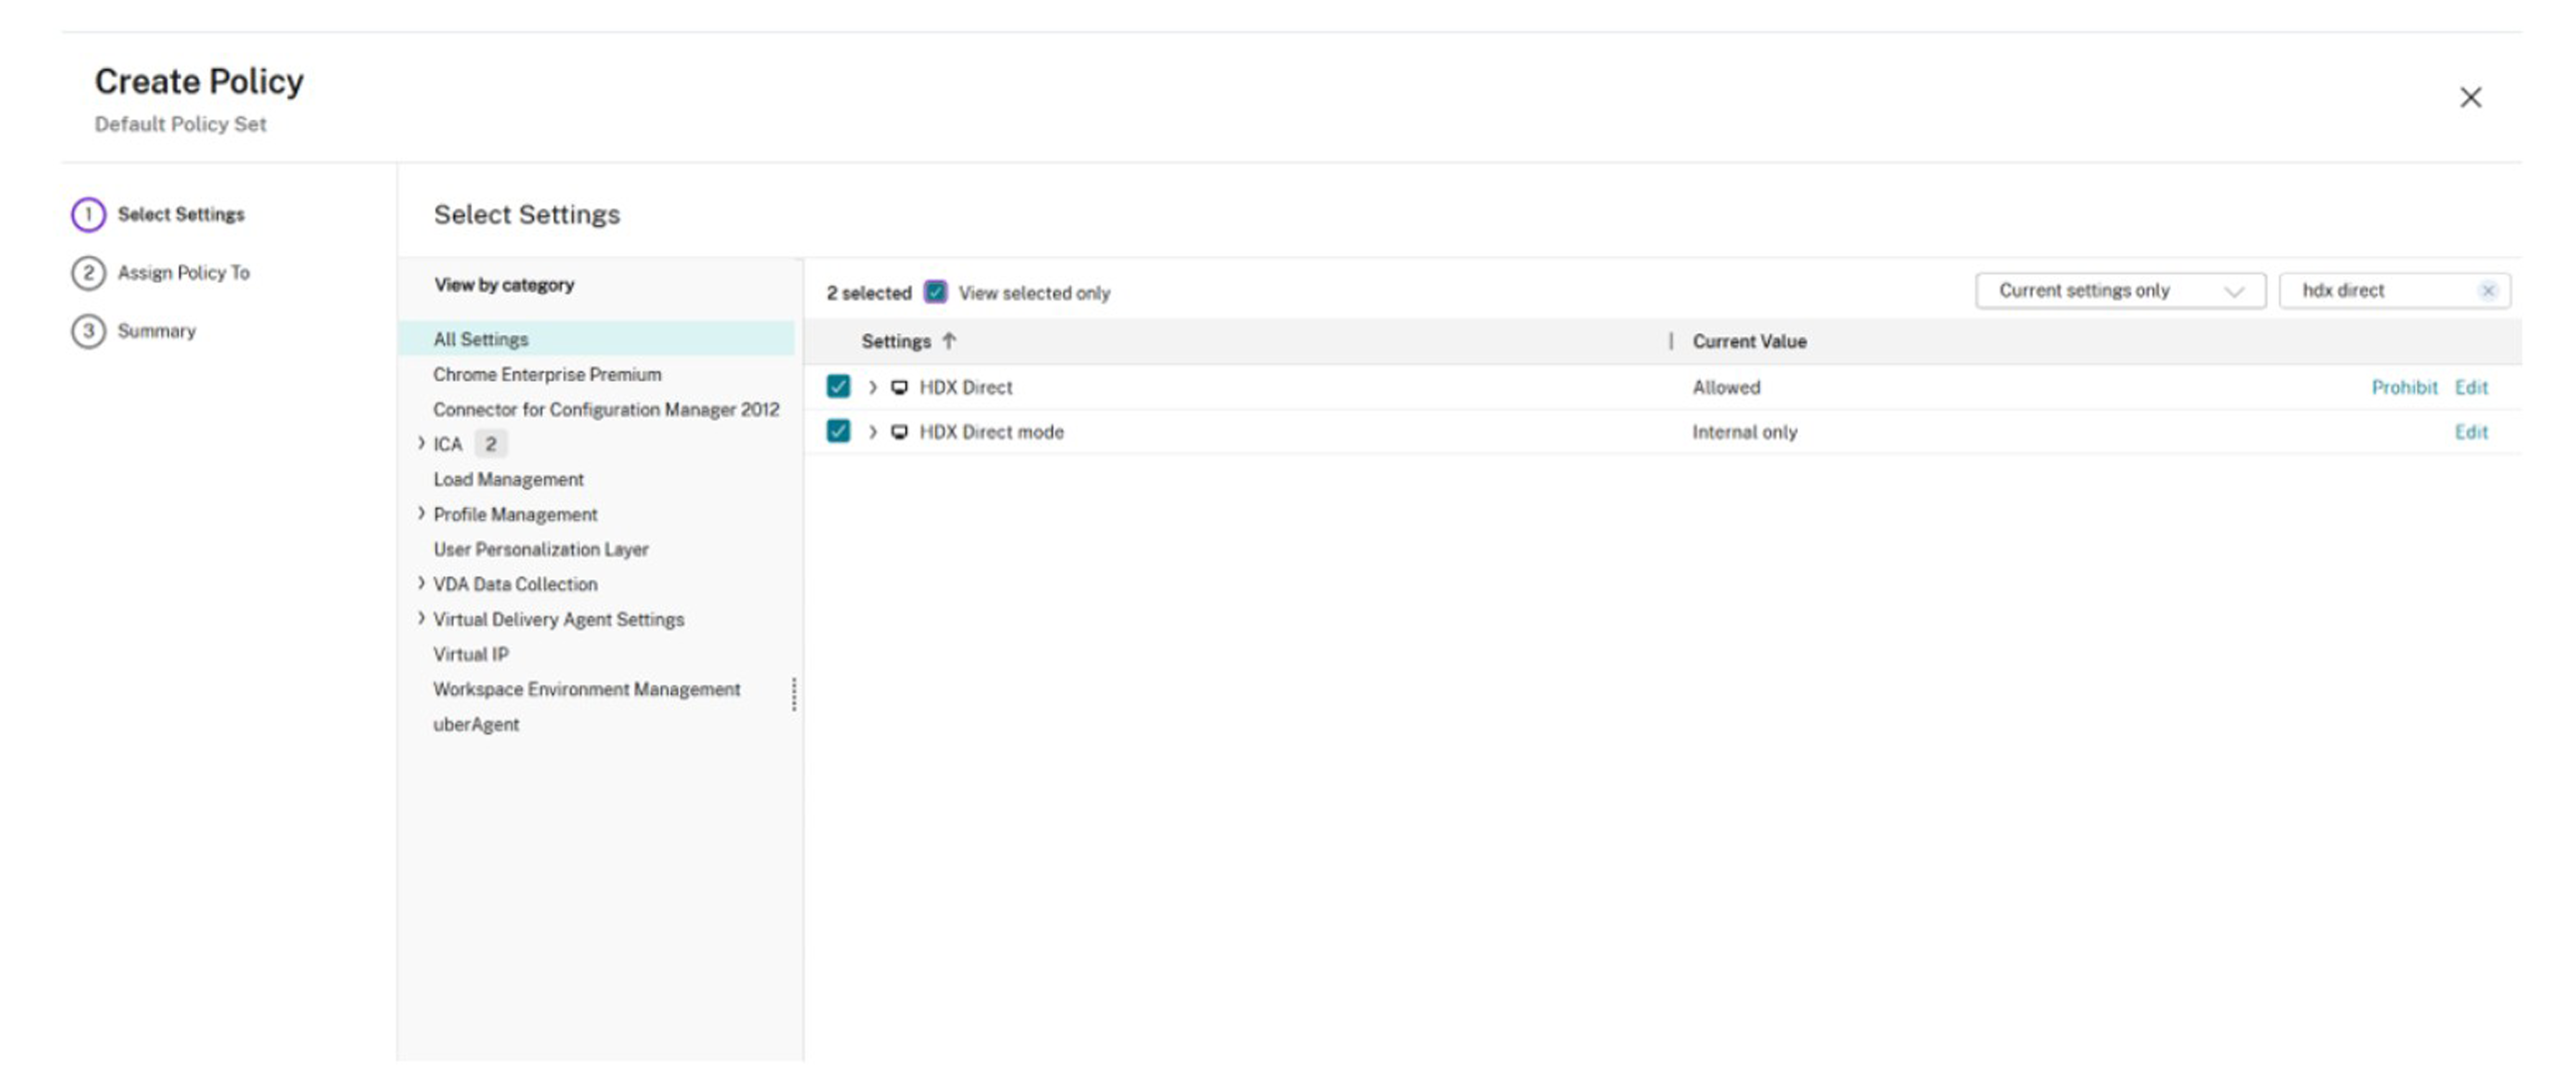
Figure 1 – Citrix Studio Policy
To validate that HDX Direct is functioning as expected, review the session topology in Citrix Monitor and confirm that internal sessions are establishing a direct path to the VDA rather than traversing the Gateway service. If desired, additional command-line validation can also be performed on the VDA during an active session.
- On the VDA (in-session): Run CtxSession.exe -v in Command Prompt/PowerShell → look for HDX Direct Status: Connected.
- In Citrix Director/Monitor: Check session details for direct connection indicators or performance metrics showing reduced hops/latency (see screenshots below).
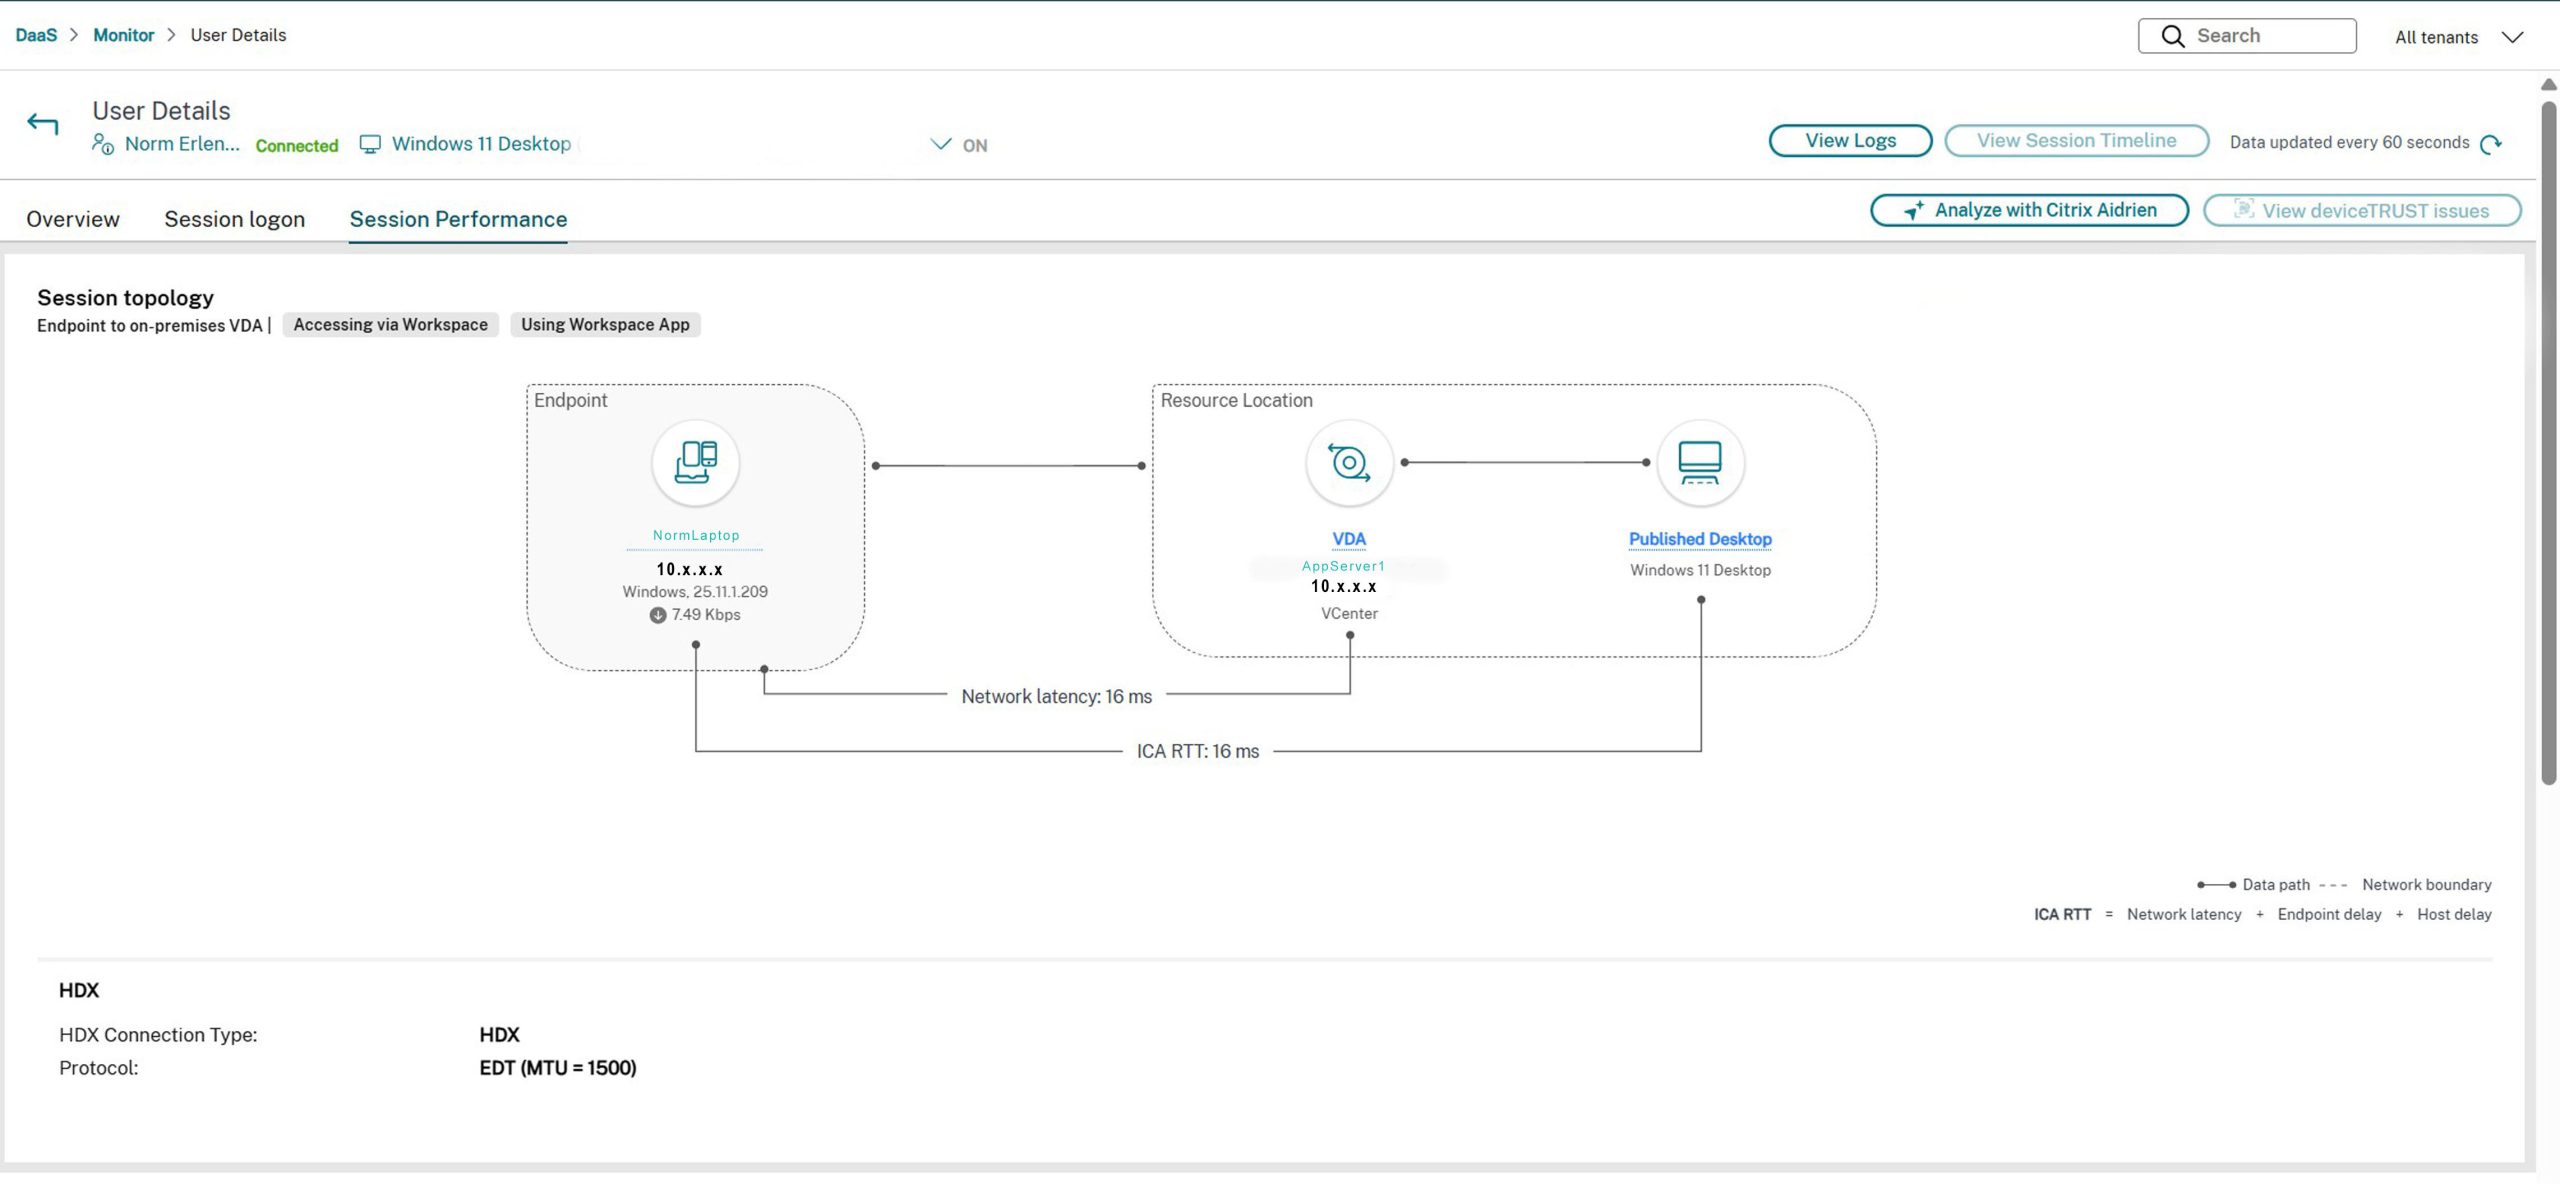
Figure 2 – Internal User connection details in Monitor (Session Topology)
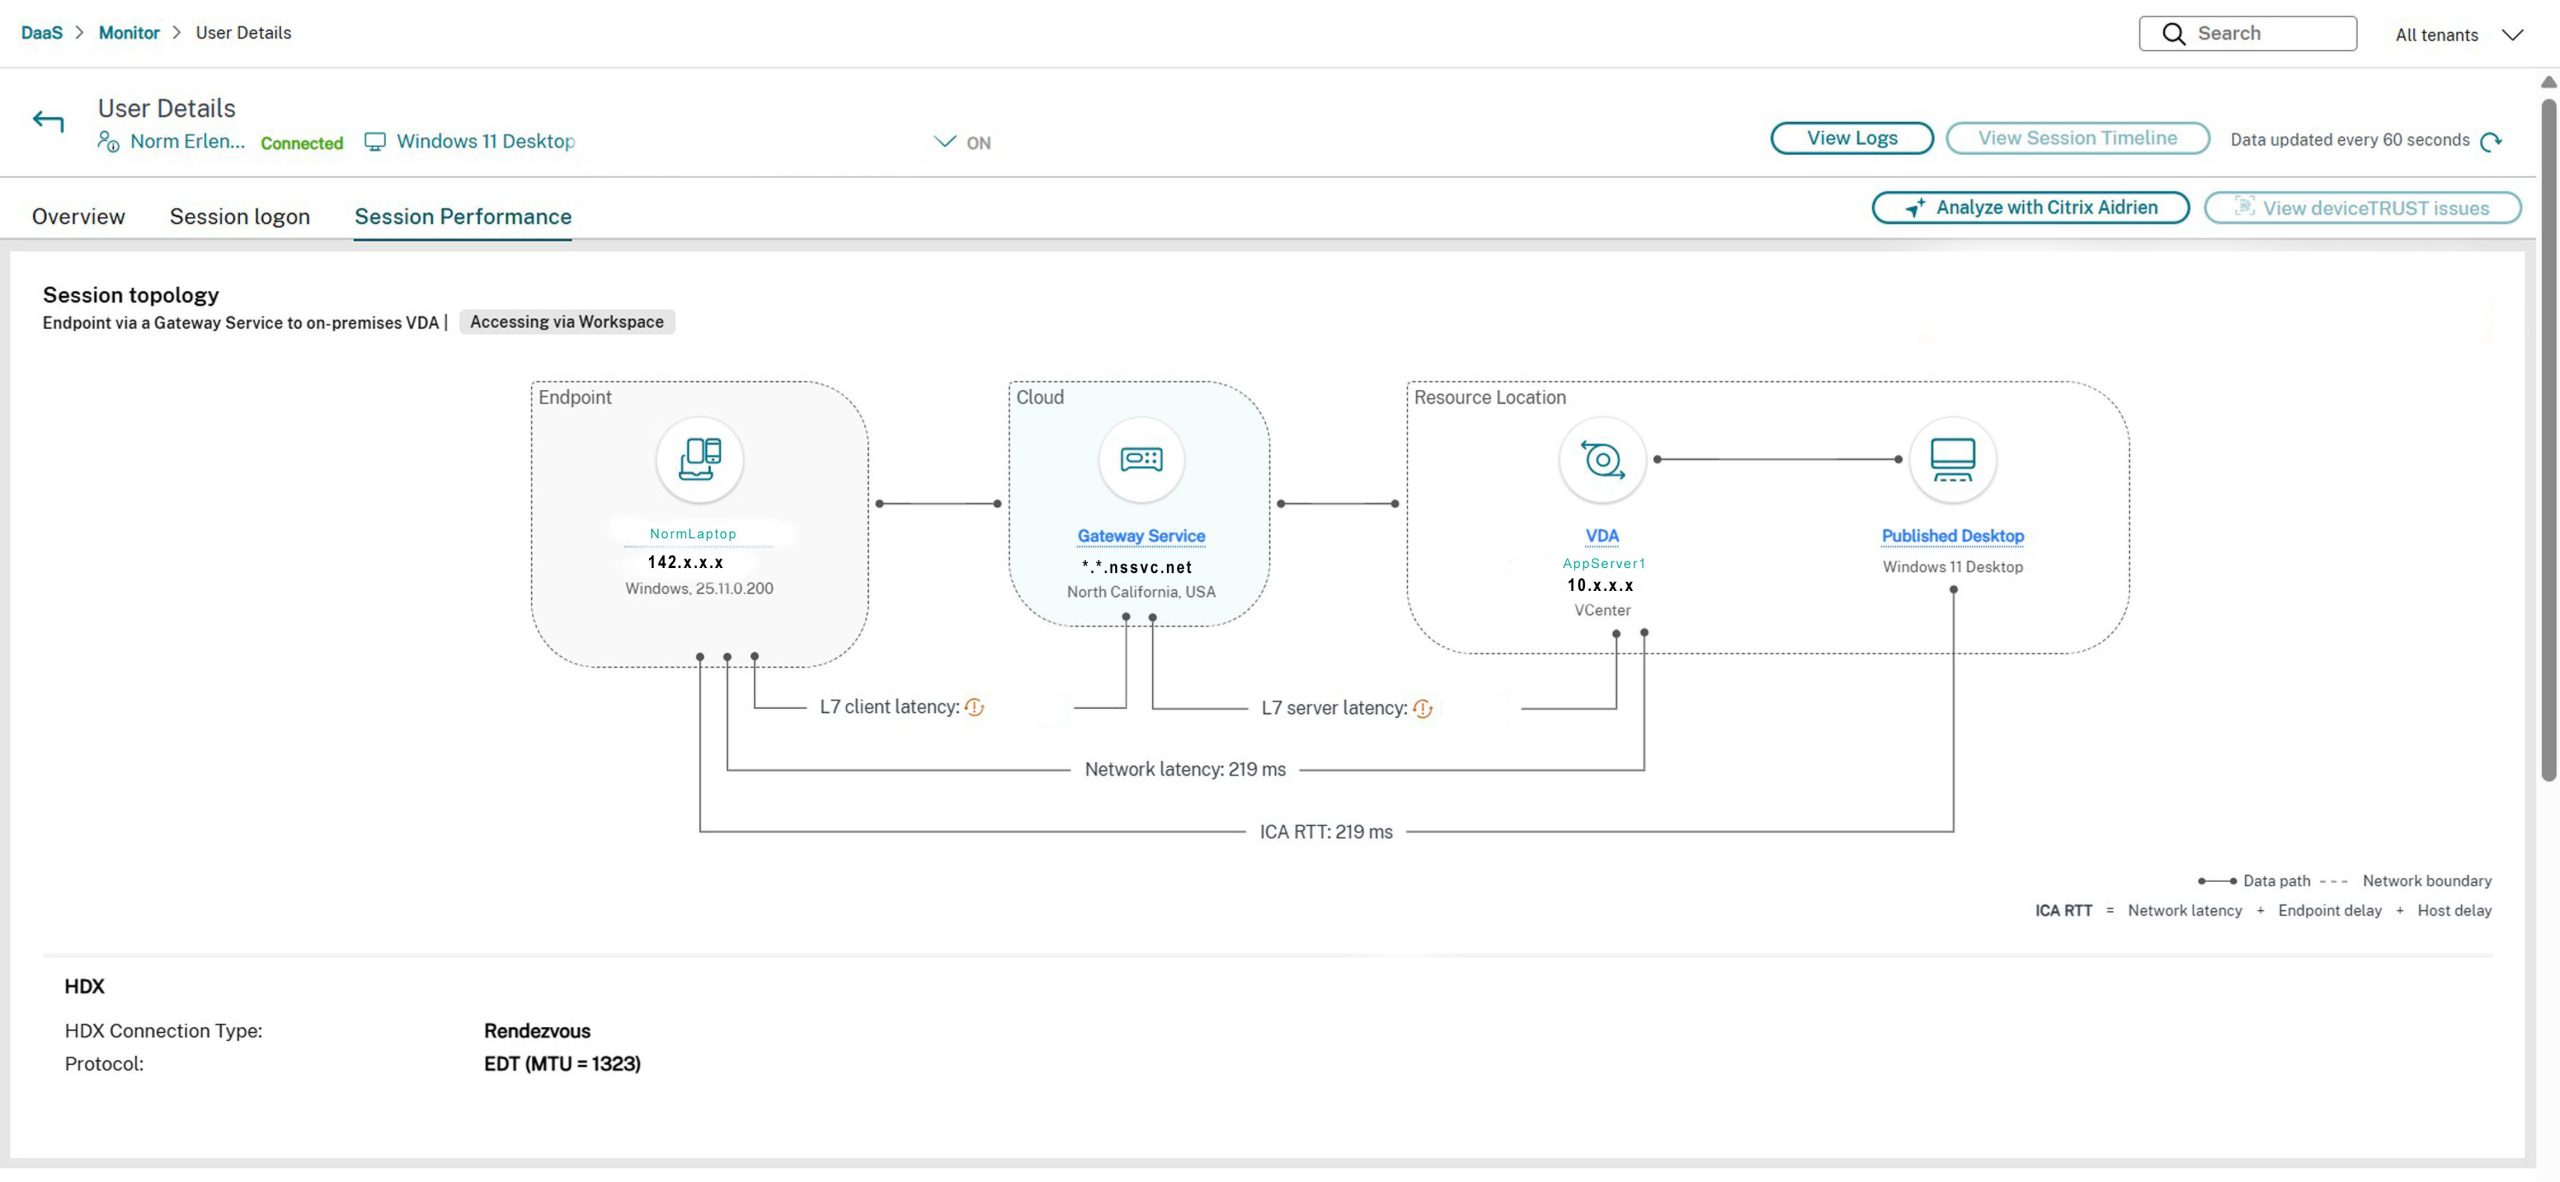
Figure 3 – External User connection details in Monitor (Session Topology)
Adaptive Access Configuration
Adaptive Access is disabled by default. Enable it in the Citrix DaaS management console, then define the network locations that should be treated as trusted. These locations should be configured using the public egress IP addresses or ranges associated with your corporate sites, expressed in CIDR notation. Private RFC1918 address ranges should not be used. Once configured, Citrix can classify sessions by network location and apply Smart Access tags accordingly.
Enable it with the Citrix DaaS console under Workspace Configuration > Adaptive Access. Toggle to On.
Define network locations: From the DaaS console Platform Menu – Choose Network Locations:
- Add Network Location – You can choose a friendly name e.g. Internal or Region/City and add the public IP address/ranges of your internal network locations. Configure the public IP address ranges that identify a specific office or network as “internal.” You define them using CIDR notation (standard for subnets/ranges). This supports both full ranges/subnets (e.g., 203.0.113.0/24 for a /24 office subnet, or 198.51.100.0/16 for a larger block) and single IPs (e.g., 203.0.113.50/32 if it’s just one static public IP or a small site with one egress IP). Note: do not use internal RFC1918 private ranges like 10.x or 192.168.x.
- Tags can also be defined for each location to reference in Studio Policies.
- This allows bypassing Gateway for internal connections or applying different policies.
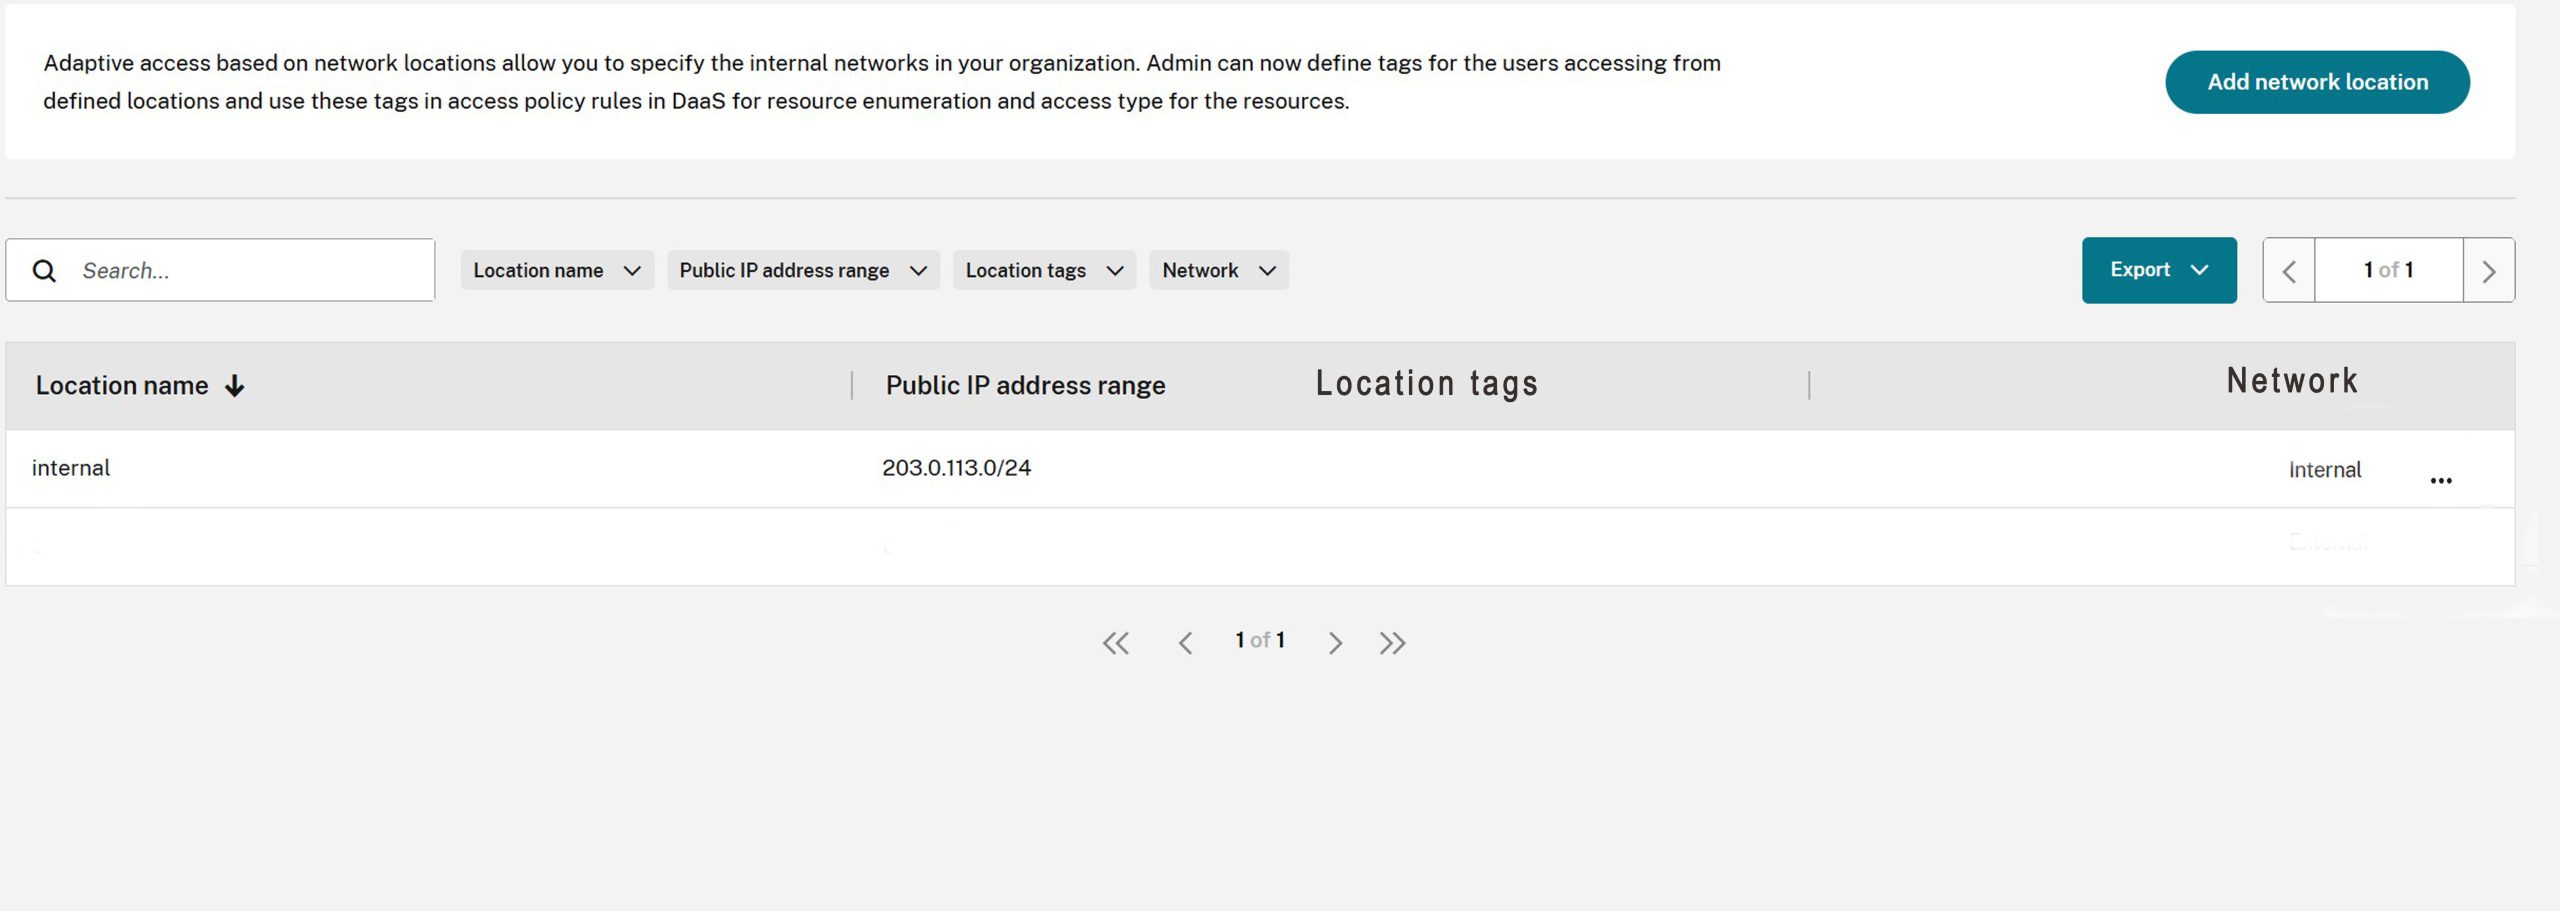
Figure 4 – Network Locations
After network locations are defined, verify that Smart Access tags are being assigned correctly. This can be viewed in Citrix monitor or by command line. In most cases, Citrix will present default tags such as LOCATION_internal, LOCATION_external, or LOCATION_undefined, depending on how the user’s source IP is classified. These tags can then be referenced in access policies.
The network locations service provides the following default tags:
- LOCATION_internal – tag sent by default when the network connectivity type is set to internal while defining a network location
- LOCATION_external – tag sent by default when the network connectivity type is set to external while defining a network location
- LOCATION_undefined – tag sent for an IP address that is not defined in the policy but is coming through the network locations service
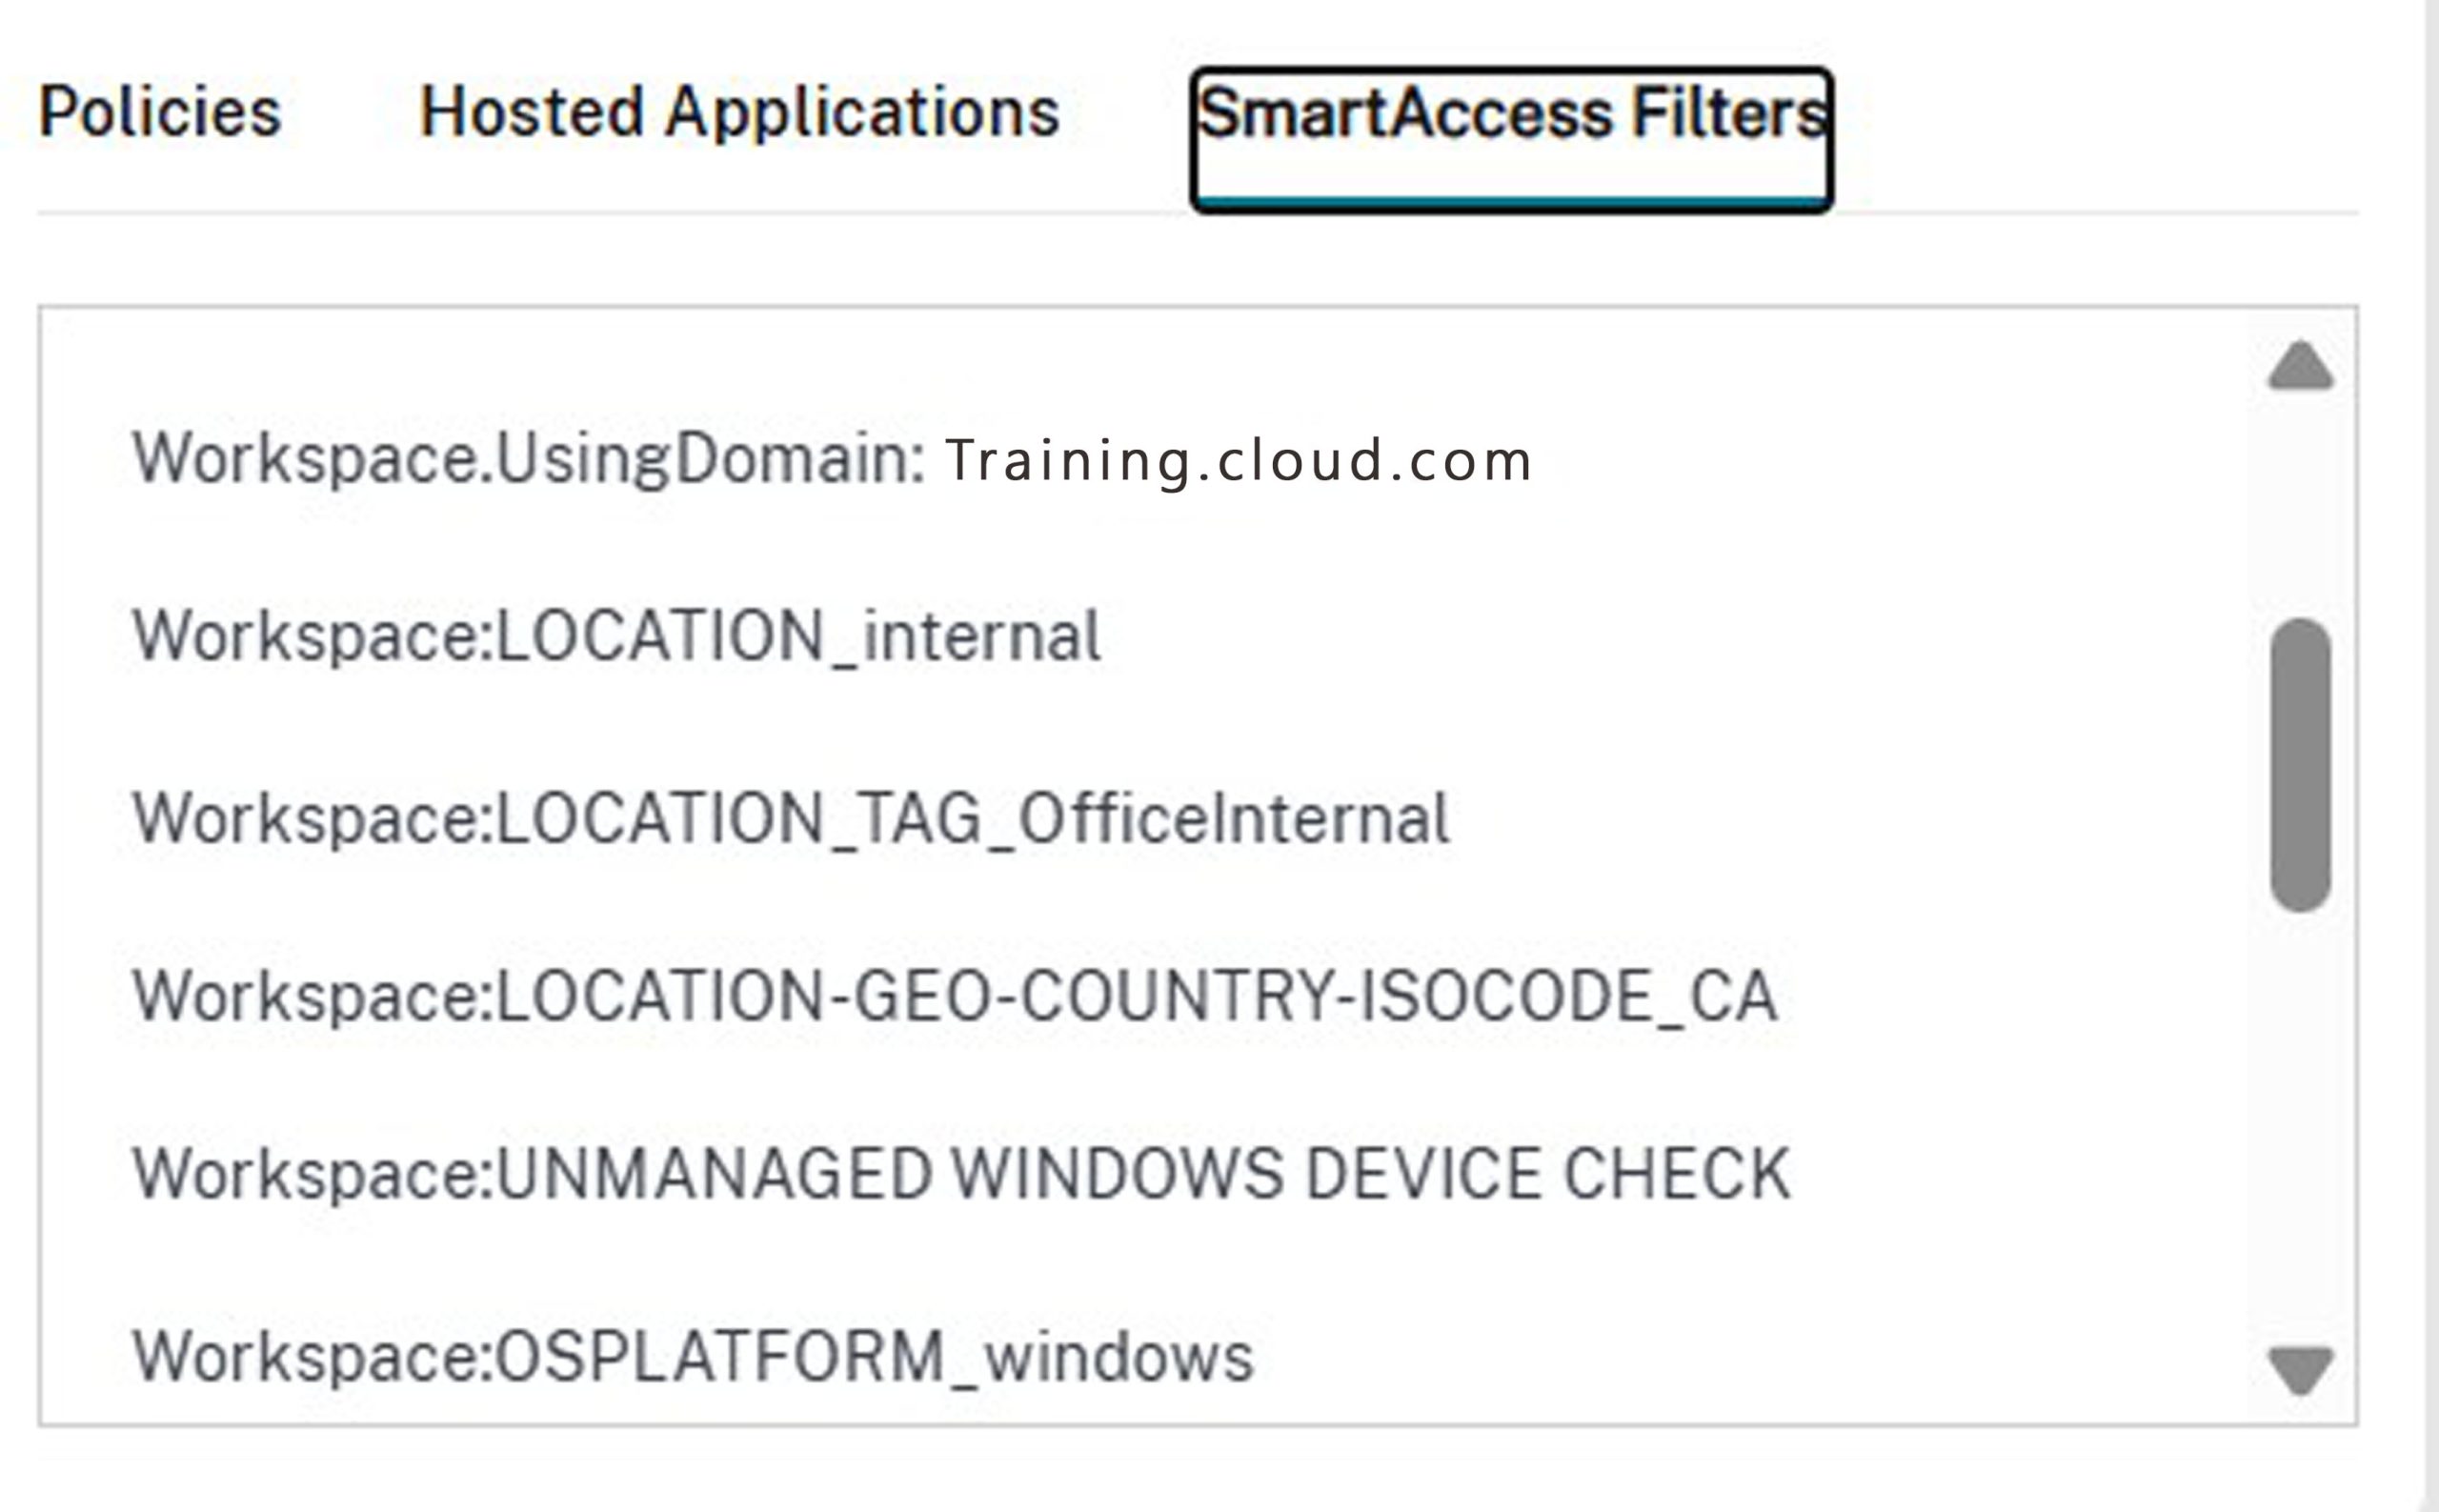
Figure 5 – Smart Access – Internal User details in Monitor
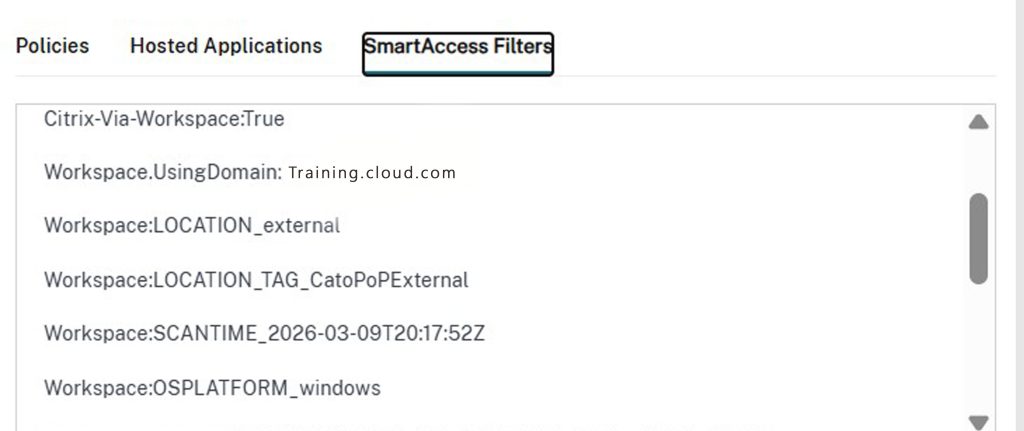
Figure 6 – Smart Access – External User details in Monitor
Or verify through command line – Remote PowerShell SDK – Run the PowerShell cmdlet
Get-BrokerSession -UserName “domain\username”
Look for the following output line e.g. (external user connected via gateway service)
IncludedSmartAccessTags : {Workspace:LOCATION_external}
Creating and applying policies in Citrix Studio / DaaS:
- Go to a Delivery Group (or Machine Catalog).
- Under the Access Policy tab (enabled once Adaptive Access is on), create rules.
- Define policy conditions based on user context, such as user group membership, connection path, and Smart Access tags derived from network location.
- Set actions: allow/deny enumeration, restrict features (e.g., disable client drive mapping outside the corporate network).
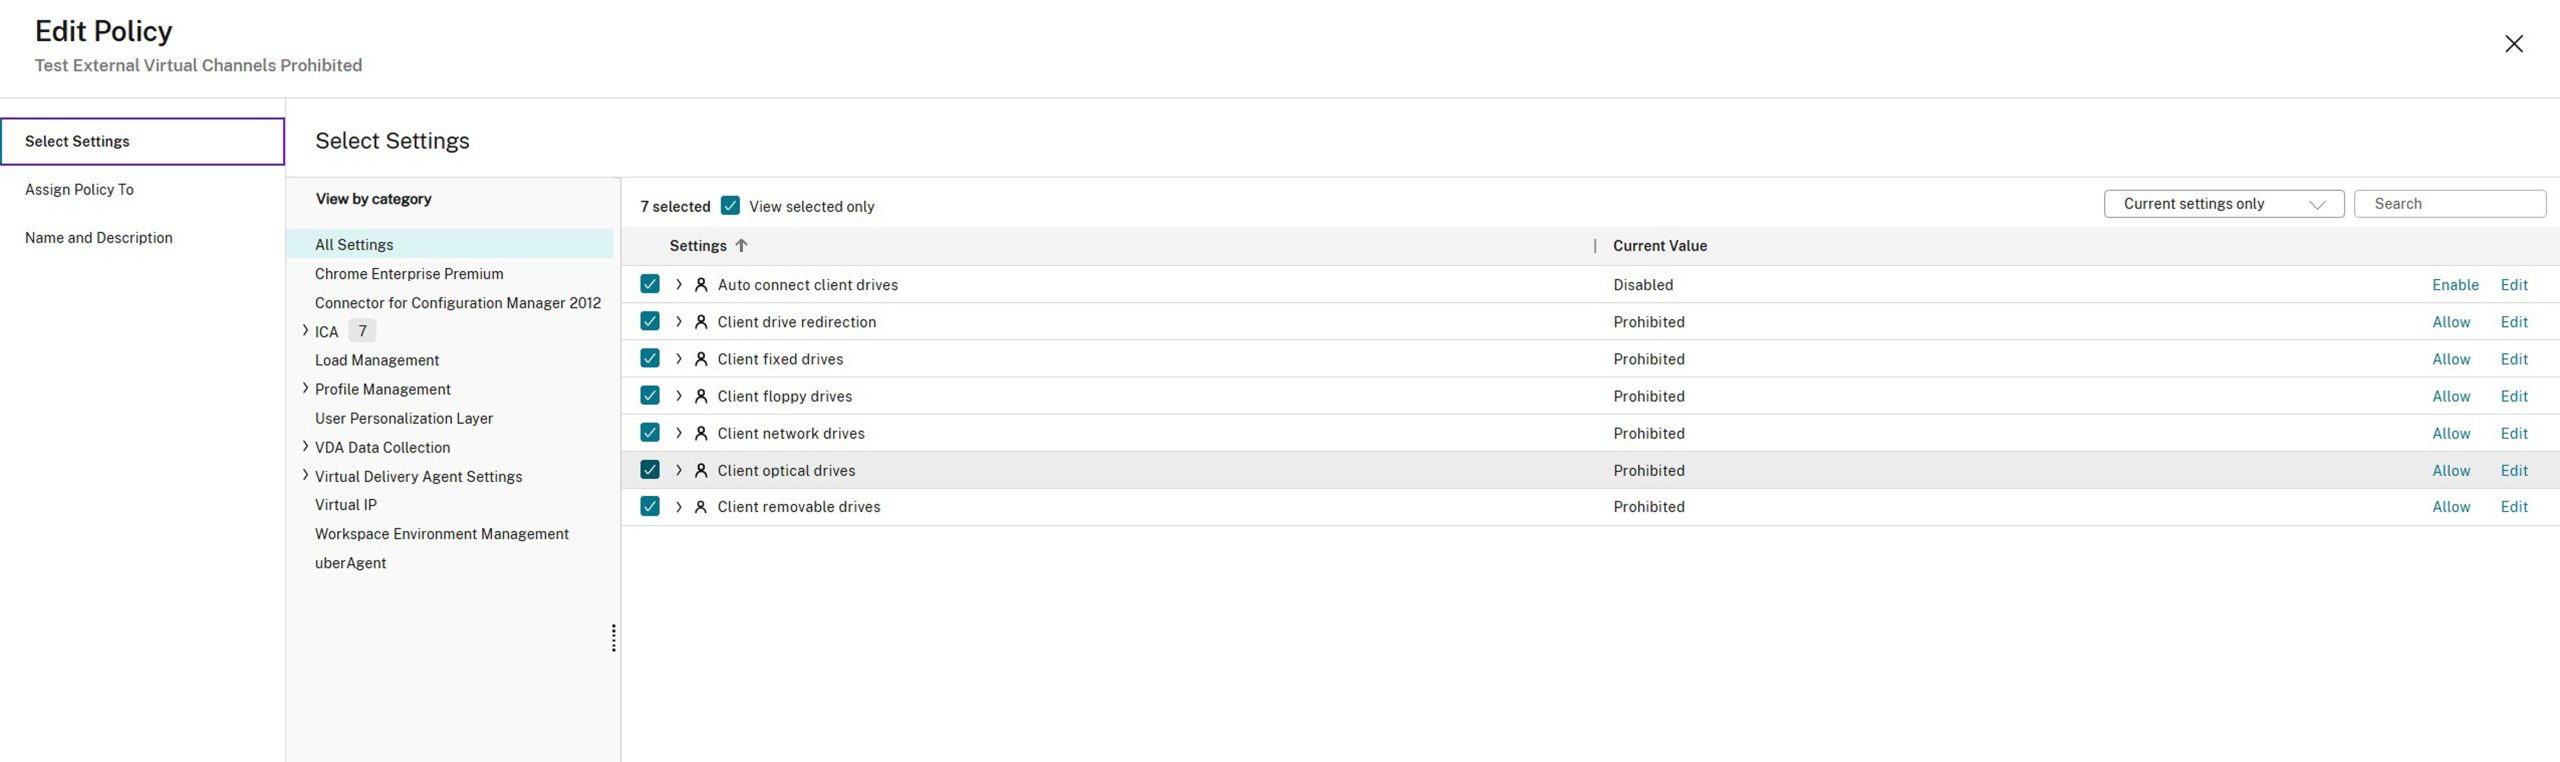
Figure 7 – Studio Policy for External Users accessing their resources via Gateway Service
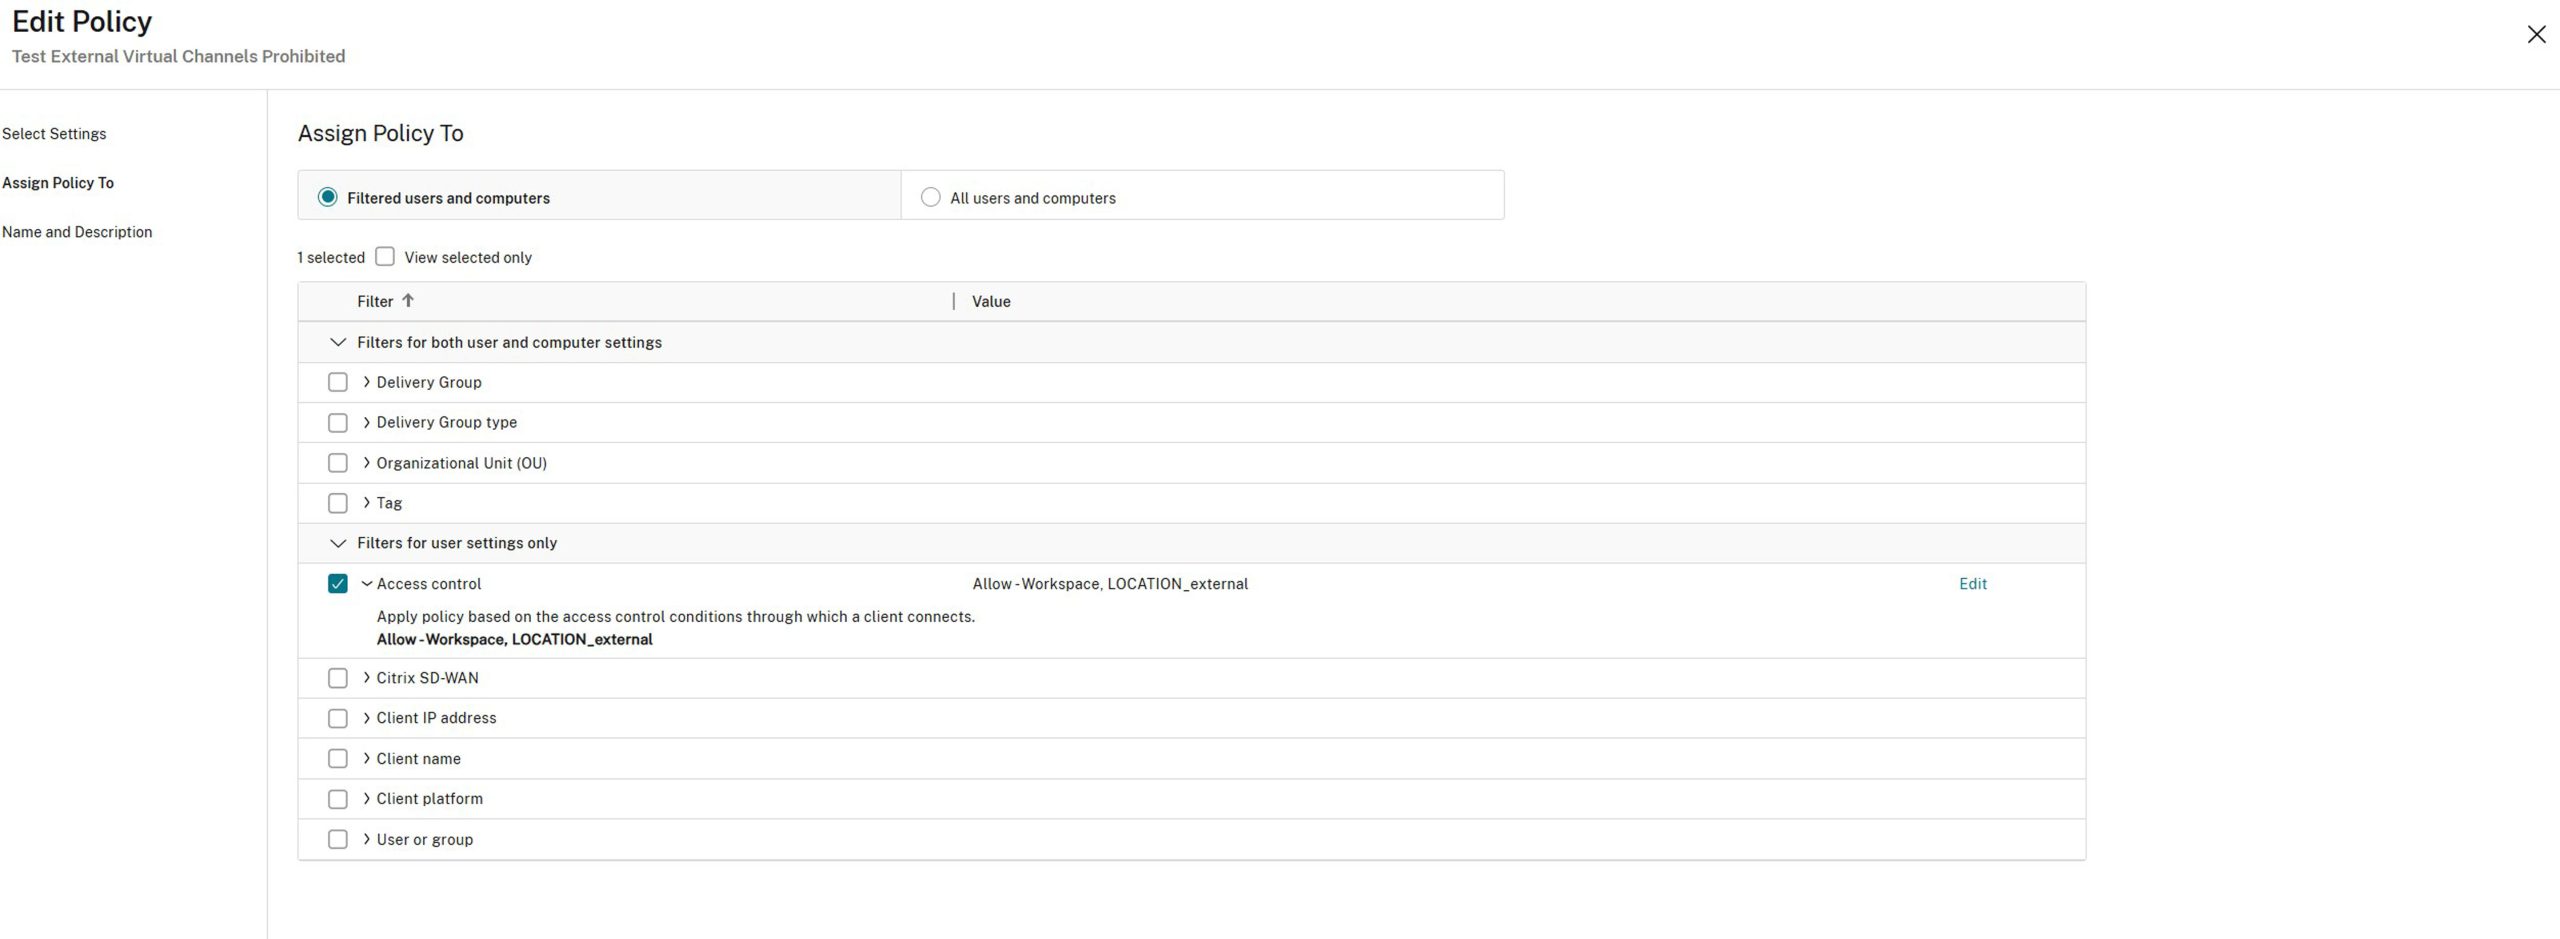
Figure 8 – Assigning the policy to Access Control (External Users accessing via Gateway Service)
Mode: Allow = this means the policy settings (i.e., prohibiting client drive redirection) apply only when the conditions match
With Citrix Gateway = Targets sessions coming through the gateway service
Farm Name = Workspace (standard value for Citrix DaaS)
Access Condition = (Smart Access Tag) Case sensitive (must match your tag in Network Locations)
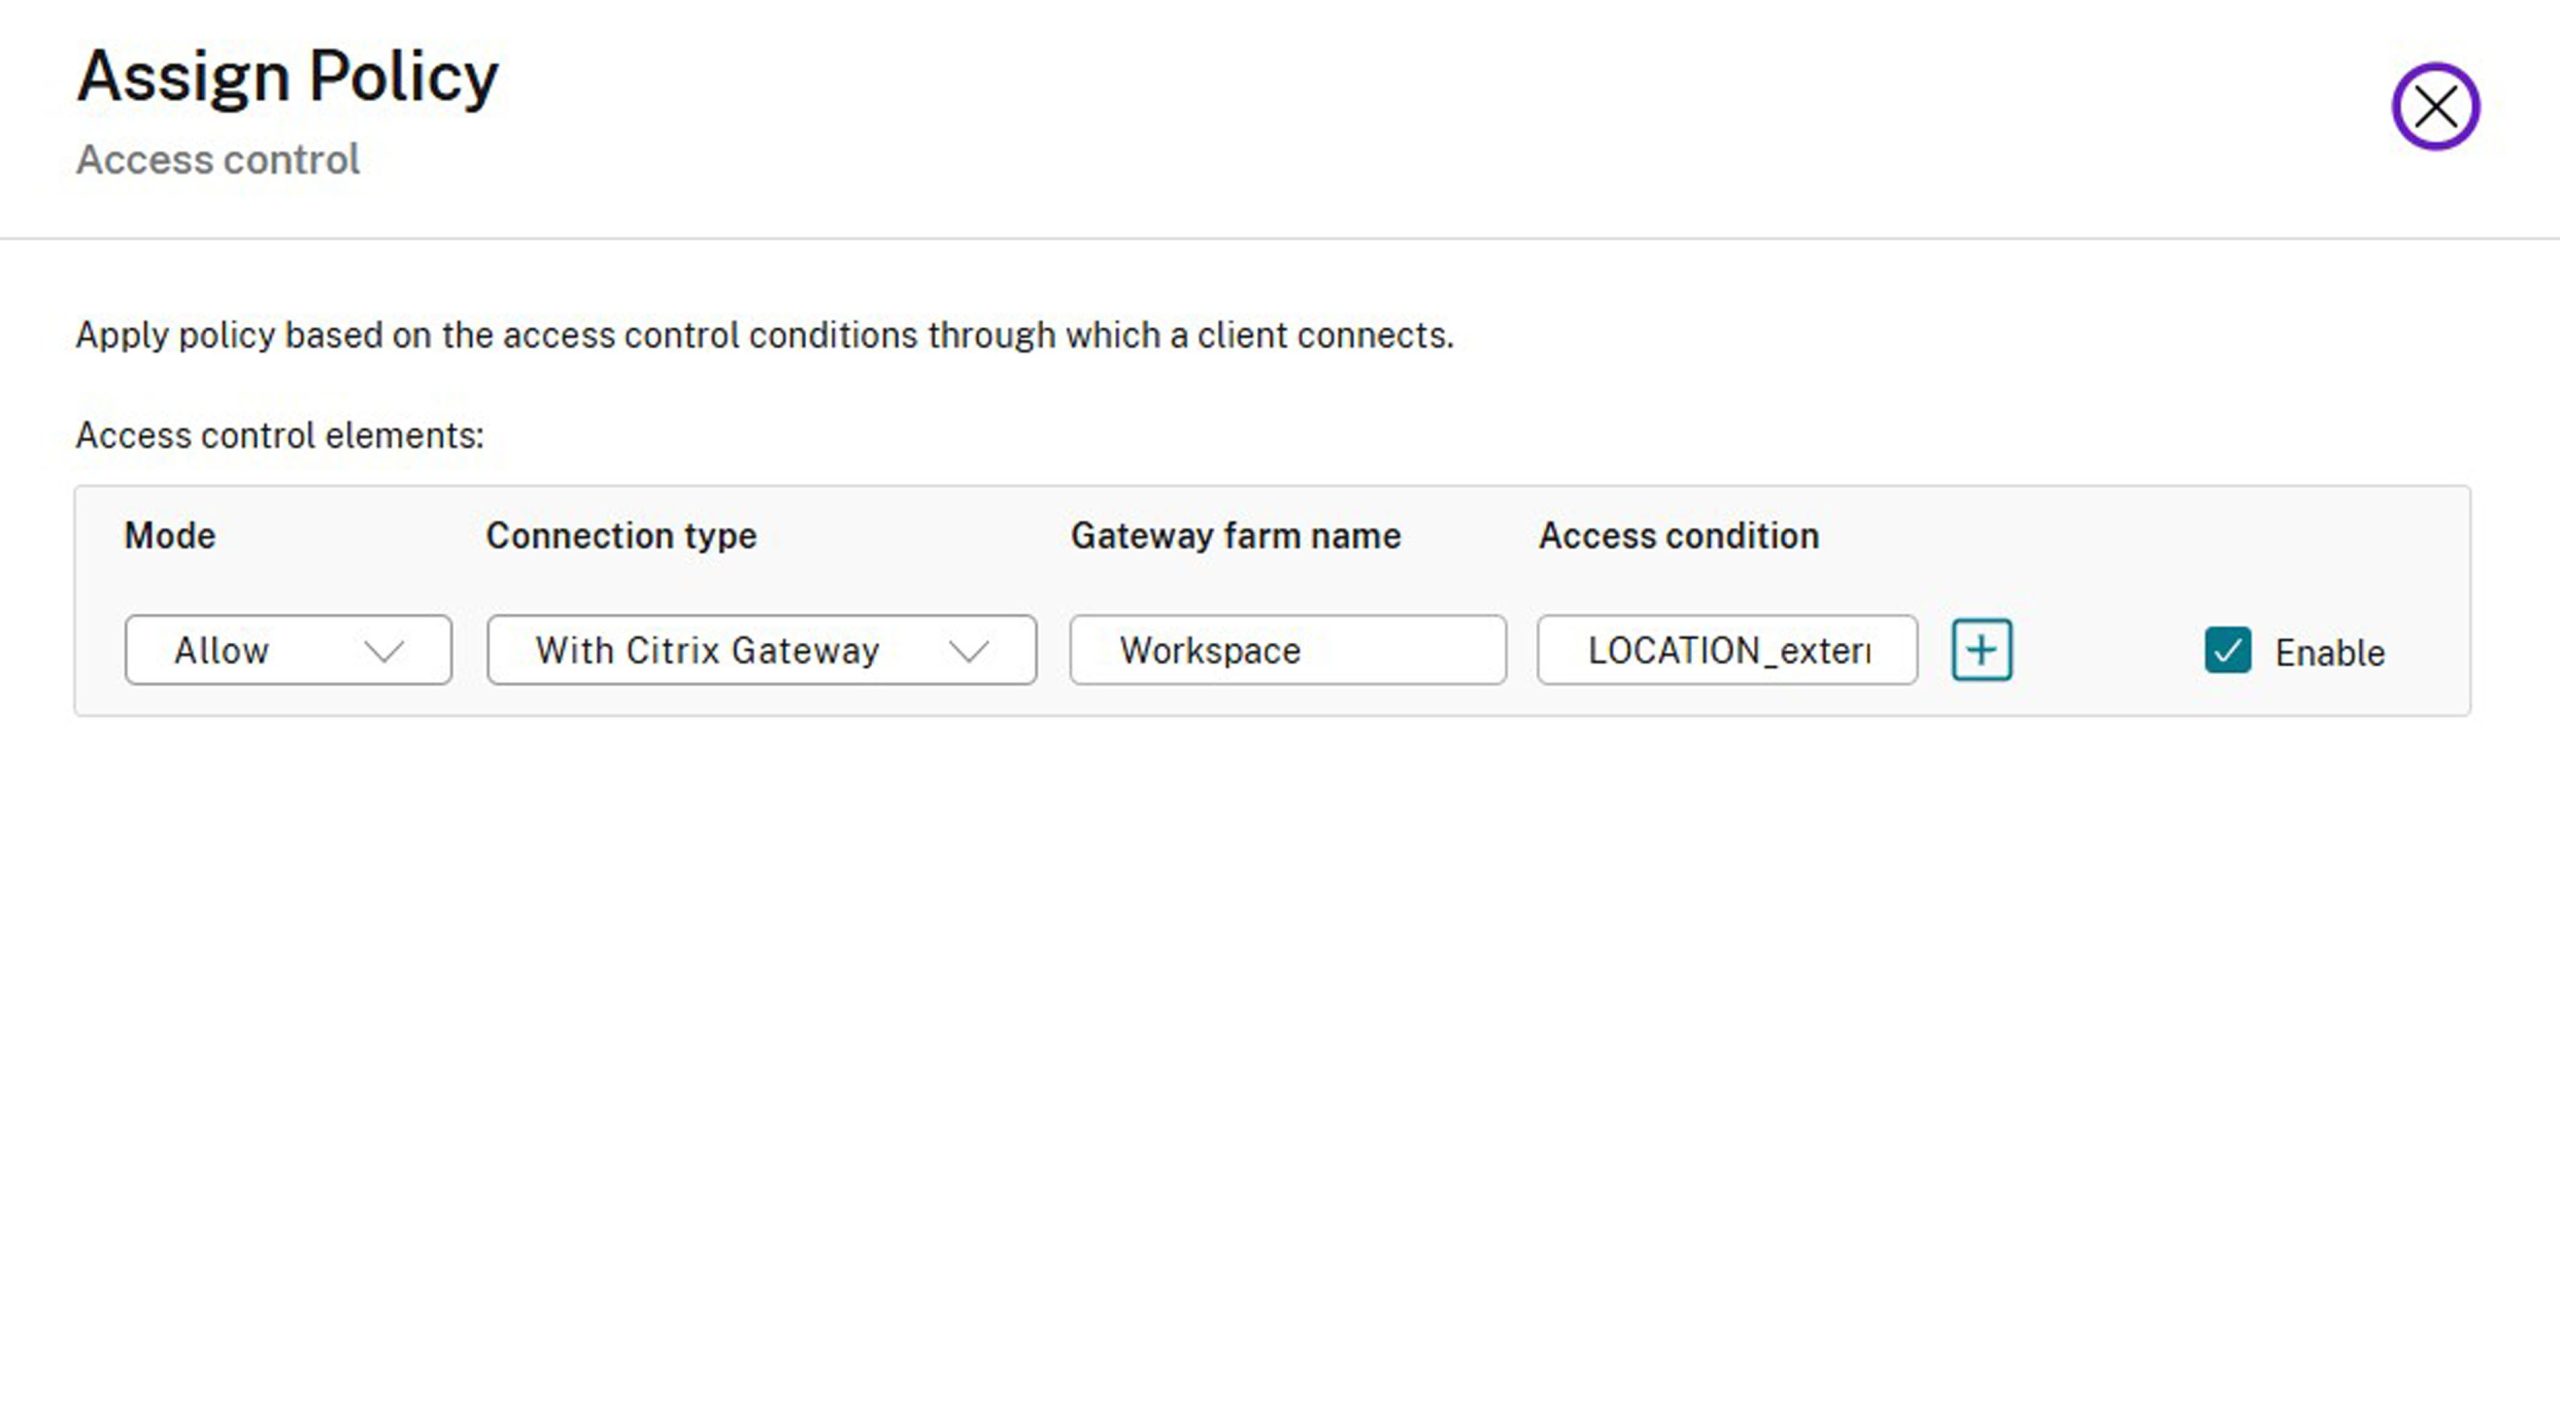
Figure 9 – Enable the policy
Key Takeaways
Used together, HDX Direct and Adaptive Access help create a more intelligent Citrix access model—one that improves session performance where direct connectivity is appropriate, while still enforcing stronger controls when users connect from outside the corporate network.
- HDX Direct improves the experience for internal users by allowing session traffic to flow directly between the client and the VDA, avoiding unnecessary traversal through the Citrix Gateway service.
- Adaptive Access strengthens security by identifying user context, such as network location, and dynamically applying policies aligned with the trust level of the connection.
The combined result is a Citrix DaaS design that is both performance-conscious and security-aware: better session performance for internal users, stronger policy enforcement for external users, and a smoother experience overall. If you are interested in creating a more intelligent and efficient Citrix access model and need an extra hand, give us a call. We would be honored to help empower your teams and environment, helping them reach their full potential.


Kudos Mr. Erlendson – it is a great read and well explained.