

For many Citrix customers, the first step toward adopting UniconOS is establishing a small, functional environment in which the team can evaluate endpoint installation, centralized management, image handling, Citrix access, and day-two support workflows.
Citrix now refers to the endpoint operating system as UniconOS, formerly eLux, and to the central management platform as UniconOS Management, formerly Scout. Some components and areas of the product documentation continue to use names such as Scout Server, Scout Console, and Scout Board; those component names are retained in this guide where applicable.
This quick-start outlines a controlled path for building an on-premises lab or pilot. The objective is to install the required management components, onboard one or two representative endpoints, establish a known-good baseline, and prove that the environment can be managed and recovered consistently before broader deployment begins.
Components
Citrix now refers to the endpoint operating system as UniconOS, formerly eLux, and to the management platform as UniconOS Management, formerly Scout. Since portions of the administrative interfaces and documentation continue to use the Scout name, this article uses the current product names while retaining the legacy names where they appear in the product.
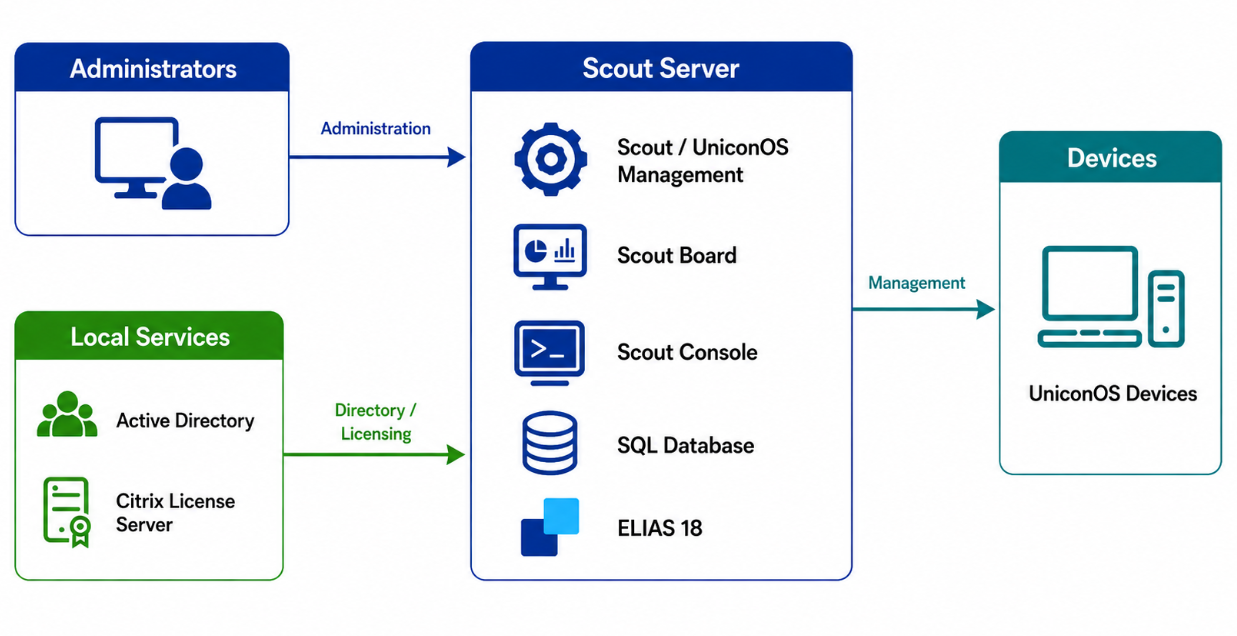
- UniconOS. UniconOS is the endpoint operating system installed on supported thin clients, repurposed PCs, laptops, or other endpoint hardware. It provides a lightweight, purpose-built OS for accessing virtual apps and desktops, most commonly via the Citrix Workspace app. In a Unicon deployment, UniconOS is the managed endpoint layer where device settings, network configuration, certificates, Citrix connections, applications, firmware packages, and user experience settings are applied.
- Citrix UniconOS Management Suite. The central management platform used to organize, configure, monitor, and maintain UniconOS endpoints. Administrators use Citrix UniconOS Management to group endpoints into organizational units, apply configuration settings, define applications, manage device commands, and control firmware or image updates. In an on-premises deployment, Citrix UniconOS Management is typically the core management service with which UniconOS endpoints communicate for device registration, configuration delivery, and ongoing management.
- Scout Console and Scout Board. Scout Console is the traditional administrative interface for managing the Scout environment. It is commonly used for detailed configuration tasks such as managing organizational units, device settings, application definitions, firmware assignments, and administrative operations. Scout Board provides a newer web-based management experience, offering a more modern interface for visibility, device management, and common operational tasks. In a basic deployment, it is useful to understand both interfaces since some administrators may continue to perform deeper configuration in Scout Console while using Scout Board for web-based access and day-to-day visibility.
- ELIAS. The UniconOS Image Administration Service (ELIAS) is used to manage UniconOS software packages and to build or maintain UniconOS firmware images. This is where administrators import packages such as the base UniconOS components, Citrix Workspace app, browser packages, peripheral support, and other software required for the endpoint image. ELIAS may only be used to validate a simple baseline image for an initial POC, but it becomes an important part of the longer-term image lifecycle as customers begin standardizing, updating, and version-controlling their UniconOS endpoint images.
The following diagram illustrates a basic Citrix UniconOS deployment, including the components mentioned above.
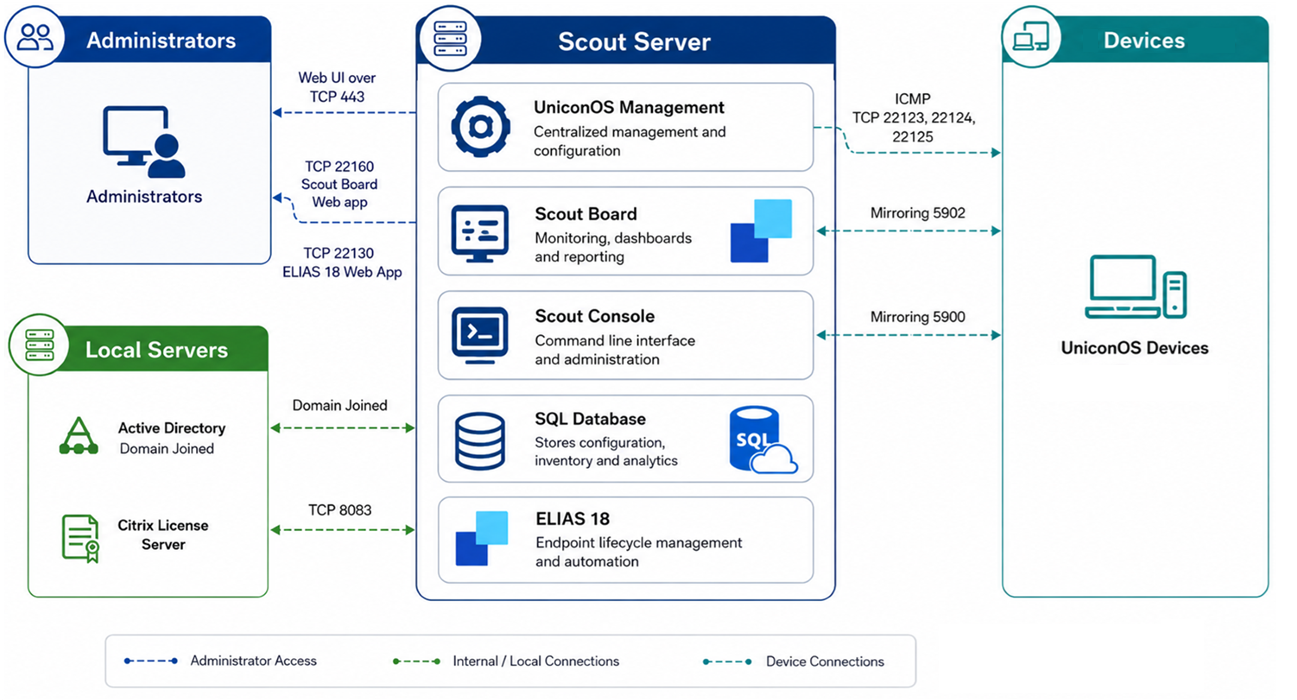
Basic On-Premises Pilot Setup
This section outlines a quick-start workflow to deploy a basic on-premises Unicon pilot or lab (i.e. a small non-production deployment), organized into easy-to-perform steps.
- Confirm core requirements.
- Download required software.
- Install UniconOS Management Suite.
- Install ELIAS.
- Create initial OU structure.
- Onboard first endpoint.
- Apply baseline configuration.
- Clone second endpoint.
The following subsections describe the activities to perform in each of these steps.
Step 1: Confirm requirements
Review supported versions, hardware requirements, Scout/ELIAS requirements, and endpoint compatibility before installing.
Minimum specifications alone do not guarantee full hardware compatibility. Confirm the endpoint model against the current Citrix hardware compatibility information, particularly for graphics, audio, WLAN, smart cards, and peripheral redirection.
Start by reviewing the current Citrix Unicon documentation and system requirements:
- Unicon system requirements
- UniconOS 7 system requirements
- Scout Enterprise Management Suite system requirements
- Scout Enterprise Management Suite installation
- ELIAS 18 installation
For an on-premises deployment, confirm the Windows Server version, SQL Server or SQL Express requirements, disk space, memory, .NET Framework, ODBC driver, and the storage needed for UniconOS packages and images. A summary of requirements is outlined below in the tables below.
Management Server Requirements Summary
| Requirement Area | Quick-Start Requirement | Notes |
|---|---|---|
| Operating System | Windows Server 2019, 2022, or 2025 | Windows Server 2025 Note: Windows Server 2019 reached end of mainstream support in January 2024. Note 2: Windows Server 2022 will reach EOMS on October 13, 2026. |
| Disk Space | 40 GB or greater recommended for a consolidated non-production deployment | Citrix UniconOS Management itself requires substantially less storage; additional capacity is recommended when Scout Board, ELIAS, SQL Express, packages, and administrative testing are hosted on the same system. |
| Database | Microsoft SQL Server 2019, Microsoft SQL Server 2022, or SQL Server Express | SQL Express is acceptable for a small POC or lab, but review production sizing separately. |
| ODBC Driver | Latest generally available Microsoft ODBC driver | Install before or during preparation so Scout can connect to SQL properly. |
| .NET Framework | Microsoft .NET Framework 4.5.1 or later | Required for Scout components. |
| IIS / Web Services | Required when using Scout Board and/or publishing ELIAS through IIS | Include IIS prerequisites and HTTPS binding. |
| Administrator Account | Domain or local administrative account for installation | The account must have rights to install software and configure required services. |
Firewall Requirements Summary
| Port | Protocol | Source | Destincation | Purpose |
|---|---|---|---|---|
| 1433 | TCP | UniconOS Management / Scout Console | Microsoft SQL Server | SQL database communication. |
| 1434 | UDP | UniconOS Management / Scout Console | Microsoft SQL Server Browser | SQL Browser service / instance discovery. |
| 80 / 433 | TCP | Administrator Browser | Scout Board / IIS / ELIAS Web Server | Web administration access. |
| 80 / 433 | TCP | UniconOS Endpoint | Web server / ELIAS / Firmware Source | Firmware, image, or package downloads. |
| 22123 | TCP | UniconOS Management | UniconOS Endpoints | Scout management communication (secure) |
| 22125 | TCP | UniconOS Management | UniconOS Endpoints | Scout management communication over TLS |
| 22124 | TCP | UniconOS Management | UniconOS Management Keep Alive service | Scout Keep Alive service communication. |
| 22130 | TCP | IIS / reverse proxy | ELIAS 18 Backend Service | ELIAS backend access when running behind IIS. |
| 22160 | TCP / HTTPS | Administrator Browser | Scout Board | Scout Board web application access |
| 5900 | TCP | Scout Console Admin Workstation | UniconOS Endpoint | Optional desktop mirroring / VNC. |
| 5902 | TCP / UDP | Scout Console Admin Workstation | UniconOS Endpoint | Optional browser-based mirroring / WebRTC. |
| Dynamic SQL Ports | TCP | UniconOS Management / Scout components | SQL Server | Required when the SQL instance uses a non-default or dynamically assigned port. |
UniconOS Device Hardware Requirements
| Requirement Area | Quick-Start Requirement |
|---|---|
| Processor | x86 64-bit capable processor |
| Memory | 4 GB RAM |
| Storage | 16 GB or more recommended |
| Graphics | AMD or Intel graphics |
| Network | Ethernet or WLAN |
| USB | USB 2.0 or USB 3.0 with USB boot support |
| Display | Full HD resolution support |
| Boot Mode | UEFI |
Step 2: Download required software
After confirming the target versions and deployment model, download the required software from the Unicon portal. For a basic on-premises pilot, this includes the Scout Enterprise Management Suite installer, ELIAS 18 installer, UniconOS software packages for the target operating system version, and the UniconOS USB stick image.
For a quick-start pilot, the easiest approach is to download the UniconOS USB stick image and use StickWizz to create bootable USB recovery media. This avoids introducing PXE, DHCP, TFTP, or network recovery requirements before you have validated the basic endpoint experience. The USB method is well suited for the first one or two pilot devices because it allows the administrator to prepare the endpoint directly, confirm the installation process, and quickly move into Scout registration and baseline configuration.
Step 3: Install Citrix UniconOS Management Suite
After the required software has been downloaded and staged, install the Citrix UniconOS Management Suite on the server identified during the requirements review.
UniconOS Management installation guide can be referenced here: Installing Citrix UniconOS Management Suite
Citrix provides additional guidance here: Preparing SQL Server database
Run the Citrix UniconOS Management installer from a local hard drive using an account with the required permissions. For a quick-start deployment, choose the standard installation, which installs the core Citrix UniconOS Management components required to manage UniconOS endpoints, including Citrix UniconOS Management Server and Scout Console. Administrators do not need to pre-create a database, as it can be created during installation.
UniconOS Management attended installation steps are available here: Installing Citrix UniconOS Management Suite
Before proceeding to endpoint onboarding, perform a quick initial health check to confirm the Citrix UniconOS Management installation is healthy.
- Confirm that the Citrix UniconOS Management services are running.
- Confirm that the database connection is working.
- Open Scout Console and verify that it launches without errors.
- Confirm that DNS resolves correctly for the management server and endpoint network.
- Verify that the required firewall ports are open between the Citrix UniconOS Management server and the test endpoint network.
- Resolve any service, database, DNS, or firewall issues before attempting endpoint registration.
Step 4: Install ELIAS
After validating the Citrix UniconOS Management deployment, install ELIAS to provide package and image lifecycle management for the lab.
ELIAS installation guidance is available here: Installation: ELIAS 18
As part of the ELIAS 18 installation, confirm the MongoDB requirement. For a basic lab, the ELIAS installer can use the default option to install MongoDB locally, which is the simplest approach for a quick-start environment.
Once ELIAS is installed, confirm that the service is reachable and that the administrator can log on successfully. Then verify that the initial container exists and determine whether additional containers are needed.
Although ELIAS should be installed or prepared as part of the lab, do not make custom image creation a requirement for the first endpoints. For this quick-start guide, the initial endpoint deployment will use the downloaded UniconOS USB stick image and StickWizz instead of first building a custom image in ELIAS. This keeps the first phase focused on validating the core workflow.
Containers, package imports, and custom image definition files can be configured later when the lab is ready to progress from basic endpoint onboarding into formal image lifecycle management. At that stage, ELIAS can be used to create containers, import the AllPackages bundle, build an image definition file, add required packages, solve dependencies, and generate custom recovery media for future deployments.
Citrix documentation for containers is available here: Creating a container
Citrix package import documentation is available here: Importing software packages
Step 5: Create an initial OU structure
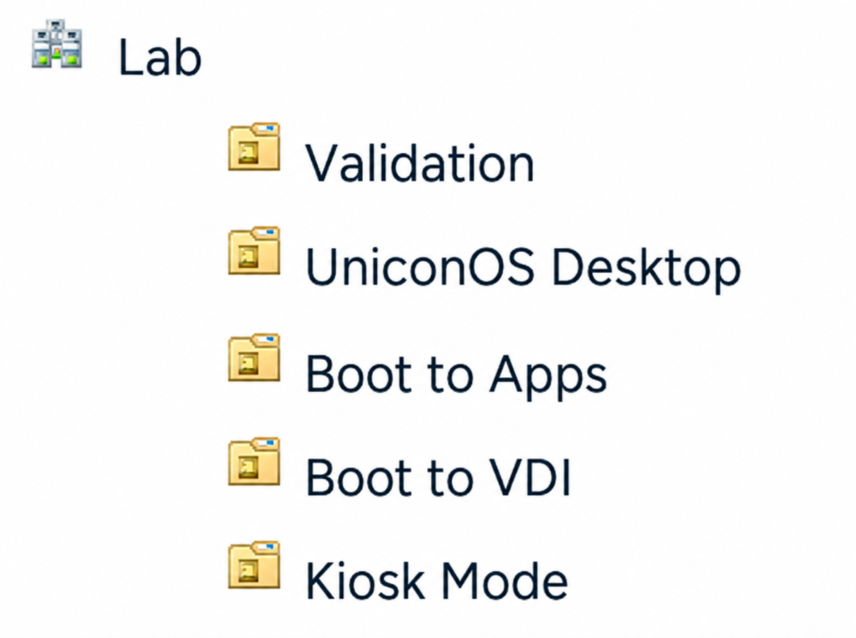
After Citrix UniconOS Management is installed and the basic management services are confirmed to be healthy, create a simple starter OU structure for the pilot devices. For a basic proof of concept, keep the OU structure small and easy to understand.
A simple model could look like this:
Step 6: Onboard the first endpoint
With Citrix UniconOS Management installed, ELIAS prepared, and a starter OU structure in place, the next step is to onboard the first UniconOS endpoint. The first endpoint validates the basic end-to-end workflow: install UniconOS, connect the device to the network, register it with Citrix UniconOS Management, place it in the correct OU, and confirm it receives the expected configuration.
For the first endpoint, use the USB recovery method because it is the fastest and simplest approach for a quick-start pilot. From the Unicon portal, download the UniconOS USB recovery stick image. Note: use a dedicated USB drive, preferably 16 GB or larger, because the write process will permanently erase the contents of the USB device.
On an administrator workstation, launch the StickWizz app that is included with the recovery stick archive, select the downloaded UniconOS image file, insert the USB device, and choose the correct USB device from the list. Enable the “Verify write process” option so the tool validates the USB media after writing the image, then click “Write”. When the process completes, confirm the success message, close StickWizz, and safely remove the USB device.
Insert the USB device into the test device and boot from USB using the device’s boot menu, such as F8, F12, or the vendor-specific boot key. From the UniconOS boot menu, select the option to install UniconOS to the local hard disk, then confirm the target disk when prompted. Note that this installation process erases the selected disk, so it should only be performed on hardware that has been approved for re-imaging.
After the installation completes, remove the USB device and allow the endpoint to reboot into UniconOS. Upon first boot, complete the initial configuration wizard by configuring network settings, connecting to the Scout Server FQDN or IP address, selecting the target Organizational Unit, and assigning a unique device name. Once onboarding is complete, confirm that the device appears in Scout under the correct OU and begins receiving the expected baseline configuration.
Step 7: Apply baseline configuration
After the first endpoint is registered in Citrix UniconOS Management and is placed in the correct OU, apply the required pilot baseline. Configure the core device settings first: desktop language, keyboard language, time zone, NTP/time server, display behavior, and power management. For actively tested pilot devices, consider disabling sleep mode so that the endpoint remains available for troubleshooting and remote validation.
Next, configure the required security and support settings. Set the appropriate end-user access restrictions under security and user rights, then enable mirroring or shadowing for remote support. If mirroring is required, the UniconOS image must include the VNC Server package, and the administrator workstation must have the required VNC viewer or browser-based mirroring access available. Configure whether users must confirm mirroring sessions and whether encryption is required.
The baseline must also include the standard pilot applications. At minimum, configure the Citrix Workspace app with the appropriate StoreFront store or Citrix Workspace URL, login behavior, and desktop icon visibility. If browser testing is in scope, define a Chrome or Chromium browser application and set the required start page. If local troubleshooting is required, include tools such as File Manager, XTERM, and Resource Info. Any application configured in Citrix UniconOS Management must have the corresponding package included in the ELIAS image.
Apply this baseline at the highest practical OU level so child OUs inherit the common configuration. Use lower-level OUs only for use-case-specific behavior, such as UniconOS Desktop, Boot to Apps, Boot to VDI, or Kiosk Mode. After applying the baseline, reboot the endpoint and confirm that the settings apply, applications appear, Citrix resources launch successfully, and remote support works as expected.
Pro tip: Keep a “known good” baseline and avoid changing it casually. If a new setting, package, or image update needs to be tested, apply it first to a separate testing OU or a single break/fix device. This makes troubleshooting much easier and gives the team a reliable configuration to which to return if something breaks during the pilot.
Step 8: Clone the approach to a second endpoint
After you successfully install, register, configure, and validate the first endpoint, repeat the process with a second endpoint. Use the same approved UniconOS image, onboarding method, and target OU to confirm the process is repeatable. For a quick-start pilot, the second endpoint should not introduce unnecessary changes unless hardware validation is part of the test plan.
Install UniconOS on the second endpoint using the same USB media used to prepare the second endpoint. During first-time configuration, connect the endpoint to the Citrix UniconOS Management Server, assign it to the same pilot OU, and provide a unique endpoint name.
Once the second endpoint appears in Scout, confirm that it inherits the same baseline configuration as the first endpoint. Validate the required settings: desktop language, keyboard language, time zone, NTP/time server, display behavior, power management, security/user rights, mirroring configuration, and assigned applications. Then launch the configured Citrix Workspace app with the appropriate StoreFront store or Citrix Workspace URL and confirm that the user experience is consistent across both endpoints.
Do not expand the pilot until one or two endpoints are consistently manageable and recoverable.
Pro tip: Make the second endpoint a different hardware model if the customer expects mixed hardware in production. This helps expose driver, firmware, peripheral, and/or display differences early.
What to Test First
After the first two endpoints are onboarded, validate the core pilot workflow before adding more devices. The first test is management connectivity. Each endpoint must appear in Citrix UniconOS Management, appear in the correct OU, receive inherited configuration, and respond to basic management actions such as reboot, configuration update, and remote support.
Before expanding the pilot, validate the core lab workflows on one or two endpoints. The following checklist focuses on the minimum items that should be confirmed before introducing more advanced configurations.
| Test Area | Checklist Item | Expected Results |
|---|---|---|
| USB installation | Install UniconOS from the USB recovery media created with StickWizz. | Endpoint installs successfully and reboots into UniconOS. |
| First-time configuration | Complete the initial configuration wizard. | Network settings are configured and the endpoint can reach the Scout Server. |
| Scout registration | Enter the Scout Server FQDN or IP address during onboarding. | Endpoint registers successfully in Scout. |
| OU assignment | Assign the endpoint to the correct pilot OU. | Endpoint appears in the expected OU and receives inherited settings. |
| Baseline policy | Apply the pilot baseline configuration from the OU. | Endpoint receives the expected configuration after reboot. |
| General settings | Validate language, keyboard, time zone, NTP, display, and power settings. | Endpoint reflects the expected non-production configuration. |
| Application launch | Launch a published desktop or application. | User can authenticate and launch the assigned application. |
| Browser access | Test Chrome or Chromium if browser access is included in the initial image. | Browser launches and opens the expected start page. |
| Local tools | Confirm File Manager, XTERM, or Resource Info are available if included. | Support tools are available for troubleshooting. |
| Remote support | Test mirroring or shadowing from Scout Console or Scout Board. | Administrators can support the endpoint remotely. |
| Reboot behavior | Reboot the endpoint after configuration changes. | Settings persist and the endpoint reconnects to Scout. |
| Repeatability | Repeat the same install and onboarding process on a second endpoint. | Second endpoint behaves consistently with the first endpoint. |
Early Lessons and Pro Tips
A successful Unicon quick start should be controlled, repeatable, and easy to troubleshoot. From a Ferroque delivery perspective, the goal is to prove that Citrix UniconOS Management, ELIAS, the UniconOS image, endpoint onboarding, baseline configuration, remote support, and Citrix access all work together before the pilot expands. Once the pilot confirms that UniconOS can support the organization’s requirements, use cases, and workloads, the team can proceed with designing and implementing the production deployment.
- Review the current state of the environment. Start with a prerequisites spreadsheet. Before installing anything, capture the Citrix UniconOS Management and ELIAS server details, SQL configuration, ODBC driver version, service accounts, certificates, DNS records, firewall ports, endpoint models, image versions, and downloaded software. This gives the project team a single source of truth during the pilot.
- Validate infrastructure before onboarding endpoints. Confirm Citrix UniconOS Management, Scout Board, ELIAS, SQL, IIS, certificates, and required network ports are working before introducing endpoint troubleshooting. Many early issues are caused by missing prerequisites (rather than by UniconOS itself).
- Start with one known-good endpoint. Start with one approved test endpoint and confirm it can be installed, registered to Citrix UniconOS Management, assigned to the correct OU, configured, rebooted, and managed consistently.
- You do not need to create the UniconOS Management database manually. For a basic pilot, the database can be created during the Citrix UniconOS Management installation wizard. As long as the SQL Server, SQL permissions, and required ODBC driver are in place, the installer can create the required Citrix UniconOS Management database as part of the setup process. This avoids unnecessary pre-work and keeps the quick-start deployment simple.
- Keep the OU structure simple. Use a small pilot hierarchy based on use cases such as UniconOS Desktop, Boot to Apps, Boot to VDI, and Kiosk Mode. Apply common settings at a higher-level OU and reserve lower-level OUs for use-case-specific behavior.
- Do not over-customize the first image. Build a clean Unicon PoC image with only the required management, usability, Citrix, browser, authentication, and support packages. Add additional packages only after the baseline image is stable.
- Include support tools in the baseline image. For a pilot, include the tools needed to troubleshoot quickly, such as VNC Server Extension for mirroring, File Manager, XTERM, Resource Info, and the required desktop environment packages.
- Validate Citrix access early. Confirm that the Citrix Workspace app with the appropriate StoreFront store or Citrix Workspace URL is accurate, authentication works, and published apps or desktops launch successfully.
- Test mirroring before endpoint validation begins. Remote support is critical during a pilot. Confirm that the VNC Server package is included in the UniconOS image and that administrators can successfully mirror or shadow the endpoint using the approved method.
- Use USB recovery for small pilots. StickWizz USB recovery is typically the fastest approach for a small non-production deployment (e.g. a pilot or POC), but be aware that it erases the target disk.
- Save PXE for larger rollout testing. PXE is useful for scale, but it introduces DHCP, TFTP, and network boot dependencies. Ferroque therefore recommends excluding PXE from the initial quick-start unless mass deployment is a specific pilot objective.
Final Thoughts
A successful UniconOS pilot is measured by whether the team can reliably install, register, configure, support, update, and recover a small number of representative endpoints. For a quick-start, the priority should be repeatability: a known-good installation method, a working Scout registration process, a simple OU structure, a validated baseline configuration, and a clear support path for troubleshooting.
Once those elements are proven, the pilot can expand into a more complete production design. That next phase may include high availability, automated onboarding, PXE or network recovery, formal certificate management, role-based administration, Scout Cloud or Scout Cloud Gateway considerations, and a more mature ELIAS image lifecycle process. Starting small provides a stable foundation from which to build and reduces the risk of introducing production-level complexity before the core management elements are understood.
The best outcome from a quick-start is confidence. If administrators can take one or two approved endpoints, install UniconOS, onboard them into Scout, apply the correct endpoint configuration, launch Citrix resources, support the endpoint remotely, and repeat the process consistently, then the environment is ready to proceed from initial testing into a structured pilot or production planning phase.
Since Citrix’s acquisition of Unicon in 2025, Ferroque Systems has led several UniconOS deployments across customer environments, including both on-premises implementations and UniconOS Management Cloud. We welcome the opportunity to help organizations evaluate, design, and deploy their own UniconOS platform. Reach out to our experts to learn more.


