Introduction
This article will deal with the configuration of a Citrix nFactor flow that accommodates multiple SAML IdPs. For oh-so-important context… in our example, we have a Citrix Cloud environment that has Resource Locations in our production, demo, and lab environments. Each Resource Location is in a different AD forest, and each Resource Location’s AD forest is linked to a different Azure AD domain as there are no trusts between the environments.
Although this configuration can be used in various use cases with different modifications (such as how we select the IdP), this example will be used to handle authentication for Citrix Cloud’s Workspace service. As the in-built authentication only supports one SAML IdP. To add more complex logic, we need a nFactor flow handled by a customer-managed Citrix ADC (or partially managed by the upcoming adaptive authentication service from Citrix that allows complex nFactor flows on Citrix-hosted ADCs).
In this guide, we will configure an AAA-TM vServer on our Citrix ADCs to provide optionality for our users when logging into our Citrix Workspace service URL to select either the Production or Demo Citrix resources. This will be handled through a domain drop-down which will allow us to send the user to the appropriate SAML IdP for their chosen environment.
The rationale behind this configuration in the scenario presented in this article is to avoid splitting up the Citrix Cloud subscription licenses into multiple subscriptions just for the purposes of accomodating different Azure AD SAML configurations. By offloading such complexity to Citrix ADC, we can keep the Citrix Cloud deployment simple.
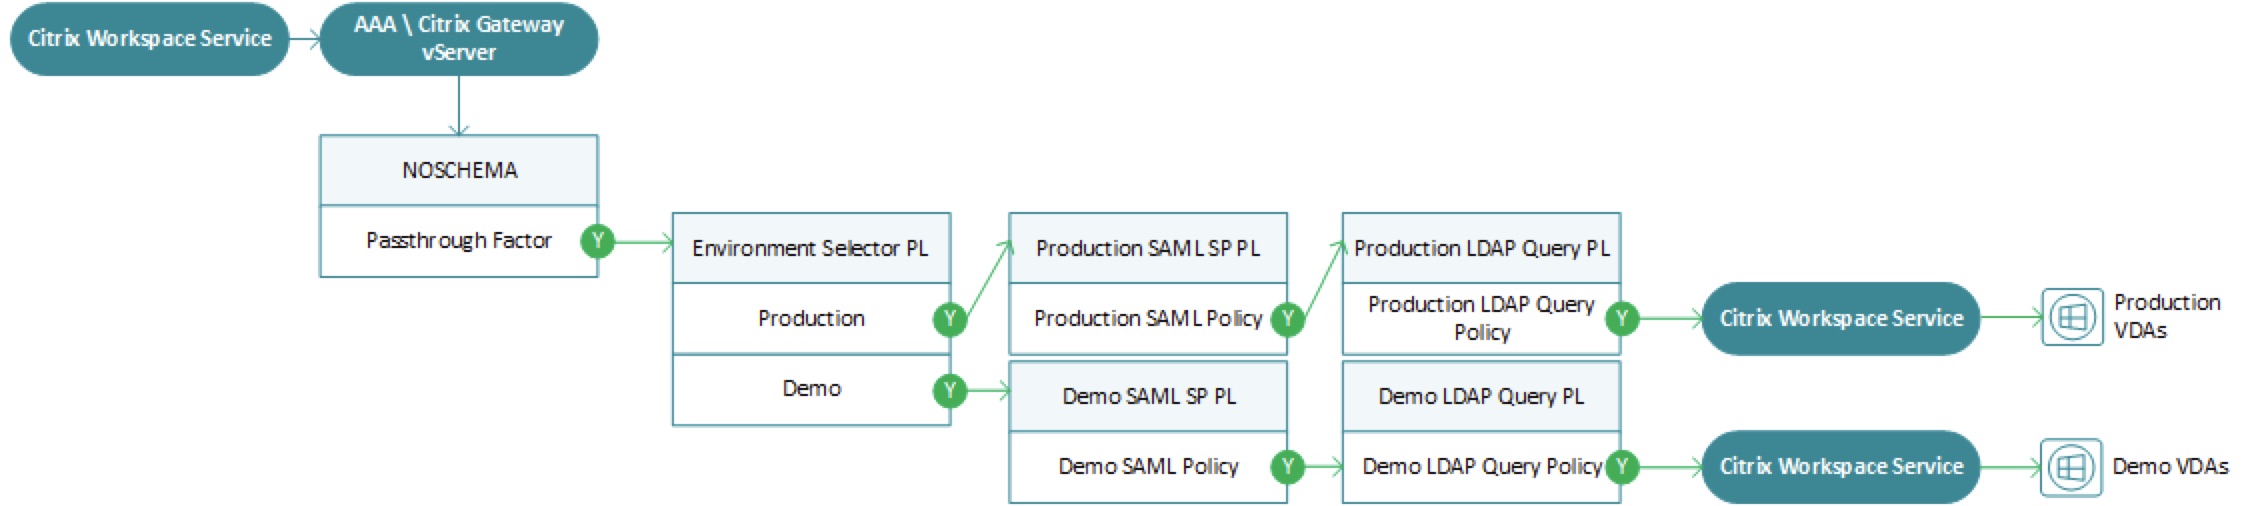
The flow we will be building looks something like this, as it is often easier to visualize for context as the configurations are assembled.
This guide will not be a comprehensive end-to-end configuration guide for integrating a Citrix Gateway\AAA-TM vServer with Citrix Workspace service and assumed various pre-existing configurations will be in place as outlined below, including authentication configurations (LDAPS and SAML IdP apps).
Pre-requisites
For this recipe, you will need:
- Citrix ADC 13.0 41.20 Advanced edition or later
- Citrix ADC 12.1 54.13 Advanced edition or later
- A public IP listening on TCP 443 and NAT’d to a DMZ IP on your Citrix ADC
- A DNS entry and SSL\TLS certificate (commercial CA issued) created for the public IP and certificate loaded onto Citrix ADC
- Citrix FAS configured and integrated into each of the respective Resource Locations (being we are using SAML in this example)
- A properly licensed Citrix Cloud tenant (optional)
- Ability to configure one or more SAML IdP applications (in this example we will use two different Azure AD domains)
- A pre-configured LDAPS (or LDAP over TLS) server on the Citrix ADC set to not authenticate as part of the OAuth IP configuration needed for Citrix Gateway authentication via Citrix Cloud (fun fact, Citrix Gateway not required, AAA-TM suffices fine). One will be needed for each of the SAML IdP’s associated AD domains (in our case two)
Step 1 – Login Schemas
In this first step, we will create a drop-down login schema. This is effectively the built-in “domain drop-down” schema which we’ll be modifying for our needs and adopting “domain” as “environment”. We could alternatively have built this flow to take actions based on the email suffix of the user, but we wanted something slightly different.
Create an XML file called “EnvironmentDropdown.xml” with the following content in Notepad++, SublimeText, or your preferred text editor. You may want to swap out the romaji text for something more intelligible, as it is one of my staff referred to me as “romaji using scum” for the text, which I found charming and endearing. Once complete, upload to the primary ADC node’s /flash/nsconfig/loginschema/LoginSchema directory (it will auto-sync between nodes). Note the “value” parameters as we will reference them in our later authentication policies.
<?xml version="1.0" encoding="UTF-8"?>
<AuthenticateResponse xmlns="http://citrix.com/authentication/response/1">
<Status>success</Status>
<Result>more-info</Result>
<StateContext/>
<AuthenticationRequirements>
<PostBack>/nf/auth/doAuthentication.do</PostBack>
<CancelPostBack>/nf/auth/doLogoff.do</CancelPostBack>
<CancelButtonText>Cancel</CancelButtonText>
<Requirements>
<Requirement><Credential><ID>domain</ID><Type>none</Type></Credential><Label><Type>none</Type></Label><Input><ComboBox><InitialSelection>unspecified</InitialSelection><DisplayValues><DisplayValue><Display>(Select an Environment)</Display><Value>unspecified</Value></DisplayValue><DisplayValue><Display>Production</Display><Value>Production</Value></DisplayValue><DisplayValue><Display>Demo</Display><Value>Demo</Value></DisplayValue><DisplayValue><Display>NonProd-Lab</Display><Value>NonProd-Lab</Value></DisplayValue></DisplayValues></ComboBox></Input></Requirement>
<Requirement><Credential><Type>none</Type></Credential><Label><Text>Select an environment, Senpai!</Text><Type>confirmation</Type></Label><Input /></Requirement>
<Requirement><Credential><ID>loginBtn</ID><Type>none</Type></Credential><Label><Type>none</Type></Label><Input><Button>Wakatta UwU</Button></Input></Requirement>
</Requirements>
</AuthenticationRequirements>
</AuthenticateResponse>
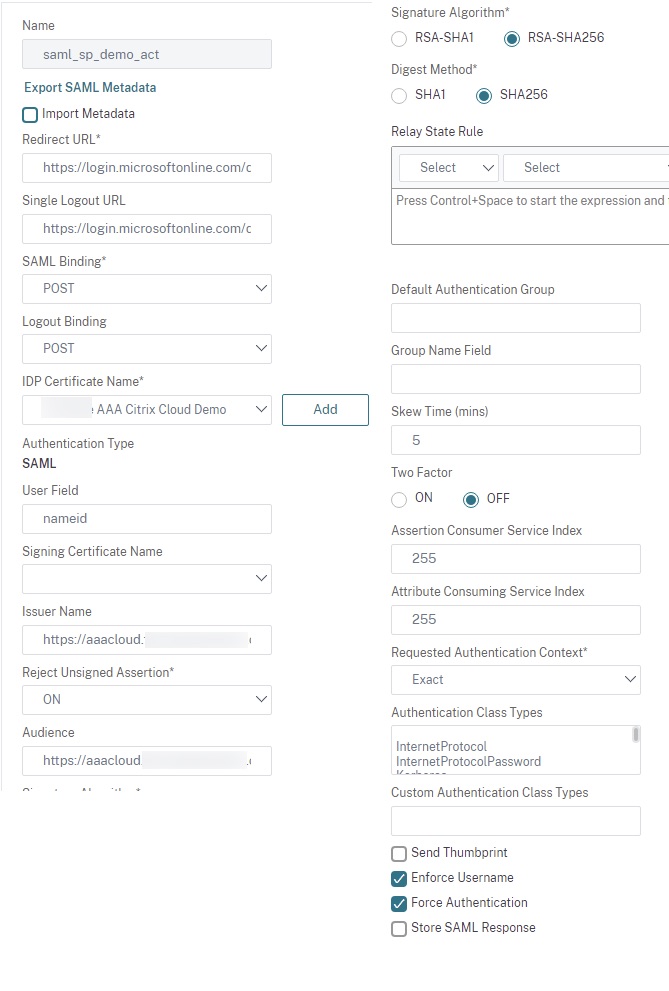
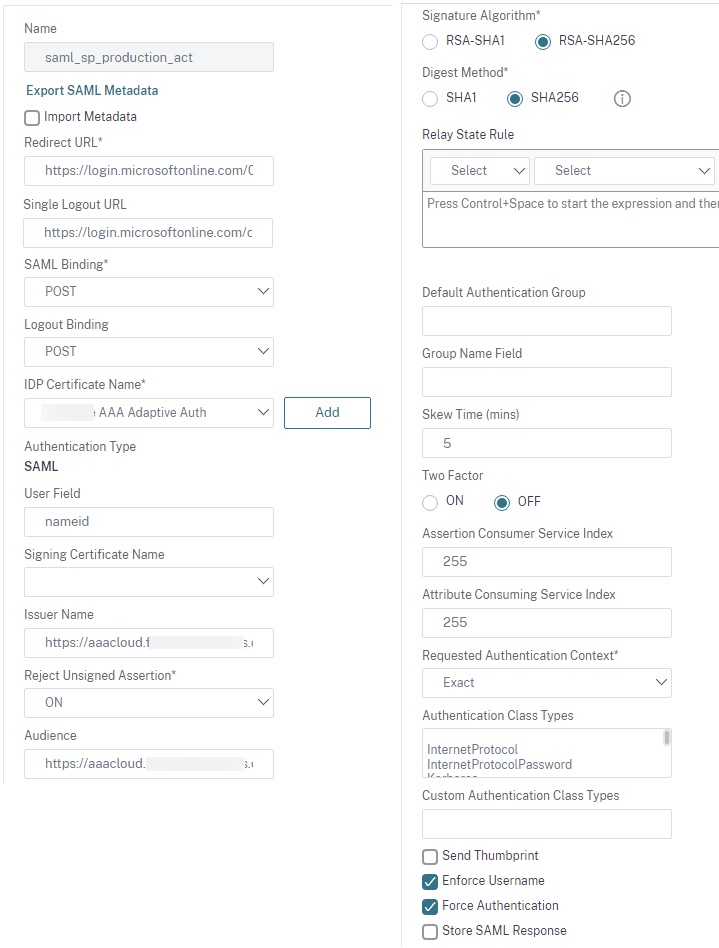
Step 2 – SAML SP Actions
We will create two of our three SAML SP actions. You will want to have loaded up the IdP certificates onto the ADC for each application prior. Configure two SAML SP actions for each of the respective environments. We’ll set the user field to “nameid”, select the proper IDP certificate for each, and for both SAML configs specify the Issuer Name an Audience as the public DNS FQDN for the public IP we will use for our AAA vServer in Step 6. In these examples below, “Force Authentication” has been set to force users to authenticate even if they had done so earlier against the IdP for added security.
Note: As advised by Citrix, we do not need to specify a Relay State URL as this URL is being consumed exclusively by Citrix Cloud.
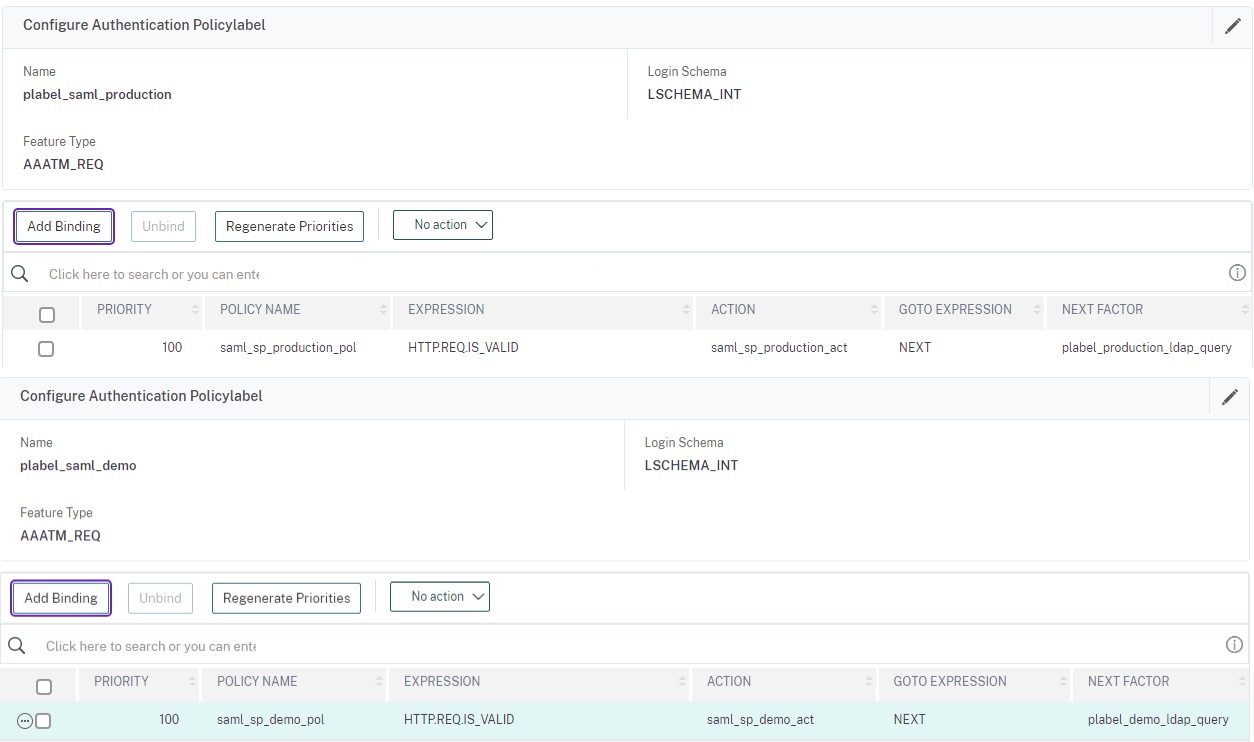
Step 3 – SAML & LDAP Policies and Labels
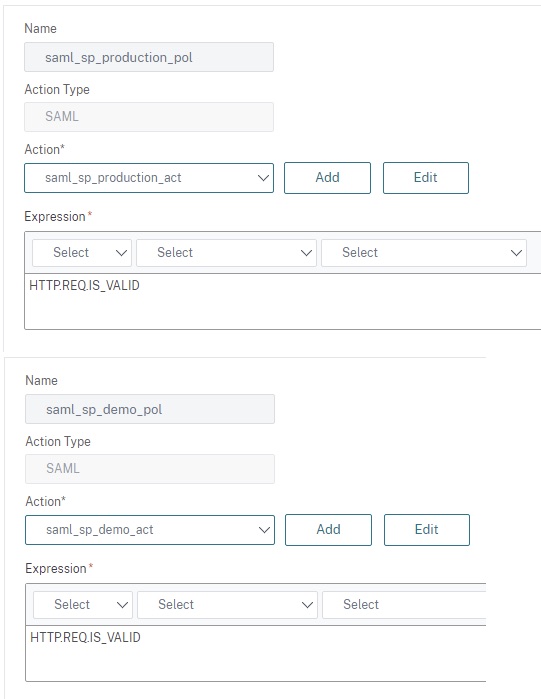
Create two SAML policies with the recommended expression “HTTP.REQ.IS_VALID”; one for Production and one for Demo in our case. Each should link to the SAML actions created earlier.
Create two LDAPS policies linking to the pre-staged LDAPS\LDAP over TLS actions created as pre-requisite whose authentication state should be left unchecked as we are not using the LDAP factor for authentication. This is a unique requirement for the customer-managed Citrix Gateway integration, and being we’re using SAML as our main authentication factor, this factor does not need to authenticate any user credentials. Note that this requirement does mean the Citrix ADC handling authentication does need L3 connectivity (via firewall presumably) to all AD environments involved. In our case, this was the production and demo AD forests.
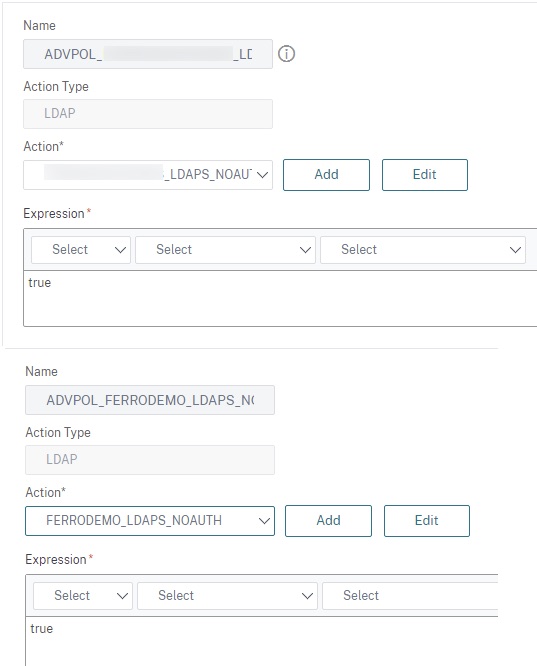
We now need to build our authentication policy labels and construct our bindings for our SAML SP and LDAPS factors. Follow the reference photos below. Note that the LDAP policy labels should be created first so they can be linked as “next factor” to the SAML policies.

Code is below for ease of use (action names to be modified to your naming conventions for pre-staged policies).
add authentication Policy saml_sp_production_pol -rule HTTP.REQ.IS_VALID -action saml_sp_production_act
add authentication Policy ADVPOL_PROD_LDAPS_NOAUTH_636 -rule true -action PROD_LDAPS_NOAUTH
add authentication Policy ADVPOL_FERRODEMO_LDAPS_NOAUTH_636 -rule true -action FERRODEMO_LDAPS_NOAUTH
add authentication Policy saml_sp_demo_pol -rule HTTP.REQ.IS_VALID -action saml_sp_demo_act

add authentication policylabel plabel_saml_production -loginSchema LSCHEMA_INT
add authentication policylabel plabel_production_ldap_query -loginSchema LSCHEMA_INT
add authentication policylabel plabel_demo_ldap_query -loginSchema LSCHEMA_INT
add authentication policylabel plabel_saml_demo -loginSchema LSCHEMA_INT

bind authentication policylabel plabel_saml_production -policyName saml_sp_production_pol -priority 100 -gotoPriorityExpression NEXT -nextFactor plabel_production_ldap_query
bind authentication policylabel plabel_production_ldap_query -policyName ADVPOL_PROD_LDAPS_NOAUTH_636 -priority 100 -gotoPriorityExpression END
bind authentication policylabel plabel_demo_ldap_query -policyName ADVPOL_FERRODEMO_LDAPS_NOAUTH_636 -priority 100 -gotoPriorityExpression NEXT
bind authentication policylabel plabel_saml_demo -policyName saml_sp_demo_pol -priority 100 -gotoPriorityExpression NEXT -nextFactor plabel_demo_ldap_query
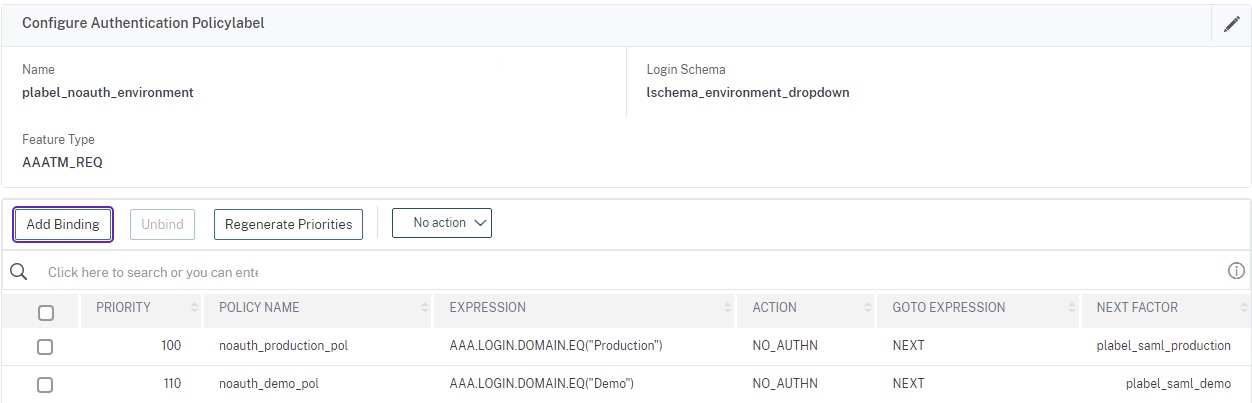
Step 4 – Environment & Policies and Label
We will be creating a number of NO_AUTHN policies to act as our selector as well as an initial passthrough factor to start the authentication flow (in part due to sporadic issues I’ve encountered with Workspace App authentication in general with nFactor). Create three policies in total; one for Production, one for Demo, and one just as an initial passthrough policy which we’ll bind to the AAA vServer directly. No login schemas are required.
Note the expressions for the policies, we are re-using the values noted in Step 1 login schema configurations.

We now need to build our policy label. Reference the photo below and link as next factor the respective SAML SP policies for the given environments.
Code is below for ease of use.
add authentication Policy noauth_environment_select_pol -rule true -action NO_AUTHN
add authentication Policy noauth_production_pol -rule "AAA.LOGIN.DOMAIN.EQ(\"Production\")" -action NO_AUTHN
add authentication Policy noauth_demo_pol -rule "AAA.LOGIN.DOMAIN.EQ(\"Demo\")" -action NO_AUTHN

add authentication policylabel plabel_noauth_environment -loginSchema lschema_environment_dropdown

bind authentication policylabel plabel_noauth_environment -policyName noauth_production_pol -priority 100 -gotoPriorityExpression NEXT -nextFactor plabel_saml_production
bind authentication policylabel plabel_noauth_environment -policyName noauth_demo_pol -priority 110 -gotoPriorityExpression NEXT -nextFactor plabel_saml_demo
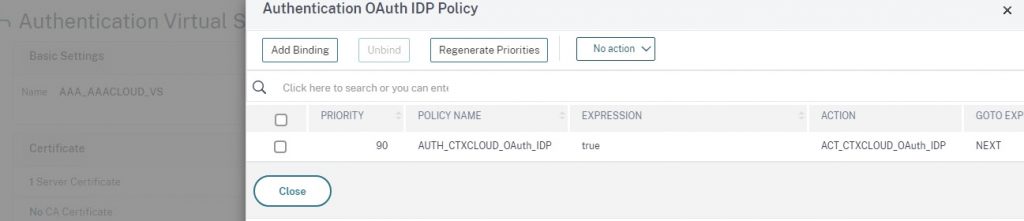
Step 5 – OAuth IdP Policy and Action
This step is derived from the Citrix Docs article “Use an on-premises Citrix Gateway as the identity provider for Citrix Cloud“. It is an essential linkage between Citrix Cloud and the customer-managed Citrix Gateway. It is this configuration that necessitates the non-authenticating LDAP server configurations for our SAML implementation.
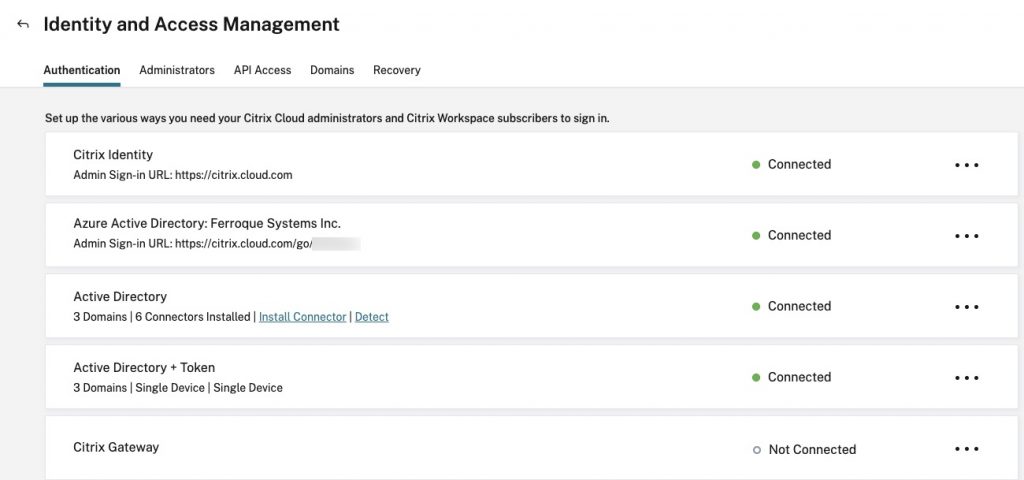
Log into https://citrix.cloud.com and select your tenant. From the hamburger menu, select “Identity and Access Management” and navigate to the “Authentication” tab. Configure the “Citrix Gateway” identity source following the instructions. Note the variables, download them, and remain on this page as we will need to return here in Step 7.
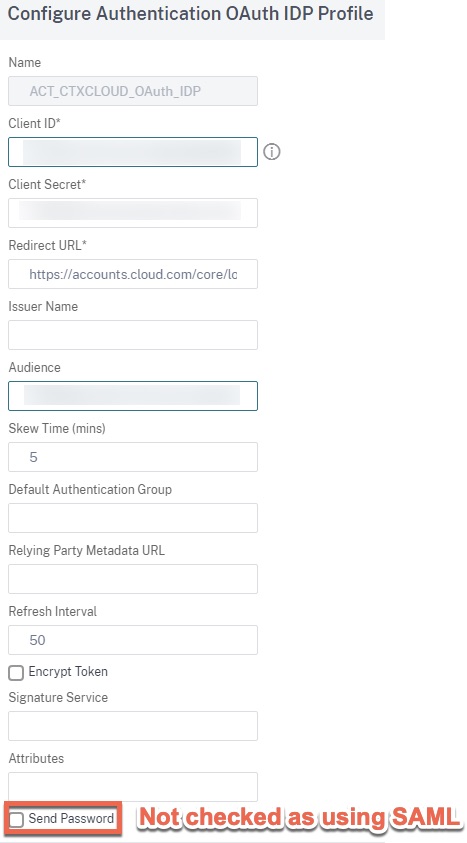
Back on the ADC, build the OAuth IdP action in accordance with the Client ID, Audience, and Client Secret variables needed to populate the action config. Note that as we are using SAML, the “Send Password” checkbox need not be checked.
Code is below for ease of use.
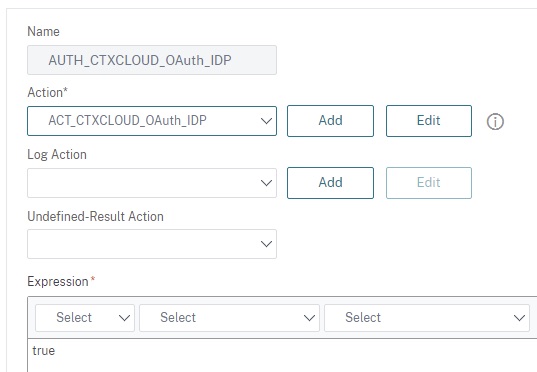
add authentication OAuthIDPProfile ACT_CTXCLOUD_OAuth_IDP -clientID XXXXXXXXXXXXXXXXXXXXXXXXX -clientSecret XXXXXXXXXXXXXXXXXXXXXXXXX -redirectURL "https://accounts.cloud.com/core/login-cip" -audience XXXXXXXXXXXXXXXXXXXXXXXXX
add authentication OAuthIdPPolicy AUTH_CTXCLOUD_OAuth_IDP -rule true -action ACT_CTXCLOUD_OAuth_IDP
Step 6 – AAA-TM vServer
Now we can build the AAA-TM vServer using the DMZ IP which is to have had the NAT applied for the public IP. Link the certificate created for this vServer (commercial CA certificate assumed), link the OAuth IdP policy to the “OAuth IdP Policy” areas within “Advanced Authentication Policies”, and the passthrough non-authentication environment selection policy to the “Authentication Policy” under the same location. Be sure to harden the SSL\TLS parameters of the vServer to your standards as well.
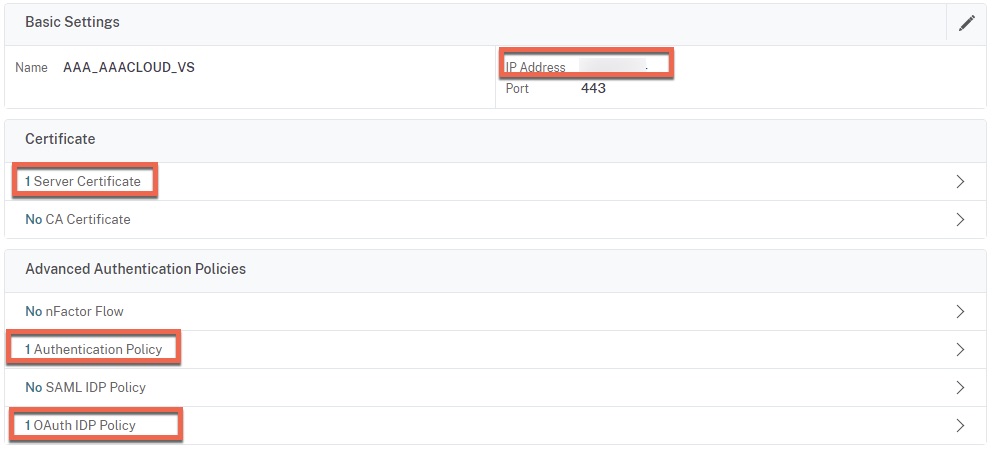
For the Authentication Policy, the next factor (not shown) should be the “plabel_noauth_environment” policy label.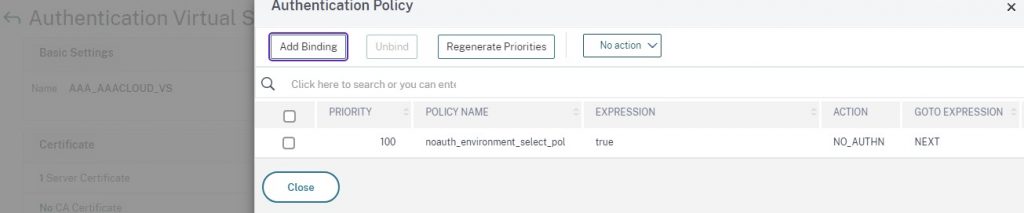
The last thing we need to do via the CLI is to bind a certificate to the global VPN parameters of the appliance as indicated in the Citrix Docs article “Use an on-premises Citrix Gateway as the identity provider for Citrix Cloud“. I suggest using the certificate of the AAA vServer. Some notes about this action:
- If copying the command from Citrix Docs and pasting into the CLI, the command may fail. I’ve found it prudent to type the code out manually and it seems to work.
- This command should be re-run when updating the certificate ahead of expiry. This may otherwise be missed leaving an expired certificate bound globally.
Code is below for ease of use.
add authentication vserver AAA_AAACLOUD_VS SSL XXX.XXX.XXX.XXX 443 -maxLoginAttempts 4 -failedLoginTimeout 15
set ssl vserver AAA_AAACLOUD_VS -dh ENABLED -dhFile "/nsconfig/ssl/dh-2048key.key" -dhCount 1000 -ssl3 DISABLED -tls1 DISABLED -tls11 DISABLED -dtls1 DISABLED -HSTS ENABLED -maxage 31536000
bind authentication vserver AAA_AAACLOUD_VS -policy noauth_environment_select_pol -priority 100 -nextFactor plabel_noauth_environment -gotoPriorityExpression NEXT
bind authentication vserver AAA_AAACLOUD_VS -policy AUTH_CTXCLOUD_OAuth_IDP -priority 90 -gotoPriorityExpression NEXT
bind vpn global -certkeyName <CERT_OF_AAA_VSERVER>
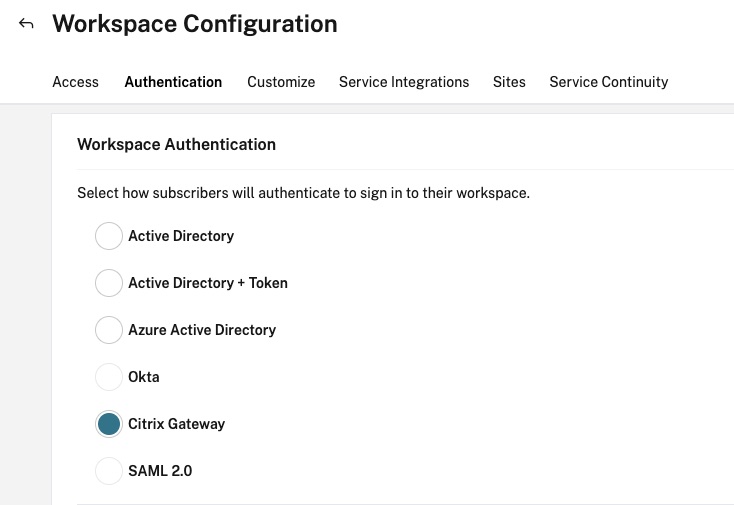
Step 7 – Citrix Cloud Configuration
Back on the Citrix Cloud Identity and Access Management screen, complete the configuration and confirm successful connectivity.
Then navigate from the hamburger menu to “Workspace Configuration” and the “Authentication” tab. Switch the Workspace Authentication identity source to “Citrix Gateway” and accept the warnings of the change in the authentication. Note it may take 5-10 minutes for the changes to reflect and during this time there may be an outage for user authentication.
Step 8 – Testing
With any luck when we hit our Citrix Workspace URL we should be greeted by our login screen.
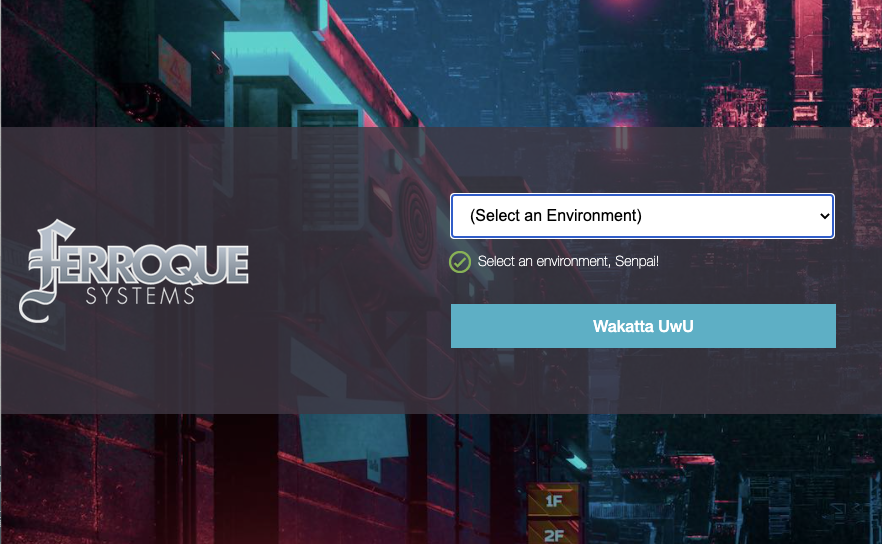
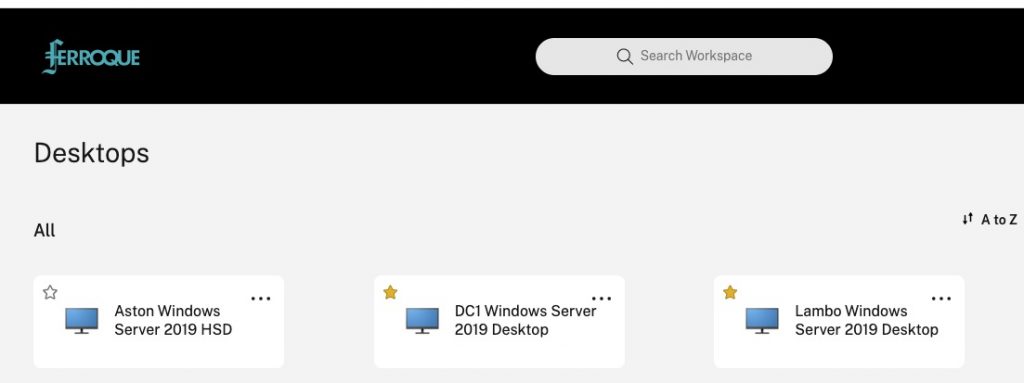
If we select Production and log into Azure AD, we should see the resources that the user is entitled to under the production identity context.
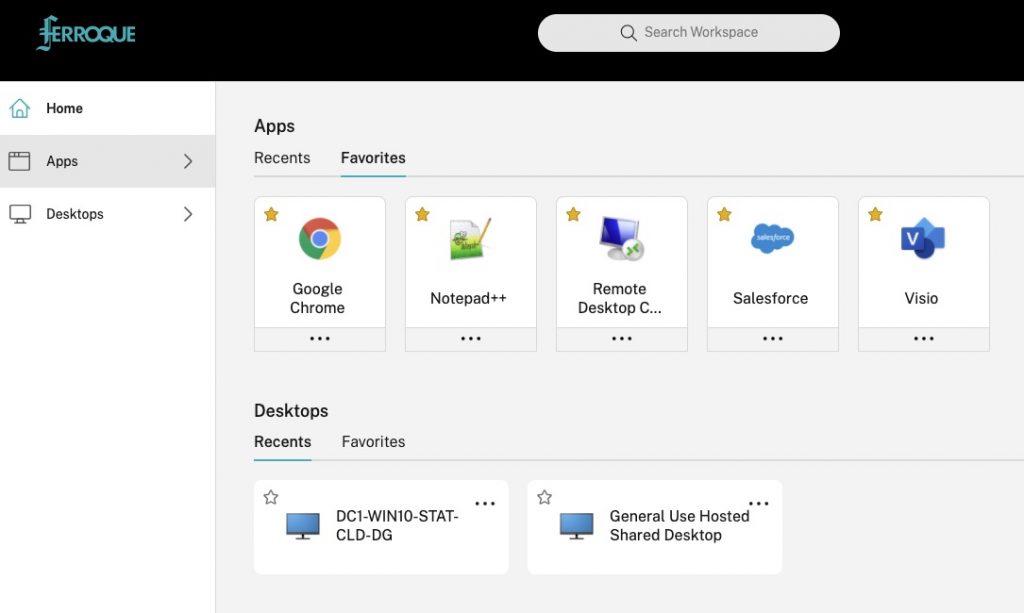
If we select Demo and log into Azure AD, we should see the resources that the user is entitled to under the demo identity context.
Conclusion
Although a little complex, this configuration allows for great flexibility in authentication methods for users. The general principles can be adapted to other authentication flows and methods as well.