
Introduction and Background
The subject of this topic has been a long-standing request from customers and consulting engineers alike for years. Something that I’m still personally surprised has not been baked into the NetScaler / Citrix ADC code more elegantly (be it for use on customer-managed ADCs or Adaptive Authentication which is more or less Citrix-hosted ADCs for customers to build complex auth flows on).
The means of how to scan for the Citrix Workspace App (CWA, formerly Citrix Receiver) for Windows has been a topic of debate for some time amongst the talented Citrix admins community.
Note: Companion article for Workspace app for MacOS and Linux is now live.
With this in mind, I am proposing a registry scan target for the CWA version that leverages some standard REG_DWORD values Citrix has maintained for some time and presumably will keep using for a while yet. Special thanks to Allen Perry for his insights from the field on this one.
Scanning for a valid CWA version we’re willing to accept for external users logging in via Citrix Gateway to maintain standards and mitigate security risks of legacy clients is one thing. But what we do with that information, especially in the context of user experience is another. Do we just add some logon page footer text advising the user of what the supported client version is and where to get it and then block them when their client version does not match? This may work for some organizations but may be a little too ham-fisted for others where white gloving the user experience has to be balanced with operational and security mandates to minimize backlash from users.
To address that concern, I am coupling the Endpoint Analysis (EPA) action with two login schemas:
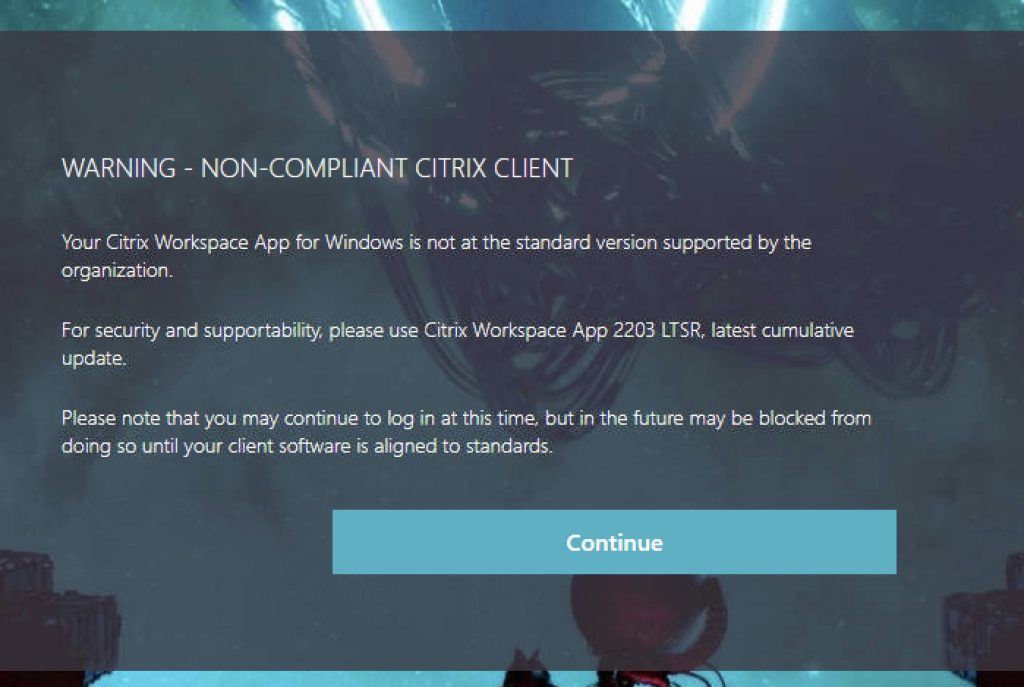
- Warning: Post-EPA failure, the user will be prompted with a page indicating their Workspace App is out of compliance (would also display if they skipped the scan) and that they will need to upgrade to avoid being outright blocked from logging in, in the future. The user can click “Continue” to proceed to the login page. This allows organizations to provide ample warning to end-users about the need to address the gap, to mitigate being caught off-guard in the future.
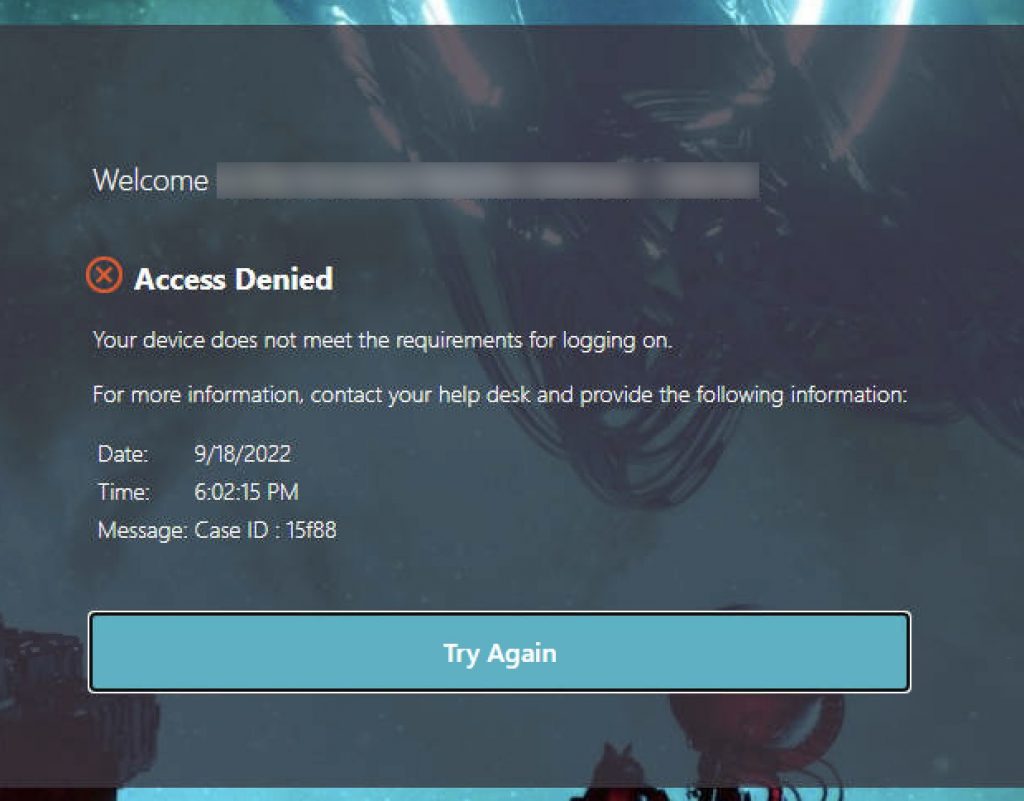
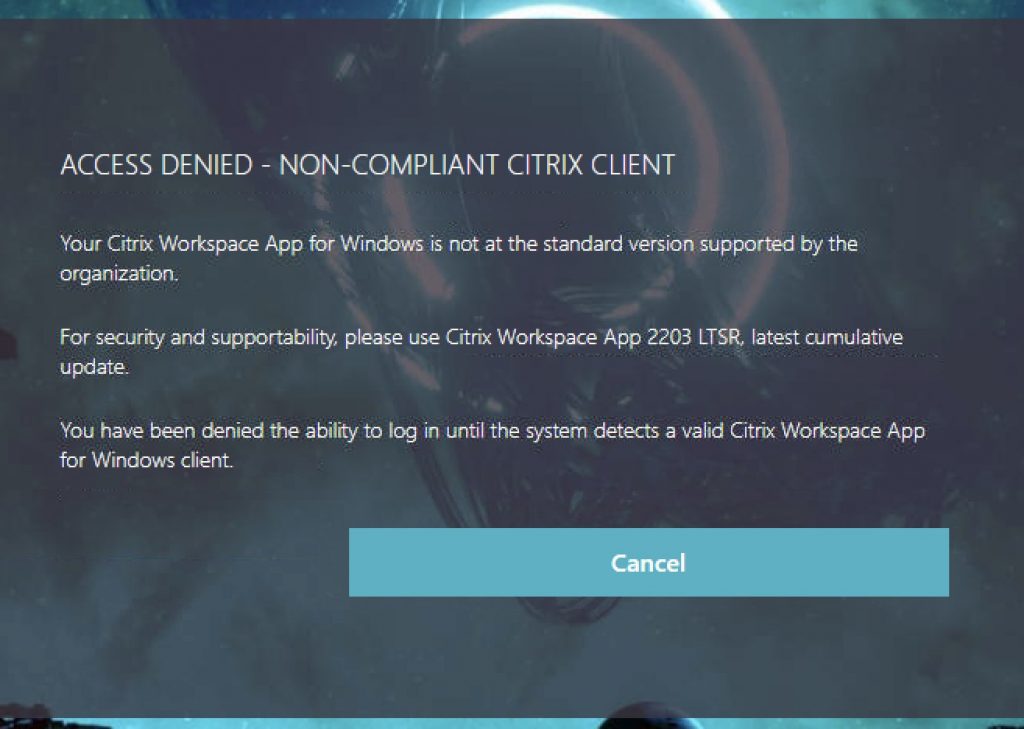
- Block: Post-EPA failure, the user will be prompted with a page indicating their Workspace App is out of compliance (would also display if they skipped the scan) and they have been denied access to the Citrix Gateway authentication page. Users will be forced to upgrade their client to be allowed entry. This schema could be attached to another Policy Label and replace when the time is right, the “Warning” Policy Label. Or, the EPA failure message Policy Label’s login schema could simply be re-pointed to the new schema. The user clicks “Cancel” which throws them back onto the login page with their auth cookies invalidated. This function uses a custom label I previously wrote about here, to produce this effect.
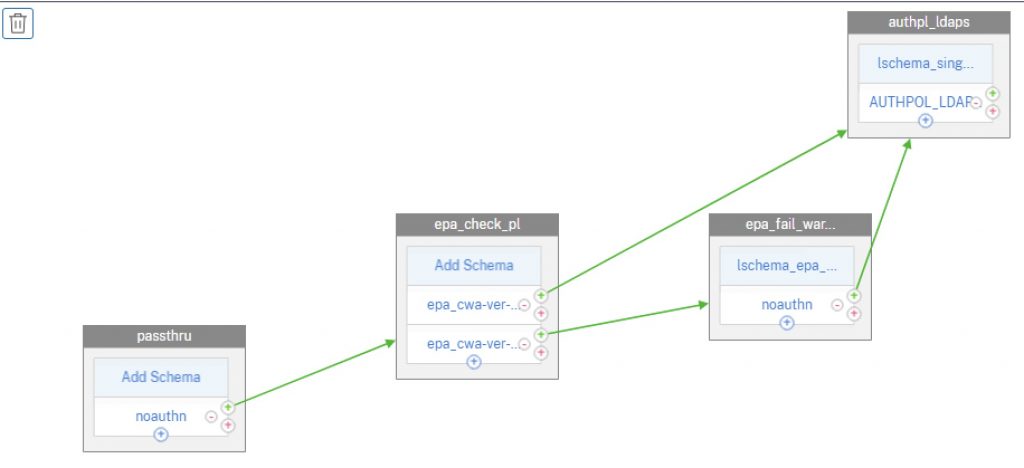
For a visual, this is the nFactor flow we’ll be creating roughly for a flow that provides an invalid Workspace App warning. For a denial of access, we would not link the EPA failure factor to the authentication factor and the auth flow will terminate, as the user will click a Cancel button, which thanks to a custom label will terminate the authentication flow and send the user back to the beginning of the flow.
Step 1 – Create Login Schemas
Starting out, we’ll create a new login schema XML file. These files are stored in the appliance under “/nsconfig/loginschema/LoginSchema/” or just store under “/nsconfig/loginschema/”.
For the “Warning” schema that allows users to continue logging in after viewing the non-compliance message, save the file as EPACheckFailedWarn.xml or something. Edit the text as you see fit.
<?xml version="1.0" encoding="UTF-8"?>
<AuthenticateResponse xmlns="http://citrix.com/authentication/response/1">
<Status>success</Status>
<Result>more-info</Result>
<StateContext></StateContext>
<AuthenticationRequirements>
<PostBack>/nf/auth/doAuthentication.do</PostBack>
<CancelPostBack>/nf/auth/doLogoff.do</CancelPostBack>
<CancelButtonText>Cancel</CancelButtonText>
<Requirements>
<Requirement><Credential><Type>none</Type></Credential><Label><Text>WARNING - NON-COMPLIANT CITRIX CLIENT</Text><Type>heading</Type></Label><Input /></Requirement>
<Requirement><Credential><Type>none</Type></Credential><Label><Text>Your Citrix Workspace App for Windows is not at the standard version supported by the organization.</Text><Type>plain</Type></Label><Input /></Requirement>
<Requirement><Credential><Type>none</Type></Credential><Label><Text>For security and supportability, please use Citrix Workspace App 2203 LTSR, latest cumulative update.</Text><Type>plain</Type></Label><Input /></Requirement>
<Requirement><Credential><Type>none</Type></Credential><Label><Text>Please note that you may continue to log in at this time, but in the future may be blocked from doing so until your client software is aligned to standards.</Text><Type>plain</Type></Label><Input /></Requirement>
<Requirement><Credential><ID>loginBtn</ID><Type>none</Type></Credential><Label><Type>none</Type></Label><Input><Button>Continue</Button></Input></Requirement>
</Requirements>
</AuthenticationRequirements>
</AuthenticateResponse>
For the “Block” schema that blocks users to continue logging in, save the file as EPACheckFailedBlock.xml or something. Edit the text as you see fit. Note that this step is optional if you do not plan to block users from logging in, but not a bad config to stage in event you wish to warn but switch to blocking some time in the future
There are a few things to note here in the file:
- We have a custom button with an ID of “nsg-logoutBtn” which we will reference in our custom label.
- We have an auth requirement component which we’ve labeled “cancelbutton” which will trigger out custom label action we’ll define in the next step.
- We have two text components in the example. One is a header for the error condition, the other is body text to describe the custom error message we want the user to see.
<?xml version="1.0" encoding="UTF-8"?>
<AuthenticateResponse xmlns="http://citrix.com/authentication/response/1">
<Status>success </Status>
<Result>more-info</Result>
<StateContext/>
<AuthenticationRequirements>
<CancelPostBack>/nf/auth/doLogoff.do</CancelPostBack>
<CancelButtonText>Cancel</CancelButtonText>
<Requirements>
<Requirement><Credential><Type>none</Type></Credential><Label><Text>ACCESS DENIED - NON-COMPLIANT CITRIX CLIENT</Text><Type>heading</Type></Label><Input /></Requirement>
<Requirement><Credential><Type>none</Type></Credential><Label><Text>Your Citrix Workspace App for Windows is not at the standard version supported by the organization.</Text><Type>plain</Type></Label><Input /></Requirement>
<Requirement><Credential><Type>none</Type></Credential><Label><Text>For security and supportability, please use Citrix Workspace App 2203 LTSR, latest cumulative update.</Text><Type>plain</Type></Label><Input /></Requirement>
<Requirement><Credential><Type>none</Type></Credential><Label><Text>You have been denied the ability to log in until the system detects a valid Citrix Workspace App for Windows client.</Text><Type>plain</Type></Label><Input /></Requirement>
<Requirement><Credential><ID>nsg-logoutBtn</ID><Type>nsg-logoutBtn</Type></Credential><Label><Type>none</Type></Label><Input><Button>Cancel</Button></Input></Requirement>
<Requirement>
<Credential><Type>cancelbutton</Type></Credential>
<Label><Type>none</Type></Label>
<Input/>
</Requirement>
</Requirements>
</AuthenticationRequirements>
</AuthenticateResponse>
With the XML files created on the appliance, we need to create the login schema profiles via Security>AAA – Application Traffic>Login Schema>Profiles tab. Create a new login schema object and select using the pencil icon the XML file we created. Click the “Select” button to actually commit your selection, before clicking OK. Repeat for the “blocked” schema if planning to use that as well.
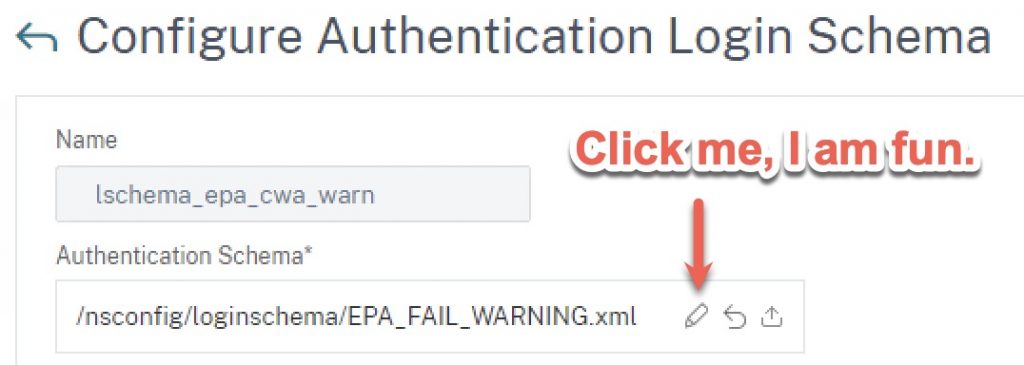
Pro Tip: If you’re unhappy with the verbiage the first time around, or are making updates to the text later, repeat the process above of selecting the XML file. Otherwise, the appliance will keep using the old one it loaded into memory. Clearing cache on client or browser won’t fix that. Additionally, if your firmware version is erroring out when trying to select the file citing an access issue, run the commands to add the lschema via the CLI instead to overcome that bug.
Step 2 – Create Custom Label (Optional)
If you are planning to outright block users from logging in and want to display a message that is both customized and less generic than the one below that they’ll otherwise get, follow “Step 2” in one of our previous nFactor articles to edit the script.js file in your custom theme. If you just want to warn users, this step isn’t necessary but optional steps will be included in this guide to accomplish this so you can stage the configurations for later use.
Step 3 – Create EPA Action
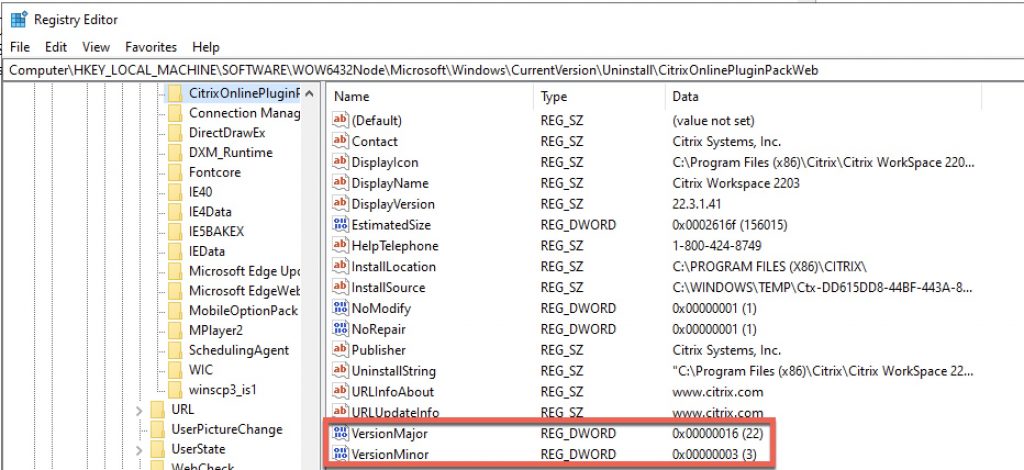
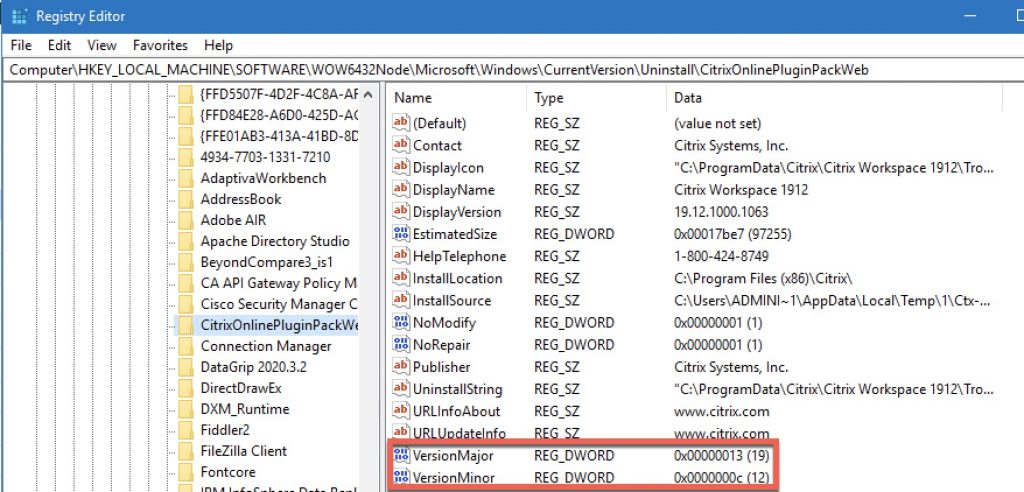
For the EPA action, we’ll be scanning for the two registry keys below on the Windows endpoint. This is where useful version information is stored as REG_DWORD values. Citrix stores the client version as “Major” and “Minor”. Contextually this versioning style (which most software vendors up until recently aligned to) originated with older Citrix clients such as Citrix Online Plugin 12.x or Citrix Receiver 4.9 aka 14.9 where 14 was the major and 9 was minor for example. In the new paradigm of date-based versioning Citrix, Microsoft, and others transitioned to around 2017/2018, in the case of the 2203 LTSR this results in the major version (year) being 22 and the minor (month) being 3.
Below is a screenshot from CWA 2203.1:
And below is a screenshot of CWA 1912 CU1:
There are some considerations to this method:
- Looking for exact version matches or setting minimum versions. When we create the EPA action, we can look for exact (==) matches for both major and minor versions as well greater than or equal to (>=). Less than or equal to (<=) is also possible.
- If we want to set a minimum version in general, this can get tricky if your minimum is say, 2203. You could do a >= 22 but if 2301 comes out, the check would fail as the minimum minor version is 3. Less of an issue if you are looking to hard-set a version (such as 2203 no more and no less).
- To add flexibility to the above limitation, or to simply allow specific releases, we can craft “OR” statements in the EPA. Say, to allow 1912 (19 major, 12 minor) as well as 2203 (22 major, 3 minor).
- The versioning does not accommodate for CUs. So this is a key caveat to this method if you need to restrict against a CU version, target the “DisplayVersion” string. Note that as discussed in this third-party blog, if you use “contains” in the EPA registry value scan, we can check for string values. Note that if you need to support multiple versions you’d be creating multiple “or” aka “||” statements in the EPA expressions unless you plan on locking the check to a specific CU version (which could make things tricky during upgrade cycles of the client).
Here are two flavours of EPA actions: one for checking a specific CWA version with a minimum minor code, and one for checking two versions so that if either are found, the scan passes.
Single major version with a minimum minor version:
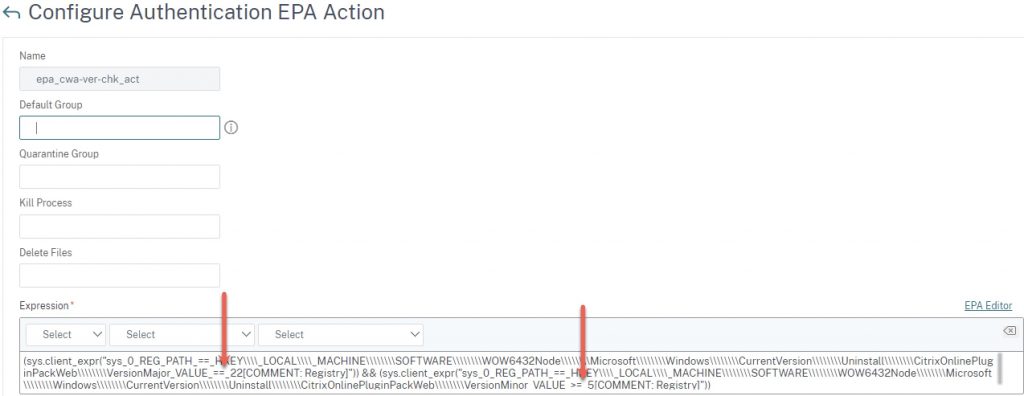
(sys.client_expr("sys_0_REG_PATH_==_HKEY\\\\_LOCAL\\\\_MACHINE\\\\\\\\SOFTWARE\\\\\\\\WOW6432Node\\\\\\\\Microsoft\\\\\\\\Windows\\\\\\\\CurrentVersion\\\\\\\\Uninstall\\\\\\\\CitrixOnlinePluginPackWeb\\\\\\\\VersionMajor_VALUE_==_22[COMMENT: Registry]")) && (sys.client_expr("sys_0_REG_PATH_==_HKEY\\\\_LOCAL\\\\_MACHINE\\\\\\\\SOFTWARE\\\\\\\\WOW6432Node\\\\\\\\Microsoft\\\\\\\\Windows\\\\\\\\CurrentVersion\\\\\\\\Uninstall\\\\\\\\CitrixOnlinePluginPackWeb\\\\\\\\VersionMinor_VALUE_>=_3[COMMENT: Registry]"))
Two major versions are acceptable with minimum minor versions:
((sys.client_expr("sys_0_REG_PATH_==_HKEY\\\\_LOCAL\\\\_MACHINE\\\\\\\\SOFTWARE\\\\\\\\WOW6432Node\\\\\\\\Microsoft\\\\\\\\Windows\\\\\\\\CurrentVersion\\\\\\\\Uninstall\\\\\\\\CitrixOnlinePluginPackWeb\\\\\\\\VersionMajor_VALUE_==_22[COMMENT: Registry]")) && (sys.client_expr("sys_0_REG_PATH_==_HKEY\\\\_LOCAL\\\\_MACHINE\\\\\\\\SOFTWARE\\\\\\\\WOW6432Node\\\\\\\\Microsoft\\\\\\\\Windows\\\\\\\\CurrentVersion\\\\\\\\Uninstall\\\\\\\\CitrixOnlinePluginPackWeb\\\\\\\\VersionMinor_VALUE_>=_3[COMMENT: Registry]")) || (sys.client_expr("sys_0_REG_PATH_==_HKEY\\\\_LOCAL\\\\_MACHINE\\\\\\\\SOFTWARE\\\\\\\\WOW6432Node\\\\\\\\Microsoft\\\\\\\\Windows\\\\\\\\CurrentVersion\\\\\\\\Uninstall\\\\\\\\CitrixOnlinePluginPackWeb\\\\\\\\VersionMajor_VALUE_==_19[COMMENT: Registry]")) && (sys.client_expr("sys_0_REG_PATH_==_HKEY\\\\_LOCAL\\\\_MACHINE\\\\\\\\SOFTWARE\\\\\\\\WOW6432Node\\\\\\\\Microsoft\\\\\\\\Windows\\\\\\\\CurrentVersion\\\\\\\\Uninstall\\\\\\\\CitrixOnlinePluginPackWeb\\\\\\\\VersionMinor_VALUE_>=_12[COMMENT: Registry]")))
If you just want to slam these into the CLI, here are the corresponding commands to create the EPA actions
One version:
add authentication epaAction epa_cwa_ver_check_act -csecexpr q/(sys.client_expr("sys_0_REG_PATH_==_HKEY\\\\_LOCAL\\\\_MACHINE\\\\\\\\SOFTWARE\\\\\\\\WOW6432Node\\\\\\\\Microsoft\\\\\\\\Windows\\\\\\\\CurrentVersion\\\\\\\\Uninstall\\\\\\\\CitrixOnlinePluginPackWeb\\\\\\\\VersionMajor_VALUE_==_22[COMMENT: Registry]")) && (sys.client_expr("sys_0_REG_PATH_==_HKEY\\\\_LOCAL\\\\_MACHINE\\\\\\\\SOFTWARE\\\\\\\\WOW6432Node\\\\\\\\Microsoft\\\\\\\\Windows\\\\\\\\CurrentVersion\\\\\\\\Uninstall\\\\\\\\CitrixOnlinePluginPackWeb\\\\\\\\VersionMinor_VALUE_>=_3[COMMENT: Registry]"))
Two versions:
add authentication epaAction epa_cwa_ver_check_act -csecexpr q/((sys.client_expr("sys_0_REG_PATH_==_HKEY\\\\_LOCAL\\\\_MACHINE\\\\\\\\SOFTWARE\\\\\\\\WOW6432Node\\\\\\\\Microsoft\\\\\\\\Windows\\\\\\\\CurrentVersion\\\\\\\\Uninstall\\\\\\\\CitrixOnlinePluginPackWeb\\\\\\\\VersionMajor_VALUE_==_22[COMMENT: Registry]")) && (sys.client_expr("sys_0_REG_PATH_==_HKEY\\\\_LOCAL\\\\_MACHINE\\\\\\\\SOFTWARE\\\\\\\\WOW6432Node\\\\\\\\Microsoft\\\\\\\\Windows\\\\\\\\CurrentVersion\\\\\\\\Uninstall\\\\\\\\CitrixOnlinePluginPackWeb\\\\\\\\VersionMinor_VALUE_>=_3[COMMENT: Registry]")) || (sys.client_expr("sys_0_REG_PATH_==_HKEY\\\\_LOCAL\\\\_MACHINE\\\\\\\\SOFTWARE\\\\\\\\WOW6432Node\\\\\\\\Microsoft\\\\\\\\Windows\\\\\\\\CurrentVersion\\\\\\\\Uninstall\\\\\\\\CitrixOnlinePluginPackWeb\\\\\\\\VersionMajor_VALUE_==_19[COMMENT: Registry]")) && (sys.client_expr("sys_0_REG_PATH_==_HKEY\\\\_LOCAL\\\\_MACHINE\\\\\\\\SOFTWARE\\\\\\\\WOW6432Node\\\\\\\\Microsoft\\\\\\\\Windows\\\\\\\\CurrentVersion\\\\\\\\Uninstall\\\\\\\\CitrixOnlinePluginPackWeb\\\\\\\\VersionMinor_VALUE_>=_12[COMMENT: Registry]")))/
For the visually inclined, the EPA action will look like this (single major version check).
We will circle back to creating the EPA policy itself (nothing special) later.
Step 4 – Create Policy Label for Warning
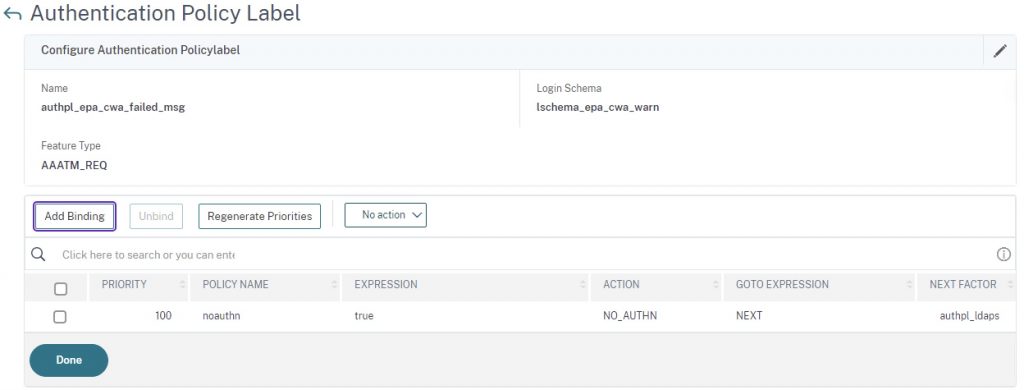
Create a Policy Label using the lschema_epa_cwa_warn login schema, and use (create if need be) a non-authenticating policy. Bind your next authentication action that users will hit after accepting the non-compliant version warning. In this example, it’s just an LDAPS factor.
CLI references for this step:
add authentication Policy noauthn -rule true -action NO_AUTHN
add authentication policylabel authpl_epa_cwa_failed_msg -loginSchema lschema_epa_cwa_warn
bind authentication policylabel authpl_epa_cwa_failed_msg -policyName noauthn -priority 100 -gotoPriorityExpression NEXT -nextFactor authpl_ldaps
Step 5 – Create Policy Label for Block (Optional)
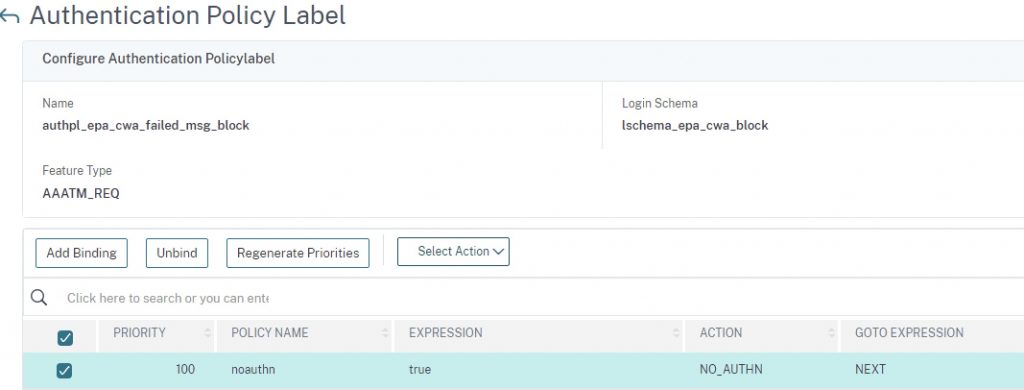
This step is similar to the above step but has no next factor and uses the “block” login schema.
CLI references for this step:
add authentication Policy noauthn -rule true -action NO_AUTHN
add authentication policylabel authpl_epa_cwa_failed_msg_block -loginSchema lschema_epa_cwa_block
bind authentication policylabel authpl_epa_cwa_failed_msg_block -policyName noauthn -priority 100 -gotoPriorityExpression NEXT
Step 6 – Create EPA Check Policy Label
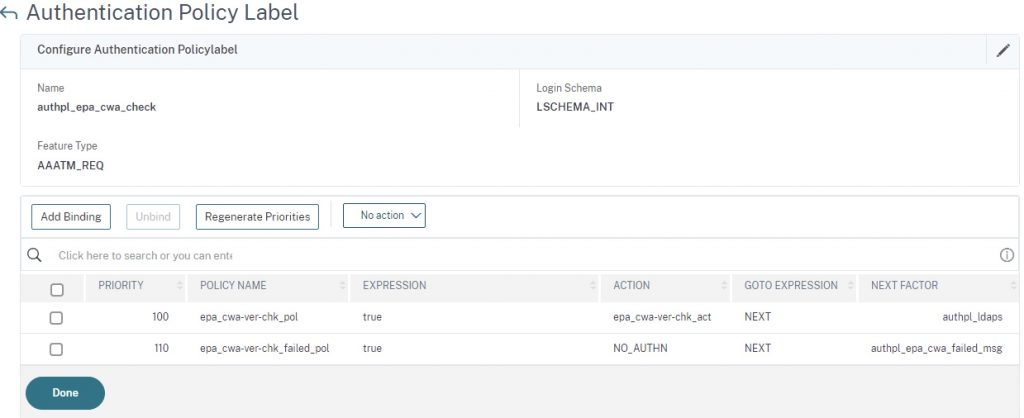
Create a new Policy Label with no schema and create and bind two policies with the expression of true. The first policy in the list should be the EPA check with a next factor to your auth step Policy Label (in this case we’re just using an LDAPS factor) for users who match the version requirement of the EPA scan. The second will be a passthrough if the EPA check fails, sending the user to the EPA failed warning Policy Label (if you want the user to be blocked, you would swap it for the blocking Policy Label created prior).
CLI references for this step:
add authentication policylabel authpl_epa_cwa_check -loginSchema LSCHEMA_INT
bind authentication policylabel authpl_epa_cwa_check -policyName epa_cwa-ver-chk_pol -priority 100 -gotoPriorityExpression NEXT -nextFactor authpl_ldaps
bind authentication policylabel authpl_epa_cwa_check -policyName epa_cwa-ver-chk_failed_pol -priority 110 -gotoPriorityExpression NEXT -nextFactor authpl_epa_cwa_failed_msg
Step 7 – Bind to AAA vServer
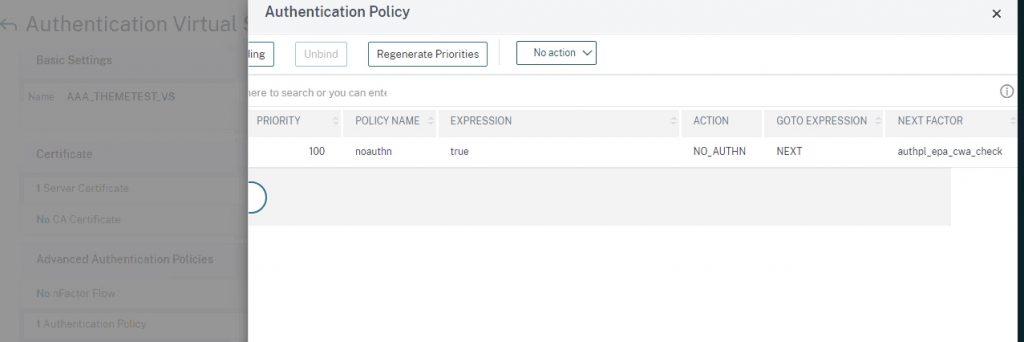
When performing EPA preauth checks on Citrix ADC (EPA being the first factor aka preauth scan) I find it useful to start off with a passthrough factor due to some historical experiences with sporadic auth failures if authenticating via Workspace App (vs. via browser). Therefore we’ll start out by binding to an existing AAA-TM vServer a noauthn policy (which should be created by this point) that links to the EPA check Policy Label.
CLI references for this step:
bind authentication vserver YOURVSERVERNAME -policy noauthn -priority 100 -nextFactor authpl_epa_cwa_check -gotoPriorityExpression NEXT
Testing
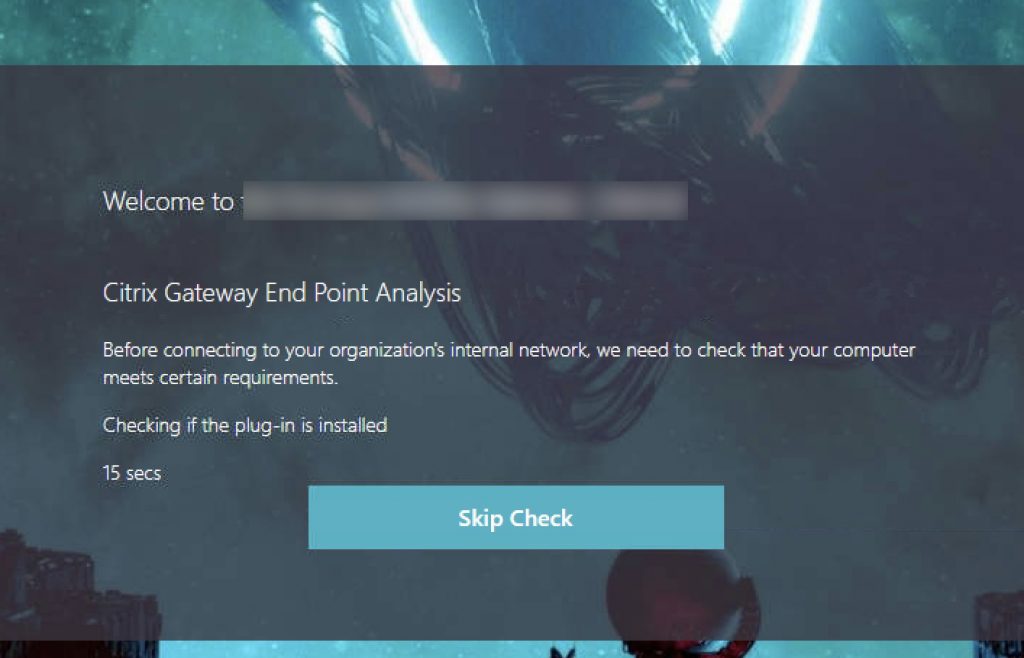
Provided I did not miss any vital step in creating this guide, we can get to testing once your Citrix Gateway is linked to your AAA-TM vServer via an authentication profile.
The experience should look as follows.
Hitting the Citrix Gateway
Passing to Authentication if Workspace App EPA Passed
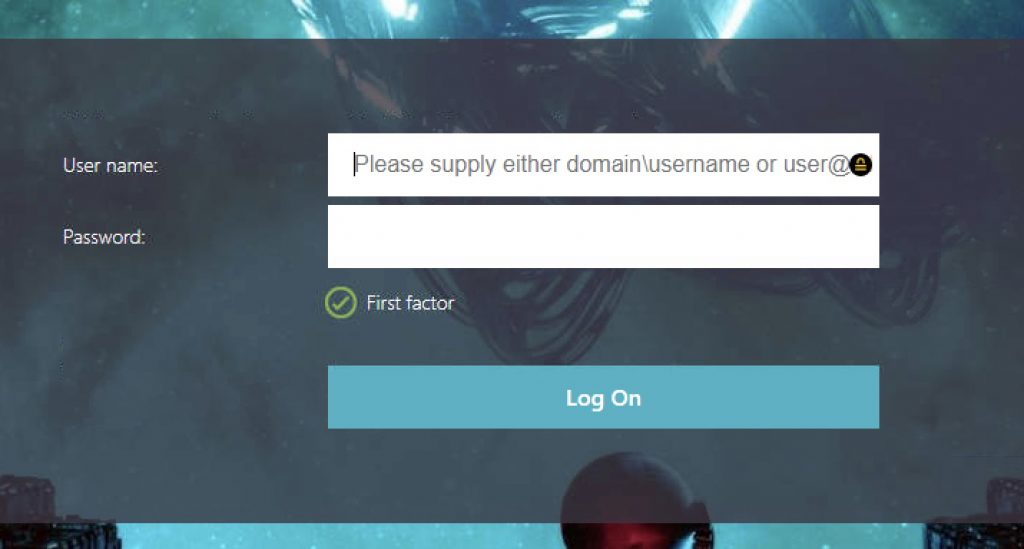
Passing to EPA Failure (Invalid Workspace App) Warning
Clicking “Continue” will move the user to the authentication page seen above.
Passing to EPA Failure (Invalid Workspace App) Blocked
If you swap the “Warning” Policy Label for the “Blocked” Policy Label in the flow, this screen will appear and will be the end of the line for the user. Clicking “Cancel” invokes the Custom Label which will invalidate the auth cookies by hitting the tmlogout page and restart the authentication sequence back at the EPA scan factor.
Conclusion
This post is intended to illustrate one of several methods for checking for a CWA for Windows client version in order to make a determination of the next action. Either a warning (perhaps for a couple weeks or a month ahead of an outright denial of access) or a blocked/access denied message barring users with invalid Citrix clients from logging in. It is not perfect, but can be adapted to meet various workflows and not necessarily even a preauthentication step.
-
 Michael Shuster
Michael is Ferroque's founder and a noted Citrix authority, overseeing operations and service delivery while keeping a hand in the technical cookie jar. He is a passionate advocate for end-user infrastructure technology, with a rich history designing and engineering solutions Citrix, NetScaler, VMware, and Microsoft tech stacks.


Really good article!!
Hello,
I need to configure Radius as first factor and Ldap as Second factor using nfactor flow. when i configure the Dualauth.xml Loginschema does not accepts password in 2nd field. it accepts passcode in second field and password in 3rd field. so selected DUALAUTH_Flipped.xml as login schema for first factor, here as well Passcode not accepted in second field. rather it accepts password in second field and passcode in 3rd filed(the way i want) but it doesnt performs sso for storefront and give cannot complete your request.
Hi,
How can we identify the Citrix secure access using policy expression as we are trying to send this traffic to EPA domain check.
Thanks.