
Introduction and Background
Many organizations are still in the throws of migrating from legacy multifactor / 2FA solutions to modern authentication solutions. Common examples would be moving from RADIUS-based secondary factors to modern authentication methods powered by SAML or OAuth such as Azure AD, Okta, PingID, etc. Organizations may require a transitionary period between authentication factors in such a scenario, or, simply due to technical or business requirements need to support several authentication methods in production on a single authentication portal.
This can be achieved via nFactor on Citrix ADC/NetScaler, both on customer-managed appliances (Advanced Edition licenses and up) or the Citrix Adaptive Authentication service Citrix provides to Citrix Cloud service customers.
In this guide, I will walk through an example configuration developed for a customer. As usual, the details of these configurations are found throughout this guide for easy adaptation for similar or different use cases you may have.
A good part of these configurations has been adapted from the masterful work of my colleague Juliano Reckziegel from Citrix/CSG. Credit goes to him for the “choose your auth” logic and nFactor custom label for the “remember my choice” cookie creation.
Reference Solution
This guide is similar in spirit to the “environment selector” article written about previously but with a number of different requirements. In this guide, we will be solving for the following requirements. Note that this is a fairly specific set of requirements and certain configurations in this guide can be skipped if not applicable to your use case.
- The customer is on a RADIUS-based solution today
- The customer is moving to Azure AD / Azure MFA via SAML and eventually, all users will use this option
- Users must be prompted to make an authentication choice at the start of the login flow, as there will not be automated logic available to choose on the user’s behalf (such as AD group membership we could gather from a non-authenticating LDAP lookup at the start of the flow)
- The customer is unable to deploy Citrix FAS so post-SAML authentication, the user will be prompted to enter their password after performing SAML authentication so LDAP credentials can be passed back to StoreFront (in the use case of this guide) or to Workspace service (via Adaptive Auth or customer-managed Citrix Gateway) via the required OAuth IdP config
Ultimately, users are expected to switch over to Azure AD permanently once they have been enrolled in the service. To improve the flow for those users who have made the switch, a “remember” cookie has been added into the configuration. Once the user on their endpoint has chosen to use Azure AD over RADIUS, the next time they visit the login page, they are automatically redirected to Azure AD thanks to a cookie. If the user needs to switch back to RADIUS, they will need to clear the cookies for the site.
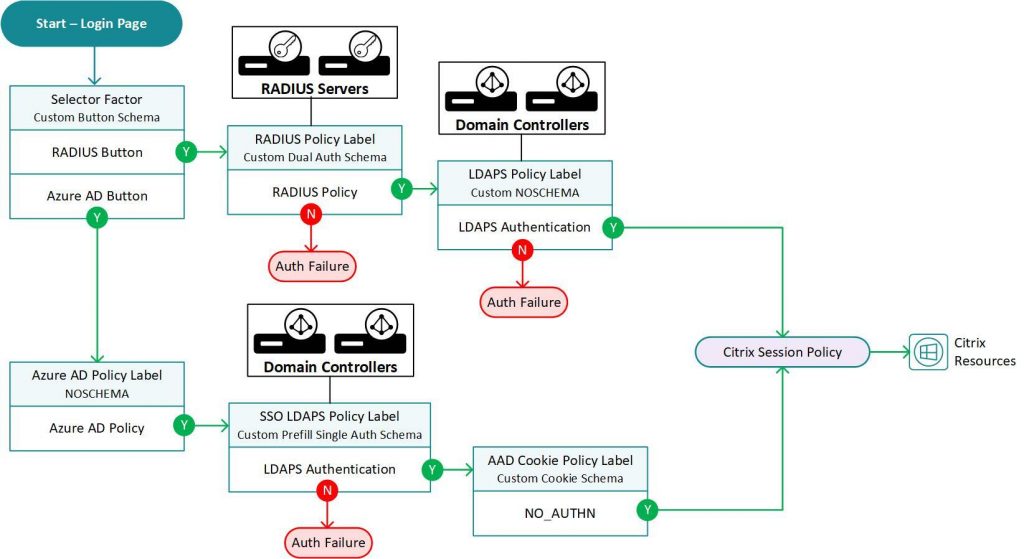
Our solution flow will look as follows:
Pre-requisites
For this recipe, you will need:
- NetScaler (Citrix ADC) 13.0 or 13.1 Advanced or Premium Edition with a full baseline configuration and integrated into the network (firewall rules, routing, etc.), or a configured Adaptive Authentication service instance
- An IP for the Citrix Gateway vServer with firewall rules opened from the endpoint to IP on port 443
- Certificate issued for the Citrix Gateway URL loaded onto the appliance and cert key pair and cert links completed
- A staged IdP application (in our case it is Azure AD) for the Citrix Gateway web app
- A staged SAML SP action on the NetScaler corresponding to the IdP application configuration
- An LDAP server IP to be used in the LDAP actions
- A staged and tested RADIUS action on the NetScaler, secret configured on NetScaler, NetScaler IPs added as RADIUS clients (if applicable) on the RADIUS server(s)
- A new custom RfWebUI-based theme (we will configure custom label configs via the script.js file of the theme)
- StoreFront configured, accessible from NetScaler SNIP, Citrix Gateway object defined and bound to Store, and trusted domain FQDN added to the Store’s authentication configuration
- Session policy(ies) staged on NetScaler with FQDN domain value (this solution could work without SSO via UPN but this example is set up using UPN for SSO to StoreFront)
Configuration
Step 1 – LDAP Actions and Policies
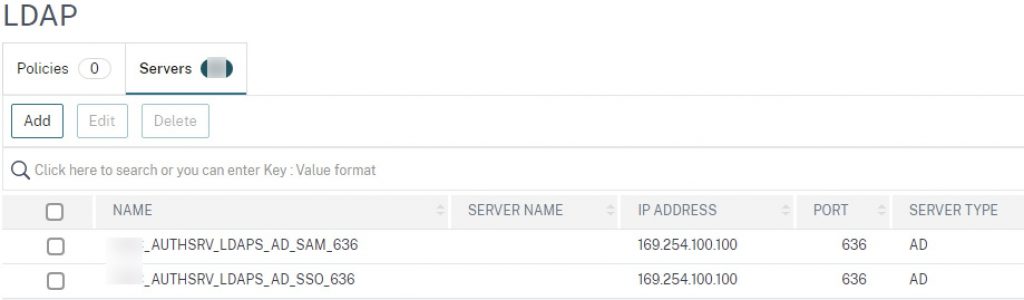
Stage two LDAP actions. One will be used post-Azure AD for collecting the user’s network password which will be sent back to StoreFront. It will use the Server Logon Name Attribute and SSO Name Attribute value of UserPrincipalName. The second is used for the RADIUS authentication selection (assuming RADIUS is performing token check only, and LDAP authentication remains on NetScaler). It will use the Server Logon Name Attribute of sAMAccountName and SSO Name Attribute of UserPrincipalName. In these example configs, an APIPA address corresponding to an LDAP LBVIP is used.
add authentication ldapAction AUTHSRV_LDAPS_AD_SAM_636 -serverIP 169.254.100.100 -serverPort 636 -ldapBase "dc=[YOURDOMAIN],dc=com" -ldapBindDn [YOUR_LDAP_BIND_ACCOUNT] -ldapBindDnPassword [YOURPASSWORD] -ldapLoginName sAMAccountName -groupAttrName memberOf -subAttributeName cn -secType SSL -ssoNameAttribute UserPrincipalName -passwdChange ENABLED

add authentication ldapAction AUTHSRV_LDAPS_AD_SSO_636 -serverIP 169.254.100.100 -serverPort 636 -ldapBase "dc=[YOURDOMAIN],dc=com" -ldapBindDn [YOUR_LDAP_BIND_ACCOUNT] -ldapBindDnPassword [YOURPASSWORD] -ldapLoginName UserPrincipalName -groupAttrName memberOf -subAttributeName cn -secType SSL -ssoNameAttribute UserPrincipalName
Create the advanced authentication LDAP policies, with value of “true”.
add authentication Policy ADVAUTH_LDAPS_AD_SAM_POL -rule true -action AUTHSRV_LDAPS_AD_SAM_636
add authentication Policy ADVAUTH_LDAPS_AD_SSO_POL -rule true -action AUTHSRV_LDAPS_AD_SSO_636
Step 2 – RADIUS Action and Policies
This was indicated as a pre-requisite but including sample configurations for completeness.
add authentication radiusAction AUTHSRV_RSA_RADIUS_1812 -serverIP [YOUR_RADIUS_IP] -serverPort 1812 -authTimeout 60 -radKey [YOUR_SECRET_KEY]
add authentication Policy ADVAUTH_RSA_RADIUS_POL -rule true -action AUTHSRV_RSA_RADIUS_1812
We also need to create a non-authenticating “selector” policy that will be used when a user selects the “RSA” button. The expression is checking for the text of the login button on the rendered page to make the match. Note the login button text must match what is coded into the login schema and presented on the user’s screen.
add authentication Policy ADVAUTH_RSA_SELECT_POL -rule "HTTP.REQ.BODY(500).AFTER_STR(\"loginBtn\").CONTAINS(\"RSA\")" -action NO_AUTHN
Step 3 – SAML Action and Policy
The SAML SP action was indicated as a pre-requisite but including sample configurations for completeness. Note that this sample includes the recommended RelayState params for security, and is forcing auth at Citrix Gateway even if the user has a valid IdP session, which can always be unchecked if desired.
Unlike the RADIUS flow we only need one policy, which will be the selector policy. The expression is checking for the text of the login button on the rendered page to make the match, or the presence of a cookie with value “AzureAD” to auto-select the “Azure AD” option for the user on subsequent logins to the portal. Note the login button text must match what is coded into the login schema and presented on the user’s screen. If spaces are used such as in the case of Azure AD, the expression has a + symbol to ensure it matches.
add authentication samlAction AUTHSRV_AzureAD_SAML -samlIdPCertName [YOUR_IDP_CERT] -samlSigningCertName [YOUR_CTX_GW_CERT] -samlRedirectUrl "https://login.microsoftonline.com/[YOUR_URI]/saml2" -samlIssuerName "https://[YOUR_CTX_GW URL]" -relaystateRule "AAA.LOGIN.RELAYSTATE.EQ(\"https://[YOUR_CTX_GW URL]/\")" -logoutURL "https://login.microsoftonline.com/[YOUR_URI]/saml2" -forceAuthn ON -audience "https://[YOUR_CTX_GW URL]"

add authentication Policy ADVAUTH_AzureAD_SELECT_SAML_POL -rule "HTTP.REQ.BODY(500).AFTER_STR(\"loginBtn\").CONTAINS(\"Azure+AD\") || HTTP.REQ.COOKIE.VALUE(\"NSC_AUTH_METHOD\").EQ(\"AzureAD\")" -action AUTHSRV_AzureAD_SAML
Step 4 – Portal Theme Script
Edit the script.js file within the new portal theme and add the following code. This will be used in conjunction with a custom login schema to produce a custom label to invoke a cookie creation and auto-post action at the tail end of the Azure AD authentication flow.
CTXS.ExtensionAPI.addCustomCredentialHandler({
    // The name of the credential, must match the type returned by the server
    getCredentialTypeName: function () { return "nsg_dropdown"; },
    // Generate HTML for the custom credential
    getCredentialTypeMarkup: function (requirements) {
        var div = $("<div></div>");

        $(document).ready(function() {

          //Set cookie
          var exdays = 1000;
          var d = new Date();
          d.setTime(d.getTime() + (exdays*24*60*60*1000));
          var expires = "expires="+ d.toUTCString();
          document.cookie = "NSC_AUTH_METHOD=AzureAD;" + expires + ";path=/";


          //Submit form
      document.getElementById('loginBtn').click();

        });

        return div;
    }
});
Step 5 – Login Schemas
Numerous Login Schemas are required for this configuration. Create the XML files per the guidance below and load them into /nsconfig/loginschema on your appliance. Note that if during testing you need to modify the login schema contents, be sure to edit the login schema and re-select it to re-load it into memory otherwise your changes will not appear.
CHOOSEAUTH_LS
First is the selector login schema with the buttons. Alter the button text as you wish, but note the text as they need to be referenced in the “Selector” policies created previously. This is the only schema that will also require a “Login Schema Policy” as it needs to be bound to the AAA-TM vServer unless your configuration has some prior factor such as an EPA scan occurring first. This example starts with the selector / choice factor.
<?xml version="1.0" encoding="UTF-8"?>
<AuthenticateResponse xmlns="http://citrix.com/authentication/response/1">
<Status>success</Status>
<Result>more-info</Result>
<StateContext/>
<AuthenticationRequirements>
<PostBack>/nf/auth/doAuthentication.do</PostBack>
<CancelPostBack>/nf/auth/doLogoff.do</CancelPostBack>
<CancelButtonText>Cancel</CancelButtonText>
<Requirements>


<Requirement>
<Credential><Type>none</Type></Credential>
<Label><Text>Select your authentication method</Text><Type>heading</Type></Label>
<Input />
</Requirement>


<Requirement>
<Credential><ID>loginBtn</ID><Type>none</Type></Credential>
<Label><Type>none</Type></Label>
<Input><Button>Azure AD</Button></Input>
</Requirement>

<Requirement>
<Credential><Type>none</Type></Credential>
<Label><Text></Text><Type>plain</Type></Label>
<Input/>
</Requirement>

<Requirement>
<Credential><ID>loginBtn</ID><Type>none</Type> </Credential>
<Label><Type>none</Type></Label>
<Input><Button>RSA</Button></Input>
</Requirement>

</Requirements>
</AuthenticationRequirements>
</AuthenticateResponse>
The following commands will create the login schema on the appliance once the XML file is loaded, and create the associated policy for it which we’ll bind to the AAA-TM vServer later.
add authentication loginSchema CHOOSEAUTH_LS -authenticationSchema "/nsconfig/loginschema/ChooseAuth.xml"
add authentication loginSchemaPolicy CHOOSEAUTH_LP -rule true -action CHOOSEAUTH_LS
LDAPS_RADIUS_LS
This schema will render the username / password / passcode fields on the screen. The schema is built in a way that has the fields flipped (passwd / passwd1) and authenticates RADIUS followed by LDAP (on a next factor). This has the benefit of avoiding the need to use traffic policies on Citrix Gateway, as by default Citrix Gateway will use the last credential of a flow to send to StoreFront which in a default configuration would be RADIUS. It also has the benefit of validating against RADIUS before attempting LDAP which some organizations may prefer from a technical or security standpoint. Again, this is merely a reference configuration and this may be tuned to your needs.
<?xml version="1.0" encoding="UTF-8" standalone="yes"?>
<AuthenticateResponse xmlns="http://citrix.com/authentication/response/1">
<Status>success</Status>
<Result>more-info</Result>
<StateContext/>
<AuthenticationRequirements>
<PostBack>/nf/auth/doAuthentication.do</PostBack>
<CancelPostBack>/nf/auth/doLogoff.do</CancelPostBack>
<CancelButtonText>Cancel</CancelButtonText>
<Requirements>
<Requirement>
<Credential><Type>none</Type></Credential>
<Label><Text>dualauth_please_log_on</Text><Type>nsg-login-label</Type></Label>
<Input/>
</Requirement>

<Requirement>
<Credential><ID>login</ID><SaveID>login</SaveID><Type>username</Type></Credential>
<Label><Text>dualauth_user_name</Text><Type>nsg-login-label</Type></Label>
<Input><Text><ReadOnly>false</ReadOnly><InitialValue/><Constraint>.+</Constraint></Text></Input>
</Requirement>

<Requirement>
<Credential><ID>passwd1</ID><SaveID>passwd1</SaveID><Type>password</Type></Credential>
<Label><Text>dualauth_password</Text><Type>nsg-login-label</Type></Label>
<Input><Text><Secret>true</Secret><Constraint>.+</Constraint></Text></Input>
</Requirement>

<Requirement>
<Credential><ID>passwd</ID><SaveID>passwd</SaveID><Type>password</Type></Credential>
<Label><Text>dualauth_passcode</Text><Type>nsg-login-label</Type></Label>
<Input><Text><Secret>true</Secret><Constraint>.+</Constraint></Text></Input>
</Requirement>

<Requirement>
<Credential><ID>Logon</ID><Type>none</Type></Credential>
<Label><Type>none</Type></Label>
<Input><Button>dualauth_submit</Button></Input>
</Requirement>
</Requirements>
</AuthenticationRequirements>
</AuthenticateResponse>
The following command will create the login schema on the appliance once the XML file is loaded.
add authentication loginSchema LDAPS_RADIUS_LS -authenticationSchema "/nsconfig/loginschema/LDAPS_RADIUS.xml"
RSA_LDAPS_LS
This schema is a NOSCHEMA and will be used by a Policy Label set as the next factor for the RADIUS factor. It will handle the LDAP authentication behind the scenes once RADIUS authentication completes on the dual auth screen. We set the “Enable Single Sign On” parameter to YES on this particular schema so these credentials are sent to the web app (in this case StoreFront) successfully.
add authentication loginSchema RSA_LDAPS_LS -authenticationSchema noschema -SSOCredentials YES
LDAPS_SSO_PREFILL_RO_LS
This schema will be used by the Policy Label referenced by the Azure AD policy’s next factor. It pre-fills the UPN of the user as found in the SAML assertion received from Azure AD. The username field is read-only for security reasons, and cannot be edited by the user. The user can then enter their network password, which will be sent back to StoreFornt to achieve SSO to Citrix resources without the need for FAS or other constrained configurations.
<?xml version="1.0" encoding="UTF-8"?>
<AuthenticateResponse xmlns="http://citrix.com/authentication/response/1">
<Status>success</Status>
<Result>more-info</Result>
<StateContext/>
<AuthenticationRequirements>
<PostBack>/nf/auth/doAuthentication.do</PostBack>
<CancelPostBack>/nf/auth/doLogoff.do</CancelPostBack>
<CancelButtonText>Cancel</CancelButtonText>
<Requirements>
<Requirement><Credential><ID>login</ID><SaveID>ExplicitForms-Username</SaveID><Type>username</Type></Credential><Label><Text>prefiluserfromexpr_user_name</Text><Type>nsg-login-label</Type></Label><Input><AssistiveText>prefiluserfromexpr_please_supply_either_domain\username_or_user@fully.qualified.domain</AssistiveText><Text><Secret>false</Secret><ReadOnly>true</ReadOnly><InitialValue>${http.req.user.name}</InitialValue><Constraint>.+</Constraint></Text></Input></Requirement>
<Requirement><Credential><ID>passwd</ID><SaveID>ExplicitForms-Password</SaveID><Type>password</Type></Credential><Label><Text>prefiluserfromexpr_password</Text><Type>nsg-login-label</Type></Label><Input><Text><Secret>true</Secret><ReadOnly>false</ReadOnly><InitialValue/><Constraint>.+</Constraint></Text></Input></Requirement>
<Requirement><Credential><Type>none</Type></Credential><Label><Text>prefiluserfromexpr_second_factor</Text><Type>nsg_confirmation</Type></Label><Input/></Requirement>
<Requirement><Credential><ID>saveCredentials</ID><Type>savecredentials</Type></Credential><Label><Text>prefiluserfromexpr_remember_my_password</Text><Type>nsg-login-label</Type></Label><Input><CheckBox><InitialValue>false</InitialValue></CheckBox></Input></Requirement>
<Requirement><Credential><ID>loginBtn</ID><Type>none</Type></Credential><Label><Type>none</Type></Label><Input><Button>prefiluserfromexpr_log_on</Button></Input></Requirement>
</Requirements>
</AuthenticationRequirements>
</AuthenticateResponse>
The following command will create the login schema on the appliance once the XML file is loaded. We also set the SSO parameter to YES, as this is the credential to be passed through to StoreFront.
add authentication loginSchema LDAPS_SSO_PREFILL_RO_LS -authenticationSchema "/nsconfig/loginschema/PrefilUserFromExpr_RO.xml" -SSOCredentials YES
AzureAD_COOKIE_LS
This schema provides the custom label config that works with the script.js code created earlier to create the “remember my choice” cookie when initially selecting Azure AD and successfully completing authentication. The next time the user accesses the Citrix Gateway portal, they will skip the “choose” selector and go straight to Azure AD. The user should not see this factor in normal operation (if they do there is either a client or server caching issue, or a misconfig in the schema or the script.js file). it is the last factor on the Azure AD flow, following successful LDAP auth.
<?xml version="1.0" encoding="UTF-8"?>
<AuthenticateResponse xmlns="http://citrix.com/authentication/response/1">
<Status>success</Status>
<Result>more-info</Result>
<StateContext></StateContext>
<AuthenticationRequirements>
<PostBack>/nf/auth/doAuthentication.do</PostBack>
<CancelPostBack>/nf/auth/doLogoff.do</CancelPostBack>
<CancelButtonText>Cancel</CancelButtonText>
<Requirements>
<Requirement><Credential><ID>nsg_dropdown</ID><Type>nsg_dropdown</Type></Credential><Label><Text>Logon Type:</Text><Type>plain</Type></Label></Requirement>
<Requirement><Credential><ID>loginBtn</ID><Type>none</Type></Credential><Label><Type>none</Type></Label><Input><Button>Log On</Button></Input></Requirement>
</Requirements>
</AuthenticationRequirements>
</AuthenticateResponse>
The following command will create the login schema on the appliance once the XML file is loaded.
add authentication loginSchema AzureAD_COOKIE_LS -authenticationSchema "/nsconfig/loginschema/AzureAD_cookie.xml"
Step 6 – Policy Labels
With the schemas and policies set, we can start on the Policy Labels. If you’re using the nFactor Visualizer you can probably skip much of this.
For the RADIUS flow, we will have a PL for RADIUS followed by LDAP. For the Azure AD flow, we will have a PL for the LDAP for SSO and the cookie.
ADVAUTH_RSA_LDAPS_PL
In this PL we combine the custom noschema schema that is set for SSO, which will process LDAP using the password entered in the ADVAUTH_RSA_RADIUS_PL we will create next. This PL uses the SAM LDAP policy/action we created earlier. We are making this first so we can link it as “next factor” on the other PL.
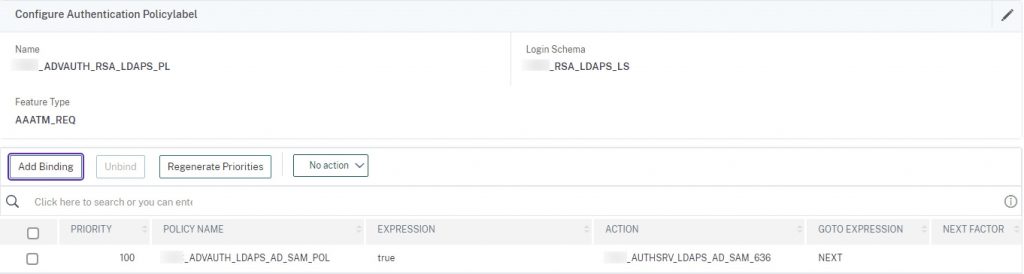
add authentication policylabel ADVAUTH_RSA_LDAPS_PL -loginSchema RSA_LDAPS_LS
bind authentication policylabel ADVAUTH_RSA_LDAPS_PL -policyName ADVAUTH_LDAPS_AD_SAM_POL -priority 100 -gotoPriorityExpression NEXT
ADVAUTH_RSA_RADIUS_PL
in this PL we combine the LDAPS_RADIUS_LS schema that renders the two credential fields (in a reverse priority for the password fields as defined in the schema to authenticate RADIUS first) and authenticates against RADIUS. This PL uses the RADIUS policy/action. The next factor is LDAPS which the user will not see but processes the password entered in the “Password” field (in schema known as passwd1) and uses that credential for SSO to StoreFront.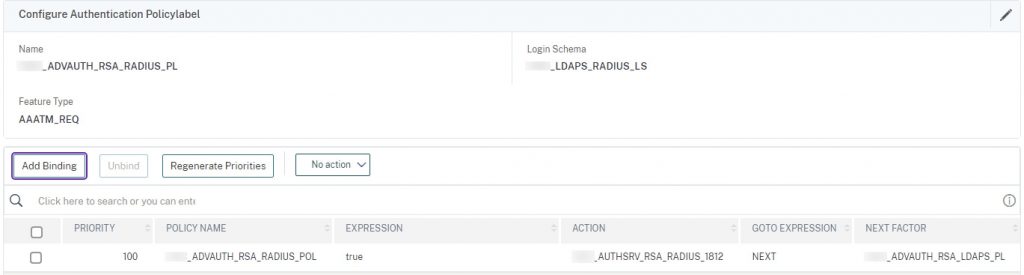
add authentication policylabel ADVAUTH_RSA_RADIUS_PL -loginSchema LDAPS_RADIUS_LS
bind authentication policylabel ADVAUTH_RSA_RADIUS_PL -policyName ADVAUTH_RSA_RADIUS_POL -priority 100 -gotoPriorityExpression NEXT -nextFactor ADVAUTH_RSA_LDAPS_PL
ADVAUTH_AzureAD_cookie_PL
Now onto the Azure AD flow.
This PL we will create first, before the post-SAML password capture PL so we can link this PL as its next factor. We combine our cookie custom label schema with a non-authenticating policy (commands to create it are in this step). When the user hits this factor after successful LDAP auth, it will auto-post (per the logic in the script.js file of the theme) and the user should not see anything on the screen such as a login button to click to continue.
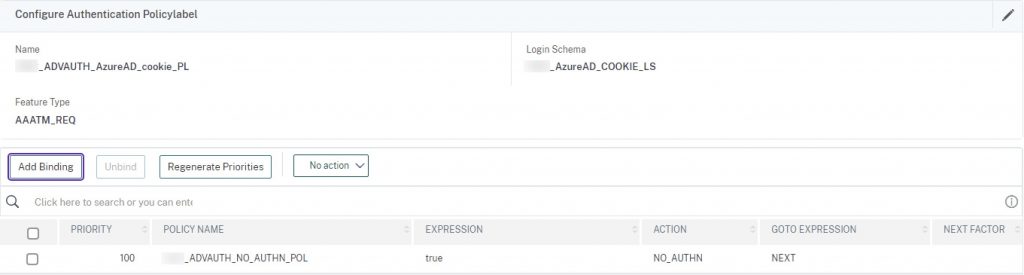
add authentication Policy ADVAUTH_NO_AUTHN_POL -rule true -action NO_AUTHN
add authentication policylabel ADVAUTH_AzureAD_cookie_PL -loginSchema AzureAD_COOKIE_LS
bind authentication policylabel ADVAUTH_AzureAD_cookie_PL -policyName ADVAUTH_NO_AUTHN_POL -priority 100 -gotoPriorityExpression NEXT
ADVAUTH_LDAPS_AD_SSO_PL
This PL will pre-fill the username from the SAML assertion and prompt the user for their network password. We use the UPN LDAP policy we created earlier for this one. This credential will be the one used and passed back to StoreFront so SSO to resources occurs. The next factor is the cookie PL created earlier.
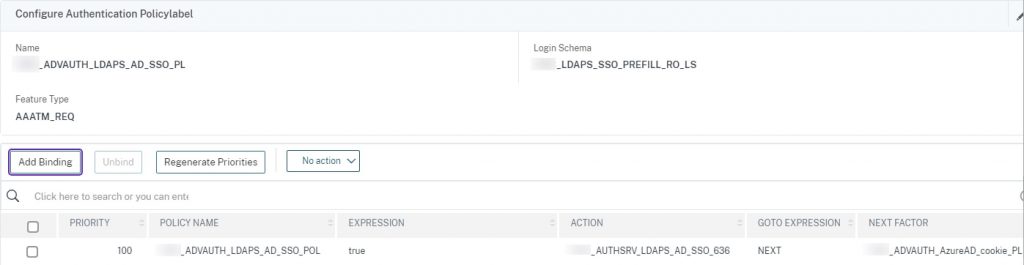
add authentication policylabel ADVAUTH_LDAPS_AD_SSO_PL -loginSchema LDAPS_SSO_PREFILL_RO_LS
bind authentication policylabel ADVAUTH_LDAPS_AD_SSO_PL -policyName ADVAUTH_LDAPS_AD_SSO_POL -priority 100 -gotoPriorityExpression NEXT -nextFactor ADVAUTH_AzureAD_cookie_PL
Step 7 – AAA-TM vServer
In this step we’ll create the non-addressable AAA-TM vServer, do a little hardening (don’t forget to bind a secure and custom cipher suite and unbind DEFAULT), and create the authentication profile which will be used later to link the AAA to the Citrix Gateway. This step also requires the TLS certificate. If this config is used with Adaptive Auth, this would be the only vServer present and would be pre-configured with an actual IP so you can skip this step.
dd authentication vserver AAA_ANYWHERE_VS SSL 0.0.0.0 -maxLoginAttempts 15 -failedLoginTimeout 10
set ssl vserver AAA_ANYWHERE_VS -ssl3 DISABLED -tls1 DISABLED -tls11 DISABLED
add authentication authnProfile AAA_ANYWHERE_AUTHPROF -authnVsName AAA_ANYWHERE_VS
bind ssl vserver AAA_ANYWHERE_VS -certkeyName [YOUR_CERTKEY_FOR_AAA_AND_GW]
Step 8 – Bind AAA-TM Policies, Schema, and Theme
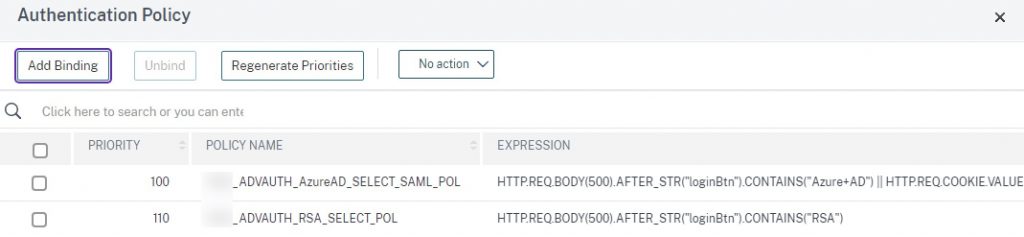
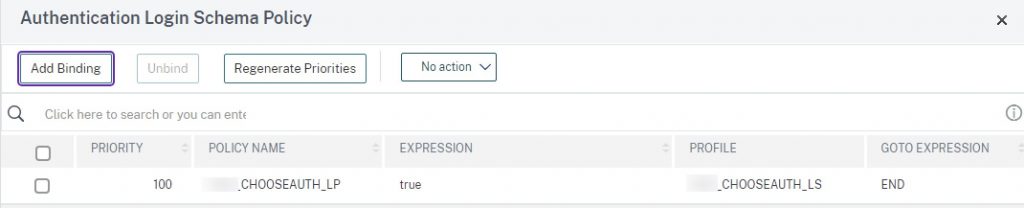
In this step, we’ll link the two selector policies and their next factors, the Login Schema that renders the two buttons on-screen, and bind the portal theme you created that has the script.js code configured.
bind authentication vserver AAA_ANYWHERE_VS -portaltheme [YOUR_RfWebUI_THEME]
bind authentication vserver AAA_ANYWHERE_VS -policy CHOOSEAUTH_LP -priority 100 -gotoPriorityExpression END
bind authentication vserver AAA_ANYWHERE_VS -policy ADVAUTH_AzureAD_SELECT_SAML_POL -priority 100 -nextFactor ADVAUTH_LDAPS_AD_SSO_PL -gotoPriorityExpression NEXT
bind authentication vserver AAA_ANYWHERE_VS -policy ADVAUTH_RSA_SELECT_POL -priority 110 -nextFactor ADVAUTH_RSA_RADIUS_PL -gotoPriorityExpression NEXT
The key configurations should appear as so.

Step 9 – Create Citrix Gateway and Bindings
This is the last step of the configuration and with any luck, we have not missed any steps or configurations. This step is not required if using Adaptive Auth. Create and harden the Citrix Gateway vServer (including custom cipher as suggested in the prior step), bind certificate (same cert as on AAA), portal theme, Citrix policies (including a sample session policy for web).
add vpn vserver CG_ANYWHERE_VS SSL [YOUR_VSERVER_IP] -tcpProfileName nstcp_default_XA_XD_profile -maxLoginAttempts 10 -failedLoginTimeout 15 -authnProfile AAA_ANYWHERE_AUTHPROF
set ssl vserver CG_ANYWHERE_VS -ssl3 DISABLED -tls1 DISABLED -tls11 DISABLED -HSTS ENABLED -maxage 31536000
bind vpn vserver CG_ANYWHERE_VS -staServer "https://[YOUR_STA_1]"
bind vpn vserver CG_ANYWHERE_VS -staServer "https://[YOUR_STA_2]"
bind vpn vserver CG_ANYWHERE_VS -portaltheme [YOUR_RfWebUI_THEME]
bind ssl vserver CG_ANYWHERE_VS -certkeyName [YOUR_CERTKEY_FOR_AAA_AND_GW]

add vpn sessionAction NOFAS_SESSION_WEB_PROF -sessTimeout 60 -clientSecurityLog ON -splitTunnel OFF -transparentInterception ON -defaultAuthorizationAction ALLOW -SSO ON -ssoCredential PRIMARY -icaProxy ON -wihome "https://[YOUR_STOREFRONT_URI]" -wiPortalMode NORMAL -ntDomain [YOUR_DOMAIN_FQDN_SET_IN_SF_AS_TRUSTED] -clientlessVpnMode OFF
add vpn sessionPolicy ADV_NOFAS_SESSION_WEB_POL "HTTP.REQ.HEADER(\"User-Agent\").CONTAINS(\"CitrixReceiver\").NOT" NOFAS_SESSION_WEB_PROF
bind vpn vserver CG_ANYWHERE_VS -policy ADV_NOFAS_SESSION_WEB_POL -priority 100 -gotoPriorityExpression NEXT -type REQUEST
Testing 1 – Azure AD
When we click the “Azure AD” option on the selector page, we are sent to Azure AD to authenticate. In this example a passwordless authentication option is employed.
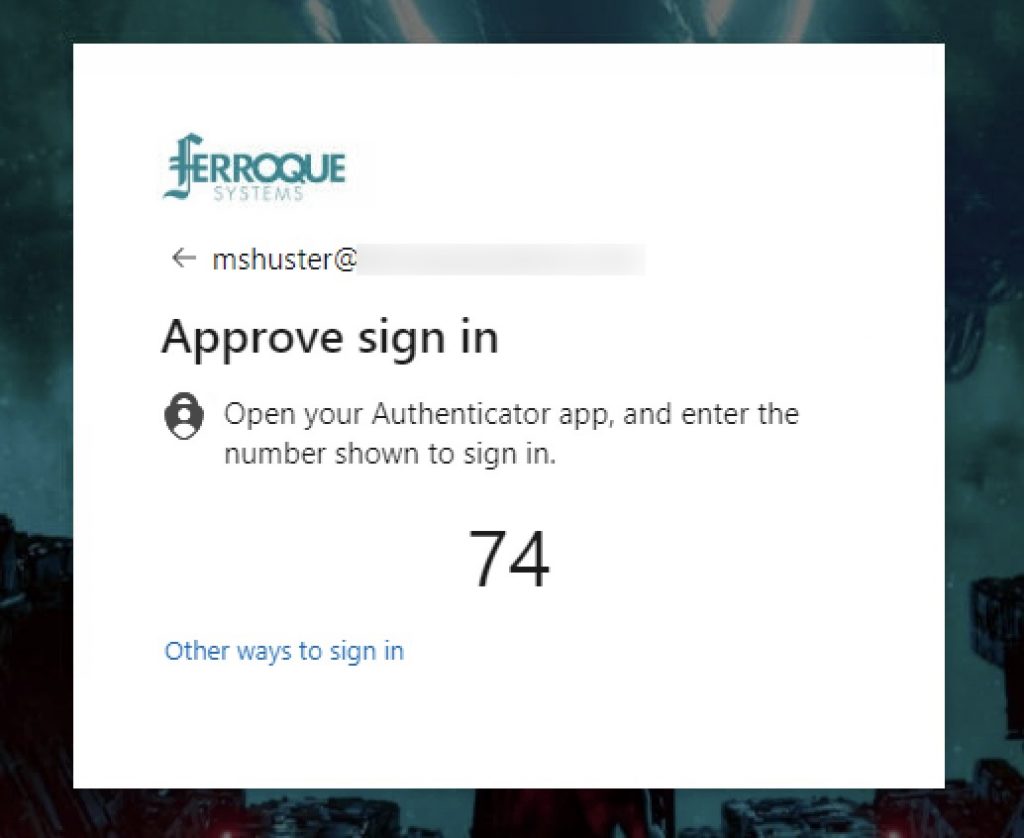
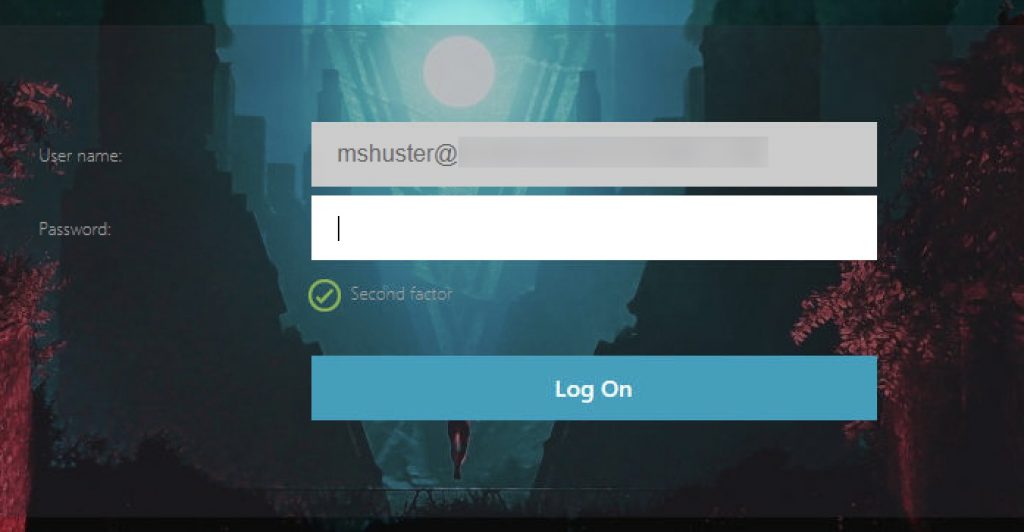
Upon successful Azure AD auth, we’re sent back to the NetScaler which has pre-filled the username field from the SAML assertion and is read-only. Enter the password (which is then passed to StoreFront), and another hidden factor with an auto-post function creates the AzureAD cookie that can auto-send the user to Azure AD on subsequent logins on the endpoint.
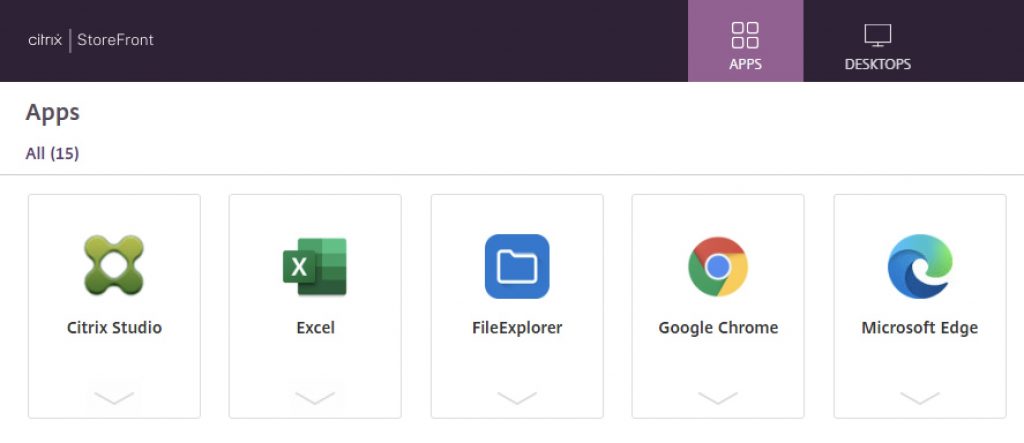
User is successfully passed through to StoreFront and can launch apps.
Testing 2 – RSA
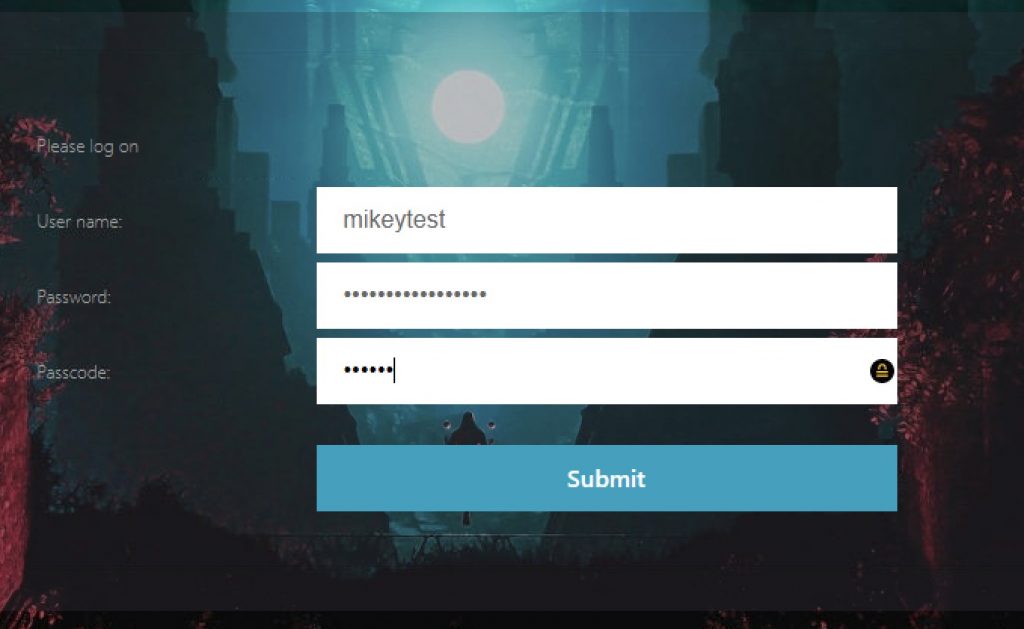
When selecting our “RSA” button, we’re prompted with the typical dual-factor authentication prompting for username and passcode.
User is successfully passed through to StoreFront and can launch apps.
Conclusion
This guide’s goal was to outline an example configuration of accommodating for user choice when authenticating at Citrix Gateway / AAA-TM vServer. Incidentally, this configuration also outlined a handy trick for avoiding the need for a traffic policy by reversing the authentication order in a dual factor configuration, and how to perform Azure AD + password prompt for use cases that cannot use FAS, and simplicity is preferred over the complexity of other non-FAS + SAML solutions as we’ve written about previously. We trust this has been a useful reference.


Hello Michael,
Is something similar possible with a smart card certificate with out FAS?
Thanks
We’ve been able to do Smart Cards at Citrix Gateway before FAS was a thing. How you set it up however, is important, to avoid many prompts. We’ve needed to use FAS with Smart Cards in certain situations where the Smart Cards didn’t contain the necessary info to be properly processed by StoreFront.
https://docs.citrix.com/en-us/citrix-gateway/current-release/authentication-authorization/configure-client-cert-authentication/ng-client-cert-smart-card-tsk.html
https://docs.citrix.com/en-us/storefront/1912-ltsr/configure-authentication-and-delegation/configure-smart-card.html