Introduction
I’ve had the opportunity to work with a customer recently who was interested in developing an identity-aware network access solution using only Citrix products, mimicking what a next-generation firewall (NGFW) might do such as Palo Alto with its TS Agent to map users to a set of firewall rules. I won’t cover the entire solution end-to-end including CVAD in this post, but I will cover the Citrix ADC elements. We needed to meet a few key objectives:
- Provide an identity-aware access solution that will grant network access rules based on user identity \ Active Directory group.
- Users must not need to enter credentials once they get into their domain-joined desktop to make use of the identity-aware access platform. They should get access to their related rule sets automatically upon logging into their desktop.
- Allow for granular audit logging of access flows.
So the first thought that might come to mind is why not use an NGFW to begin with? And that’s a very fair point. The desire in this case, however, is to keep all functions within the control of the Citrix stack, to avoid dealing with multiple teams to support the platform. There were a couple of ways of doing this on Citrix ADC (both involving SSL VPN) but I landed on this method as the least complex vs. the additional device certificate requirements of say, Citrix AlwaysON VPN.
Now, VPNs have been falling out of favour recently and for good reason. As our Strategic Advisor Mike Loftus has so elegantly put it in the past “…is pretty much extending the corporate network into people’s homes”. Despite controls here and there (if they’re actually implemented at all), that summarization is a fact, and there are far better ways to provide secure, auditable, zero-trust remote access to corporate IT resources than a VPN. VPNs do have their place (site-to-site, etc.), but really, the age of client VPNs is done. And unfortunately, many customers on account of COVID have fallen back on VPN and frantically rolled it out more broadly and with limited controls on account of government WFH orders vs. moving forward with more appropriate options and sadly, months later might find they’ve paid the price once breaches are discovered.
However, in this case, we’re using the SSL VPN capability from WITHIN the corporate network, essentially as a gating mechanism to allow controlled and audited access to sensitive back-end networks from a less trusted internal landing zone network where the desktops reside.
We achieved the first requirement by using AAA groups matching security groups in Active Directory (remember, the AAA groups are case sensitive!) and applying authorization policies to each of the groups based on the access management design (network-centric, department-centric, or job role-centric, etc.). A few notes on this per our discussions with product management, engineering, and Citrix’s networking consulting team:
- There is no hard limit on the number of AAA groups on the appliance.
- There is a limit on the number of AAA groups associated with an AAA session, with a maximum 40K group string length.
- A user can be a member of multiple AAA groups and receive the consolidated result of authorization policies which provides flexibility in access design. However, if a user is a member of two different groups with conflicting policy expressions, the policy binding order will take precedence.
The second requirement was achieved through a little less conventional solution, being one normally doesn’t need to SSO to a VPN, albeit Citrix’s AlwaysON VPN does this, but with a different goal in mind. In our case, we used NEGOTIATE authentication. NEGOTIATE doesn’t perform any group extraction, so we followed the first authentication factor with a second noschema factor that referenced an LDAP action that does not perform authentication, thus just performs group extraction. With the proper nFactor configuration in place, visiting the Citrix Gateway page in a browser automatically connects the SSL VPN. As for having this occur at user login… simply a matter of dropping the webpage shortcut into the user’s startup items via GPP or WEM etc.
As for the third requirement, we aren’t going to cover that in this article but the syslog INFO logging for SSLVPN helps part-way, and using pooled IPs for the VPN connections (not covered in this config) will open up more options for granularity. On the desktop front, Citrix Session Recording has also been proposed to layer on for additional auditability for this high-security platform.
Alright, without further ado, let’s get to it.
Step 1 – Configure Intranet Site URL
Be sure whatever URL you plan to use for the Citrix Gateway vServer is configured on the Windows endpoints as being in Intranet Sites in order for passthrough authentication to occur (Internet Options or GPO Site-to-Zone Assignments list). Without it, users hitting the URL will get a prompt from the browser to enter credentials, which is the opposite of what we want.
Step 2 – Create Kerberos Service Account
Create a service account in the domain for use by the ADC for authentication. Set a non-expiring password. Configure the SPN for the Citrix Gateway URL.
setspn -A http/<FQDN OF GATEWAY> <domain>\<kerb_svc_acct_name>

We can verify the config by running the following command:
setspn -l <kerb_svc_acct_name>

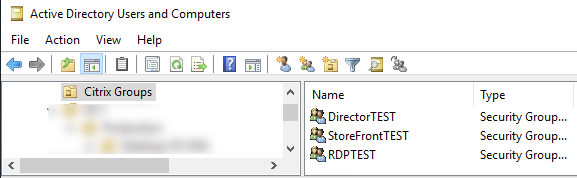
Step 3 – Create AD Groups
We’ll first start by creating some AD groups we want to use to represent our test cases. In this example, I’ve created some groups for some VIPs as well as RDP. We’ll want to note the names down as we need to add them to the Citrix ADC as AAA groups, and they’re case sensitive.
Step 4 – Create Authorization Policies
On the Citrix ADC, create appropriate Authorization Policies. Because the Session Profile we create later will remain default with the authorization action as “DENY” (strongly recommended), we need to define permissible traffic flows. How you make your Authorization Policies are up to you. Some may want to make them based on entire subnets, and perhaps extend them to include specific ports and protocols, others may wish to do this based on ports only or specific IPs. It really comes down to you you wish to design the access model and how you balance manageability with granular controls.
In the case of this lab here, we’ll be creating policies to control access to specific VIPs and to RDP. In the next step, we’ll create the AAA groups that correspond to the AD groups we just created, and bind the Authorization Policies.

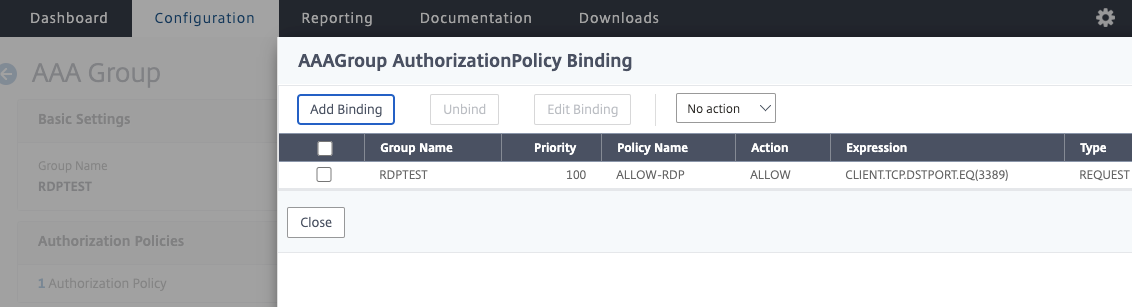
Step 5 – Create AAA Groups
In this step, create the AAA groups that exactly match the AD security groups we created earlier.
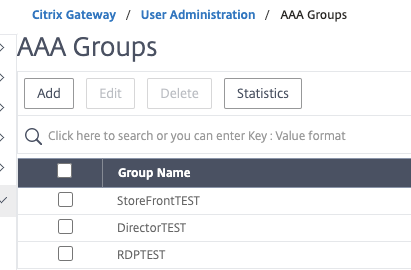
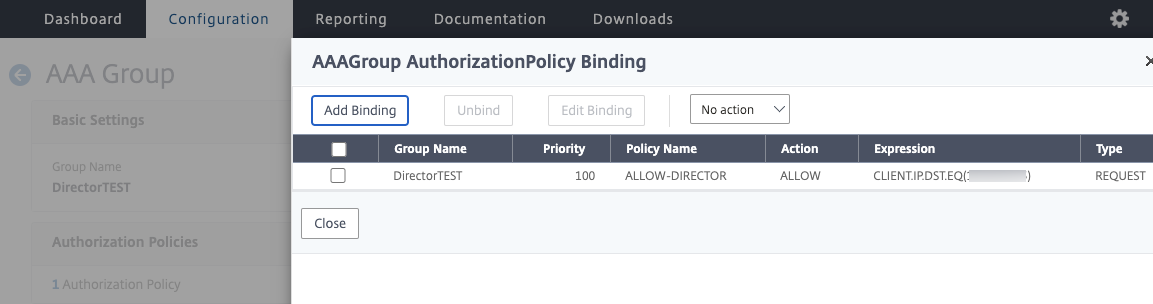
Once the groups are created, you can bind the Authorization Policies created in the last step, to the appropriate group. You can do a one-to-many AAA group to Authorization Policy design, or one-to-one, whatever is needed by your preferred access model. Below are some examples.
Step 6 – Create LDAP Group Extraction Action and Policy
Now we’ll create the components to support our AAA-TM vServer configuration we will create later. First up, is our LDAPS no authentication action. It’s the same as a standard LDAPS server one might create, with exception of us not configuring authentication, as we will not be prompting users for credentials, we just want to perform group extraction. Second, it is important that we define the logon name attribute as UserPrincipalName and not sAMAccountName, as the NEGOTIATE authentication action we’ll create in the next step, sends the user’s ID in a UPN-style format (from the Kerberos ticket) automatically to this LDAP factor. Note that this will not work for customers with disjointed UPNs as what NEGOTIATE captures is not necessarily the UPN attribute of the user account. See the “Additional Considerations” note at the bottom of this post on instructions on making this work with sAMAccountName. You will need a service account for this step for the BIND account, preferably one with a non-expiring password. In this example I am using the same ID as the Kerberos account we discuss later, but it can be any LDAP account you wish to use.

With this out of the way, we’ll create our Authentication Policy for the LDAP action. Nothing special here, but be sure it’s an advanced authentication policy.
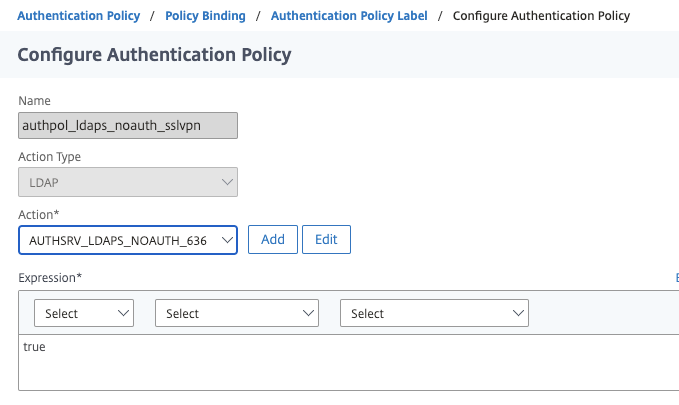
And lastly, because the LDAP action will follow the NEGOTIATE action (in hindsight I probably should have made the NEGOTIATE action and policy the first step in this guide but whatever), we need to create a policy label. We do not need a login schema here.

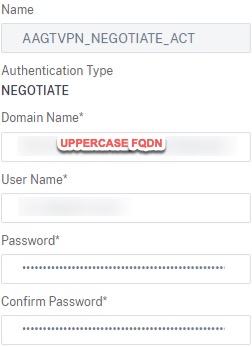
Step 7 – Create NEGOTIATE Action and Policy
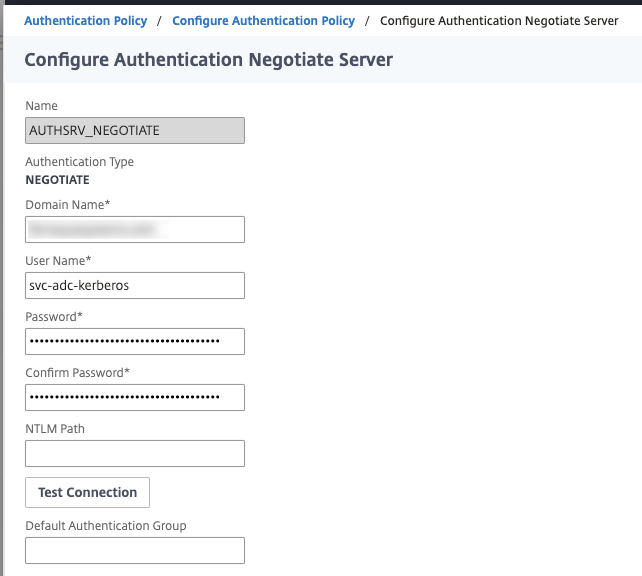
This is a fairly simple authentication action to create. We’ll need to define the domain name (FQDN) and the service account (I am re-using the one we used for LDAP). We have no need to fall back to NTLM so do not configure the NTLM path. If in your use case you want to enable SSOing to web apps through the VPN tunnel, you may want to configure delegation parameters in AD accordingly. We will specify in this authentication action the name of the Kerberos service account we configured in step 1.
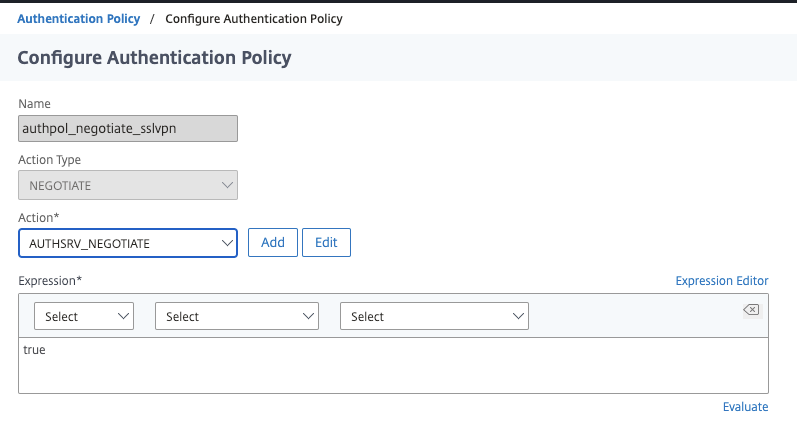
Next up, create the associated advanced Authentication Policy.
Step 8 – Create the AAA-TM Server & Bind Authentication Policies
Now we can go ahead and create our AAA-TM Server and create our nFactor flow. I won’t detail this step by step, but suffice to say, bind your preferred portal theme, make the IP non-addressable, bind the same SSL\TLS certificate you’re going to use on the Citrix Gateway we’ll create later, perform some SSL hardening (I’ve done a bit in the screenshot, but HSTS and DH keys should also be set).
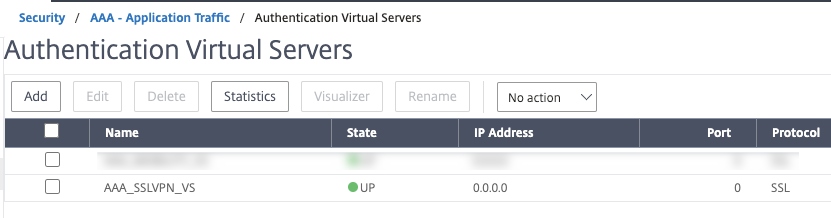

While still editing the AAA-TM vServer, bind the NEGOTIATE Authentication Policy and configure the next factor as the LDAPS no authentication Policy Label created earlier.

Our AAA-TM vServer is now done at this point, so we can save and move on.
Step 9 – Create Authentication Profile
I am not going to detail this one out being it is so basic, but simply create a profile that links to the AAA-TM vServer we just created, no other configuration is needed on the profile.
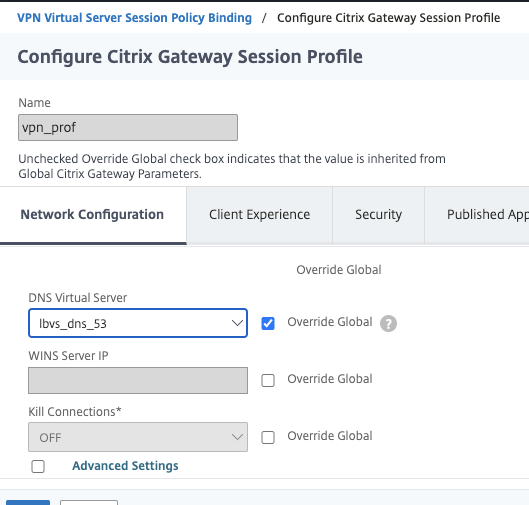
Step 10 – Create Citrix Gateway Session Policy and Profile
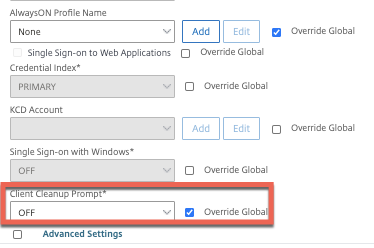
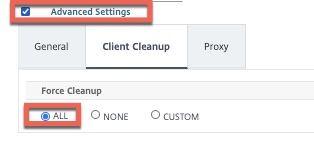
Before we create the Citrix Gateway vServer we’ll create the Session Policy and profile. Screenshots below outline the configurations we’ll need. I’ve tuned the advanced settings to auto-perform client cleanup at logout to avoid any mishaps with stale cookies fudging the next connection attempt. If you did enable KCD on the Kerberos service account, you can configure KCD here as well.
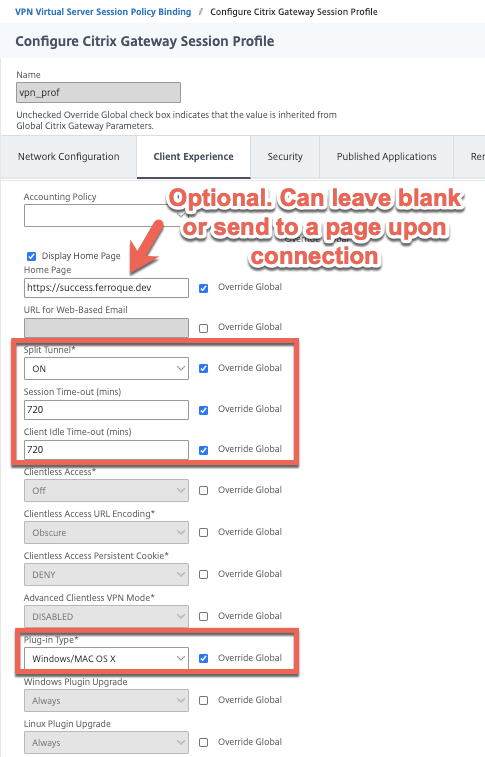
By default upon successful connection, the browser page will change to the standard Citrix Gateway non-ICA proxy only interface. This may not be ideal for your use case, so in this session policy, I opted to change the home page to an addressable HTTPS VIP with a message indicating the user has been connected which may also be useful for displaying upcoming maintenance messages, etc. You can read up on doing that from a prior blog I wrote found here, with the exception this VIP needs to be addressable.
Also, note that we have split-tunnel enabled here. This is critical because in our use case we do not want to sever communication to other dependencies such as ICA proxy (the desktops are Citrix VDIs) flows, Active Directory, and other tooling which should remain unaffected by the VPN session. With split-tunneling enabled, we’ll define Intranet Applications to indicate which applications or network segments should traverse the VPN tunnel. Alternatively, you could enable reverse split-tunneling and force all traffic through the tunnel except for flows defined by Intranet Applications (such as AD, ICA to SNIP, etc.).
And we can now create a Session Policy associated to the profile we have just created, a value of true is sufficient.
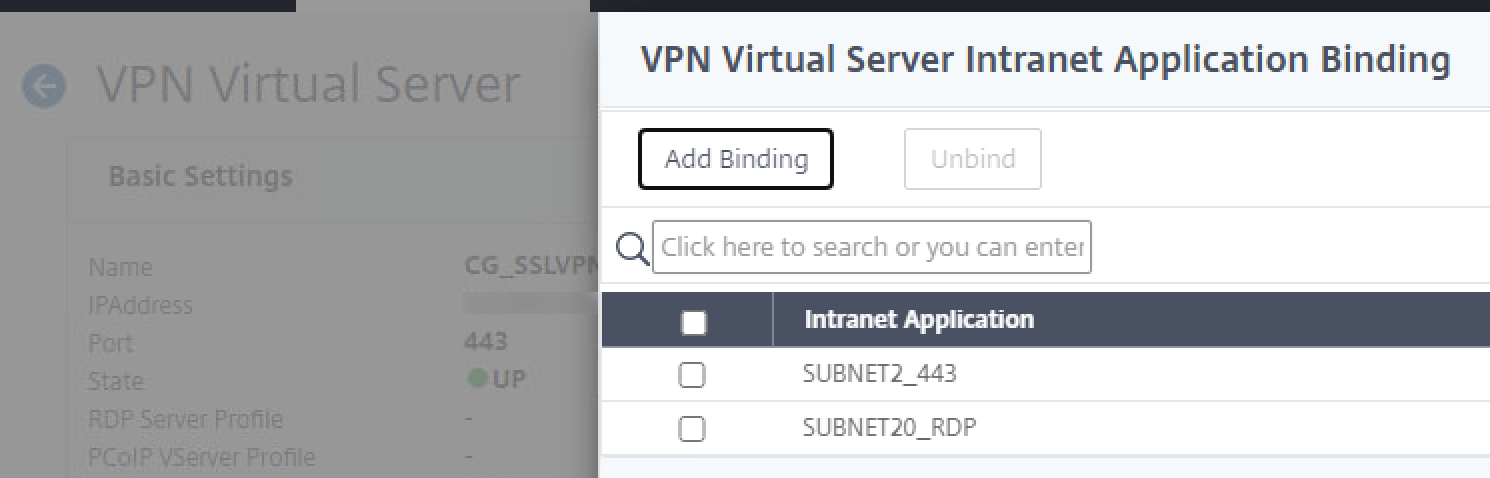
Step 11 – Create Intranet Applications
I’ve created some sample Intranet Applications here, which we will bind to the Citrix Gateway vServer in a future step, so they apply to all sessions established. I simply created a couple for some specific subnets.
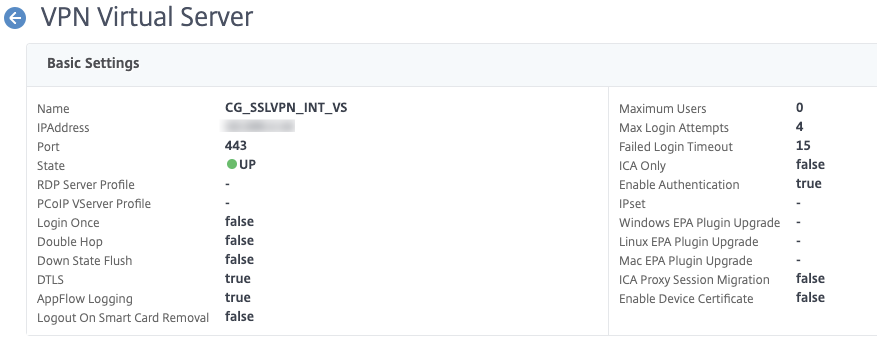
Step 12 – Create Citrix Gateway vServer
Now we can put the remaining config together. Go ahead and create the vServer with an addressable IP, one the clients will be able to route to of course. Same disclaimer on SSL hardening as the AAA-TM vServer. Be sure to bind the authentication profile created in the earlier step so the Citrix Gateway sends users over to it for authentication. The SSL\TLS certificate should be the same between the AAA-TM vServer and the Citrix Gateway vServer.

Go ahead and bind the Intranet Applications which will direct client traffic matching their parameters through the VPN tunnel.
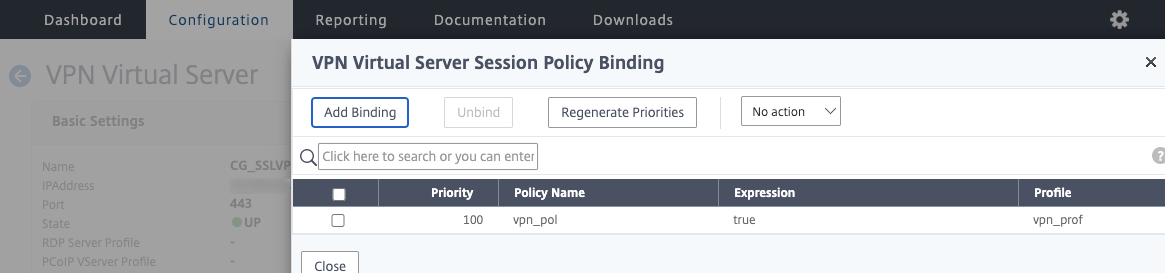
Now bind the Session Policy created earlier.
Step 13 – Testing
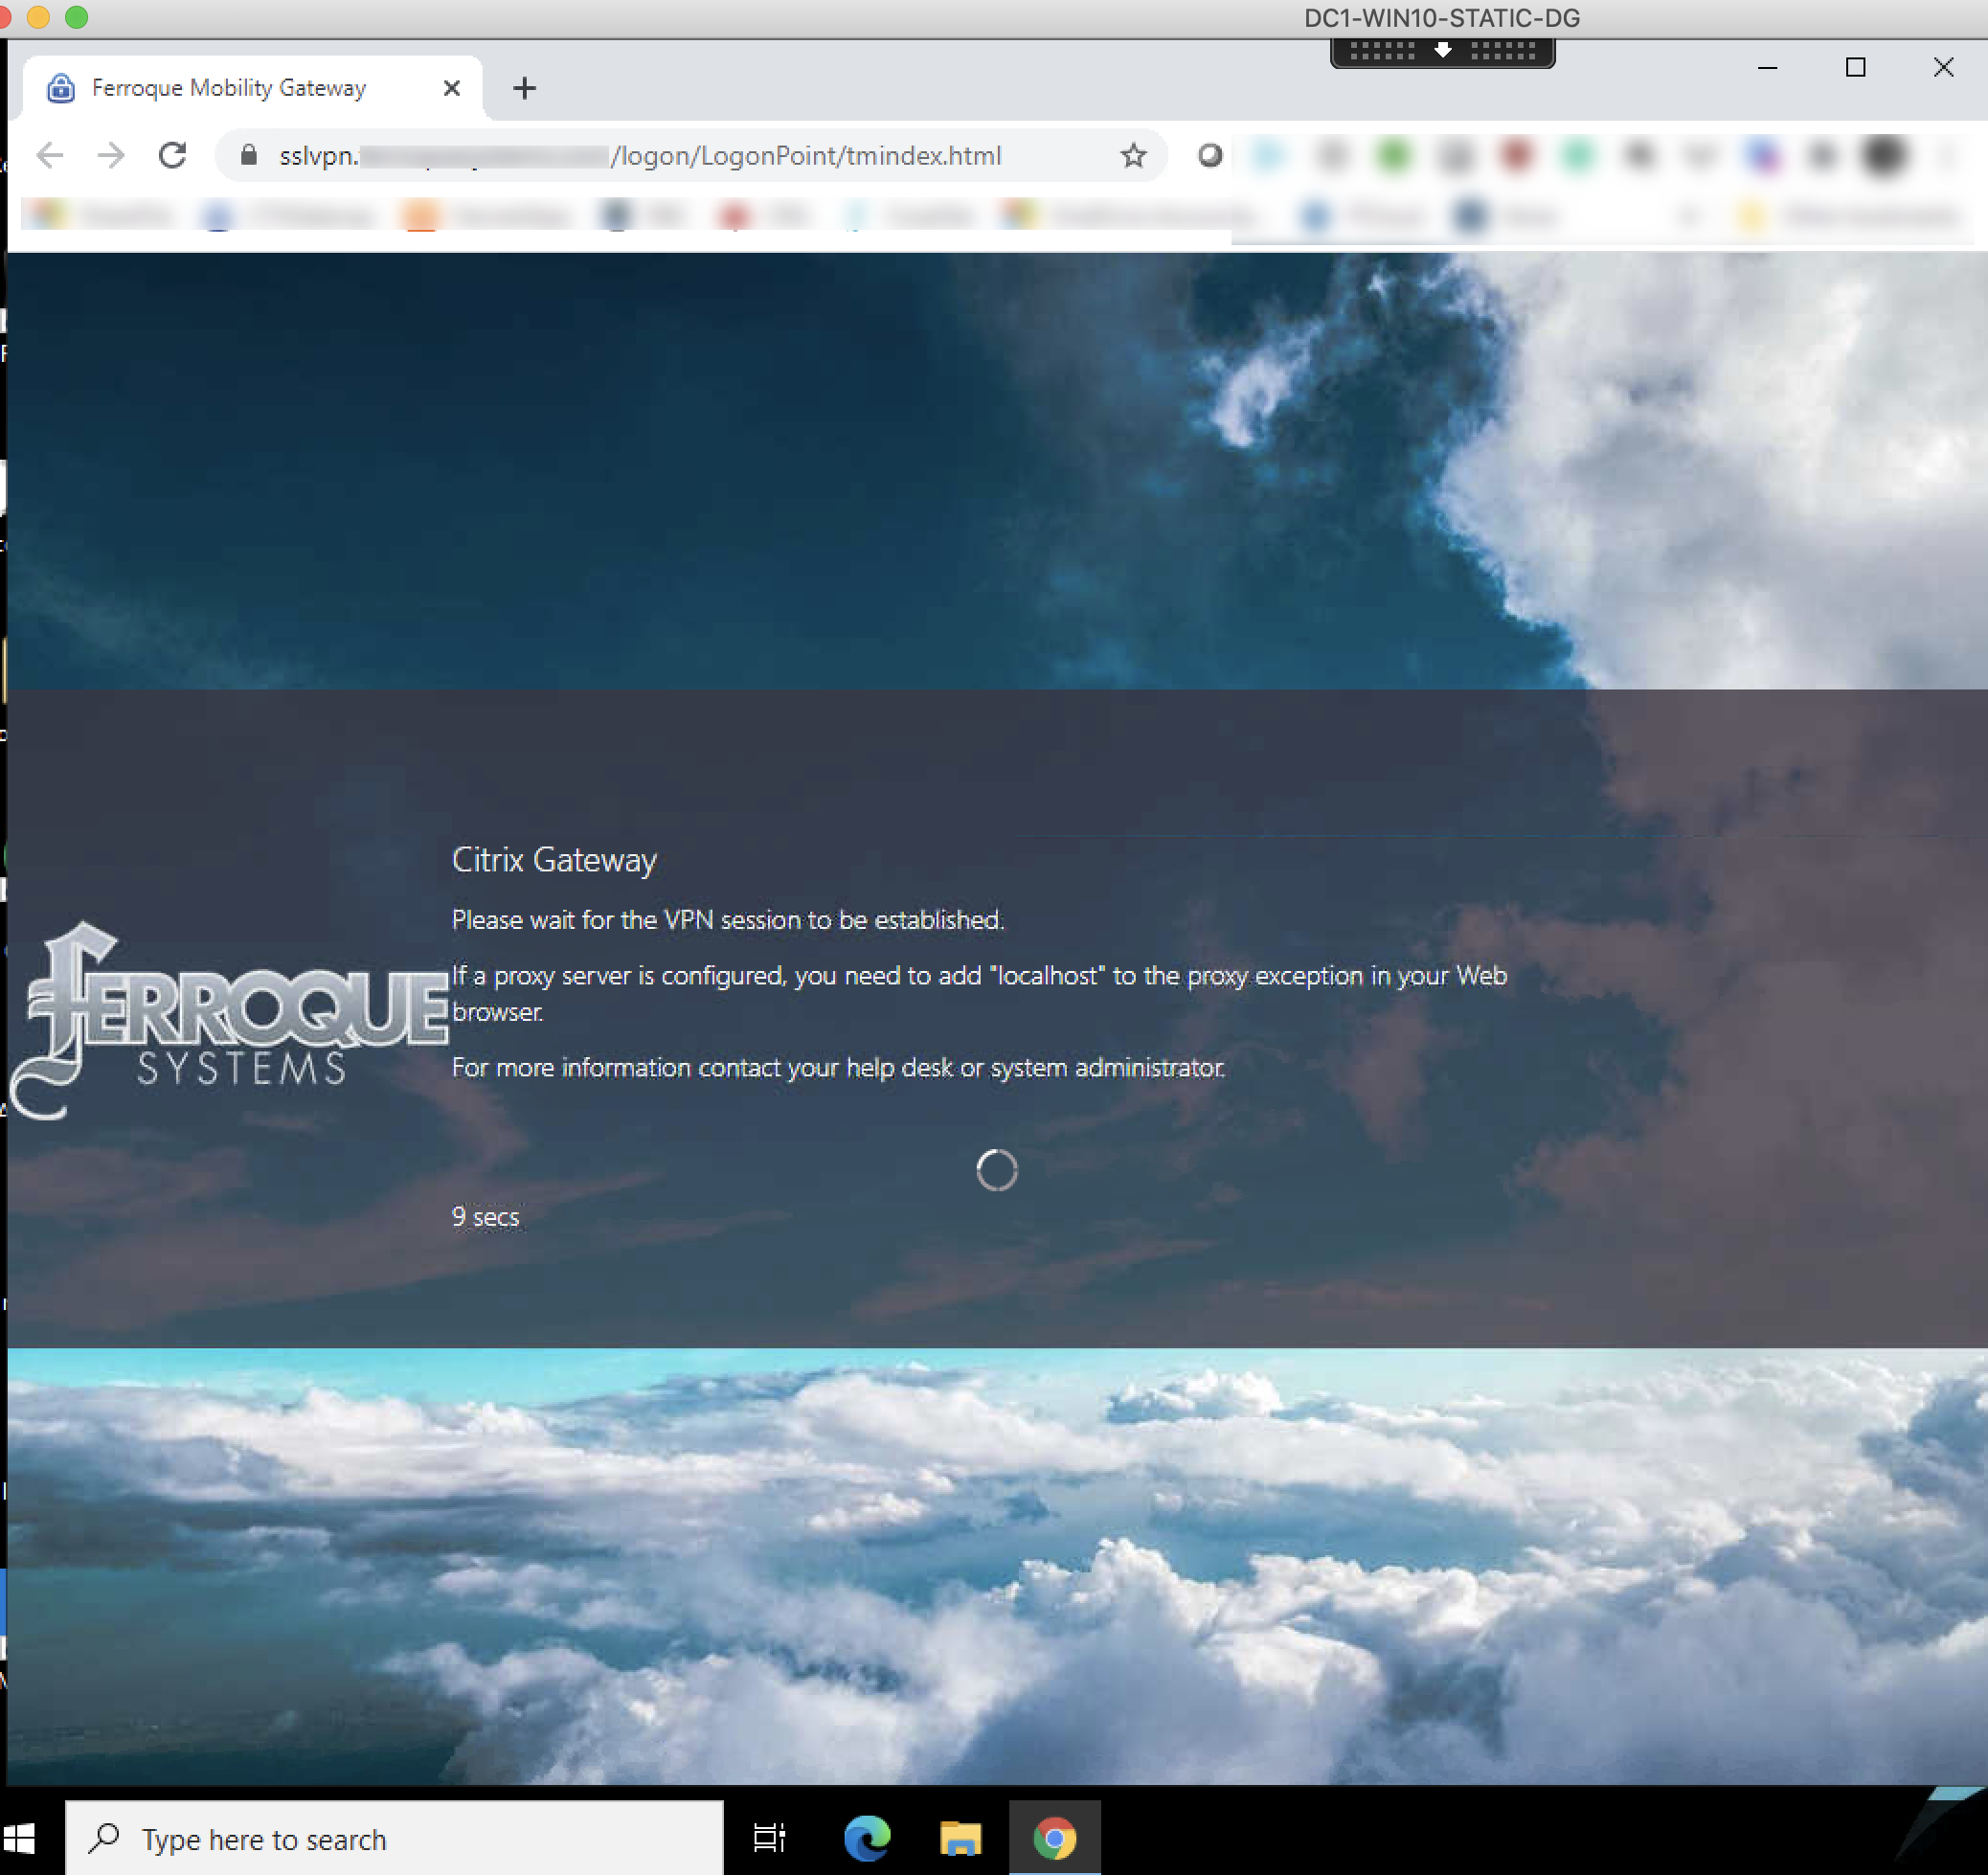
We now have all our bits and pieces assembled, all that’s left is to fire up a browser and hit the SSL VPN Citrix Gateway URL. Immediately upon loading the page, the VPN connection sequence should kick off.
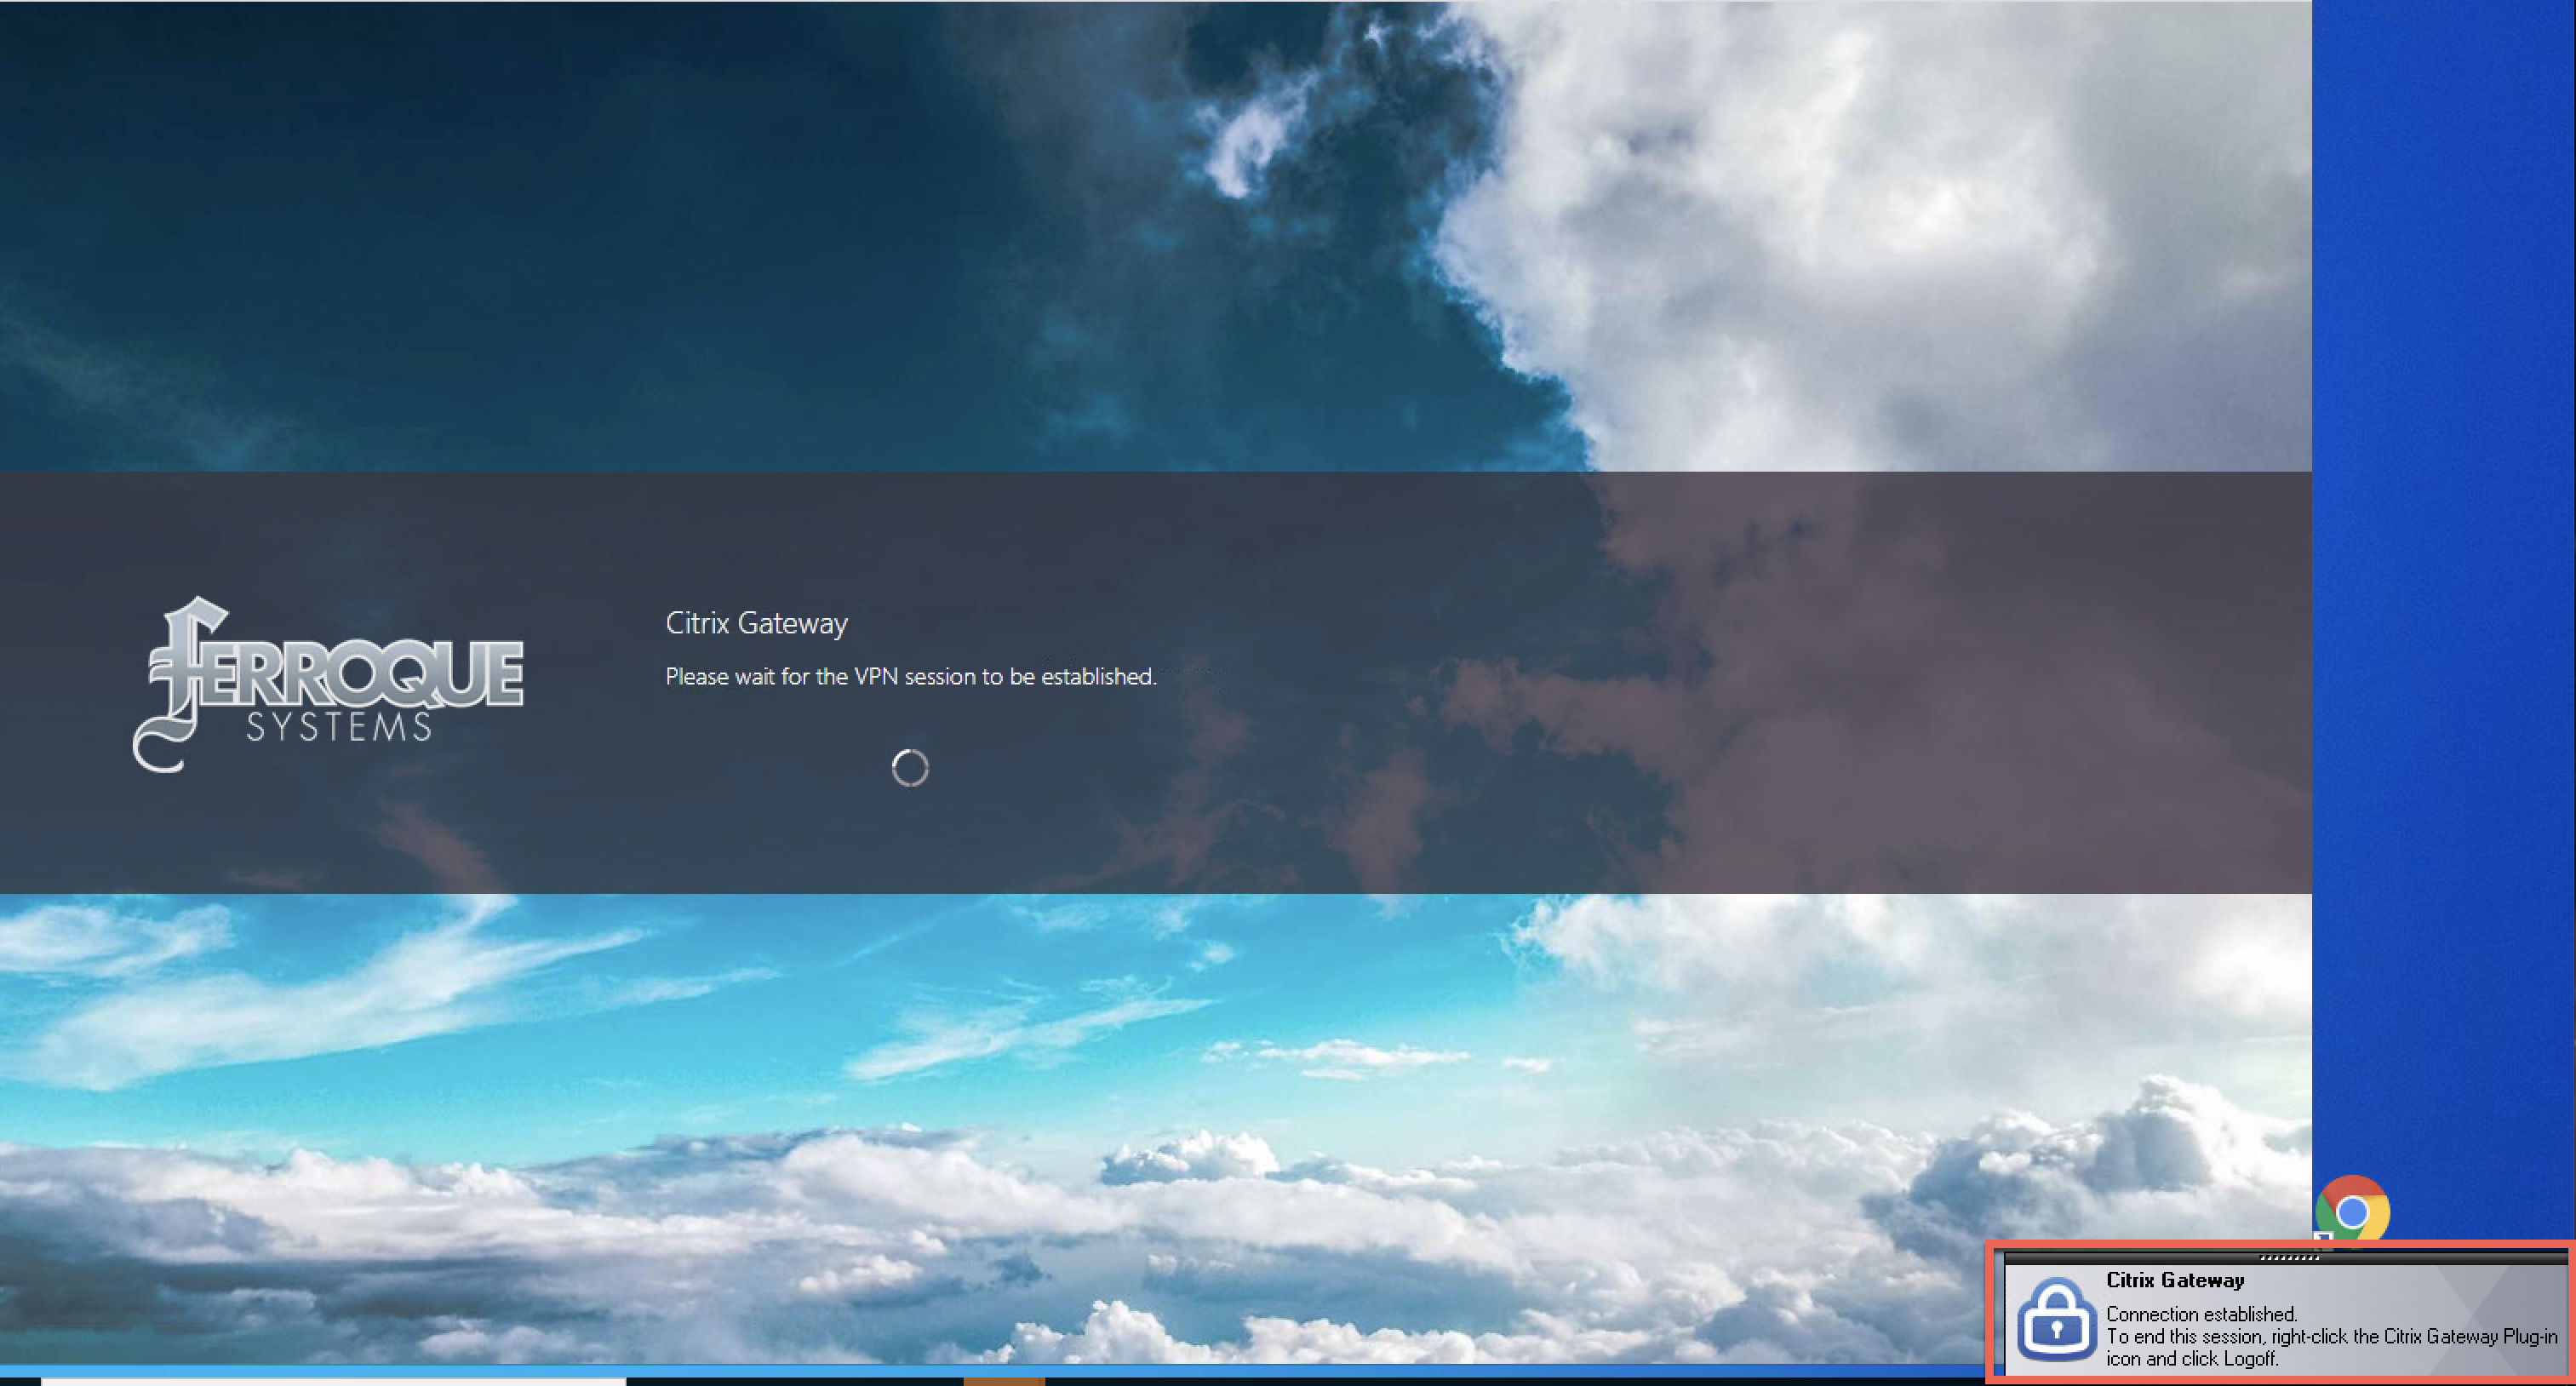
And once we’ve connected, our homepage displays as defined in the Session Profile.

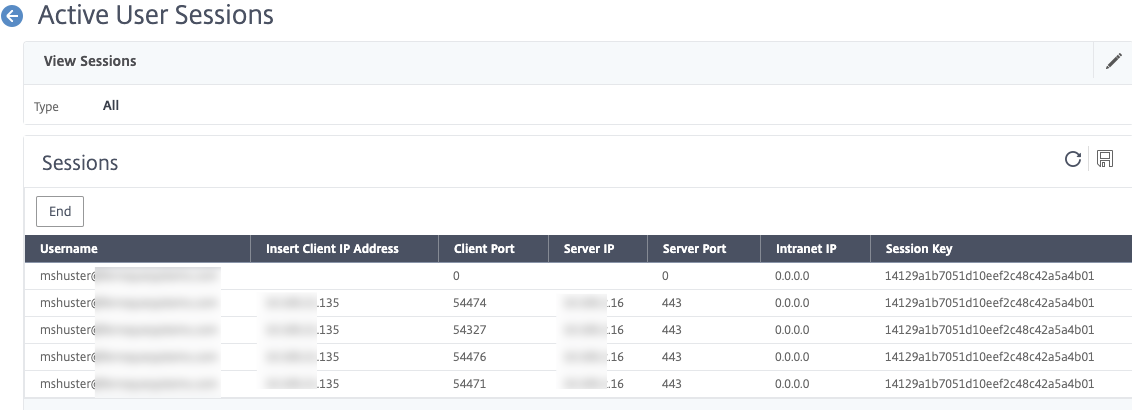
And there you have it. If you scoot back over to the Citrix ADC and examine the Citrix Gateway active sessions, you will see the user’s UPN is shown, despite never explicitly authenticating to the Citrix Gateway.
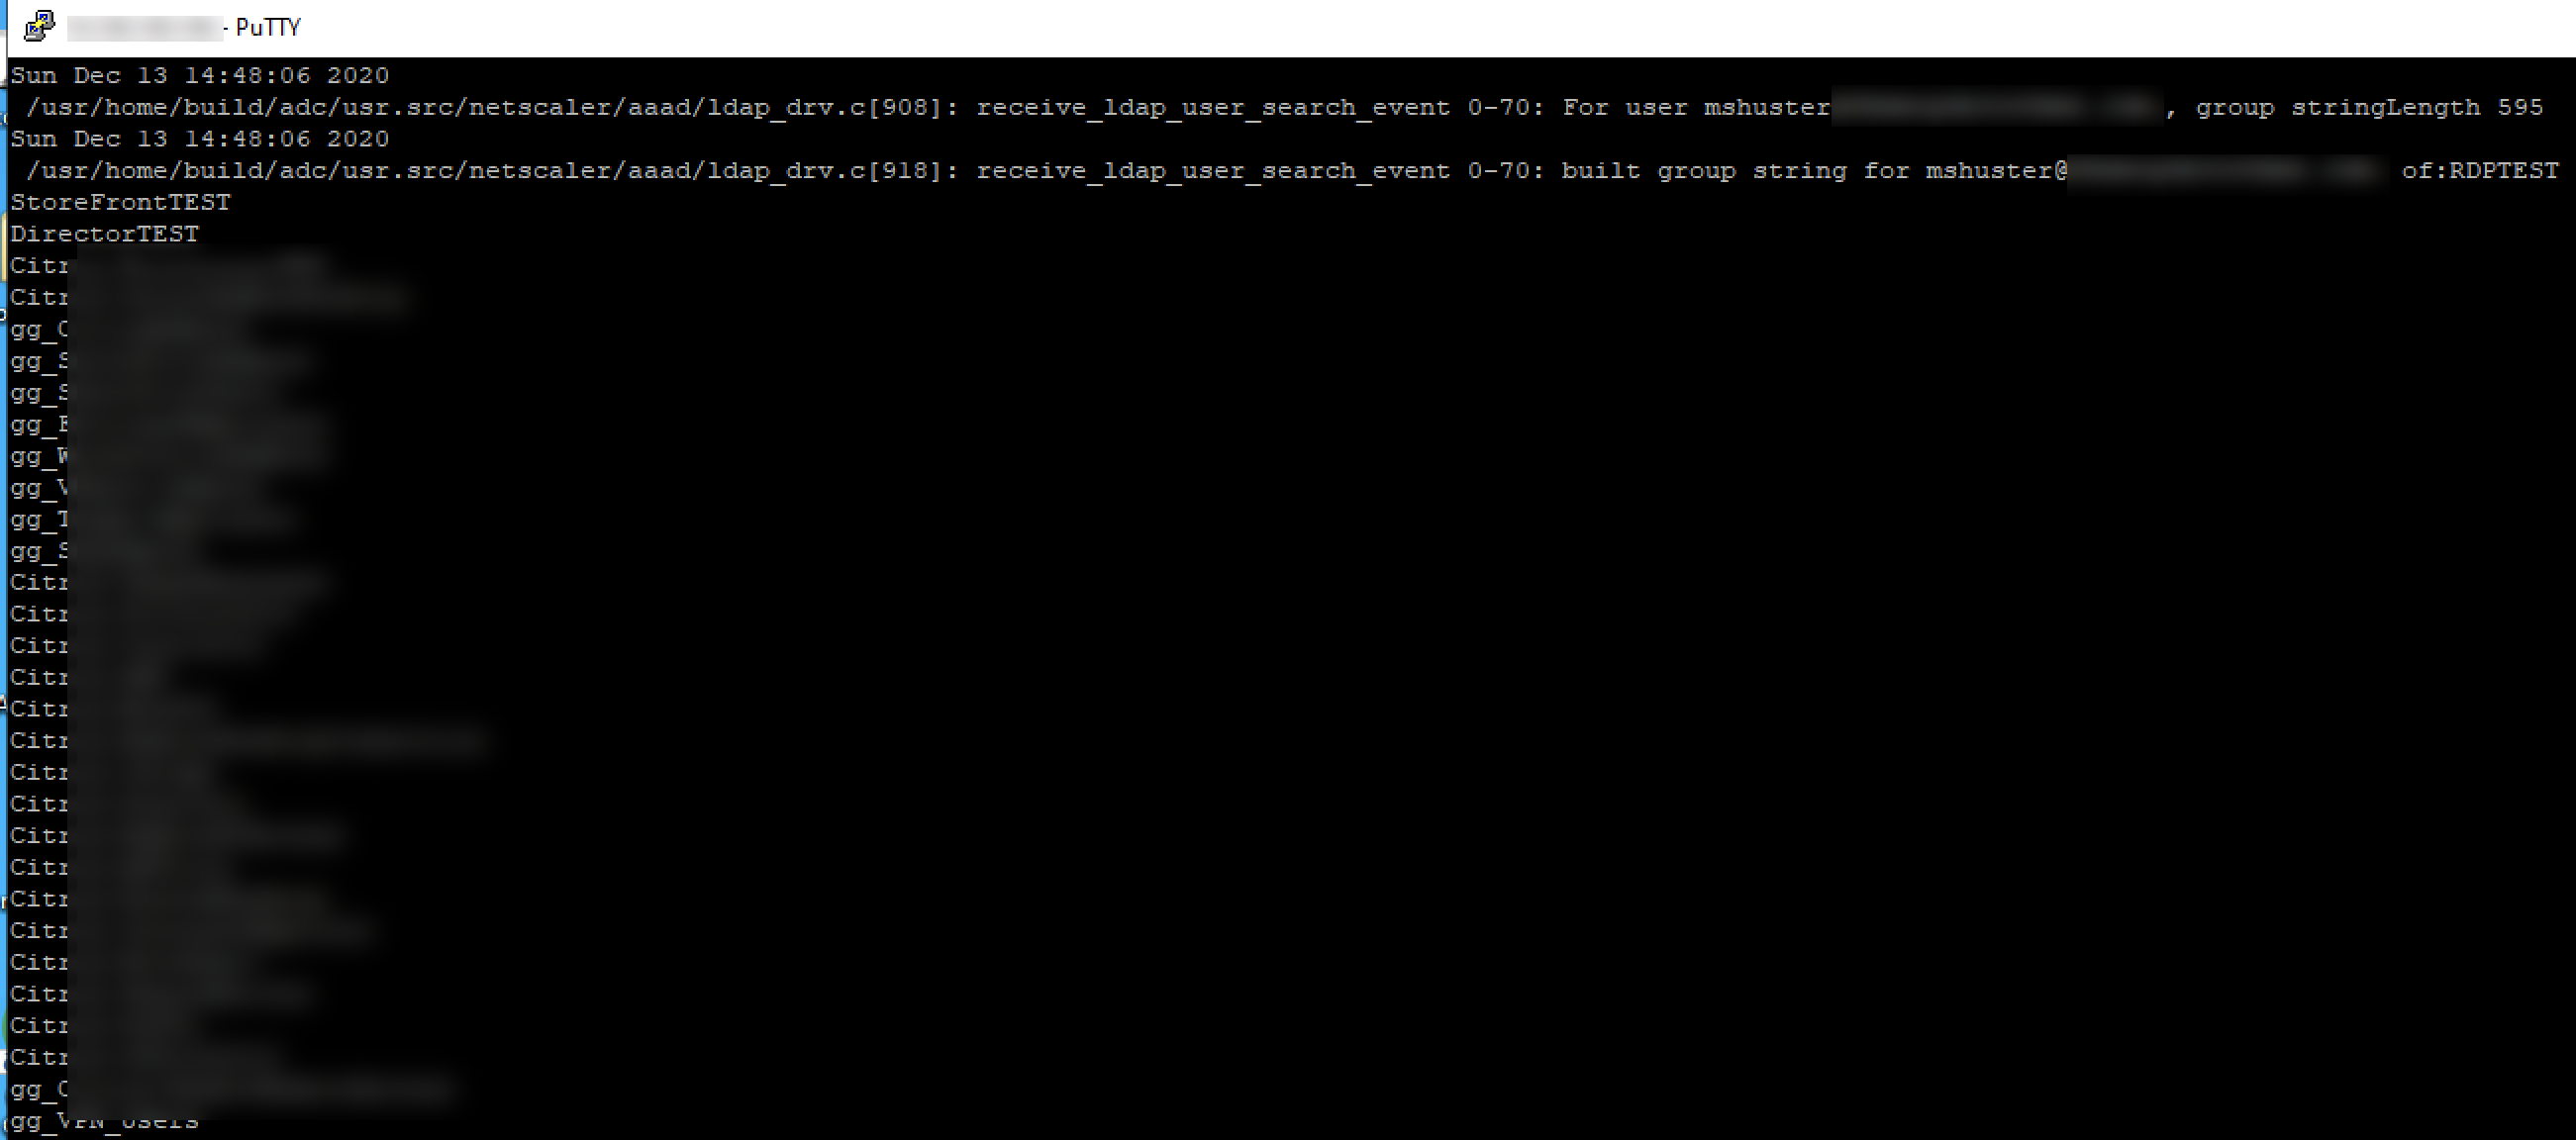
And if you happened to have run aaad.debug from shell on the ADC, you can see what’s going on as far as authentication. Note that NEGOTIATE does not log anything here, but we can see evidence of our group extraction occurring as expected, therefore our AAA groups and Authorization Policy configurations apply accordingly.
In my case, it was just a matter of hitting the VIPs defined in my Intranet Applications, and from the properties of the Citrix Gateway plug-in confirming the connection logs had these flows confirmed as flowing through the tunnel.
Additional Considerations
For some deployments, relying on userPrincipalName will not suffice in the LDAP policy, as it may be disjointed from the DNS domain name of the AD domain. We can use sAMAccountName instead in the LDAP group extraction, provided we use a modified noschema Login Schema that extracts the username from the extended username that NEGOTIATE captures from the user. For more details on this, please check out Rasmus Kindberg’s blog post on Kerberos found here.
After changing the LDAP action to use sAMAccountName, create a new Login Schema as follows:
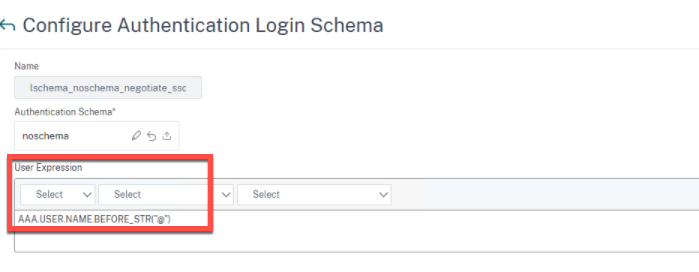
The user expression we use is as follows, which parses out the username from the ID string NEGOTIATE is sending over to the LDAP factor.
AAA.USER.NAME.BEFORE_STR("@")
Once created, create a new Policy Label that uses that new Login Schema and bind the LDAP group extraction policy to it. Then go update the policy binding on the AAA-TM vServer to link to the new Policy Label.
December 2022 Notes – Kerberos Ticket Encryption Issues
With Microsoft’s November 2022 security patching, patches applied to Domain Controllers appear to have affected the NetScaler’s ability to decrypt the tokens. As such Kerberos authentication to the Citrix Gateway fails.
When examining before and after patching, it was noted the KerbTicket Encryption setting on the client after they visited the Citrix Gateway SSL VPN URL configured for Kerberos switched from RC4 to AES encryption, this is seen by running klist from CMD on the endpoint. This occurred even if the Kerberos Service Account was set to not support AES encryption types and when the domain policies were set to allow RC4 once again post-patch. Removing the patch from the DCs restored the functionality but that was not a solution. NS.LOG showed Kerberos ticket decryption was failing.
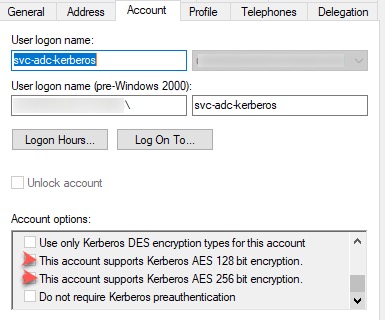
The fix to get this working and keep the patches in place required a few configurations, some on the AD service account, and one of the NetScaler’s NEGOTIATE action.
On the service account, enable the support for AES 128 and 256-bit encryption,
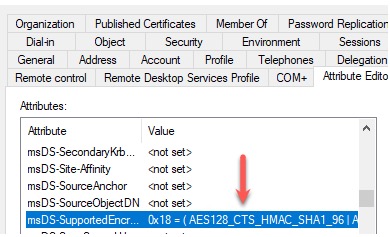
In the Attributes Editor, navigate to ms-ds-SupportedEncryptionTypes attribute which is probably blank.
![]()
Set the decimal value to 24 (0x18) which should allow AES128_CTS_HMAC_SHA1 or AES256_CTS_HMAC_SHA1.
The 0x18 comes from combining the hex attributes of AES128 and AES256 per Microsoft.
AES128_CTS_HMAC_SHA1_96 = 0x08
AES256_CTS_HMAC_SHA1_96 = 0x10
On the NEGOTIATE action, it is case-sensitive. You may need to switch it to uppercase if your domain FQDN in AD is uppercase.