
Introduction
This blog is intended to detail the steps and necessary configurations in Duo and the SAML 2.0 service available via Citrix Cloud. SAML 2.0 support with Citrix Workspace Service is significant because it allows:
- Simplified federated integration of IdP solutions without sacrificing an organization’s ability to shift the security perimeter of their environments outside the traditional corporate boundaries.
- When combined with appropriate IdP licensing, administrators can create specific policies for individual applications that further scrutinize user behavior in the environment. This can be achieved via risk-based multi-factor authentication, device posture checking, and contextual access policies that can be applied when the appropriate IdP licensing is available.
Advanced authentication solutions integrated with Citrix Cloud services via SAML 2.0 are being positioned as superior zero trust solutions.
The General Availability (GA) announcement of SAML 2.0 support in Citrix Cloud is significant because it enables Citrix Cloud customers the ability to ‘Bring-Your-Own’ advanced authentication service provider, with a simplified and secured user experience.
On September 15, 2021, Citrix issued a GA announcement for SAML 2.0 support within Citrix Cloud. For Ferroque Systems, the SAML GA announcement meant that Christmas came early to our offices! Since Citrix first published the blog ‘Citrix + Duo: All cloud, all zero trust’, in March 2021, we’ve considered this one of the most significant new Citrix Cloud capabilities in recent memory, because it allows organizations to BYO Advanced Auth Solution to their Citrix Service enabled environments, without a customer-managed ADC (albeit we can confidently say there remains a strong use case for this for adaptive authentication and nFactor). Contextual access to the Citrix Workspace service, without an ADC, FINALLY!
My talented colleague, Chetan Kini, and I have celebrated the release of SAML 2.0 by integrating this Citrix Cloud feature for a long-time Ferroque customer whose new managed Citrix offerings for SMBs feature a Zero Trust Security approach that shifts the security perimeter outside of the traditional data center space. The benefits of the extended security perimeter shifted outside of any organization’s network and physical locations offer a distinct and desirable security posture.
As configured, the below documentation details provide the following functionality:
- Login attempts are only permitted to accounts from specific email domains.
- Accounts permitted to log in receive if an initial prompt to register with the Duo advanced authentication.
- Integration with Citrix Cloud.
- Identity and Access Management
- Citrix Gateway
- Citrix FAS (pre-existing config)
Since the spring of 2021, the Ferroque Team has been anxiously waiting for the General Availability Announcement of SAML 2.0 integration in Citrix Cloud.
The purpose of this blog is to help educate viewers on the key concepts of technology architecture, clarify distinctions between architecture and design, provide practical guidance for developing environment architecture and design artifacts, and highlight common pitfalls to be wary of.
Target Audience
If you’ve been a follower of Ferroque blogs you’ll notice we feature heavily on FAS-related content. Hopefully, this material has assisted you in planning/deploying/troubleshooting modern auth solutions in your respective environments to date. While this isn’t a ‘FAS Blog’ in its immediate focus, there is a FAS tie into it.
This blog will focus purely on the Duo setup and SAML 2.0 integration from Citrix Cloud. That said, I see this blog assisting 4 distinct target groups:
- New to Citrix Cloud. Perhaps you are trying to determine the exact functionality Citrix Cloud services are going to be able to provide an environment that is still in the early stages of planning. Your organization has invested in a modern auth solution as a primary IdP, other than Okta which has been a supported Identity and Access Method in Citrix Cloud for some time now, in BYO-Advanced-Auth solution fashion. Congratulations, bring your existing advanced auth solution.
- Existing Citrix Architect/Engineer/Admins. Perhaps you are an existing customer, with an existing SAML-based modern auth solution, and you are trying to determine the supportability of Citrix Gateway features.
- Citrix Workspace Aficionados. Perhaps you are an advocate of Citrix Workspace Services (i.e. the value beyond merely launching Citrix apps and desktops). If so, intelligent workspace services from Citrix feature prominently on your organization’s cloud adoption strategy. An organization’s ability to integrate Citrix intelligent workspace services is contingent on that organization’s ability to use the Citrix Gateway Service rather than an on-premises access layer. Of course, the Citrix Gateway Service is not a feature-parity product to an ADC in terms of the depth of features offered. The GA announcement of SAML 2.0 by no means bridges the feature gap between the Citrix Gateway Service and the Citrix ADC, but does inch it forward in a crucial manner.
This blog targets an audience who commonly work in architecting and/or designing various technology solutions, as well as those who may not have as much hands-on experience in doing so but are seeking a solid understanding of this topic.
Pre-requisites
- Duo
- Existing Duo subscription
- Duo licensing that allows for SAML (such as Duo MFA, Duo Access, Duo Beyond but note that Duo Access and above is where the best conditional access policies come in)
- A custom sub-domain name
- <SubDomainName>.login.duosecurity.com
- Duo Admin with Owner Role
- For Active Directory, you’ll need the following:
- At least one standalone Windows or Linux server that can communicate with your Active Directory Domain Controllers to provide the Duo proxy role
- Service Account credentials for Active Directory
- Access to DNS for to configure the email domains (TXT records)
Duo Setup
Setup documentation from Duo is available here. At first glance, the scope of the documentation may be a bit overwhelming. Fear not, this setup only requires that we complete the following sections in the Duo documentation:
- Enable Duo Single Sign-On
- Configure Your Authentication Source
- Active Directory
Step 1 – Duo Subdomain Creation and Identity Source
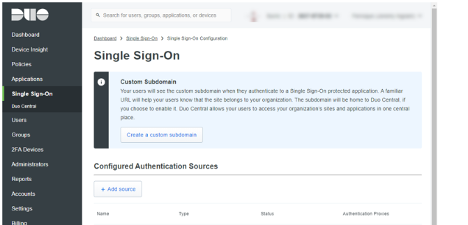
Login to your Duo admin account and click Single Sign-On from the menu on the left. Click ‘Create a custom subdomain’.
You don’t have to create the Duo SSO Subdomain first, but it is a requirement. If you log in to your Duo admin console and click Single Sign-On in the menu to the left of the screen, the setup task at the top of the page is to create the custom subdomain. The documentation mentions that once this is specified, you will not be able to change this subdomain. In a worst-case scenario, you’ll be able to accomplish an edit via Duo Support.
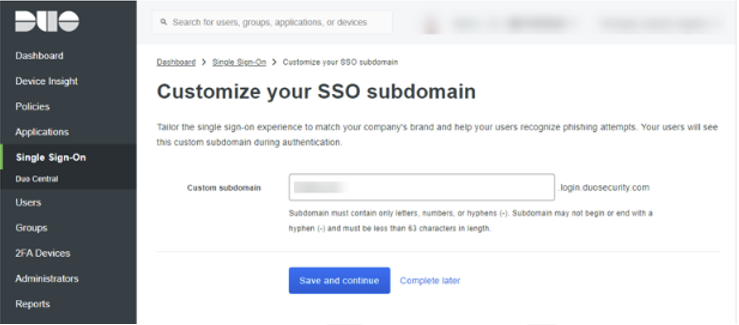
Specify the name of your custom subdomain and click ‘Save and Continue’.
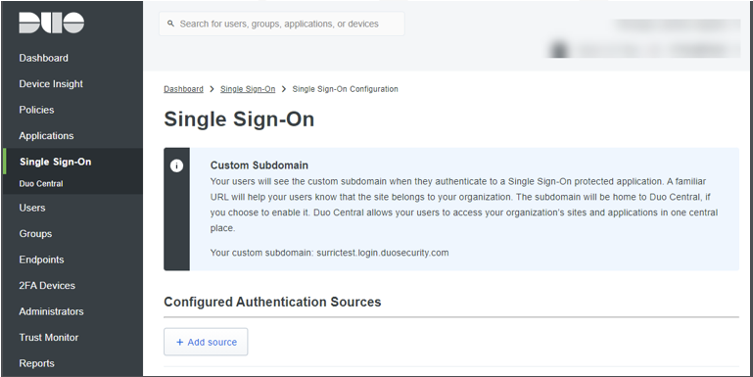
On the menu, click ‘+ Add Source’
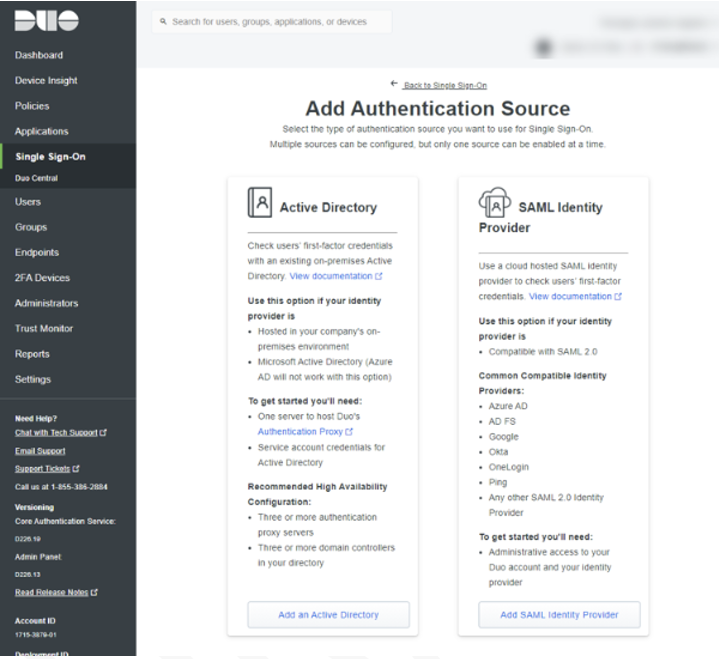
You’ll be presented with two options. Click ‘Add an Active Directory Domain’.
Step 3 – Authentication Proxy
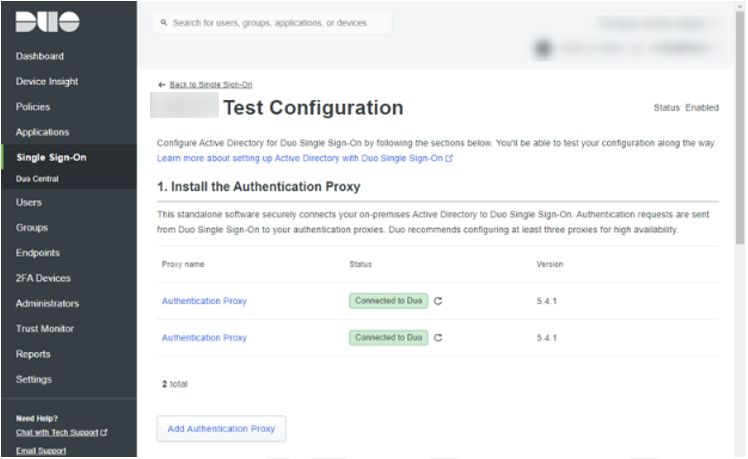
The next step is to ‘Install the Authentication Proxy’. Click ‘Add Authentication Proxy’.
Duo recommends the installation of a minimum of x3 Authentication Proxies. If you have not installed the Authentication Proxy yet, the installation process for a new Authentication Proxy specifies the following:
-
- A recommendation to install on Windows Server 2016, although Windows Server 2012 is the low watermark for functionality.
- A recommendation to deploy a minimum of three Authentication Proxies
- A recommendation to install on a machine with a 1 vCPU x 4 GB RAM configuration, although a minimum machine spec is identified.
- Connectivity requirements of 443 outbound, but please see Duo additional documentation on specifying IP-based rules for firewall configurations.
The ‘Authentication Proxy’ page contains all the details and instructions to install and connect the Authentication Proxy to Duo.
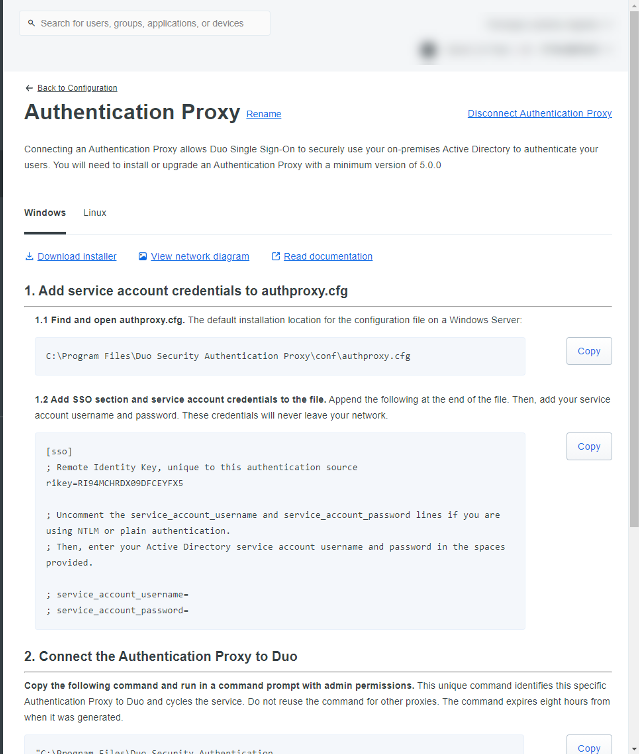
The instructions on this page are quite straightforward. I do want to point out Steps 1.1 and 1.2. After the Authentication Proxy is installed, there is a default configuration file created at the below path.
C:\Program Files\Duo Security Authentication Proxy\conf\authproxy.cfg
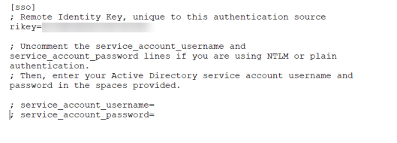
Instructions in step 1.2 mention that lines specific to service credentials should be edited and uncommented. In the setup we’re providing here, this isn’t necessary as we are using LDAPS on port 636 for authentication to our domain controllers. The only line we really need is the ‘rikey’ value.
For reference, here is our config file, exactly as it appears from Duo.
Scrolling down to step 2, notice that Duo has generated a command to run from an elevated command prompt on the Authentication Proxy server.
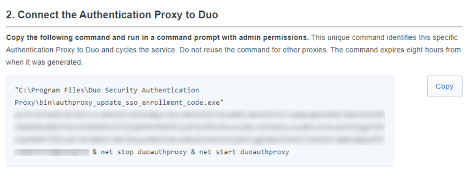
When this command is run successfully you should see the following output:
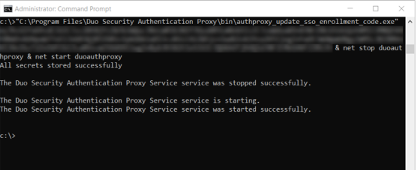
The bottom two lines indicate that we’ve connected the Authentication Proxy to Duo:
- The Duo Security Authentication Proxy Service is starting.
- The Duo Security Authentication Proxy Service was started successfully.
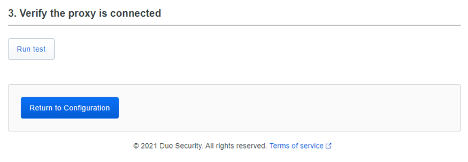
If we go back to the Duo setup now, we can continue scrolling down to Step 3. Click ‘Run Test’, and then click ‘Return to Configuration’.
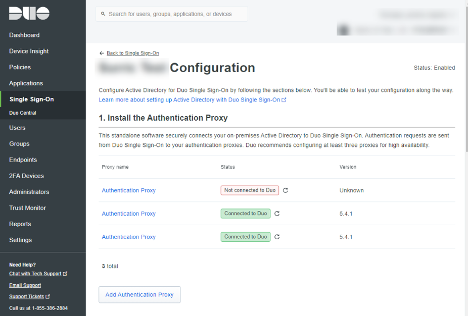
After we click ‘Return to Configuration’ you should now see your Authentication Proxies ‘Connected to Duo’. For reference, I’ve included a single Authentication Proxy that has not connected to Duo to demo a failed attempt to connect an Authentication Proxy to Duo.
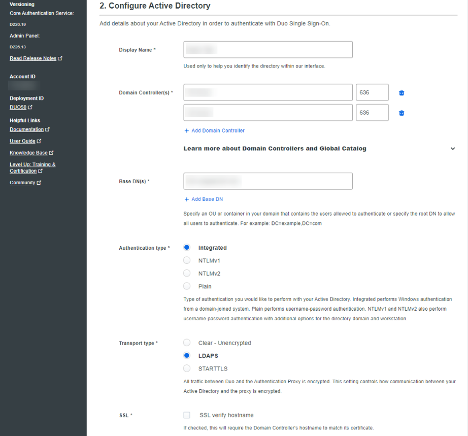
Step 4 – Active Directory Integration
This step requires that you specify; a name for your AD Authentication Configuration, Domain Controllers, and define the base DN(s) where accounts for authentication exist.
Additionally, we specify:
- Authentication Type: Integrated
- Transportation Type: LDAPS
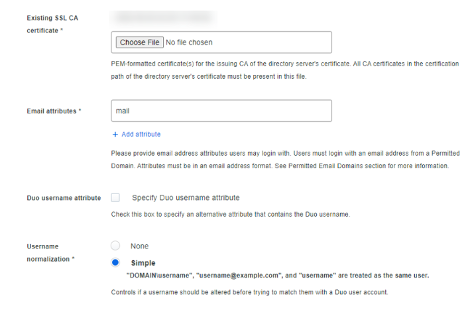
Continuing with the Configuration of Active Directory, you will need a PEM-formatted certificate. All CA certificates in the certification path of the directory server’s certificate must be present in this file.
If you don’t have a PEM formatted certificate, or you have issues creating a PEM formatted certificate, Duo support has an internal-facing KB article that a support technician should be able to reference for you. The internal Duo KB will have you create your own PEM file manually by opening each certificate in the chain in Notepad and copying the contents of the certificates into a single notepad. The order you copy the certificates is essential. Instead of the typical order a certificate chain would be exported ( Root CAIssuingCAServer), reverse the order of the certificates. To confirm, the contents of your certificate should be copied into a new notepad version in the following order:
- Server
- Issuing CA
- Root CA
Save your newly created file with a. PEM extension. You can then upload this PEM file as the ‘Existing SSL CA’ certificate.
Additionally, specify the following:
- Email attributes: mail
- Username normalization: Simple
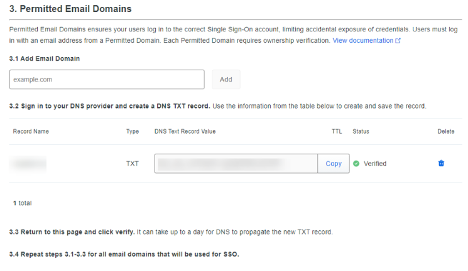
Step 5 – Domain Validation
This step requires that we define permitted email domains that can use the Duo / SAML 2.0 configuration. For each Email Domain, enter in text field 3.1 and click ‘Add’. Duo will then generate a DNS text record value for each Email Domain specified, which then needs to be used to create a new TXT record in your DNS provider.
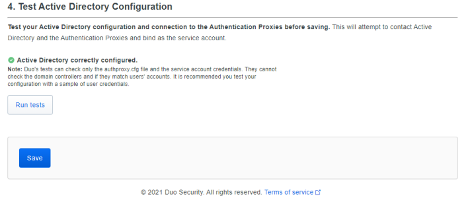
Step 6 – Domain Validation
Click ‘Run tests’, confirm that your Active Directory settings are configured correctly, and click ‘Save’.
Step 7 – Duo SAML Configuration
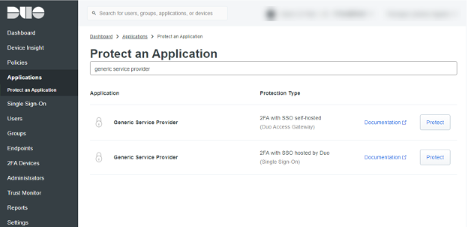
With Singe Sign-On configurations complete, our next step is to integrate the Citrix Cloud. This is accomplished by “Protecting Applications” within the Duo console. Duo offers a number of pre-configured application templates for quick integration, but at the time of this blog there is no application template for the Citrix Workspace and Gateway Service. We complete the configuration by using the ‘Generic Service Provider – Single Sign-On’ template.
Begin this configuration by clicking ‘Applications’ from the menu on the left, and then ‘Protect an application’.
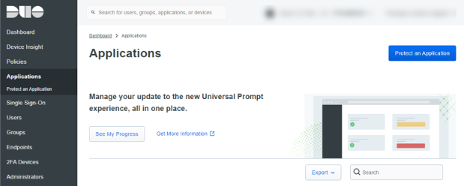
Search for ‘Generic Service Provider’. Two results will be returned; you want to select ‘Generic Service Provider – 2FA with SSO hosted by Duo (Single Sign-on)’. Locate and click ‘Protect’.
The following configuration page is quite long; not surprisingly for a generic service provider page. Not all the information is required. We will first jump into Citrix Cloud before returning to Duo in order to grab relevant inputs.
Step 8 – SAML 2.0 and Citrix Cloud Integration
The SAML 2.0 and Duo Generic App – SSO configuration prompt will require you to bounce back and forth between the two configuration menus.
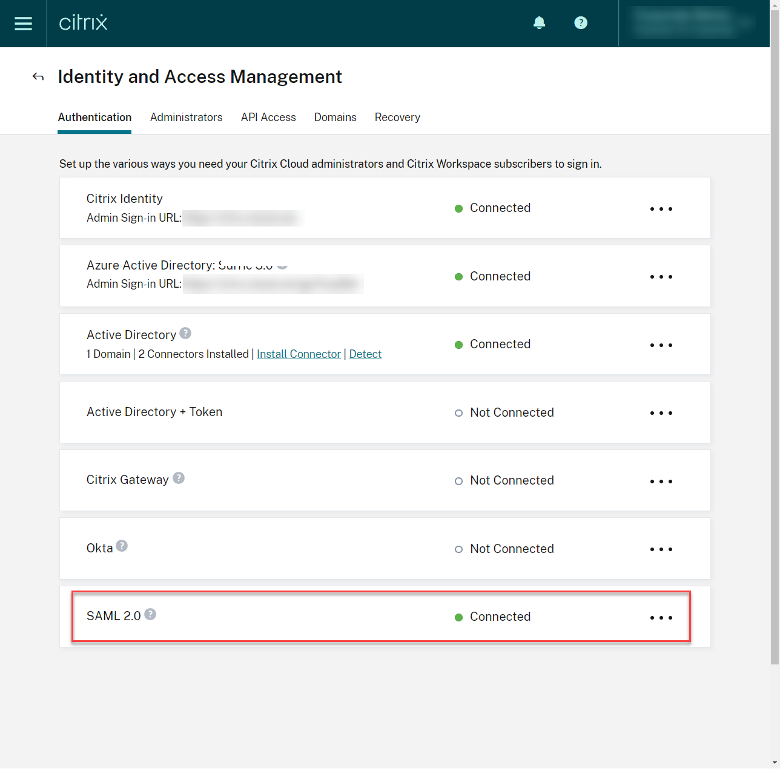
Log into Citrix Cloud and navigate to the following page:
Citrix Cloud > Identity Access Authentication > SAML 2.0 > Configure SAML
Back in Duo, please navigate back to this location:
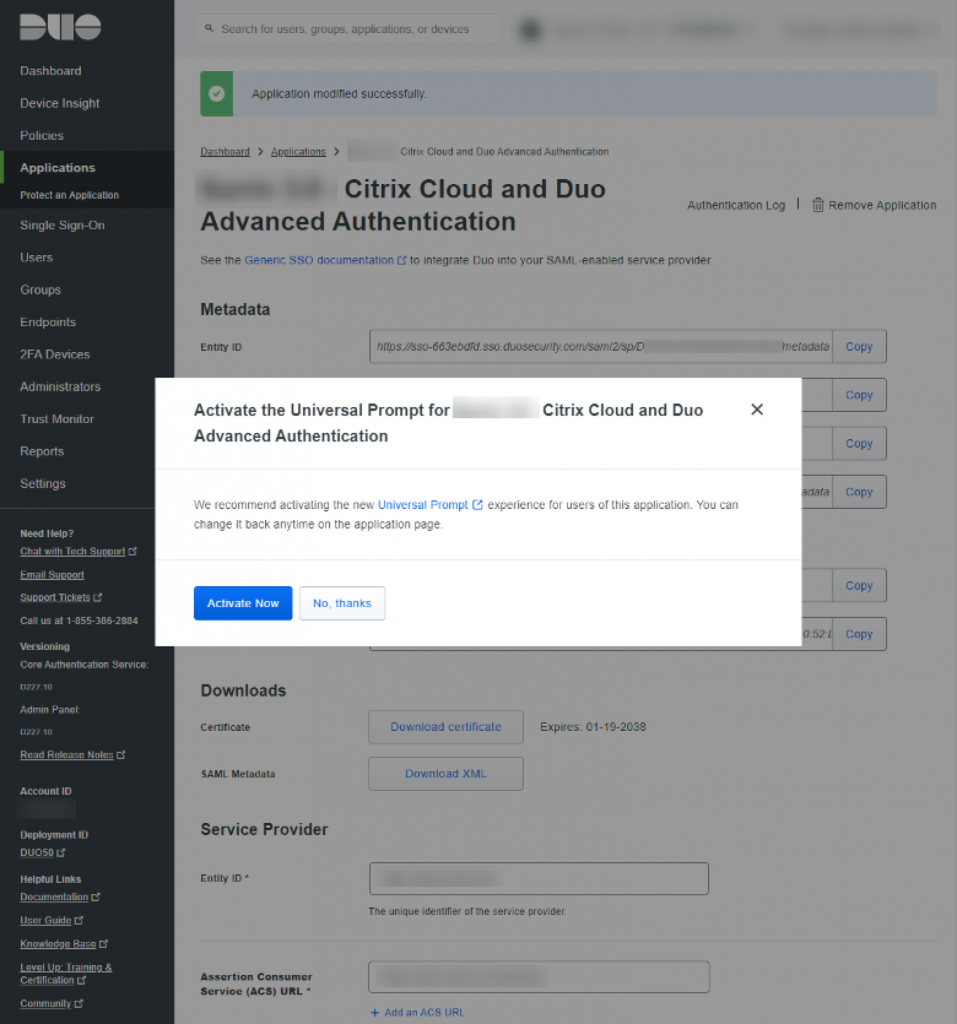
Duo > Applications > Protect an application > Generic Application SSO Hosted by Duo
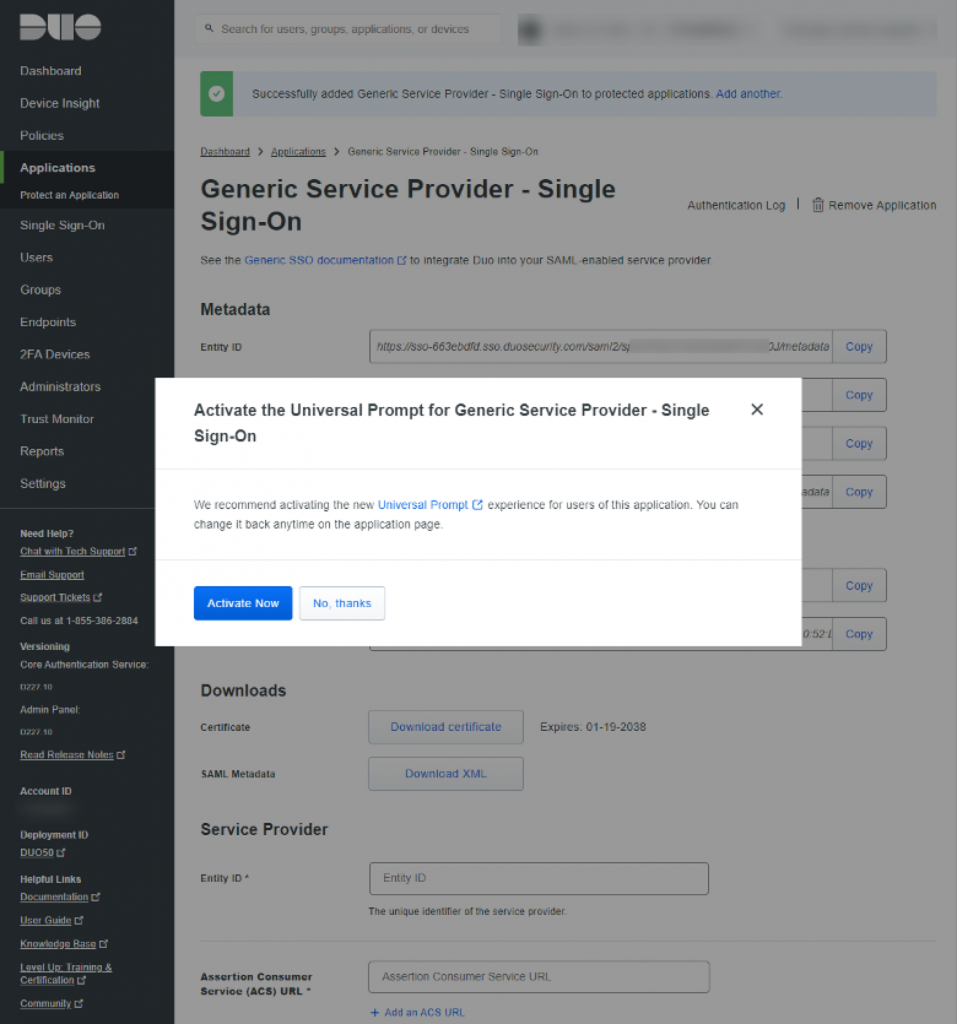
Click ‘No, thanks’
It’s in your best interest to pre-stage some of the info that needs to be copied into the respective consoles.
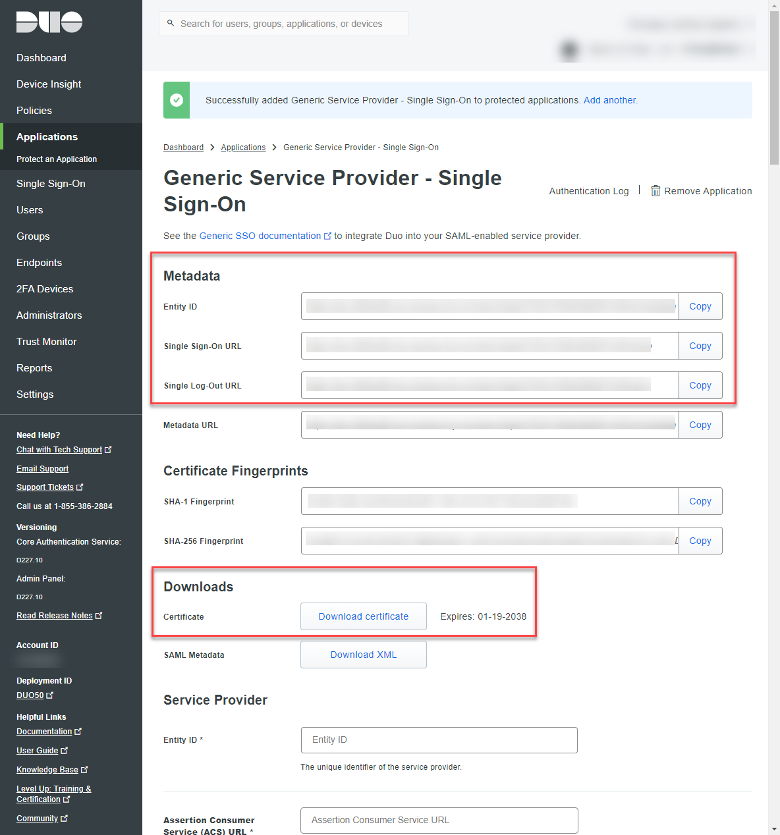
In Duo, I recommend copying the Entity ID, Single Sign-On URL, and Single Log-Out URL from the Metadata section. Click ‘Download certificate’ from the Download section. These items will need to be ported into the Configure SAML configuration page in Citrix Cloud.
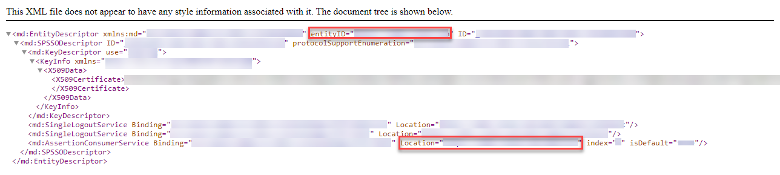
Back in Citrix Cloud, in the ‘SAML Configuration’ page, click ‘Download’ on SAML Metadata.
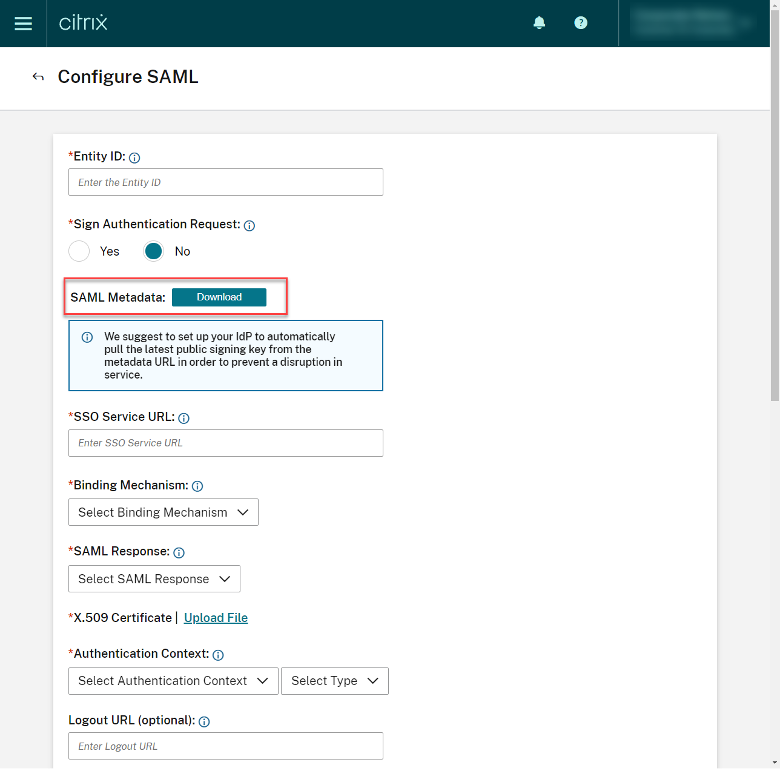
From the XML file, make note of the Entity ID and Location (these values will be ported into Assertion Customer Service (ACS) URL in Duo).
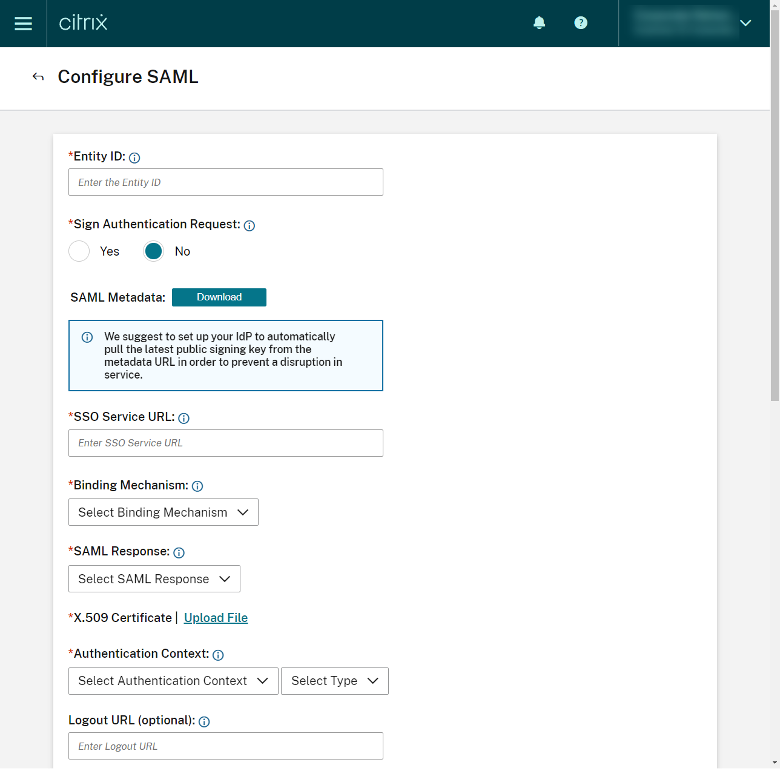
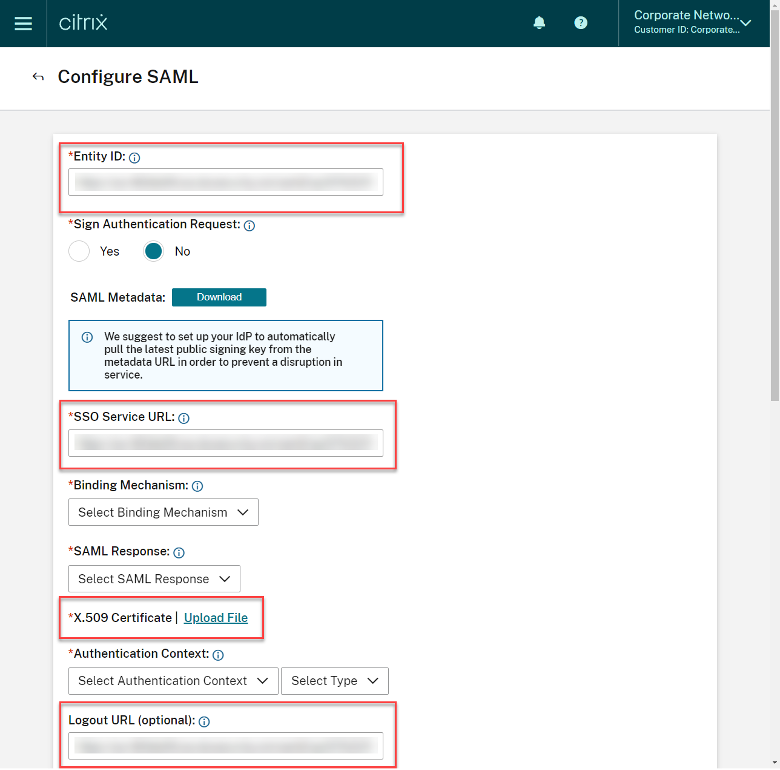
In the SAML Configuration menu in Citrix Cloud, copy the Entity ID, Single Sign-On URL and Single Logout URL, and upload the downloaded certificate.
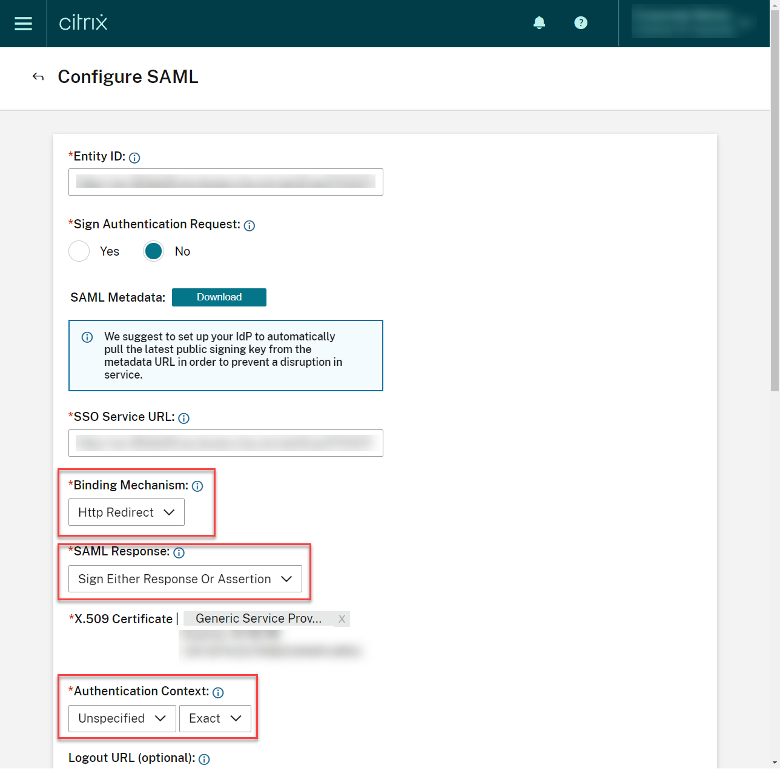
Staying in the Citrix Cloud SAML configuration console, set the following:
- Binding Mechanism = Http Redirect
- SAML Response = Sign Either Response or Assertion
- Authentication Context = “Unspecified” + “Exact”
Pre-populated attributes do not require adjustment. We’ll align these values in Duo soon.
Navigate back to the Duo configuration window, and copy details from the XML file from the SAML Configuration screen in Citrix Cloud:
- Entity ID
- Single Logout URL
- Location (Assertion Consumer Services (ACS)) URL
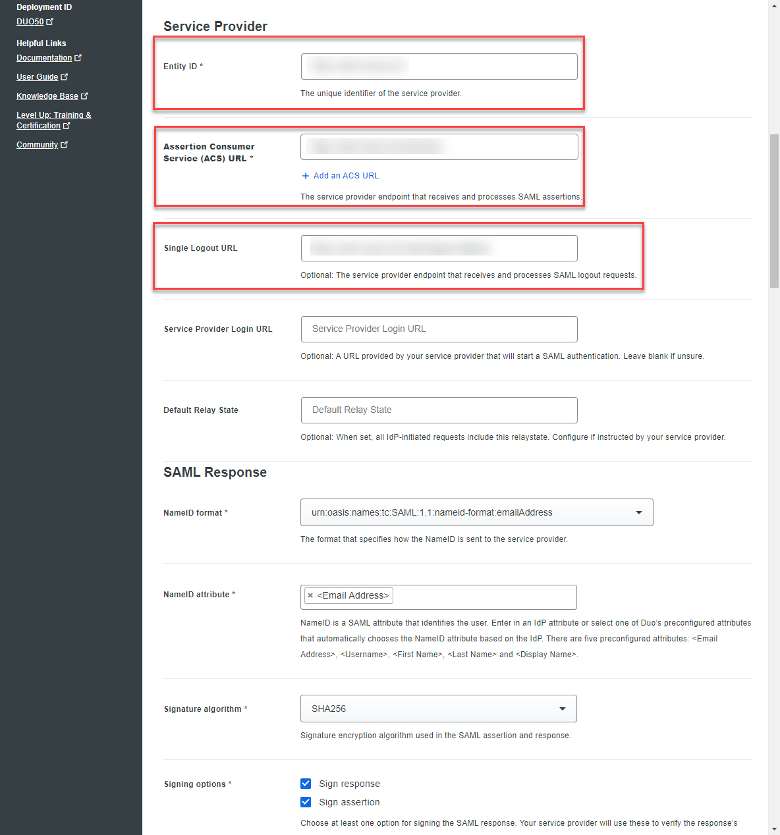
Within the SAML Response section:
- NameID format: Keep the default setting
- NameID attribute: Keep default
- Signature algorithm: Keep Default
- Signing options: Ensure both ‘Sign response’ and ‘Sign assertion’ are SELECTED
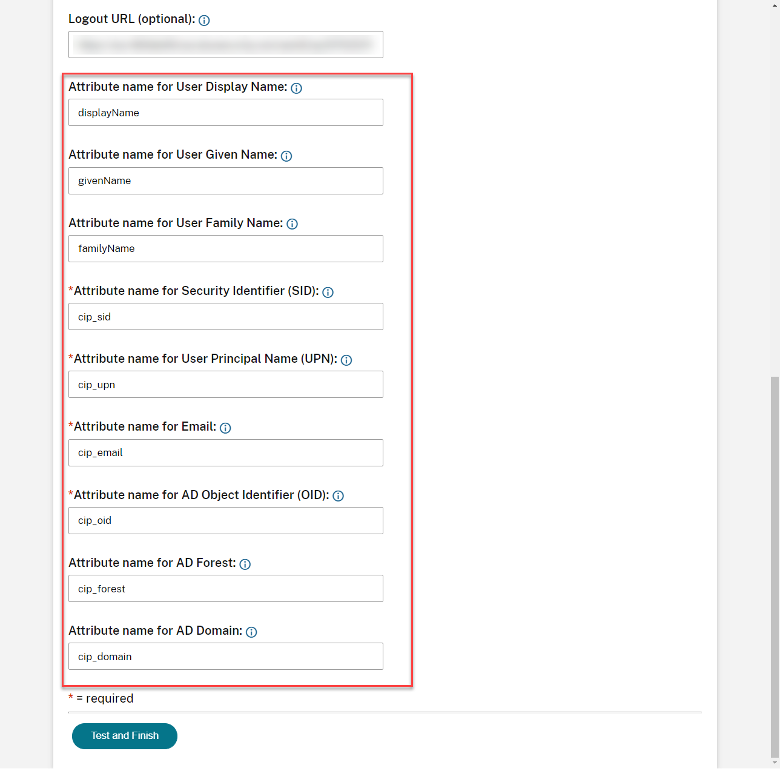
- Map Attributes: Ensure the following are created inline with the attributes from the Configure SAML screen in Citrix Cloud:
| IdP Attribute | SAML Response Attribute |
| <Display Name> | DisplayName |
| <Email Address> | cip_email |
| <First Name> | FirstName |
| <Last Name> | LastName |
| ObjectSID | cip_sid |
| userPrincipalName | cip_upn |
| ObjectGUID | cip_oid |

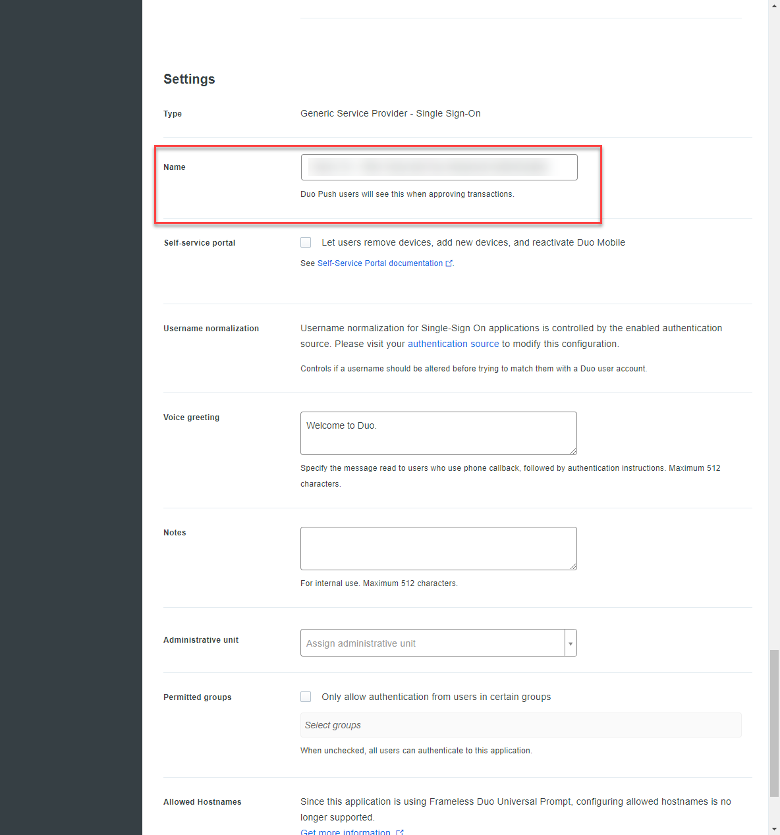
Scrolling down the Duo configuration screen there is a section call Settings. I recommend specifying a unique name. This setting is visible to the end-user, so take this visibility into consideration when identifying an appropriate identifier.
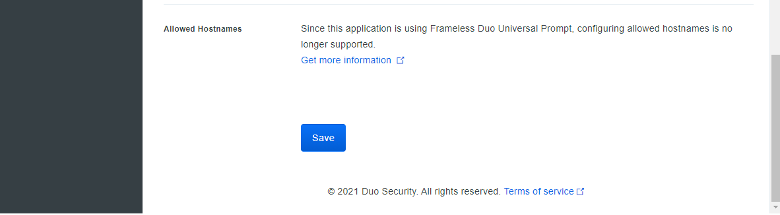
Scroll to the very bottom of the Duo configuration page and click ‘Save’.
Click ‘Activate Now’.
Navigate back to the SAML configuration menu in Citrix Cloud and click ‘Test and Finish’.

You should see SAML 2.0 with the status ‘Connected’.
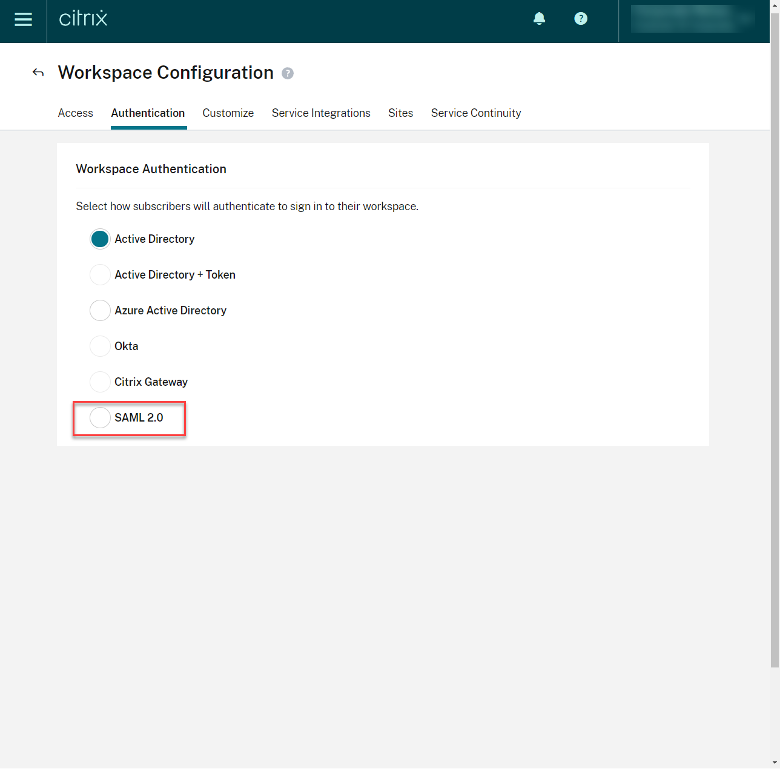
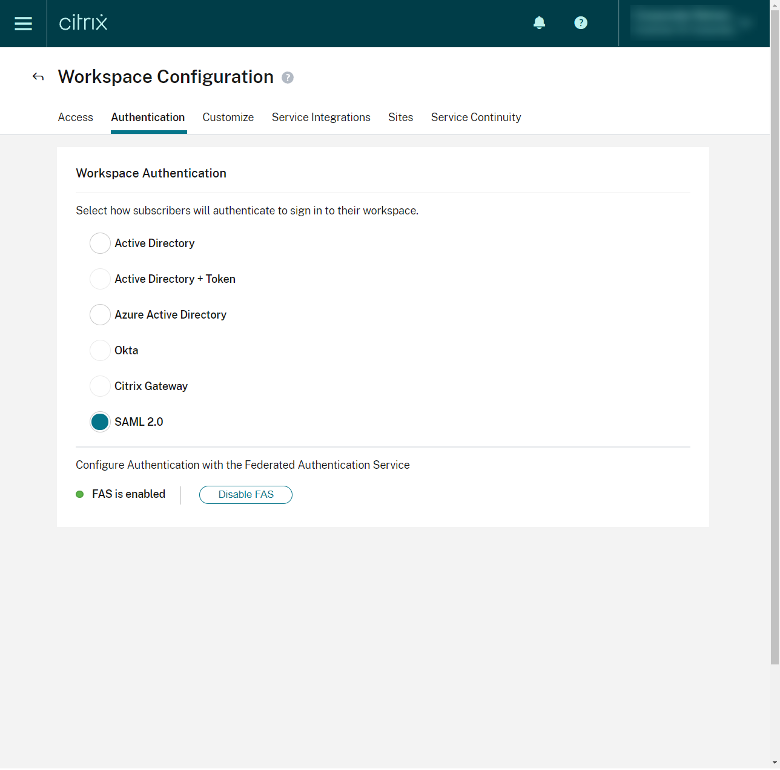
Step 9 – Enable SAML 2.0 Authentication for Workspace
To enable the SAML 2.0 configuration in Citrix Cloud, browse to the Workspace Configuration through the Hamburger Menu, select Authentication, and select SAML 2.0.
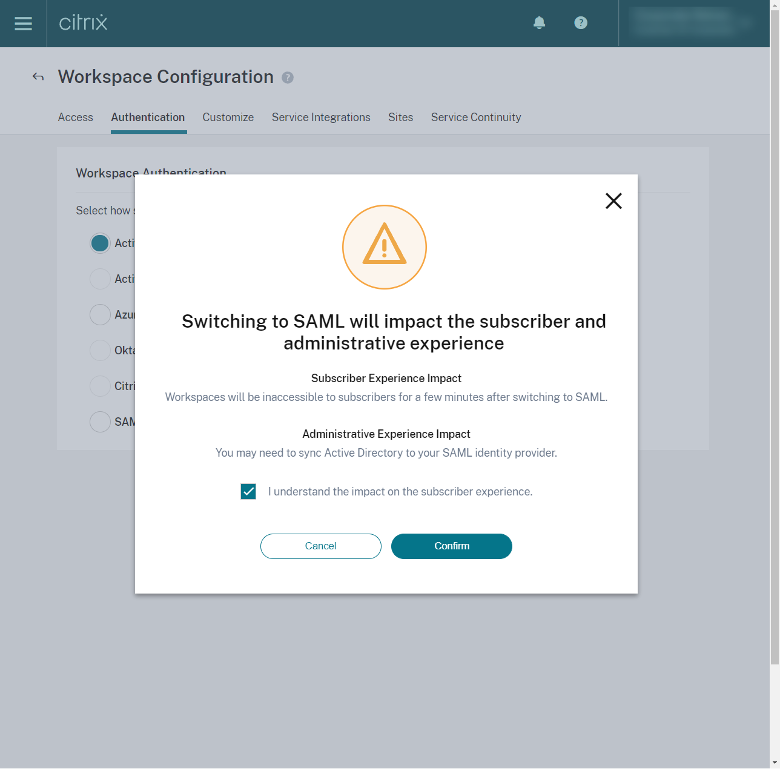
You will be prompted that your user’s authentication experience will change. Click the check box, acknowledging the impact on the user experience, and click Confirm.
Step 10 – (Optional) Verify FAS is Enabled
If your Workspace features FAS (to SSO into Citrix Apps and Desktops resources), ensure that FAS is enabled immediately below the listed authentication options.
Step 11 – Testing
Congratulations, you’ve completed the steps to integrate Duo and Citrix Cloud SAML 2.0 authentication. Time to test your end-to-end workflow by accessing the Citrix Workspace Service URL.
Parting Thoughts
This guide has walked through a high-level setup and integration of Duo into Citrix Cloud. You will likely want to configure conditional access policies in Duo to secure Citrix access based on contextual parameters for the user logins.


Fantastic guide regarding the Duo side of the configuration :). Really useful for our customers and engineers alike.
Thank you for the feedback on behalf of the team!
Amazing guide Michael
This article is excellent, except for one thing – the “Logout URL” field that’s labeled in Citrix SAML 2.0 is not optional, no other value works (including leaving that field blank). Also, in step 7 of the official Citrix SAML 2.0 documentation, they have this super misleading note: 7. In Logout URL, locate the SingleSignOnService element with the HTTP-Redirect binding in your SAML provider’s metadata file and enter the URL. If you choose to omit the Logout URL, Citrix Cloud doesn’t send a logoff request to the identity provider. Instead, Citrix Cloud redirects to the Workspace URL. Citrix Cloud doesn’t… Read more »