Introduction
This blog outlines the design and implementation of BitLocker device encryption with Microsoft Intune. BitLocker is Microsoft’s full-disk Windows device encryption technology, first introduced in Windows Vista, which keeps data at rest unreadable if a device is lost, stolen, or tampered with. While BitLocker can be managed with various tools, including legacy Group Policy in Active Directory, due to its widespread usage, the implementation described in this blog references Microsoft Intune as the SaaS control plane.
Deploying BitLocker reduces the risk of data loss and supports common audit and certification programs (e.g., ISO, SOC 2, NIST, CIS) by providing centralized policies, device-state visibility, and auditable recovery-key access logs. With Windows 10 reaching end of support on October 14, 2025, organizations have a timely opportunity to re-assess Windows encryption: treat the effort as a greenfield deployment wherein BitLocker has not previously been implemented, or modernize existing deployments by replacing scripts/MBAM/GPO sprawl with Intune policies, tightening recovery-key access, and integrating encryption state with Intune compliance policies and Microsoft Entra conditional access.
Intune Prerequisites and Windows 11 Requirements
Objectives and Design
Together, we will learn how to configure a BitLocker policy that performs silent encryption on Windows 11 with a single OS drive (C:) and escrows recovery keys to Entra ID for centralized auditable management (including rotation and reporting via Intune).
To reliably meet these objectives, Intune administrators should consider the join state of the corporate Windows devices: Entra ID-joined, hybrid Entra ID-joined, or a mix. Since there are two methods to create a BitLocker policy in the Intune Admin center, policy selection matters when hybrid-joined devices are present and corporate security policy mandates BitLocker recovery keys reside in AD DS. However, the objective of this blog is to deploy a BitLocker policy that centralizes recovery-key management in Intune/Entra ID and functions both on- and off-network regardless of the corporate Windows device’s join state.
For visibility, the first method to create a BitLocker policy is via Endpoint Security > Disk Encryption > Windows Platform > BitLocker.
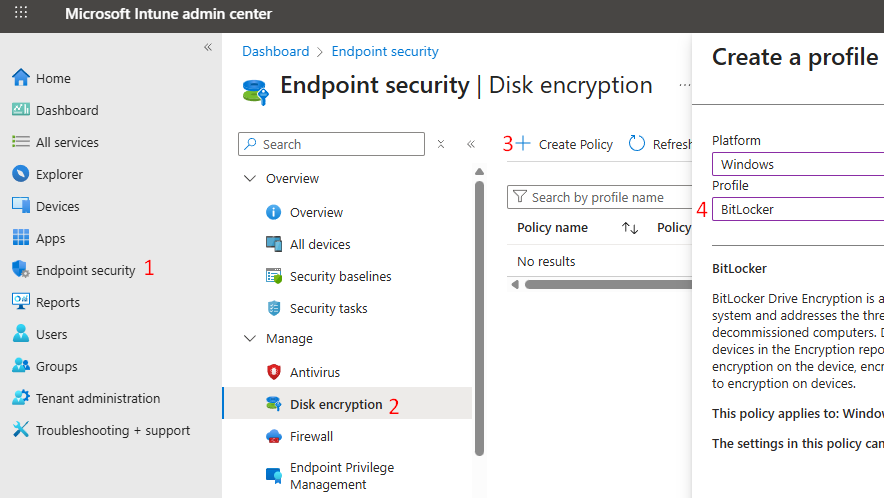
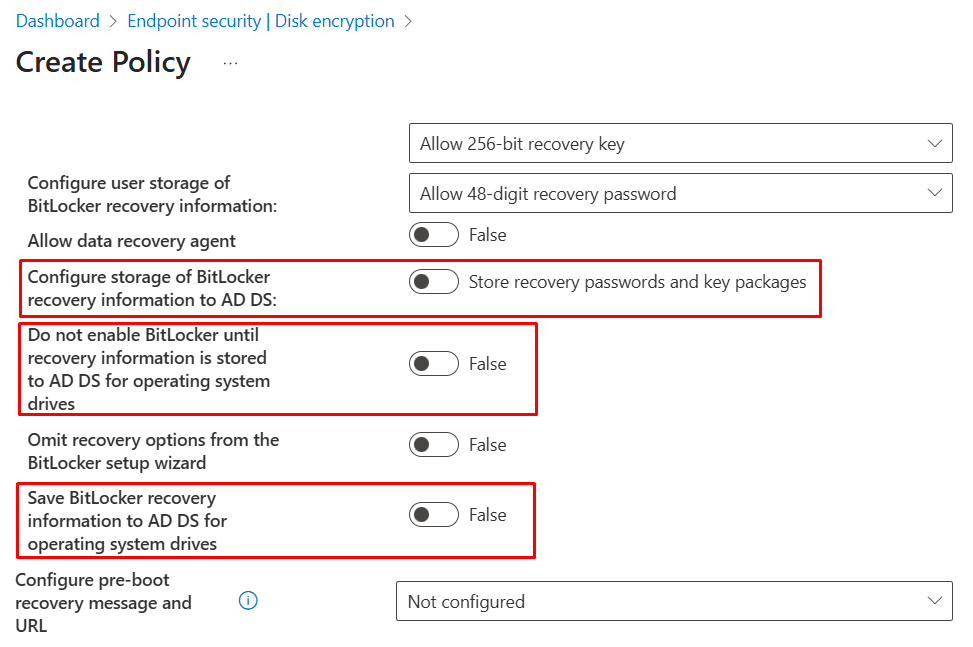
Administrators should use this method if there is a requirement to store the recovery keys in AD DS and configure accordingly. For this blog’s use case of hybrid Entra ID-joined devices, the Disk Encryption profile can be made reliable off-network, provided the AD DS settings are disabled or not configured (e.g., set storage of BitLocker recovery information to AD DS = Off, and set Do not enable BitLocker until recovery information is stored to AD DS = Off). With these options set to Off, the profile does not require the device to have line-of-sight to AD DS and will escrow recovery keys to Entra ID.
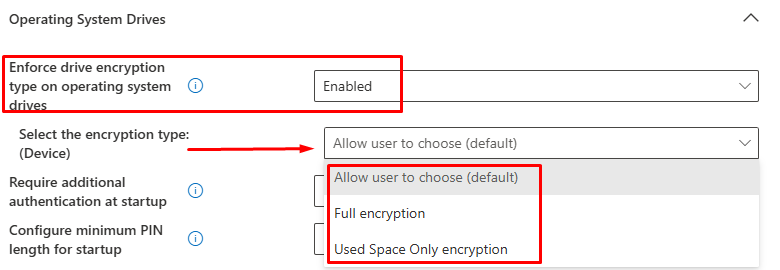
This method also exposes encryption type control in the UI, such that administrators can choose Used Space Only encryption or Full Encryption once the BitLocker profile lands and triggers the encryption on the device.
That said, to minimize the risk of accidentally introducing an on-premises dependency and to streamline the reading, this blog uses a Device Configuration (Endpoint protection) profile to keep recovery escrow scoped to Entra ID by design, which leads to the second method below – Device Configuration template profile.
Using the Device Configuration path means that, on modern Windows 11 hardware, silent enablement encrypts used space by default. This shortens the initial encryption phase, allowing post-onboarding tasks such as Autopilot provisioning, first-sign-in app installs, and profile/application deployment to complete quickly. From that point forward, all new writes are encrypted immediately, and previously unused sectors become encrypted as data is written.
The rationale for Used Space Only is straightforward: deliver a secure endpoint device that is productive immediately rather than waiting for a full-disk pass. This behavior is especially valuable during Autopilot or first-time Intune enrollment, when devices are busy applying policies, apps, and updates. If a consistent full-disk outcome is mandated, set the mode before BitLocker starts by using either an Administrative Templates profile (Windows Components > BitLocker Drive Encryption > Operating System Drives > Enforce drive encryption type) or a custom OMA-URI to the BitLocker CSP at /Device/Vendor/MSFT/BitLocker/OSEncryptionType.
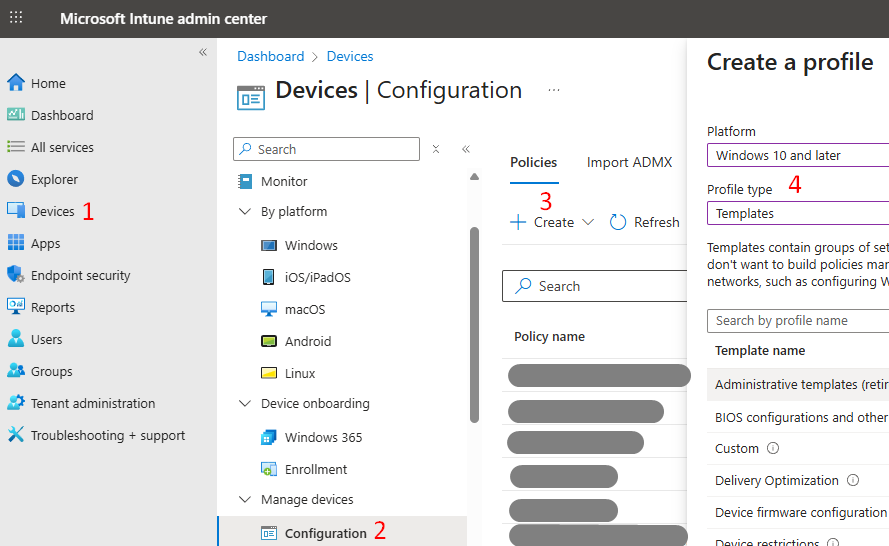
The second method can be implemented via Devices > Configuration > Templates > Endpoint Protection > Windows Encryption.
Both methods expose mainly the same settings and, for Entra-joined devices, support the same objectives – silent enablement and recovery-key escrow to Entra ID.
As a rule of thumb for mixed environments: in environments containing both hybrid Entra ID-joined and Entra ID-joined devices wherein the objective is for the recovery keys to be in Entra ID only, administrators should use a single Device Configuration (Endpoint protection) profile for all devices. This avoids on-premises AD DS escrow dependencies that can disrupt silent enablement or key rotation for off-network hybrid devices, while keeping all recovery keys in Entra ID.
For visibility regarding silently enabling BitLocker encryption on Windows devices, the required settings within the Windows encryption configuration are below and the configuration section will reflect further:
- Encrypt device: Required.
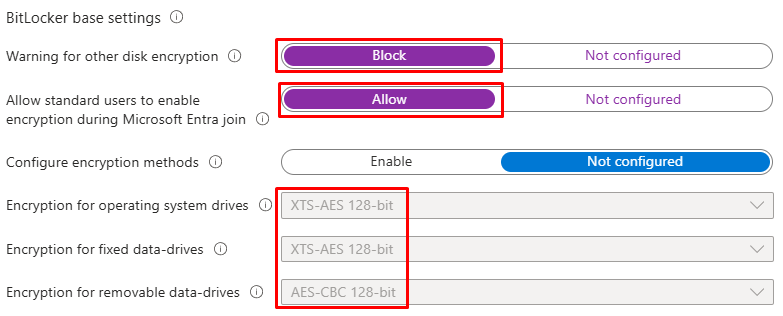
- Warning for other disk encryption: Block.
- Allow standard users to enable encryption during Microsoft Entra join: Allow.
- User creation of recovery key: Allow or do not allow 256-bit recovery key.
- User creation of recovery password: Allow or require 48-digit recovery password.
Intune Admin Center Prerequisites
There are no unusual prerequisites in Microsoft Intune to create and deploy a BitLocker policy. An administrator account with RBAC permissions to manage device configuration or endpoint security (e.g. Intune Administrator, Endpoint Security Manager, or Security Administrator), an Intune-enabled tenant with standard licensing, and at least one enrolled Windows 11 endpoint device are sufficient for initial validation and pilot rollout.
Create and define a test Intune/Entra ID group and include an enrolled test Windows 11 device beforehand for BitLocker policy assignments to later validate and ensure the tenant can escrow recovery keys to Entra ID. Once testing is satisfied, perform the production rollout to a group that contains all target Windows 11 devices.
Windows 11 Device Requirement
- Windows Edition: Windows Pro, Enterprise, or Education are all supported. Intune BitLocker management is not supported on Windows Home Edition. Device Encryption on Home SKUs is not manageable via Intune.
- TPM: Trusted Platform Module support is required for silent BitLocker enablement. Windows 11 requires TPM 2.0 for installation. BitLocker silent enablement in Intune also requires TPM 2.0. TPM 1.2 is insufficient.
- Secure Boot: Recommended for stronger platform integrity but not strictly required for BitLocker. Per Microsoft guidance, on devices that support Windows device encryption, enabling Secure Boot can satisfy eligibility conditions; when a previously ineligible device becomes eligible (e.g. after Secure Boot is turned on), Windows will automatically enable BitLocker device encryption. While not required for classic BitLocker, Secure Boot is required for Windows device encryption and strongly recommended for enterprise BitLocker deployments.
For more details on meeting Windows system requirements for BitLocker, Microsoft KB explains in full here and BitLocker FAQ.
Configuration
Configure BitLocker Policy via Device Configuration Profile
- Navigate and log into the Intune ID admin center > Devices > Configuration > Create New Policy.
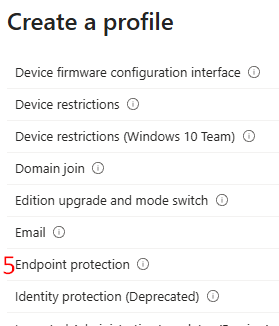
- Platform: select Windows 10 or later and Profile type: select Templates > Endpoint Protection > Create.
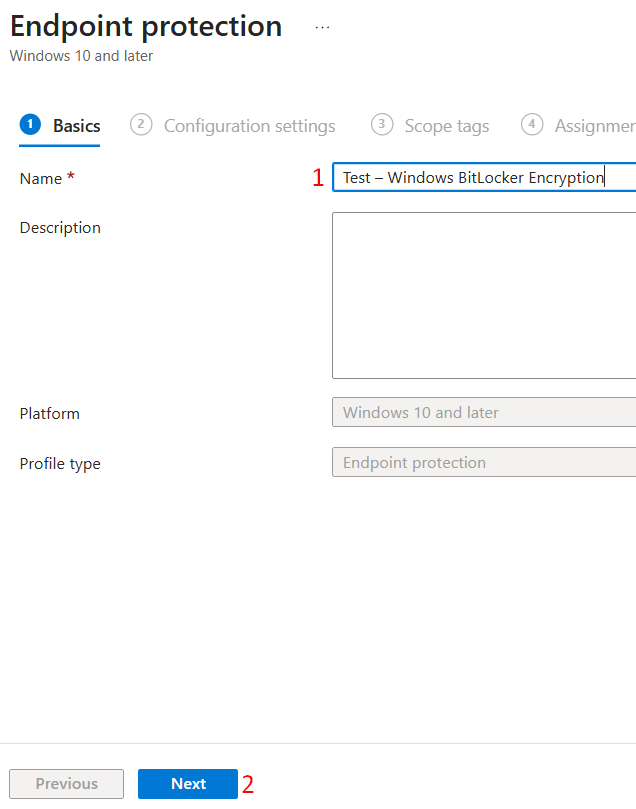
- On the Basics tab, enter a name for the policy (e.g. Test – Windows BitLocker Encryption) > Next.
-
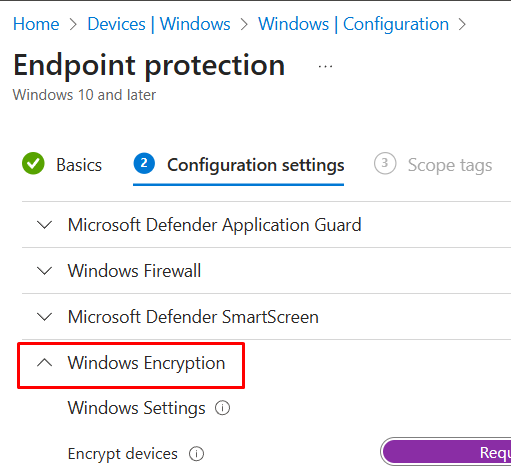
- On the Configuration settings tab, expand the section Windows Encryption. All configuration options are under this section.

- First sub-section is Windows Settings > specify the below:
- Encrypt devices: Require.
- Encrypt storage card (mobile only): Not configured. It is a legacy setting for smartphones running Windows 10 Mobile to encrypt the micro SD card.

- On the BitLocker base settings, the default encryption method for Windows 11 OS drives is XTS-AES 128, which is recommended. Leave this setting as-is unless a security standard dictates otherwise. If a different method is mandated, enable Configure encryption methods and select XTS-AES 256 for OS (and fixed) drives. Non-XTS options exist primarily for legacy scenarios and are not covered in this blog.
Note: XTS-AES 128 generally offers the best performance with no meaningful reduction in practical security for typical enterprise workloads. XTS-AES 256 increases key length to provide a larger security margin at a small performance cost on some hardware; choose it when required by policy or regulation. Both are strong, although AES-128 is sufficient for most organizations.
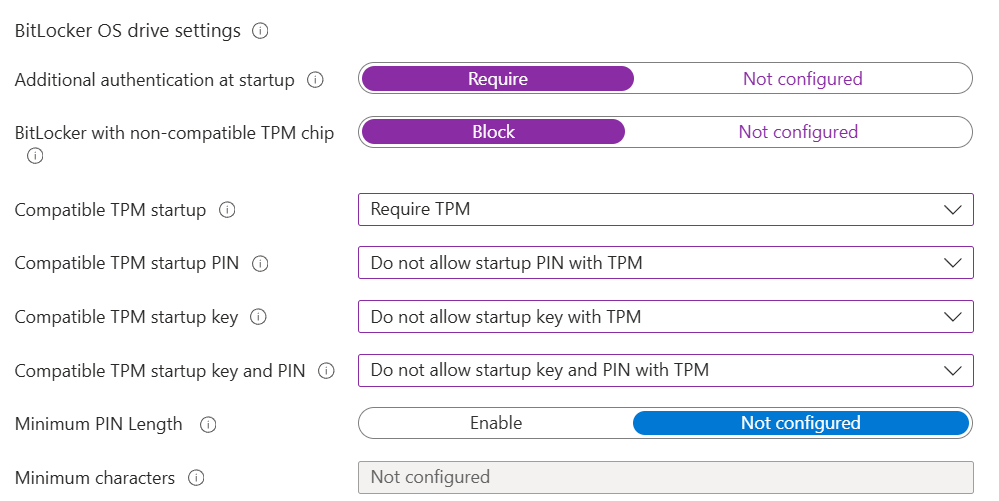
- The BitLocker OS drive settings include many configuration options. Administrators will have the option to configure and control three important items:
- Pre-boot authentication – what protects the OS before Windows starts.
- Recovery behavior – how a device can be recovered.
- Escrow/rotation – where recovery information is stored and how it is rotated.
- An administrator must turn on “Require” for additional authentication at startup, which acts as a master switch to unlock all three settings.

- Configure the below, per the screenshot, for Pre-boot authentication to enforce TPM-only startup on Windows 11.
- Blocking BitLocker on non-compatible TPMs prevents fallback scenarios and ensures only devices with a ready TPM 2.0 encrypt, which is consistent with Windows 11 hardware trust. This enables a predictable zero-touch experience for most users while recovery is handled via Entra ID for escrow and rotation. If a privileged user persona later needs stronger security, a separate TPM+PIN profile can be targeted to that group.
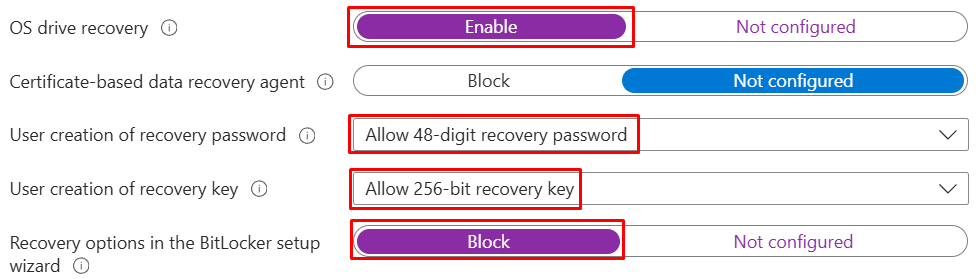
- Configure the below as per screenshot for Recovery behavior. The aim here is to have a reliable automatic backup unlock method in case the device cannot unlock normally (e.g. if/when TPM checks fail).
- Enable OS drive recovery so that a supported recovery path is always available.
- Leave the certificate-based data recovery agent disabled unless there is a formal PKI/DRA program (rare in cloud-first deployments).
- Allow the standard 48-digit recovery password (and the 256-bit recovery key format if required) but block the BitLocker setup wizard’s recovery options so users are not prompted or steered into ad-hoc choices.
With this pattern, recovery keys and materials are created automatically and per the escrow settings configured next will be backed up to Entra ID for governed access and rotation.
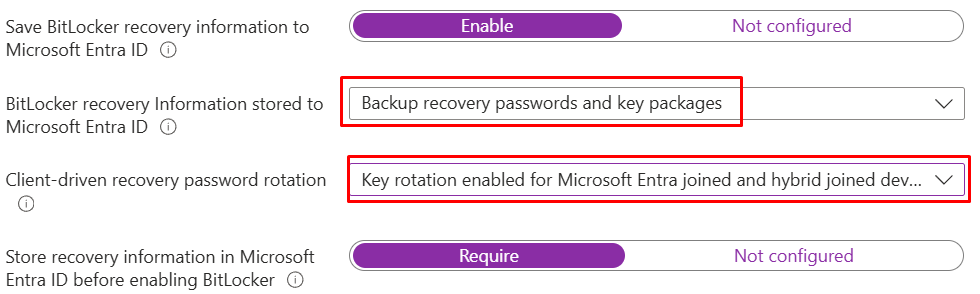
- Configure the below as per the screenshot for escrow/rotation of the BitLocker recovery keys. The goal is to have the recovery keys and materials stored in Entra ID and being rotated.
- BitLocker recovery information to Entra ID: Enable.
- BitLocker recovery information stored to Entra ID: Backup recovery passwords and key packages. This option means full recovery material is captured (the key package helps with advanced repair scenarios).
- Client-driven recovery password rotation: Key rotation enabled for Entra-joined and hybrid-joined devices. This option means whenever a recovery password is used, Windows generates a new one and automatically escrows it to Entra ID. This keeps recovery keys current, auditable, and available from anywhere without on-premises dependencies.
- Store recovery information in Microsoft Entra ID before enabling BitLocker: Require. This enforces escrow before encryption begins and blocks BitLocker from starting until the backup succeeds – preventing devices from encrypting without a recoverable key.
Note: As mentioned earlier, the Disk Encryption policy exposes controls for AD DS backup (which can be turned off or on), whereas a Device Configuration (Endpoint protection) profile does not offer any AD DS backup setting and escrow targets Entra ID only. This makes Device Configuration simpler and safer for hybrid/off-network devices.
- Arriving at the remaining configuration of the BitLocker OS drive settings is the pre-boot recovery message; these options only appear if the device enters BitLocker recovery (e.g., after a major firmware/TPM change). Leaving these options not configured uses the standard Windows recovery screen that asks for the 48-digit key and does not affect where keys are stored or rotated.
- If customization is desired, enable the setting and provide a short plain text instruction and an easy URL (e.g., an internal help page or self-service recovery link). Since these messages are user-facing, keep it brief and user-friendly; e.g., who to contact, where to find the key, and any ID the user should read to support (device name/asset tag) – e.g., “This device is encrypted with BitLocker. Retrieve your recovery key from the company portal or call IT at 857-6309 with your asset tag.”
- For this blog, the default (Not configured) is sufficient, as the keys are already escrowed to Entra ID and recoverable by IT, and the standard screen avoids clutter.

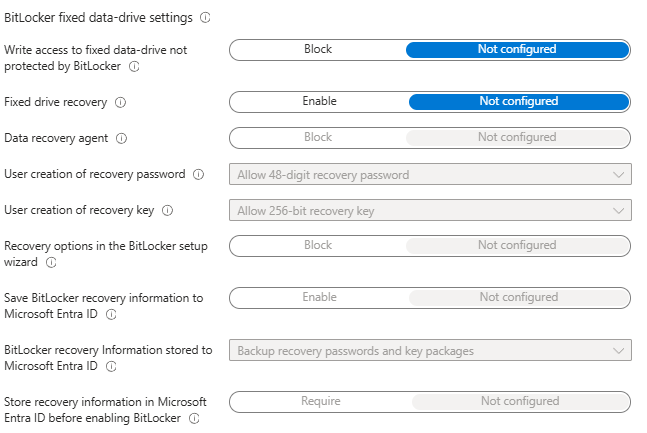
- In the BitLocker fixed data-drive settings, administrators can leave this section not configured. These options apply to additional internal, non-OS volumes (D:, E:, etc.). For the Windows 11 single-drive (C: only) scenario used in this blog, there is nothing to manage here and keeping it unset scopes the policy to the OS drive.
- If the environment subsequently includes devices with additional internal drives, administrators can use a separate Device Configuration profile for fixed data drives and set block writes to unprotected fixed drives, enable fixed-drive recovery, escrow recovery information to Entra ID (backup passwords and key packages), and require escrow before encryption.
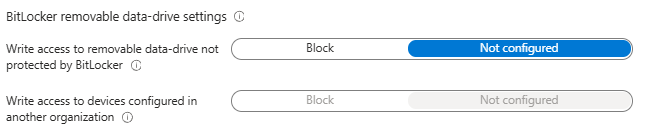
- On the BitLocker removable data-drive settings, these options are known as BitLocker To Go, which governs USB/external drives. BitLocker To Go encrypts removable media and, if required, can block writing to external devices that are not encrypted or that were encrypted under another organization’s policy. This blog’s use case is a Windows 11 device with only an OS drive, hence leave this section Not configured. It does not affect the C: drive, and keeping it unset avoids user prompts to encrypt personal USB drives.
- If a data-loss-prevention stance is needed later, enable it in a separate targeted profile that blocks write access to removable drives that are not BitLocker-protected, and optionally block writing to drives configured by another organization. Pair that with clear end-user guidance and exceptions for approved devices.
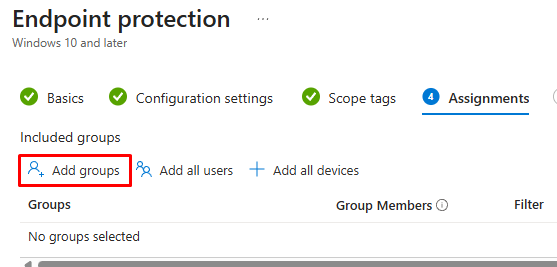
Click Next on the bottom of the page to continue > at Scope tags, click Next to skip> at Assignments, click Add groups button and select the test Intune/Entra ID group that contains the target enrolled test Windows 11 device.
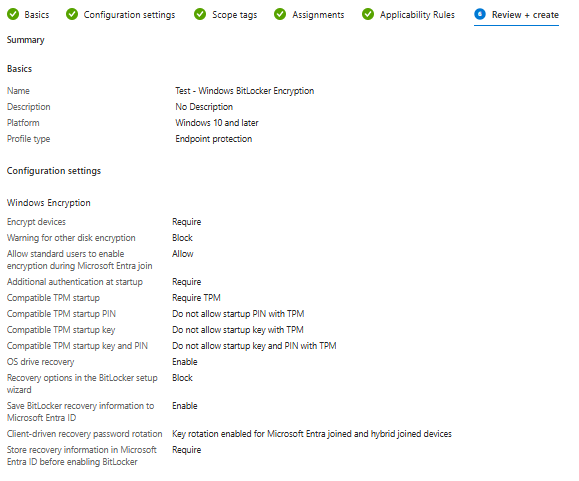
Skip the rest to get to Review + Create and verify Configuration settings are accurate > Create.
Testing and Validation
With the BitLocker encryption profile configured and deployed to a test Windows 11 device, verify the profile has applied by completing the following tasks:
- Validate the encryption status in Intune Admin Center and on the device.
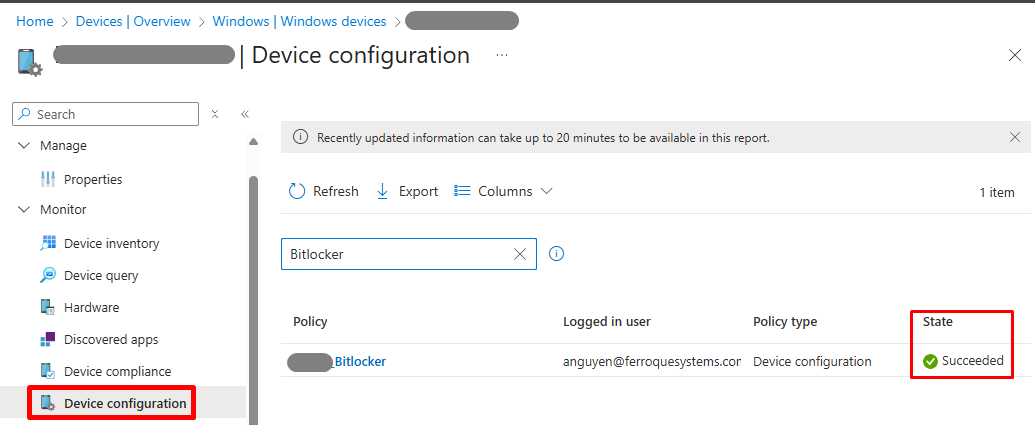
- Locate and select the test device under Devices tab > Under Monitor, select Device Configuration > Search for the deployed BitLocker policy > Validate the State is succeeded. This indicates the BitLocker policy has landed on the device.
- Under the Monitor menu of the device, click Hardware > scroll down to the Conditional access section > Validate the Encrypted status is Yes.

Note: As per Microsoft, the Encrypted Status might take 24 hours for Intune to report. If the administrator validated the BitLocker policy is successfully deployed, the device is either in the process of encryption or is already completed.
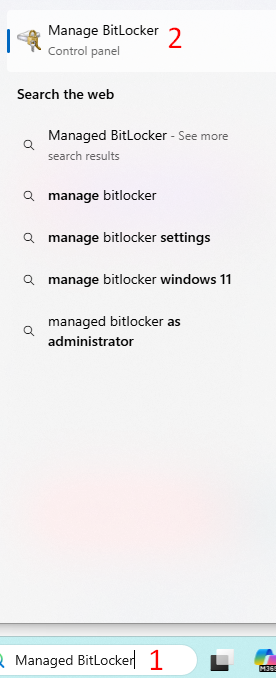
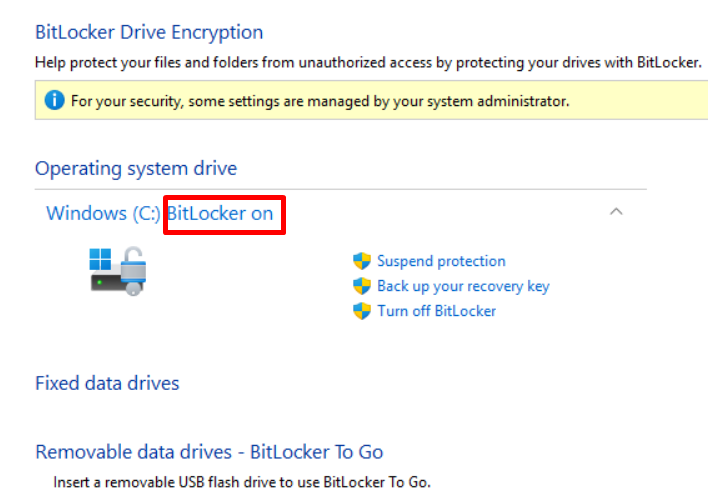
- Administrators can also validate directly on the device by searching for Manage BitLocker and validating it as On, which indicates it is successfully encrypted.
-
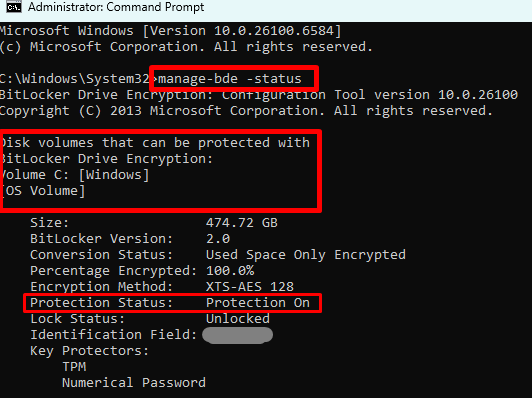
- Use Command Prompt (open as administrator) > Input the following command to validate the status: manage-bde -status
- Validate and access the BitLocker Device Recovery Keys in Intune Admin Center and Entra ID by completing the following tasks:
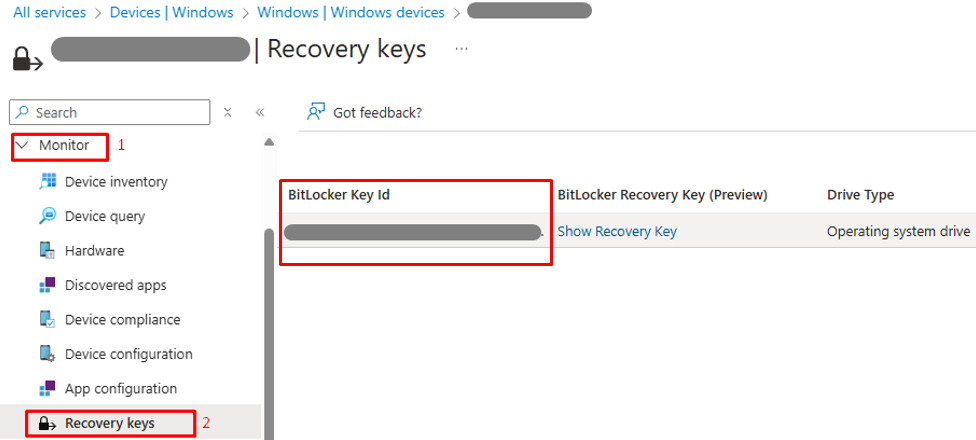
- In Intune Admin Center Locate, select the test device under Devices tab > Under the Monitor menu of the device, click Recovery keys > Validate the value of BitLocker Key ID is present.
-
- For Entra ID validation, access Entra ID with one of the following roles – Help Desk Administrator, Cloud Device Administrator, or Security Administrator, or a custom role with the permission microsoft.directory/bitlockerKeys/key/read – or query the Entra ID team to validate the BitLocker recovery key is present under the test Windows 11 device attached to the test user account on Entra ID.
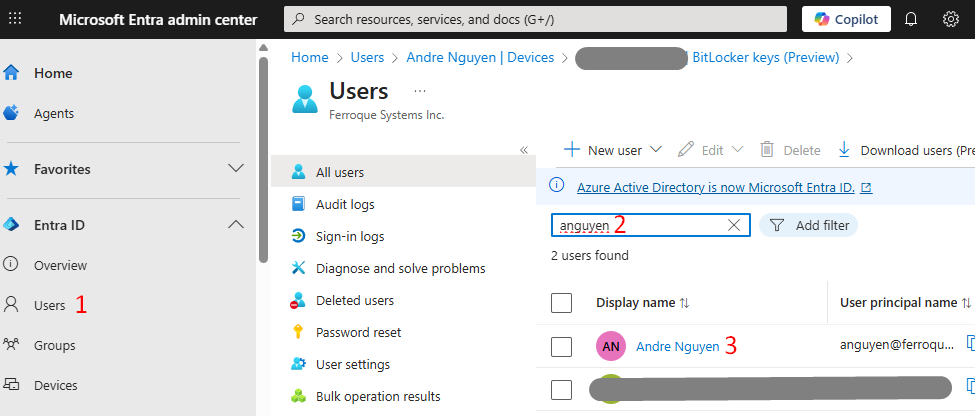
- On Entra ID, go to Users > Search and select the user who has the test Windows 11 device enrolled in Intune.
-
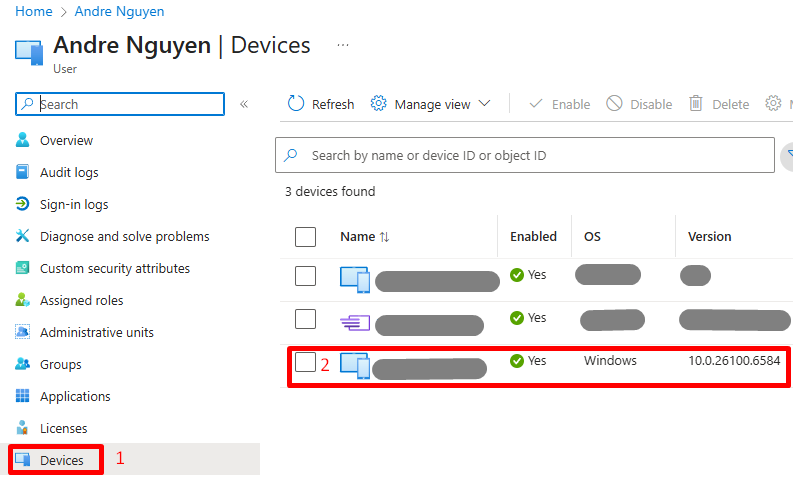
- Under the selected user’s menu, click Devices > Locate and select the test Windows 11 device.
-
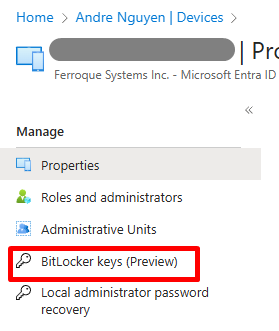
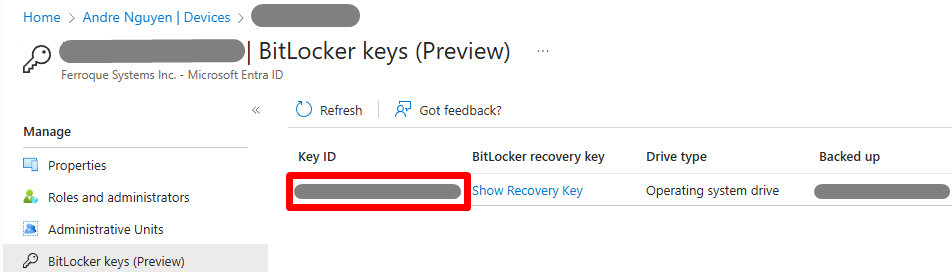
- Once the device is selected on Entra ID, under Manage, click BitLocker keys (Preview) > confirm the BitLocker Key ID value matches or is the same as the one located in Intune Admin center above.
Troubleshooting
This section covers general troubleshooting guidance for BitLocker encryption in the event an error is encountered while encrypting a device.
- On the device, launch Event Viewer (as administrator) > BitLocker events are present under Applications and Services Logs\Microsoft\Windows\BitLocker-API and BitLocker-DrivePreparation tool.
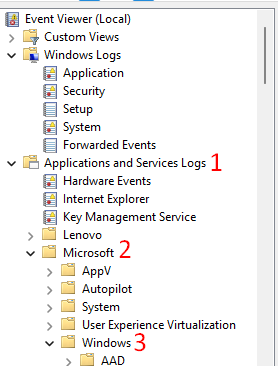
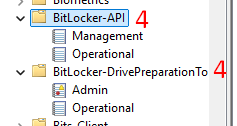
-
- Validate error messages under these Events Viewer entries to detect possible issues; this Microsoft KB article can be very helpful with such error messages.
- To export BitLocker Event Viewer logs to text file (.CSV), adminstrators can open Command Prompt and use the following command:
Get-WinEvent -logname 'Microsoft-windows-BitLocker/BitLocker management' -maxevent 30 | export-csv c:\eventviewer.csv
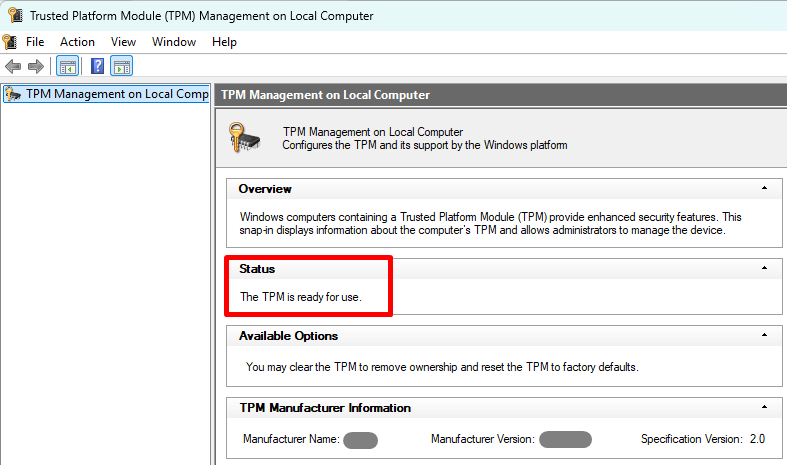
- A common issue with BitLocker encryption failure on the device is TPM incompatibility (or TPM missing). To validate TPM health and version on the device, administarors can launch TPM Management console (tpm.msc) on the device. TPM status should report “The TPM is ready for use.” If not, silent BitLocker enablement will not proceed under this policy.
In Conclusion…
Using Microsoft Intune to deploy and manage BitLocker silent disk encryption on Windows 11 endpoints provides a central and efficient method of enhancing the security of target devices, and provides flexible options to align with the organization’s security standards.
Ferroque Systems has expertise and experience in configuring Windows 11 endpoint solutions in this fashion, and we would be more than happy to speak with you to talk through how we can assist.