Introduction
In this blog, plan to learn how to navigate the process of integrating Citrix with Nutanix Prism Central and AHV — a powerful combination for simplifying virtual infrastructure management. You’ll learn how to install the Nutanix plug-in for both the Cloud Connector and Delivery Controller, create machine catalogs for different deployment scenarios, and set up Nutanix Guest Tools to ensure a seamless, fully optimized environment.
This guide walks through multiple integration paths:
- Nutanix Prism with Citrix Cloud Connectors (for Citrix DaaS).
- Creating a hosting connection to Nutanix Prism Central.
- Building a machine catalog using that hosting connection.
- Nutanix AHV with Citrix Delivery Controllers (for on-premises CVAD).
- Creating a hosting connection to Nutanix Element.
- Building a machine catalog from the hosting connection.
- Installing Nutanix Guest Tools (NGT).
- Enabling features such as file system drivers.
- Enhancing VM performance and manageability within Prism Central.
Together with Citrix, the pair provides a high-performance, flexible, and scalable VDI solution. By leveraging Nutanix Prism Central, administrators can simplify infrastructure management by giving Citrix the ability to provision and manage desktops directly on Nutanix AHV. Expect to learn how:
- Citrix Cloud Connector integration enables hybrid and cloud-first deployments, offering scalability and reduced management overhead.
- On-premises Delivery Controller integration gives organizations flexibility and control for local workloads and specific compliance needs.
- Nutanix Guest Tools ensure that desktops and applications benefit from deeper integration with Nutanix’s storage and snapshot features.
Prism Central is Nutanix’s centralized management console, providing a central console to administer, monitor, and scale resources across clusters. In the context of Citrix on Nutanix, Citrix Delivery Controllers manage authentication, brokering, and policy enforcement for end-users, and Prism Central makes it easier to provision, optimize, and troubleshoot the virtual infrastructure. Citrix documentation on this integration can be found at Connection to Nutanix | Citrix Virtual Apps and Desktops 7 2503.
Note: On the Image page, during machine catalog creation, when selecting the image snapshot, AHV snapshot names must be prefixed with “XD_” to be used in Citrix Virtual Apps and Desktops. Use the AHV console to rename such snapshots, if needed. If snapshots are renamed, restart the catalog creation wizard to see a refreshed list. More details are available here: Create a Nutanix catalog | Citrix Virtual Apps and Desktops 7 2503
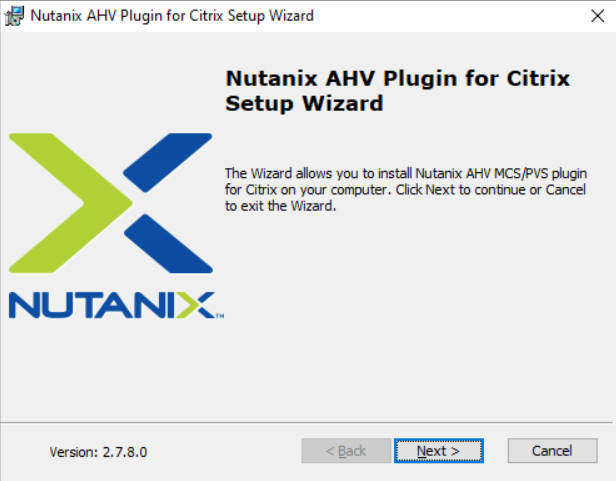
Downloading Nutanix Plug-in
The Nutanix AHV plug-in requires an account to be created on the Nutanix portal before it can be downloaded. The following link can be used to download the plug-in after account creation: Nutanix AHV Plug-In for Citrix. When integrating Citrix with Nutanix AHV, the installation and configuration steps are similar for Citrix DaaS (Cloud Connectors) and for on-premises CVAD (Delivery Controllers).
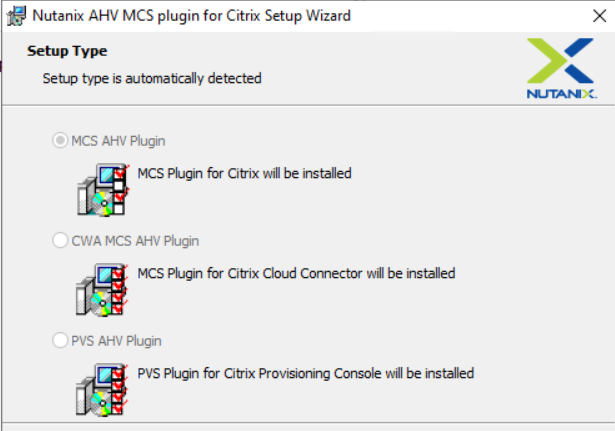
Installing Nutanix AHV Plug-in for Citrix Cloud Connectors for Prism Central
Following the installation wizard, the setup type is determined by the product installed on the machine upon which the installer is running; e.g. this setup type detected that Citrix Delivery Controller was installed.
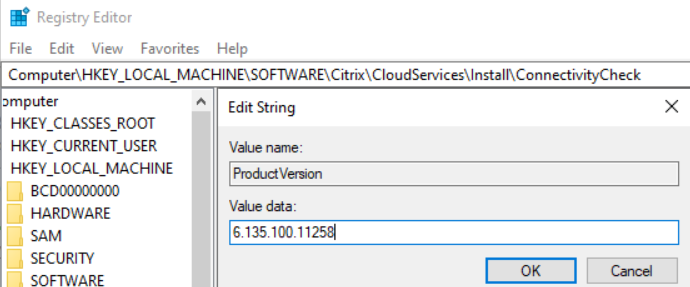
This setup type detected that Citrix Cloud Connectors were installed (and the Cloud Connector option is auto-selected). The following Registry setting is used to detect the plug-in type for Citrix Cloud Connectors. Select next to continue.
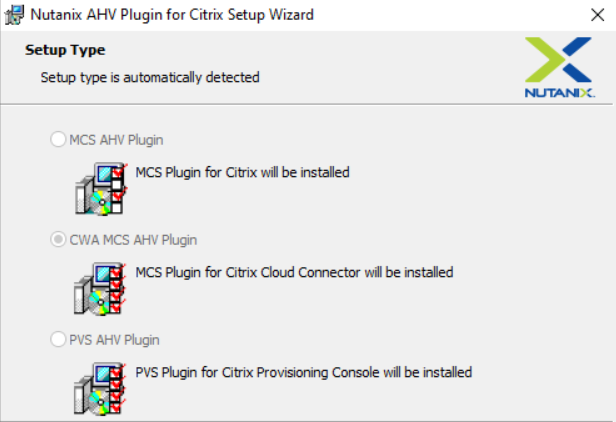
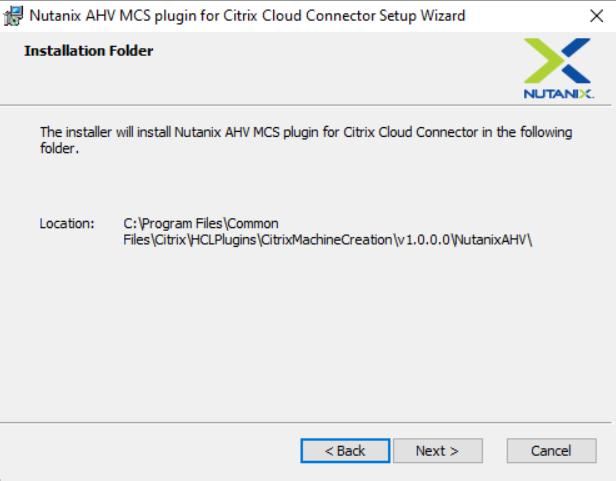
Click next and complete the installation. The installation files can be verified in the following folder path:
- “C:\Program Files\Common Files\Citrix\HCLPlug-ins\CitrixMachineCreation\v1.0.0.0\NutanixAHV\”
Creating Prism Central Hosting Connection with Local Service Account
Once the Nutanix AHV plug-in is installed, the next step is to create a hosting connection in Citrix Studio, which defines how Citrix communicates with the Nutanix environment and is required before creating machine catalogs. A prerequisite for this step is to create a service account that can be used to connect to Nutanix. For the purpose of this blog, a local account is created.
The first step is to create a service account in Prism Central by going to the Admin Center.
Create Service Account in Prism Central
The following steps will create a local user on Prism Central so the Citrix DaaS hosting connection can communicate over 9440/TCP.
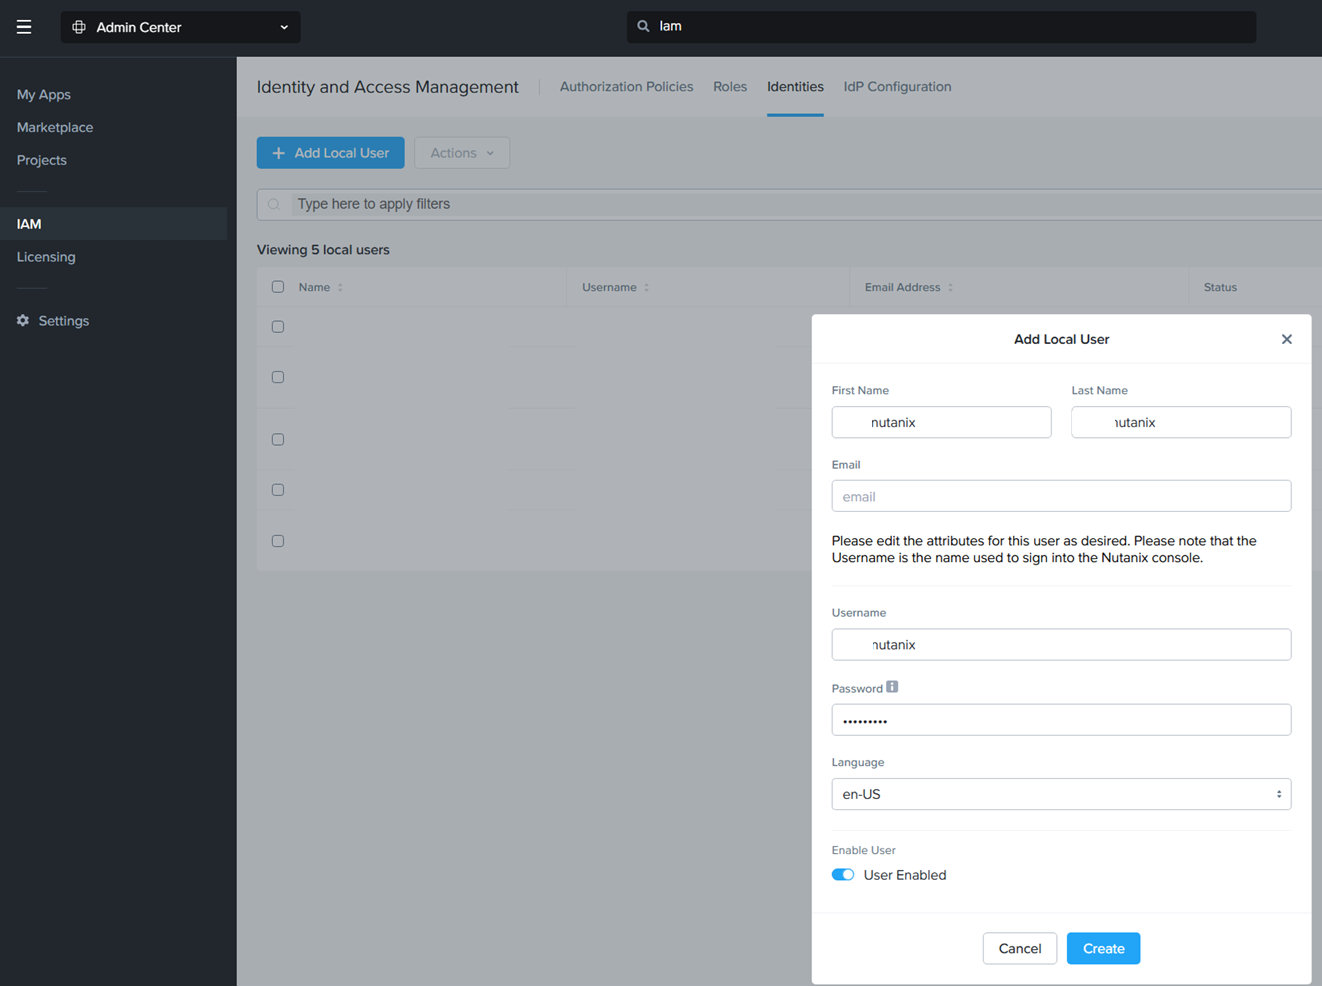
Steps to create the service account:
- Log on to Prism Central.
- Open a browser and go to the Prism Central address using port 9440.
- Sign in with an account that has administrative rights.
- Navigate to User Management.
- In the Admin Center, go to IAM → Identities.
- Click + Add Local User to begin creating a new service account.
- Configure the Service Account.
- Username: Choose something uniquely identifiable that would be used for connecting Citrix to Nutanix.
- Password: Use a strong password that complies with the organization’s security standards.
- Email (optional): Add an email address to associate notifications or alerts with the account.
Create Hosting Connection – Citrix Cloud
When using Citrix Cloud, hosting connections are managed via the Citrix Cloud Studio console. The process is similar to on-premises Delivery Controllers, although instead of connecting directly to Prism Element, administrators integrate Citrix Cloud with Prism Central for centralized cluster management.
Steps to create the hosting connection in Citrix Cloud Studio:
- Log on to Citrix Cloud.
- Access the Studio Console.
- Open Citrix Cloud Studio from the management interface.
- In the left navigation, expand Configuration and select Hosting.
- Start the Connection Wizard.
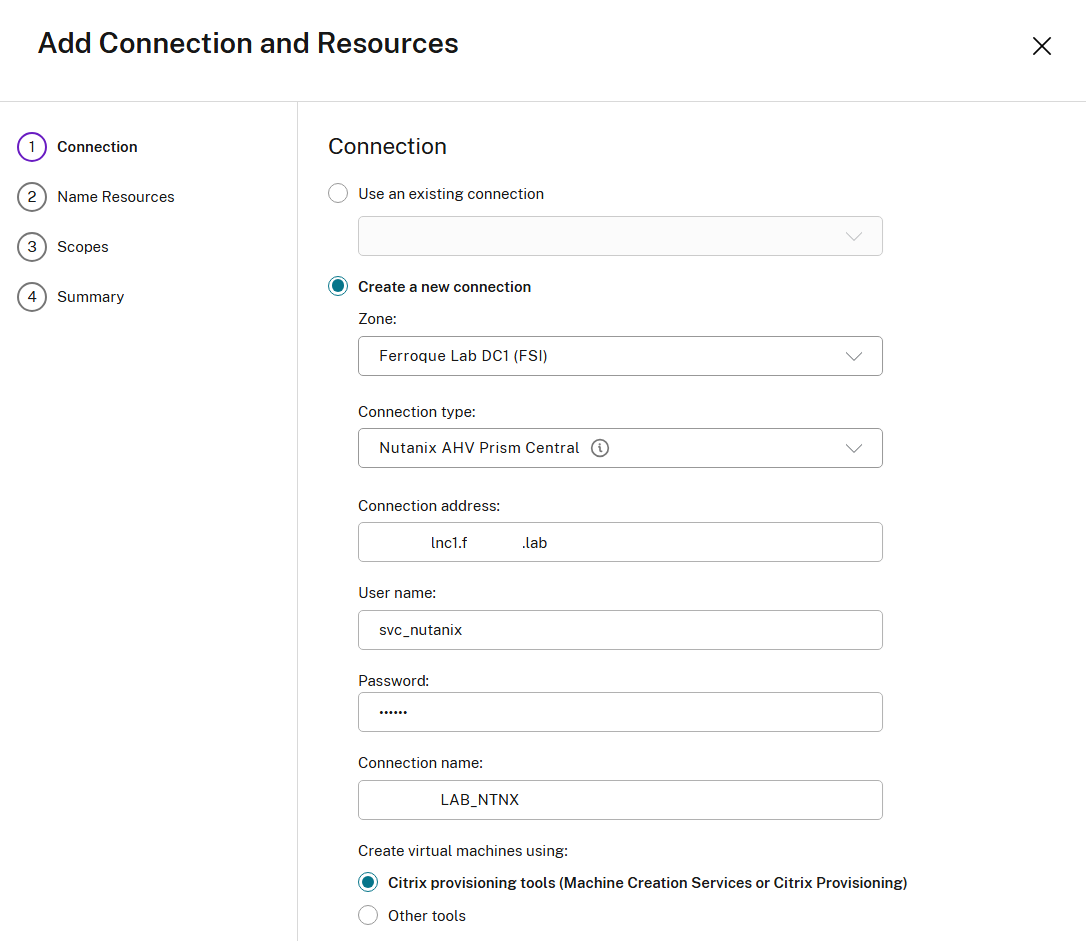
- Click + Add Connection and Resources.
- In the connection type dropdown, choose Nutanix AHV Prism Central.
- Enter Prism Central Details.
- Provide the Prism Central endpoint (FQDN or IP address).
- The default port is 9440 unless otherwise customized.
- Supply the service account credentials created earlier in Prism Central.
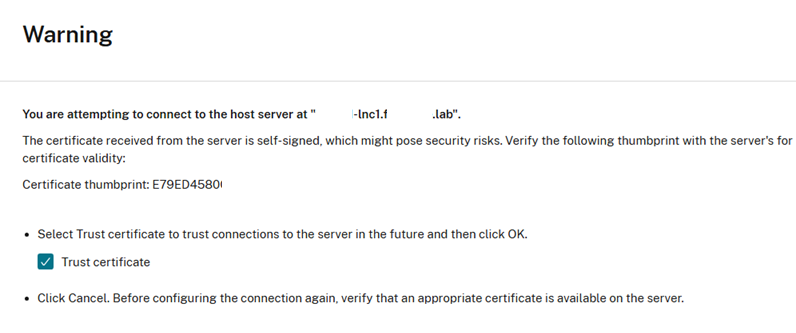
- Trust the certificate thumbprint if a self-signed certificate is used.
 Select resources.
- Choose the Network(s) that will be used for machine catalogs.
- Name the connection.
- Assign a descriptive name (e.g. PrismCentral-Cluster01) so it is easy to identify later in Cloud Studio.
- Validate the connection.
- Test the connection to confirm communication between Citrix Cloud and Prism Central.
- Once validated, the Nutanix resources should appear under Hosting.
Creating the Hosting Connection for Prism Element with Local Service Account
Create Service Account in Prism Element
Creating a service account in Prism Element is performed under Settings > Local User Management. Create that user account and use it for access into the AHV host.
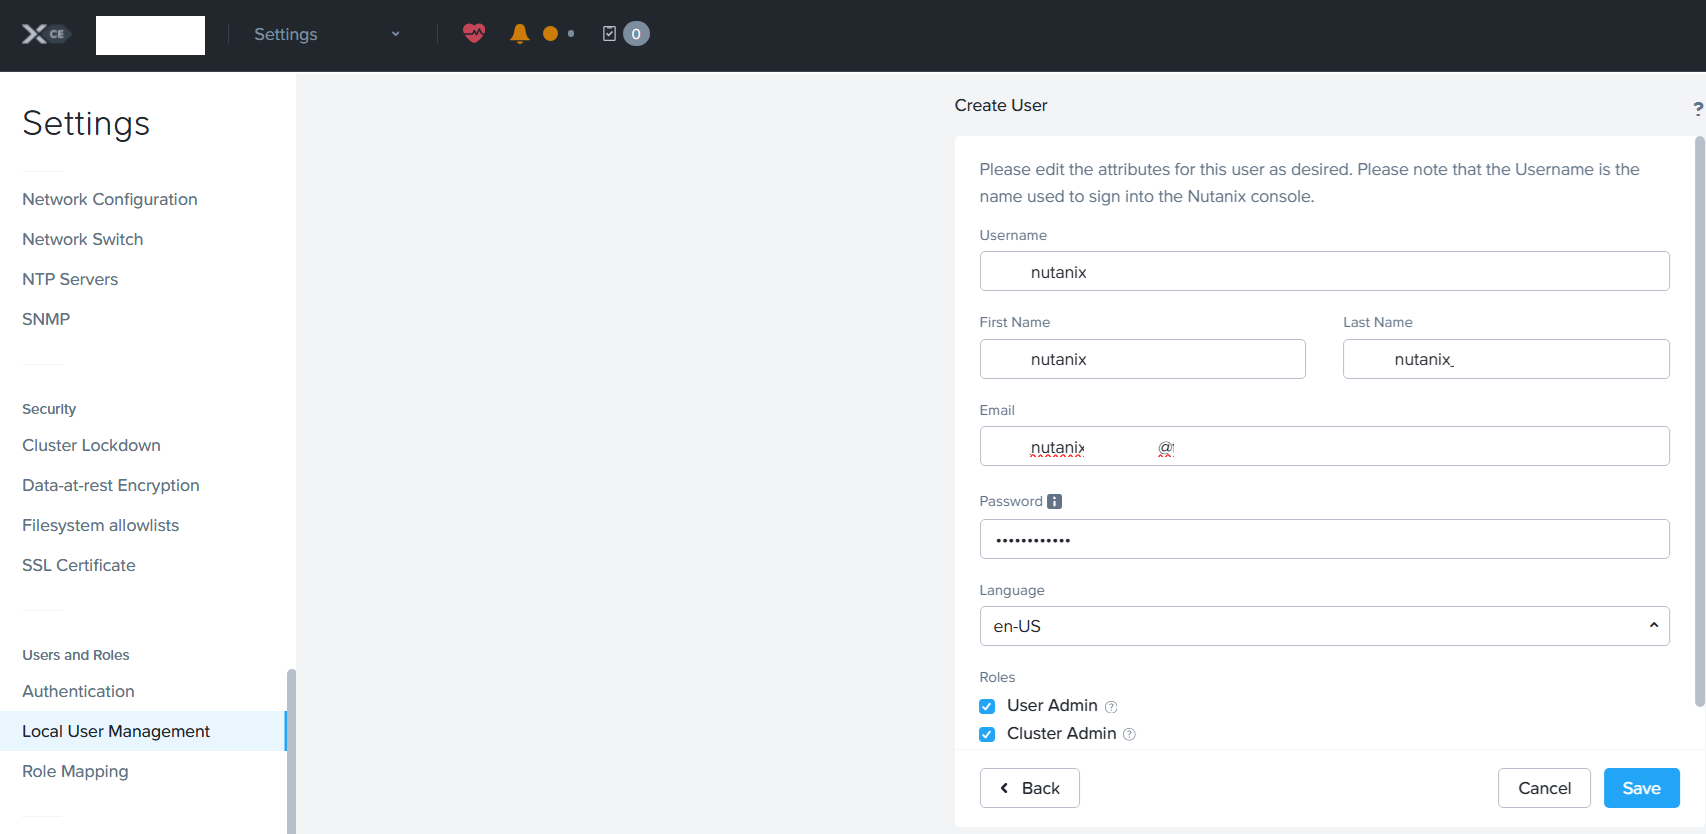
Now that the local user is created, the ensuing steps can be performed.
Create Hosting Connection – Citrix Delivery Controller – Web Studio
When using an on-premises Citrix Delivery Controller, administrators configure the hosting connection via Citrix Web Studio (Web-based management console). This process links Delivery Controllers to the Nutanix AHV environment so it can provision and manage VMs.
Steps to create the hosting connection in Web Studio:
- Log on to Citrix Web Studio on a Delivery Controller.
- Navigate to Configuration → Hosting and click Add Connection and Resources.
- In the connection type selection, choose Nutanix AHV (this option appears once the Nutanix AHV plug-in is installed).
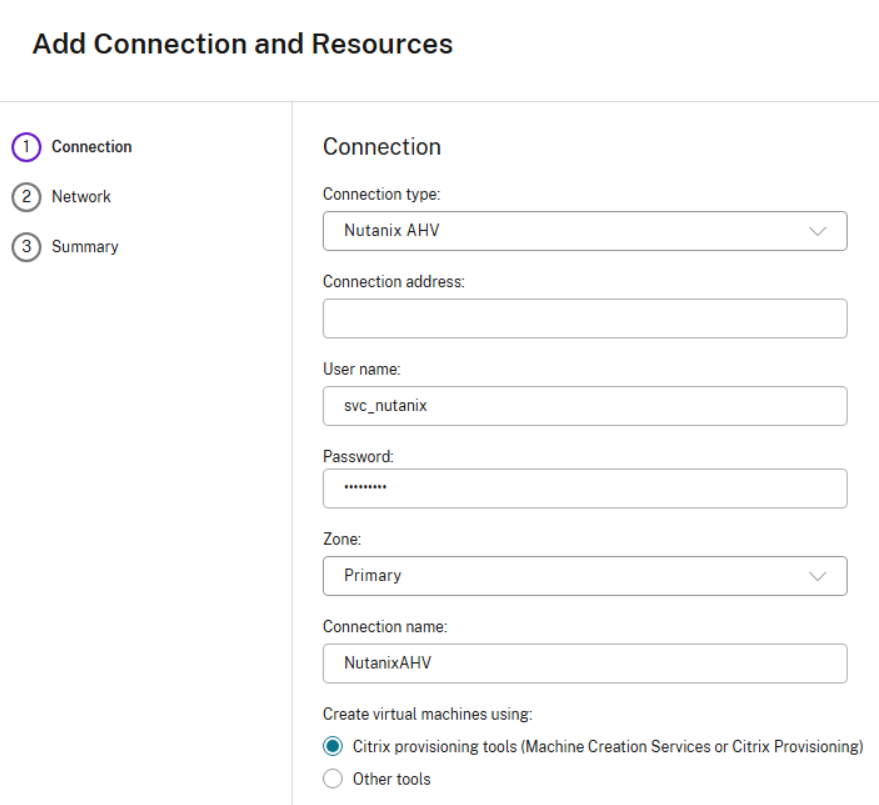
- Enter the connection details for the Nutanix cluster:
- Use the Prism Element endpoint (FQDN or IP address) of the AHV cluster.
- Provide the port (default is 9440).
- Authenticate with a Nutanix account that has appropriate permissions (typically an account with VM and storage management rights).
- Select the VLANs targeted for Citrix to use for Networking.
- Assign a name to the hosting connection for easy identification inside Web Studio.
- Complete the wizard and confirm that the Nutanix resources are visible in the Hosting section.
With the hosting connection established in Web Studio, Citrix Delivery Controllers can now leverage Nutanix AHV resources to create machine catalogs and deliver desktops and/or apps.
Create Hosting Connection – Citrix Delivery Controller – Citrix Studio
The process of creating a hosting connection to Nutanix AHV is similar in the Citrix Studio, although with a slightly different interface.
Steps to create the hosting connection in legacy Citrix Studio:
- Launch Citrix Studio on a Delivery Controller.
- In the left-hand navigation, expand Configuration and select Hosting.
- Click Add Connection and Resources to start the wizard.
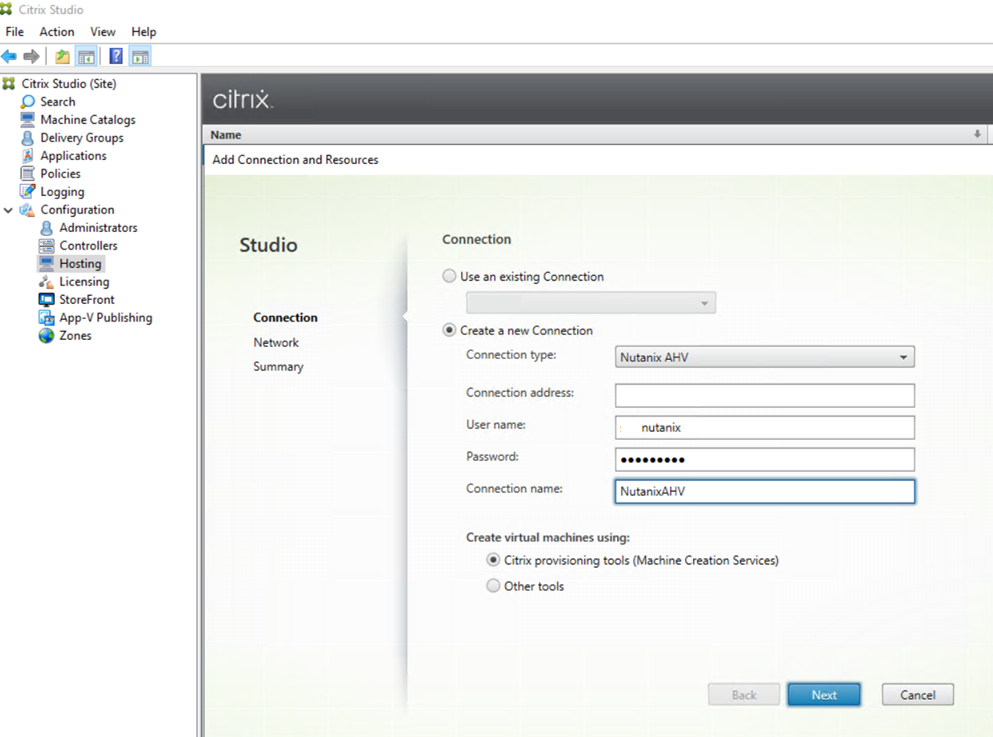
- After the Nutanix AHV plug-in has been installed, a new connection type option will be available: Nutanix AHV. Select it and continue.
- Enter the endpoint details:
- Use the Prism Element endpoint (FQDN or IP address) for the AHV cluster.
- Specify the port (default is 9440).
- Provide Nutanix credentials with sufficient permissions to manage VMs, storage, and networking.
- Select the Network to associate with this connection.
- Assign a descriptive name to the hosting connection for easy identification in Citrix Studio.
- Finish the wizard and confirm the connection by verifying that Nutanix resources appear under the Hosting node.
Note: the workflow in legacy Citrix Studio is almost identical to Web Studio, although the interface is Windows MMC-based. Many organizations still run both, so it is good to be familiar with both setups.
With the hosting connection in place, the environment is now ready to create machine catalogs using Nutanix AHV resources directly from Citrix Studio.
Select the network just like both examples shown above and complete the wizard.
Creating Machine Templates in Citrix Daas from a Nutanix Template
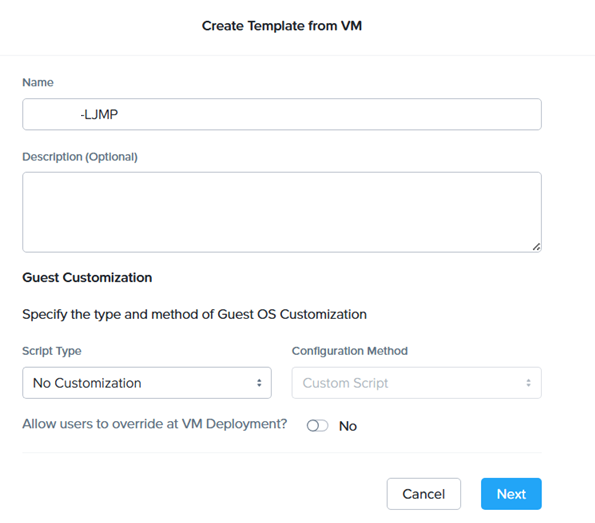
Once the golden image has been fully prepared, updated, and validated, the next step is to convert it into a template. Creating a template ensures that the master image can be consistently replicated and used for provisioning new virtual machines.
Saving it as a template prevents accidental changes to the base image while enabling Citrix Machine Creation Services (MCS) or Provisioning Services (PVS) to reference a clean, standardized copy. This step is critical for maintaining version control and ensuring that all newly deployed desktops are based upon a stable, optimized image.
When preparing Nutanix-hosted workloads for Citrix, it is important to install or update the VirtIO drivers before installing the Citrix Virtual Delivery Agent (VDA), since the VDA binds to the network and graphics stack during setup.
If the VirtIO drivers are not already in place, the VDA installer may not detect the correct interfaces, and critical functionality (such as HDX graphics or ICA networking) could be impaired. Installing the drivers first ensures that when the VDA software is installed, it properly binds to the optimized Nutanix drivers for stable and performant sessions.
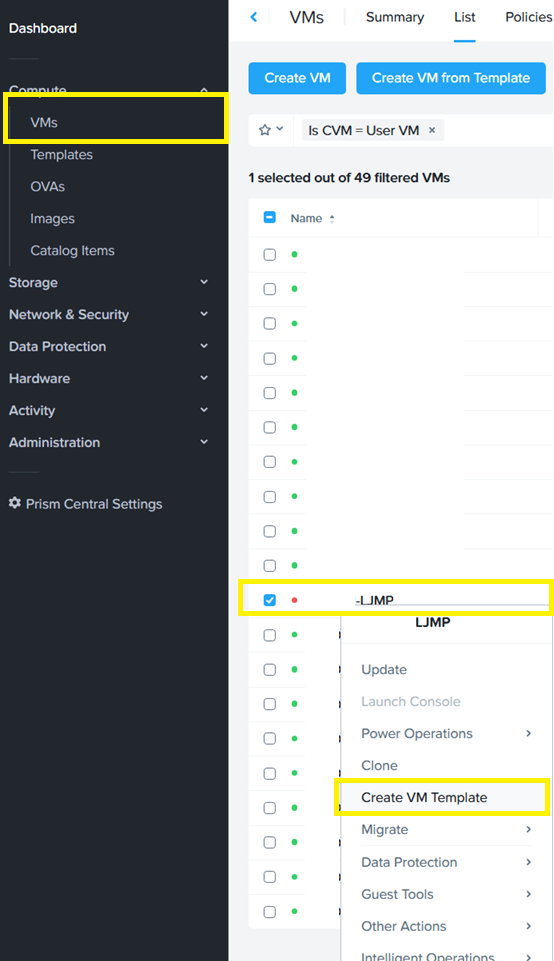
In Nutanix Prism Central, navigate to the VMs and “Create a VM Template” from a golden image. In this case, the VM has been powered down.
Create Machine Catalog in Citrix DaaS
Creating a machine catalog using the new Nutanix hosting connection is just like creating a catalog with any other hosting connection. The high-level steps are as follows:
- Introduction: Start the Create Machine Catalog wizard in Citrix Studio.
- Machine Management: Select the Nutanix hosting connection configured earlier.
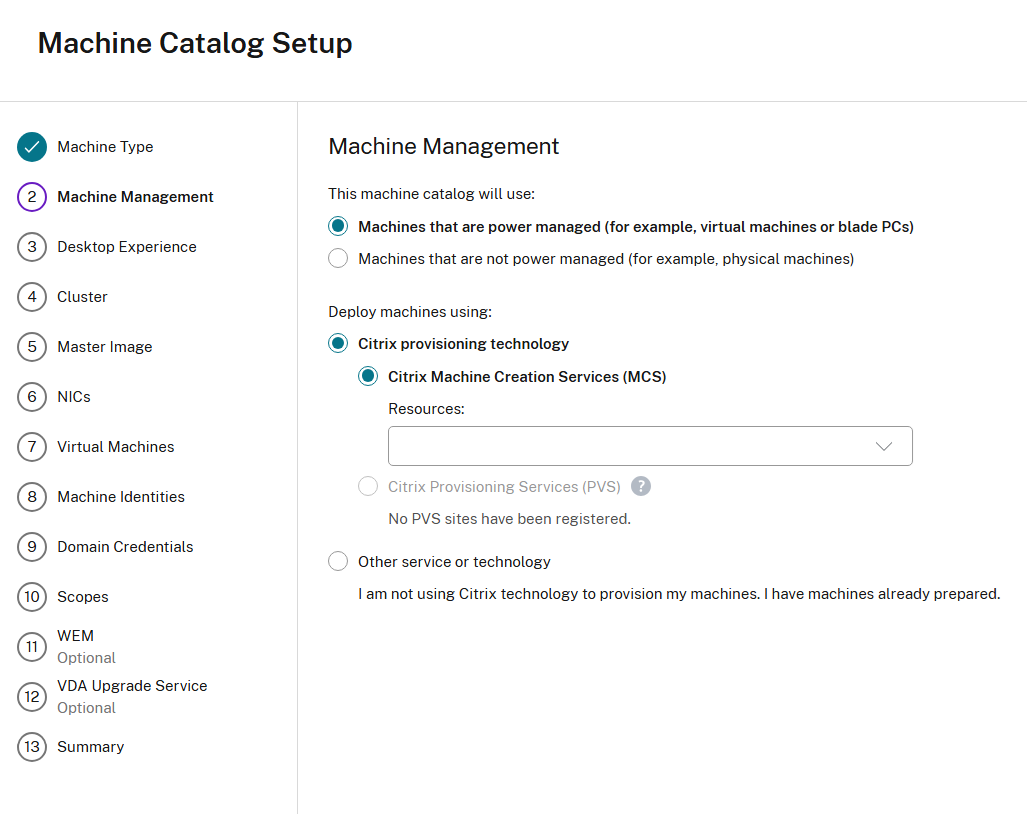
- Desktop Experience: Choose whether desktops are dedicated (persistent) or random (non-persistent).
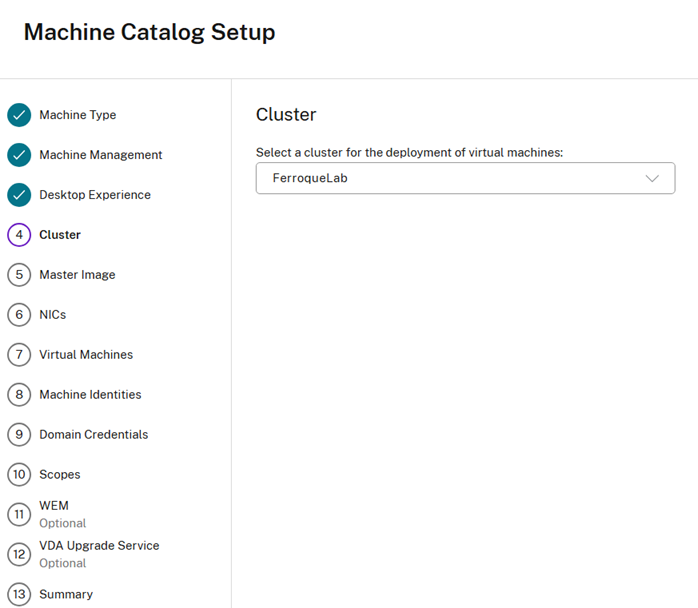
- Cluster: Pick the Nutanix cluster where the VMs will be provisioned.
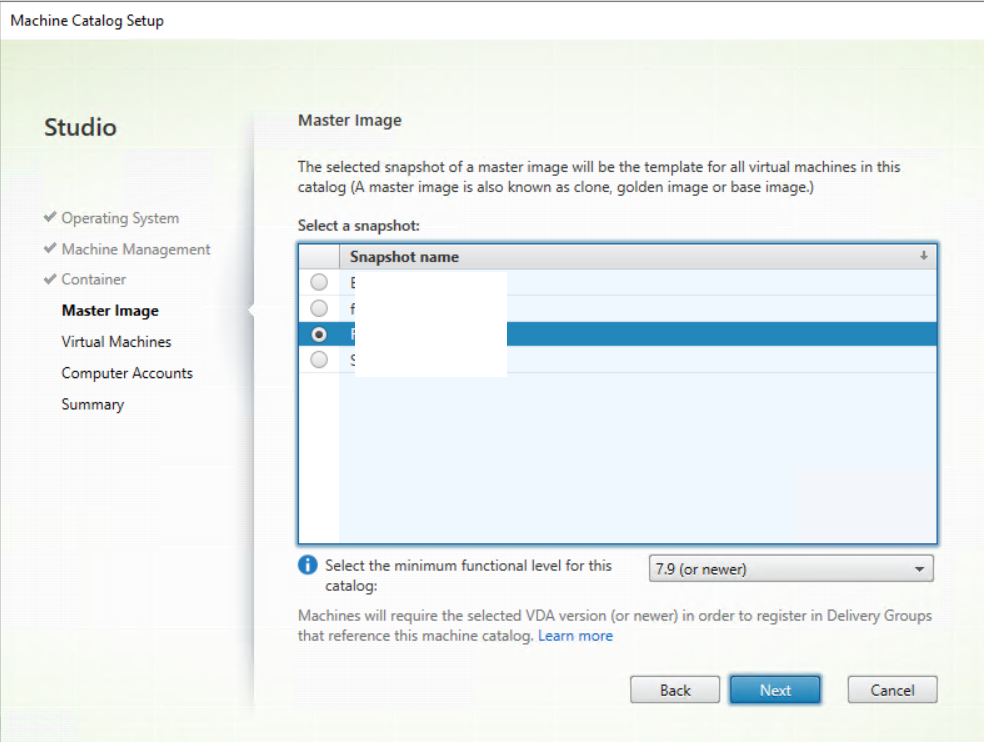
- Master Image: Browse to and select the prepared master image/template VM (with VDA and VirtIO drivers).
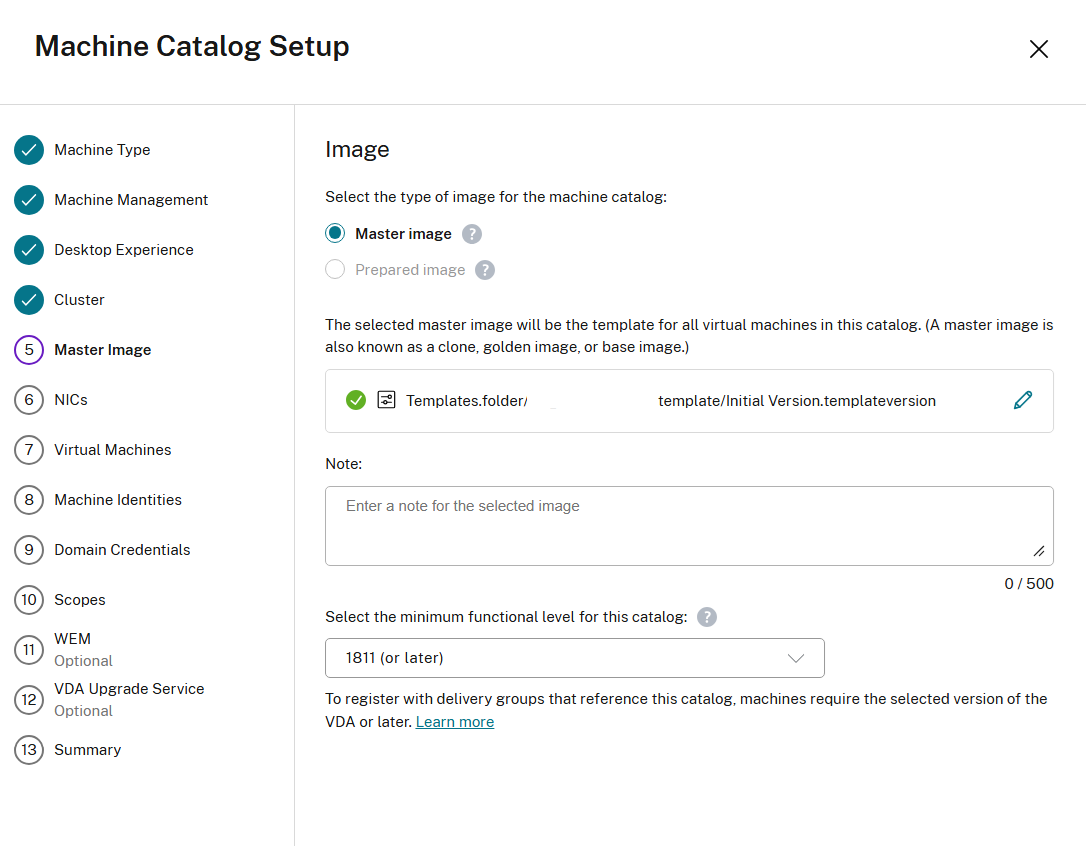
- Snapshot: If available, select the snapshot of the master image from which to provision.
- Storage: Choose the storage container or datastore where the catalog machines will reside.
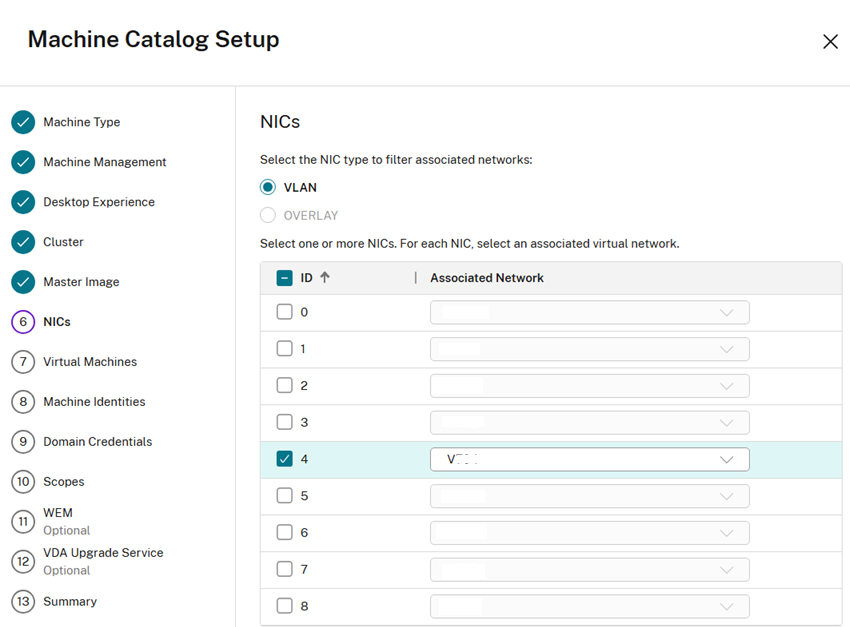
- Network Interfaces (NICs): Map the VM NICs to the proper Nutanix networks (VLANs).
- Virtual Machine Settings: Specify compute settings like vCPUs and memory allocation.
- Number of Machines: Define how many machines to create in this catalog.
- Active Directory Accounts: Provide AD OU and naming pattern so machine accounts are created in the right location.
- Summary: Review all settings and click Finish to build the catalog.
Prism Element Create Snapshots for Delivery Controllers
Snapshots in Nutanix Prism Element are lightweight, point-in-time copies of a virtual machine that are typically used to protect workloads before changes, provide rollback points, and/or serve as the base for cloning operations. When working with Citrix environments, snapshots are especially useful for capturing golden images before publishing them into machine catalogs.
Steps to create a snapshot in Prism Element:
- Log on to Prism Element.
- Open a browser and go to the Prism Element cluster address using port 9440.
- Authenticate with an account that has VM management permissions.
- Locate the virtual machine.
- From the Prism Element dashboard, go to VMs.
- Search for and select the target VM to snapshot.
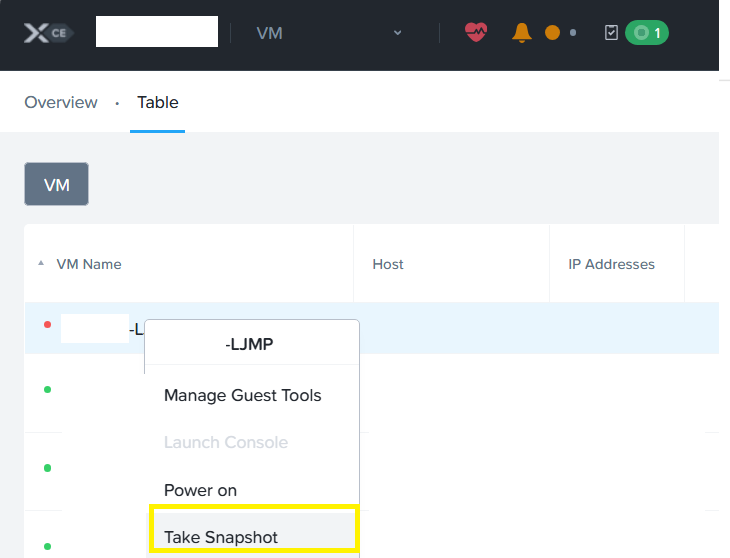
- Create the snapshot.
- In the VM details page, click Take Snapshot.
- Take a snapshot and prepend the name with “XD_” as previously mentioned.
- Confirm and save.
- Click Save/OK to create the snapshot.
- The snapshot will appear in the VM’s Snapshots tab, where administrators can manage, clone, or delete it later.
On the Image page, select the image snapshot. Again, Acropolis snapshot names must be prefixed with “XD_” in order to be used in Citrix Virtual Apps and Desktops. Use the Acropolis console to rename the snapshots if needed. If a snapshot is renamed, restart the catalog creation wizard to see a refreshed list.
Create a Nutanix catalog | Citrix Virtual Apps and Desktops 7 2503
Complete the snapshot and create the machine catalog.
Create Machine Catalog using Citrix Studio
Use the snapshot as the Citrix master image. Create the machine catalog for the Delivery Controllers using either Web Studio or Citrix Studio, as outlined below (both have the hosting connection functionality for Nutanix).
- Introduction: Start the Create Machine Catalog wizard in Citrix Studio.
- Operating System: Choose the desktop type to provide for users.
- Machine Management: Choose machines to be created in the Resource Location for Nutanix.
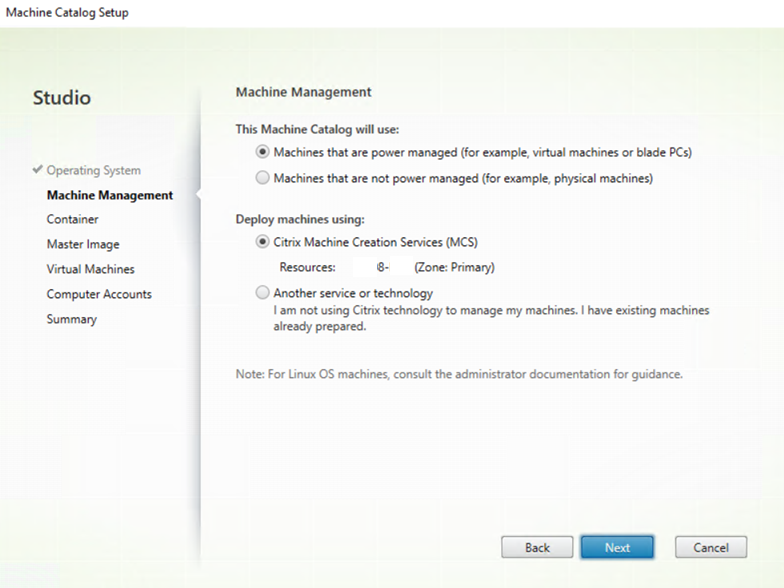
- Container: Select the storage location to store Identity Disks.
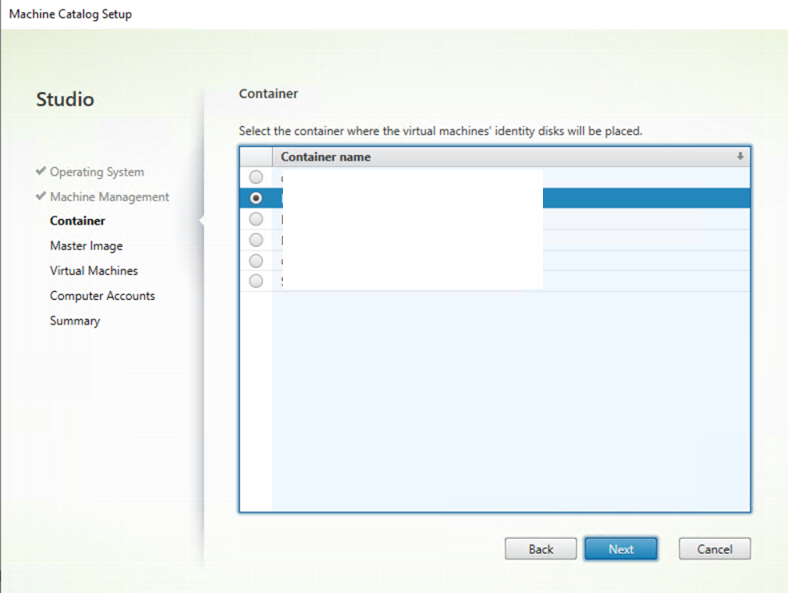
- Master Image: Select the snapshot created earlier.
- Virtual Machines: Complete the specs of the VMs to be created.
- Computer accounts and summary: Complete the setup wizard.
Once completed, create a delivery group for these machines and validate that the Desktops are registered successfully and are ready to have Nutanix Guest Tools installed in them.
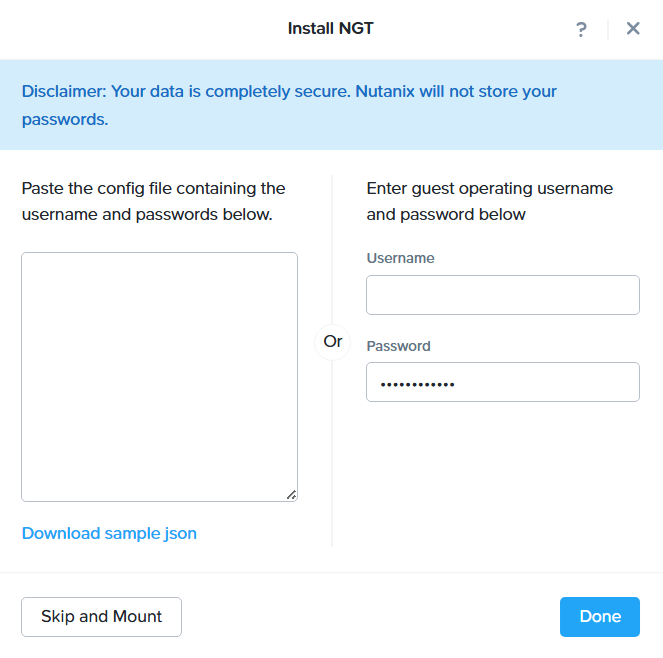
Installing Nutanix Guest Tools on New VDAs
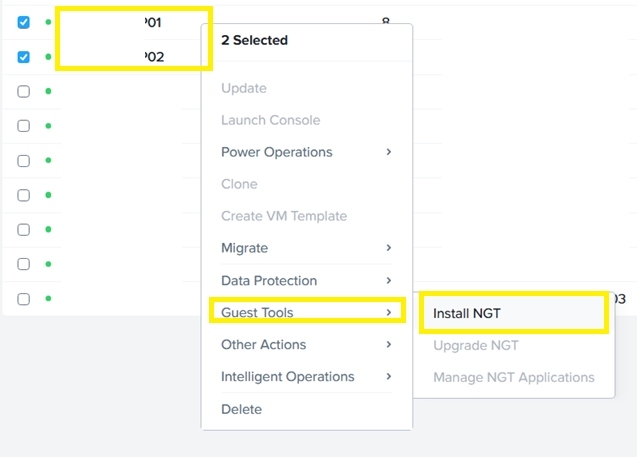
Installing the Nutanix Guest Tools (NGT) can be completed using multiple methods; this example shown will use the GUI method to provide a user account for Nutanix to install the NGT.
Select the checkbox for any VDA that was created during the Machine Catalog phase, and right-click to show the operation to “Install NGT” under “Guest Tools”.
Nutanix Guest Tools and Nutanix VirtIO
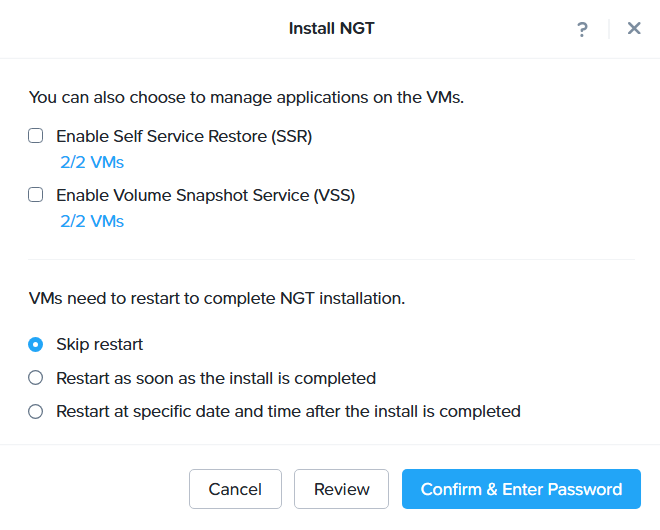
The following steps can be followed to install Nutanix Guest Tools using the GUI:
- Highlight the target VMs onto which Nutanix Guest Tools will be installed.
- Install the most basic functionality. For non-persistent machines it is okay to “Skip restart” to test, but a different strategy should be used for non-persistent machines.
- When the stage is reached to decide on additional components, it is worth distinguishing between persistent and non-persistent machine designs:
- Non-Persistent Machines:
- Features such as Self-Service Restore and Volume Snapshots do not add value here.
- Non-persistent images are reset or re-provisioned regularly, so there is no meaningful state for users to “restore.”
- Snapshots are typically managed at the image/template level, not at the per-user VM level.
- Persistent Machines:
- Self-Service Restore can be a helpful safety net, although in some organizations it could conflict with support or change management policies.
- Volume Snapshots are useful if administrators want to protect persistent desktops against corruption, failed updates, or user error since it can provide quick rollback capability at the infrastructure level.
- Supply credentials that has sufficient permissions to install Nutanix Guest Tools.

Once the install is complete, under the column “NGT Status” the value of Latest is seen after Nutanix Guest Tools successfully install.
Items for Consideration
Nutanix Guest Tools (NGT) is a helpful add-on that unlocks advanced features inside VMs running on Nutanix AHV, although there are some considerations if using it with Citrix.
Certificates and Cloned Machines
NGT uses SSL certificates to talk securely with its guest services. Each VM needs its own unique certificate. This can be tricky in Citrix environments that rely upon cloning (e.g. Citrix MCS, App Layering, or PVS), since cloned VMs all start from the same master image thus they can end up sharing the same certificate, which causes conflicts and reduces the functionality/effectiveness of NGT.
Why This Matters for Citrix
Cloned desktops and servers are meant to be deployed quickly from a single base image. Adding unique certificates to each machine after it is created adds extra steps and complexity. Thus the typical recommendation is to include only the Nutanix VirtIO drivers (for storage, networking, etc.) in the master image and delay installing NGT until after the VM is provisioned.
Leading Practice Approach
One method to handle this is with powershell scripts to install NGT automatically the first time the VM boots. In this fashion, every machine gets its own valid certificate, thus avoiding issues with Citrix provisioning models that rely upon cloned images.
In Conclusion…
Integrating Citrix with Nutanix AHV and Prism Central provides administrators with a streamlined, high-performance solution for delivering virtual desktops and applications. By leveraging the Nutanix AHV Plug-in for Citrix, administrators can connect Citrix DaaS or on-premises CVAD directly to a Nutanix environment and manage machine catalogs with ease.
By following leading practices outlined within this blog – such as installing VirtIO drivers in the base image and deploying NGT post-provisioning – administrators can ensure a smooth and scalable deployment across Citrix environments, whether cloud-based or on-premises.
Ferroque Systems consultants have the expertise and experience to design, configure, deploy, and manage Nutanix AHV hypervisor to support Citrix and other virtualization platforms, and would be happy to speak with you about how we can help.