Introduction
Before IGEL OS 12, enrolling endpoints into an organization’s Universal Management Suite (UMS) typically relied on deployment keys (single or bulk) or LAN-based discovery approaches that required shared secrets and corporate network access. As cloud adoption accelerates, coupling identity and access management with an endpoint onboarding solution has become essential for security and scale. With IGEL OS 12, the IGEL Onboarding Service (OBS) introduces a modern, identity-driven method: devices can ship directly to users and, upon first boot, complete a brief out-of-the-box setup (keyboard, language) and have the user to authenticate with an identity provider (IdP) such as Microsoft Entra ID via OAuth 2.0. Successful sign-in automatically registers the device with UMS and applies baseline applications and policies, regardless of user location.
For internet-based onboarding, UMS 12 must sit behind either a reverse proxy or IGEL Cloud Gateway (ICG). Implementation details for the reverse proxy are not covered here (topic for a separate blog), but for context, the reverse proxy used in this case is Citrix NetScaler (multiple options are available), enabling IGEL OS 12 devices to reach UMS over the single Unified Protocol (a WebSocket over TCP 8443). The reverse proxy is not a separate IGEL product; it is a standard proxy/load balancer (e.g., Citrix NetScaler, NGINX, F5, Azure Application Gateway) that can terminate TLS and optionally distribute traffic across multiple UMS servers. For large enterprise deployments, implementing a reverse proxy solution is essential for high-availability IGEL UMS 12 architectures. Use this architecture reference and configuration for internet-facing UMS, SSL offload and load balancing, or when UMS serves as an Update Proxy for app delivery. This content applies to IGEL OS 12 and UMS 12, or environments requiring remote device onboarding and management, while keeping UMS non-internet-facing, may opt for IGEL Cloud Gateway (ICG).
In summary, this blog documents the end-to-end OBS/UMS 12 integration with Microsoft Entra ID as the identity provider (IdP), with UMS 12 servers already positioned behind a Citrix NetScaler reverse proxy, enabling faster rollouts, stronger security (MFA, conditional access), and reduced operational overhead.
Objectives, Architecture Overview, and Prerequisites
The objective of this blog is to provide a reference for configuring IGEL OBS with Entra ID as IdP via OAuth 2.0 and integrating the OBS with the organization’s UMS 12, which allows end-users to leverage their Entra ID credentials to onboard the IGEL OS 12 device into UMS and receive applications and profiles to start their work.
Note: This blog does not cover OBS integration with other identity providers (IdPs). It focuses on deployments that use Microsoft Entra ID as the primary identity platform, securing federated apps.
- For IGEL OBS integration with Okta, refer to IGEL documentation here.
- For IGEL OBS integration with Ping Identity, refer to IGEL documentation here.
- For IGEL OBS integration with other Identity Providers, refer to IGEL documentation here.
The following diagram illustrates IGEL OS 12 device registration with Entra ID authentication via the IGEL OBS workflow once it is integrated.
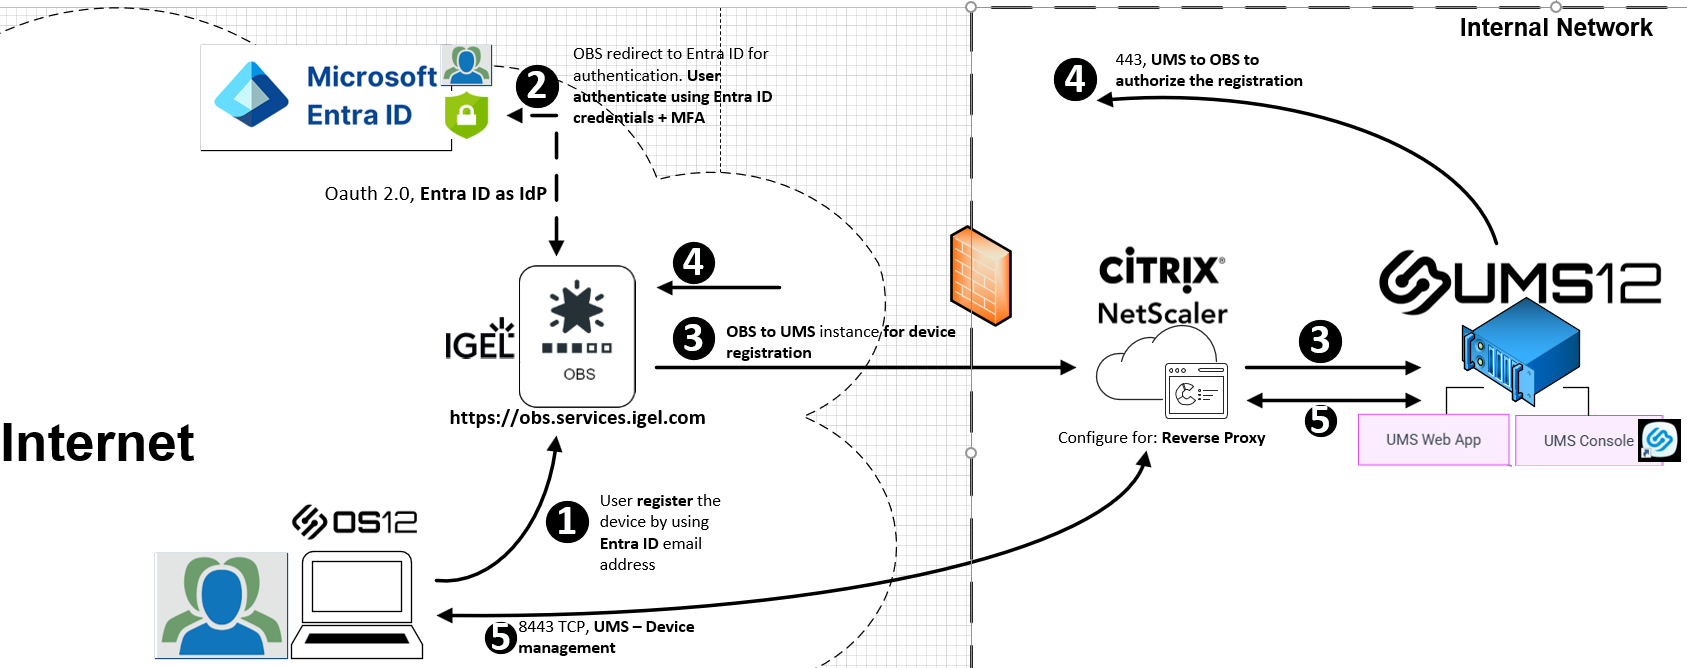
- The users receive their IGEL device, power it on, and complete a few out-of-the-box steps, such as connecting to Wi-Fi, setting the language and keyboard, and setting the time. On the screen “Let’s connect your device to your company network”, the user enters their company email address.
- The organization’s Entra ID logon page appears with the user’s email address in place and prompts for authentication based on conditional access policies. User authentication should include multi-factor authentication (MFA).
- Once authenticated, the OBS communicates with the UMS via the configured cluster address for device registration. The OBS-UMS communication is based on certificate authentication.
- The UMS validates that the device registration is coming from an authorized OBS instance. Once authorized, the UMS allows the OBS to facilitate the device registration process. The device is then registered with UMS.
- Once registration is complete, the device is now managed by UMS via reverse proxy, which enables applications and profiles to start landing on the device.
The following high-level architecture diagram illustrates the two critical integrations within the IGEL Customer Portal to activate and to configure the IGEL OBS onboarding solution (shown in orange).
The primary intent of this blog is to guide administrators in performing these two integrations within the IGEL Customer Portal.
Configure Entra ID as IdP for IGEL OS Onboarding Service
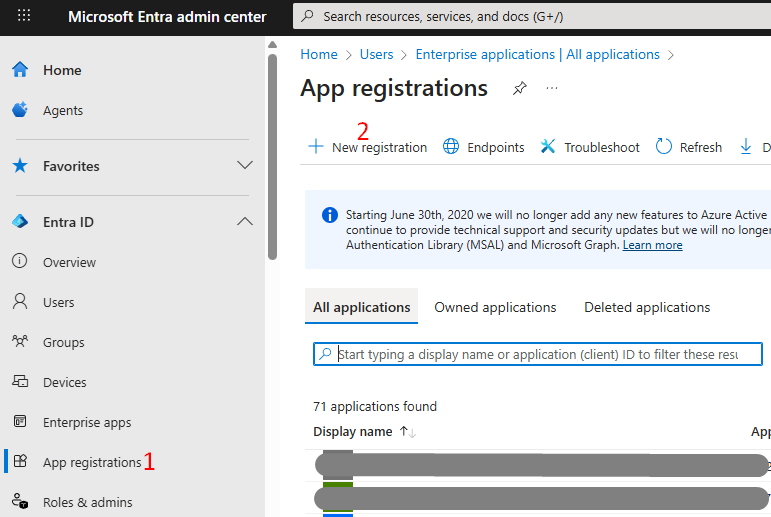
Authenticate to the Entra ID tenant with an account that has at least the Application Administrator role and create an app registration for the IGEL OBS integration (OAuth 2.0). Record the application (client) ID, generate a client secret, and note the tenant-specific authorization and token endpoints. Provide these details to the IGEL administrators, who will use them to register Entra ID as the IGEL OS IdP in the IGEL Customer Portal.
Register IGEL OBS Communication with UMS 12 via Certificate Authentication
Regarding the IGEL OBS onboarding flow, the IGEL OBS must know which UMS 12 environment to contact to authorize device onboarding in order for post-Entra ID user authentication on the IGEL OS 12 device to be successful. This service-to-service link relies upon certificate-based trust. In the UMS Console, the IGEL administrator records the cluster address (the public hostname exposed through the reverse proxy), exports the reverse proxy’s SSL certificate, including the full chain (intermediate and root), and combines these into a single certificate file (e.g., PEM). Ensure the certificate CN/SAN matches the cluster address.
With the cluster address and certificate bundle prepared, complete the final configuration in the IGEL Customer Portal under IGEL OS Onboarding by performing the following tasks:
- Provide the UMS cluster address (public FQDN behind the reverse proxy).
- Upload the certificate bundle that contains the full chain.
- Provide the Entra ID domain in the user email address (e.g. contoso.com). The domain mapping allows OBS to route onboarding requests derived from the user’s email suffix to the correct IGEL customer tenant and associated Entra ID configuration, ensuring communication with the correct UMS environment and a resultant authorization response.
To achieve these objectives, the following architectural prerequisites must be in place:
- UMS cluster address is enabled and configured in the UMS Console. This address is the public FQDN of the reverse proxy.
- Reverse proxy is successfully implemented in the IGEL environment. As a result, IGEL OS 12 devices can register (e.g., via the Mass Enrollment Token method) and be managed remotely by UMS 12.
- Open the following network ports to support IGEL OS 12 enrollment via OBS:
| Source | Destination | Ports |
|---|---|---|
| Each UMS 12 Server in the environment | IGEL OBS – http://obs.services.igel.com | Outbound only – 443 TCP |
| IGEL OBS – http://obs.services.igel.com | Reverse proxy | Inbound only – 443 TCP IGEL typically recommends device-to-reverse proxy communication over port 8443 (Unified Protocol); in this guide, port 443 is used instead. |
- Administrative access to UMS Console and UMS Web App, and to IGEL Customer Portal as Super Admin role.
- Administrative access to the Entra ID portal, at least with the Application Administrator role, to be able to create app registration and assignment.
- Microsoft Entra ID as the primary IdP with conditional access (MFA). For OBS onboarding, target the enterprise application (service principal) that represents the IGEL OBS integration with a dedicated CA policy that requires only the user password and MFA. Do not enforce device-based conditions (e.g., “require hybrid/Azure AD joined,” “require compliant device,” device filters, app protection) since IGEL OS 12 devices are not registered with UMS at this stage, and such requirements will cause authentication to fail, and the device will not register with UMS.
- An Entra ID test user or group for pilot onboarding. After registering the IGEL OBS app, set the enterprise application to require user assignment and grant access to this user/group. Scope the OBS conditional access policy (password and MFA only) to the same identities for testing.
- Notepad (or any plain-text editor) to open the reverse proxy (Citrix NetScaler for this blog) SSL certificates/Web cert for the UMS cluster address FQDN, intermediate CA, and root CA. Ultimately, the outcome is to build a single PEM chain by copying full BEGIN/END CERTIFICATE blocks in order: root>intermediate>server
Configuration
Create an App Registration representing IGEL OBS Web app in Entra ID
1) Navigate and logon to the Entra ID portal with at least the Application Administrator role > App Registrations > New Registration.
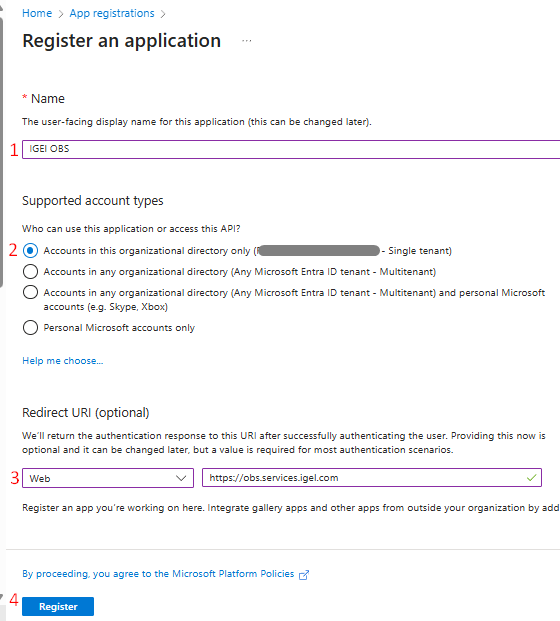
At the Register an application screen, enter the following details:
- Name: IGEL OBS or a preferred name of your choice.
- Supported Account Types: choose Accounts in this organization directory only.
- Redirect URI: for our purposes, this setting is required. Choose Web as the platform for the first field and in the second field provide the URI of the onboarding service (which is https://obs.services.igel.com).
When all information is entered, click Register, and the application is created on the Entra ID portal.
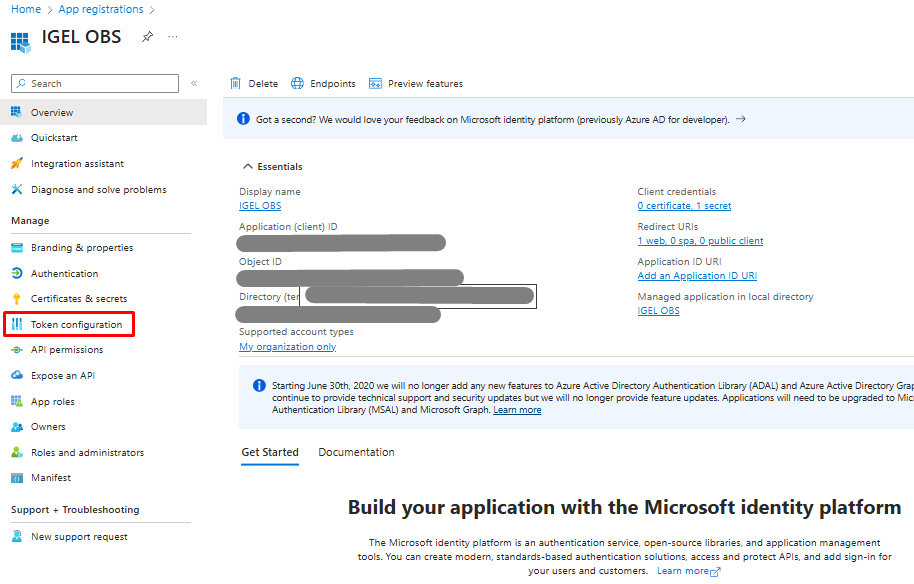
2) With the IGEL OBS application just created and under its menu, click Token Configuration.
Click Add Optional Claim > select ID for Token Type > enable (check) the below > enable (check) email and preferred_username attributes for Claim > Add:
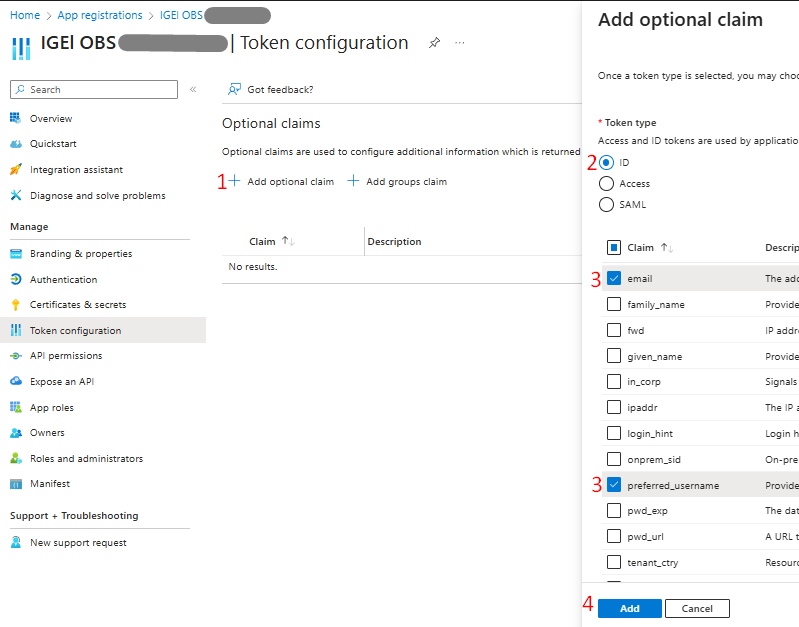
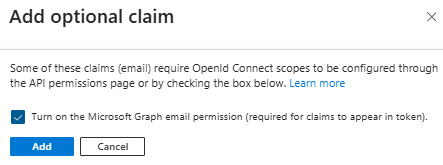
Enable (check) Turn on the Microsoft Graph email permission > Add.
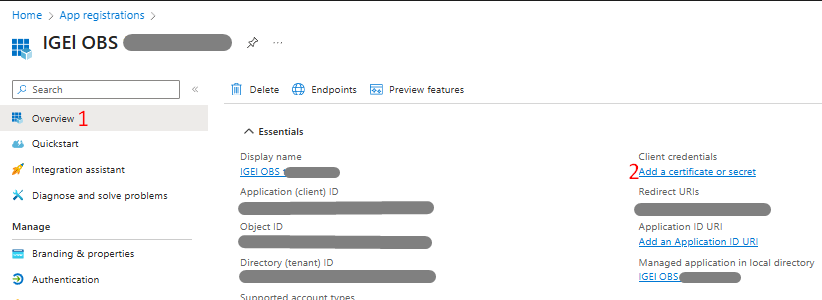
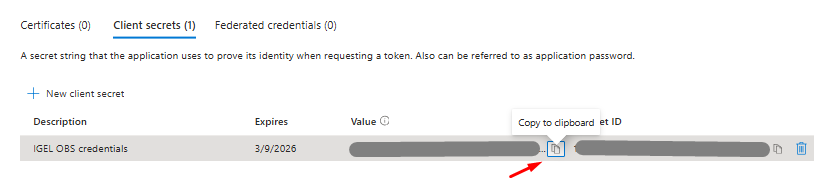
3) Under the IGEL OBS app menu, click Overview > under Client credentials, click Add a certificate or secret.
Under Certificates & Secrets screen, click + New Client Secret > For Description, input IGEL OBS credentials or preferred name of your choice > Add.
Important: After adding the client secret, copy it immediately from the confirmation page since it is shown or read only once. Store it in a secure location (ideally a password/secret vault) since thereafter the IGEL administrator will need it when configuring Entra ID as the IdP in the IGEL Customer Portal.
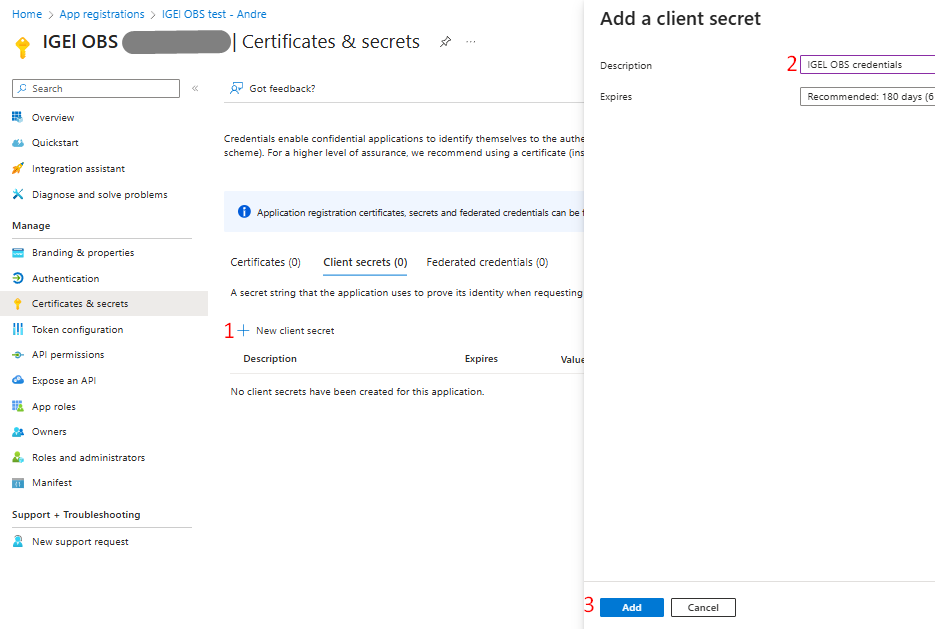
Copy to the clipboard the client secret and store it in a safe place.
4) Client secrets are now generated and stored; however, the IGEL administrator will need additional data (Application ID, OAuth 2.0 authorization endpoint (v2), and OAuth 2.0 token endpoint (v2)) to configure Entra ID as an IdP within the IGEL Customer Portal. Therefore, it is a good idea to collect this information before leaving the IGEL OBS application page on Entra ID.
Under the IGEL OBS application menu, click Overview > click Copy to Clipboard on the Application (client) ID to capture the value and store it in a safe place.
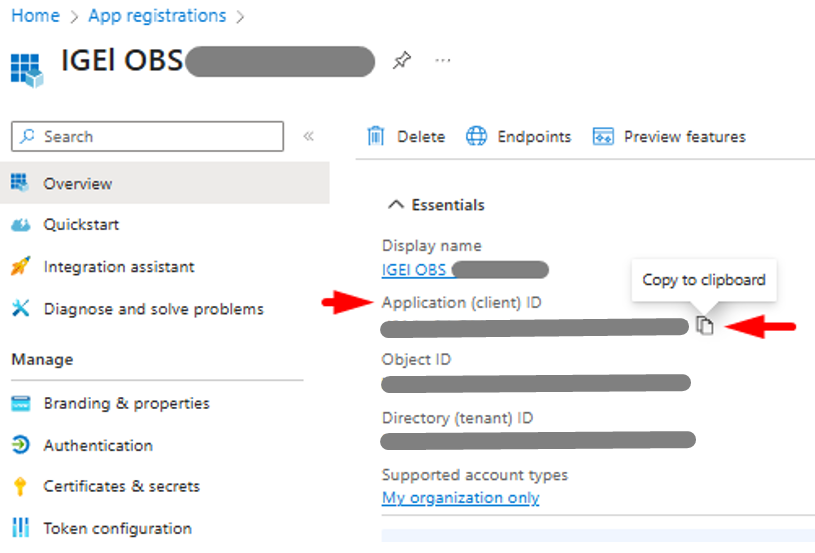
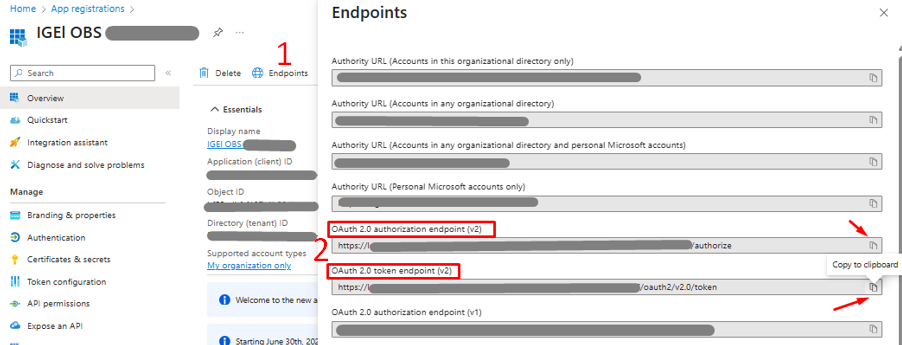
Click Endpoint (with the globe icon on the top menu), click Copy to Clipboard the following to capture the value and store it in a safe place:
- OAuth 2.0 authorization endpoint (v2).
- OAuth 2.0 token endpoint (v2).
5) Assign the IGEL OBS enterprise application to the pilot Entra ID user or group. If not already enabled, set user assignment required to Yes under Enterprise applications > IGEL OBS > Properties. Scope a dedicated conditional access policy to the IGEL OBS app and the pilot identities that require only password + MFA (no device-compliance nor join requirements). Entra ID configuration is complete!
Configure Entra ID as an IdP for IGEL OS OBS
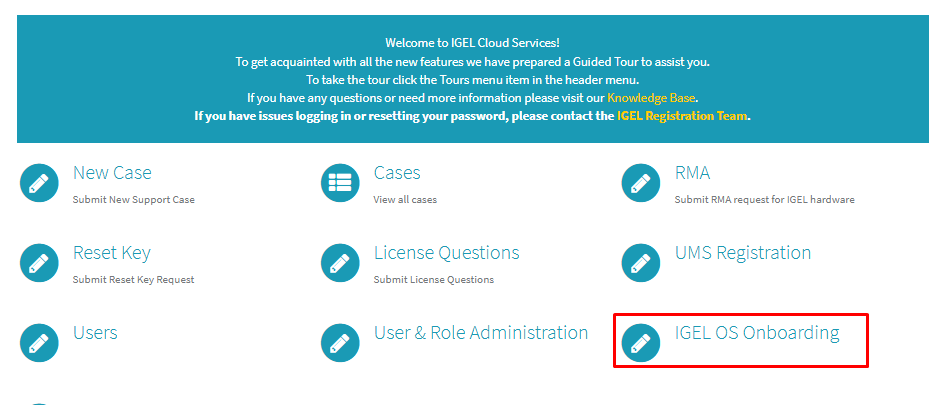
1) Open another browser session, browse to https://support.igel.com and logon to the IGEL Customer Portal account with Super Admin role.
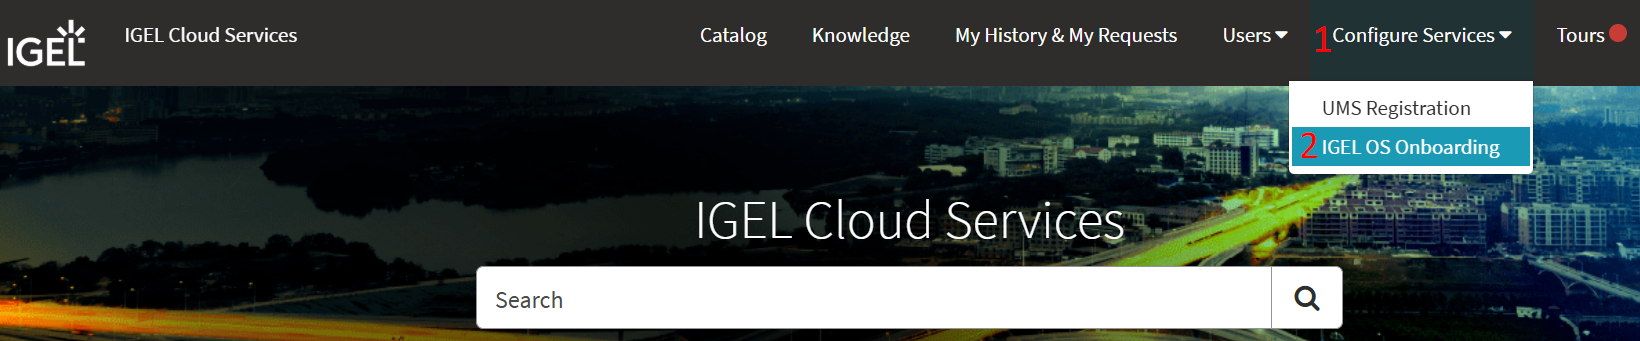
Click IGEL OS Onboarding on the landing page > click Configure Services > Click Activate IGEL OS Onboarding.
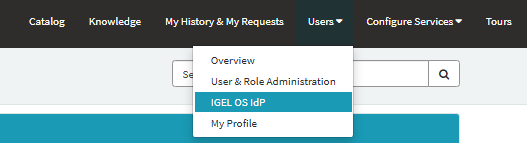
Expand the Users menu > select IGEL OS IdP. The IGEL OS IdP Management screen will appear; click Register IGEL OS IdP.

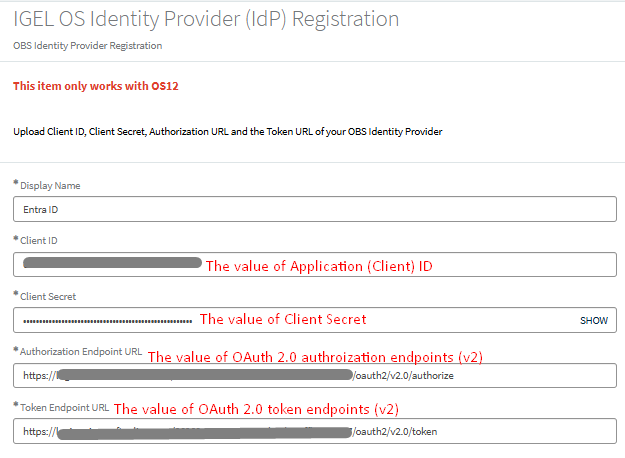
On the IGEL OS Identity Provider (IdP) Registration page, paste the data collected earlier from Entra ID to the respective fields in the following order and verify each entry for accuracy:
- Display Name: Entra ID or a preferred name of your choice.
- Authorization URL: input the collected value of the OAuth 2.0 authorization endpoint (v2).
- Token Endpoint URL: input the collected value of the OAuth 2.0 token endpoint (v2).
- Client ID: input the collected value of the Application (client) ID.
- Client Secret: input the collected Client Secret.
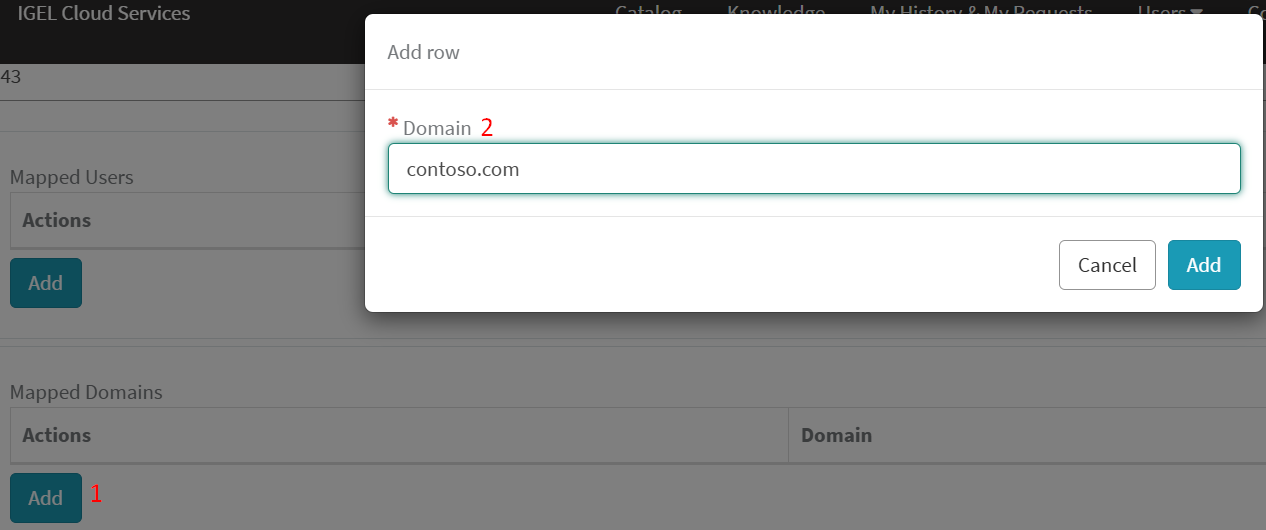
2) Scroll to the Mapped Domain section, select Add, and enter the Microsoft Entra ID domain used in users’ email addresses (e.g. contoso.com) > Add.
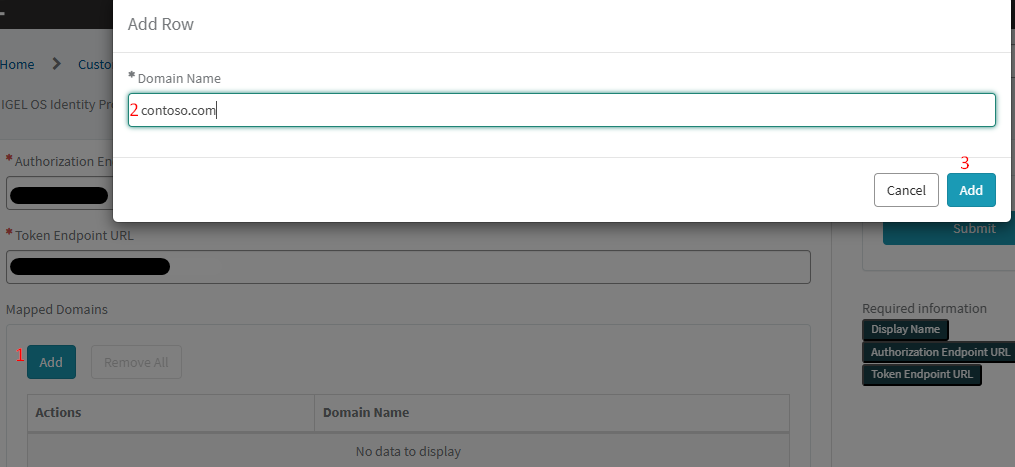
After adding the domain, click Submit to complete the configuration. Entra ID is now registered as the IdP for IGEL OBS.
Register IGEL OBS Communication with UMS 12 Via Certificate Authentication
Export Reverse Proxy Certificates Chain
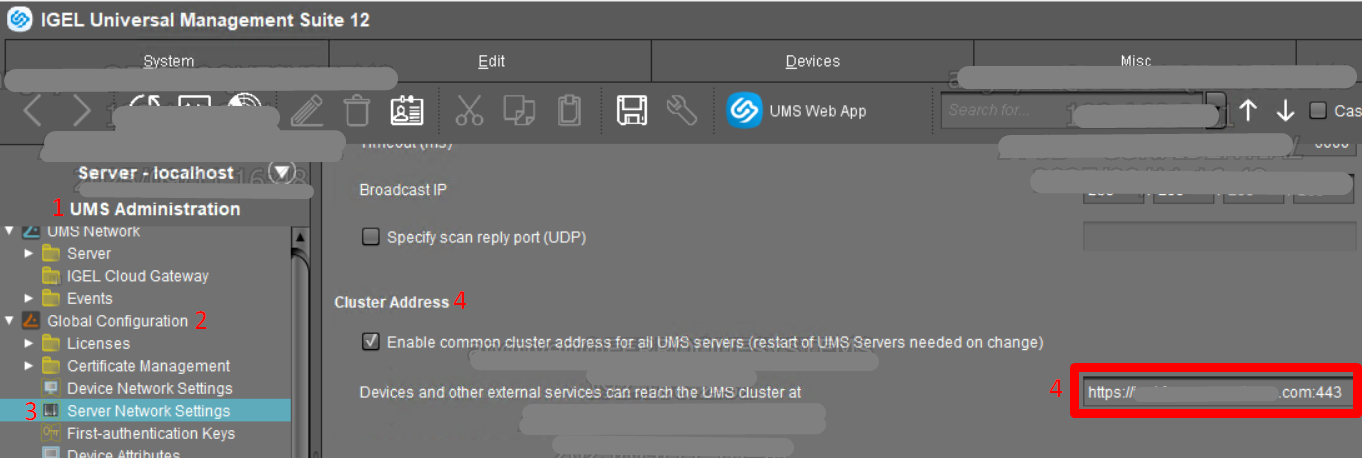
1) Access the UMS server > Access the UMS console.
In the UMS Console, go to UMS Administration > Global Configuration > Server Network Settings, copy the cluster address and port.
2) Open a browser session and browse to the cluster address URL/port, which is the public hostname of the reverse proxy (e.g. https://igel.abc.com:443 or https://igel.abc.com:8443).
The page displays HTTP Status 404 – Not Found > Ignore this message and click View Site Information button > Connection is secure.
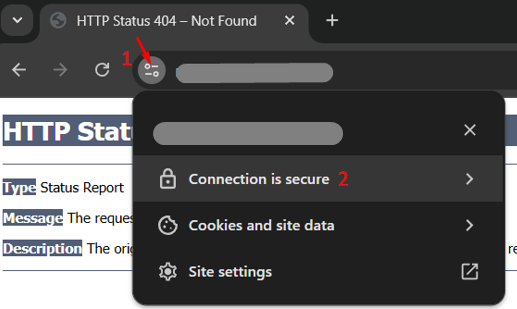
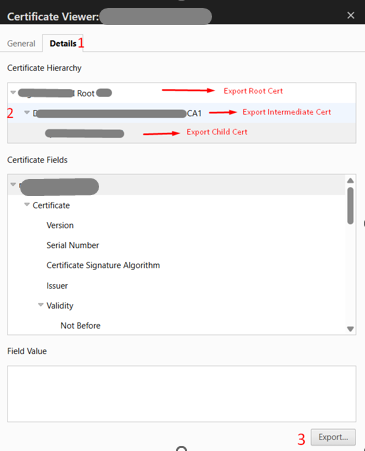
On the Certificate Viewer, open the Details tab to view the full certificate chain (root, intermediate, server), then export each certificate individually and note the location in which the files are saved (e.g., Downloads folder).
Locate the downloaded root certificate, open it in Notepad (or a text file editor of your choice) > Verify it appears in PEM-encoded X.509 format – the Base64 “PEM block” bounded by —-BEGIN CERTIFICATE—– and —-END CERTIFICATE—–
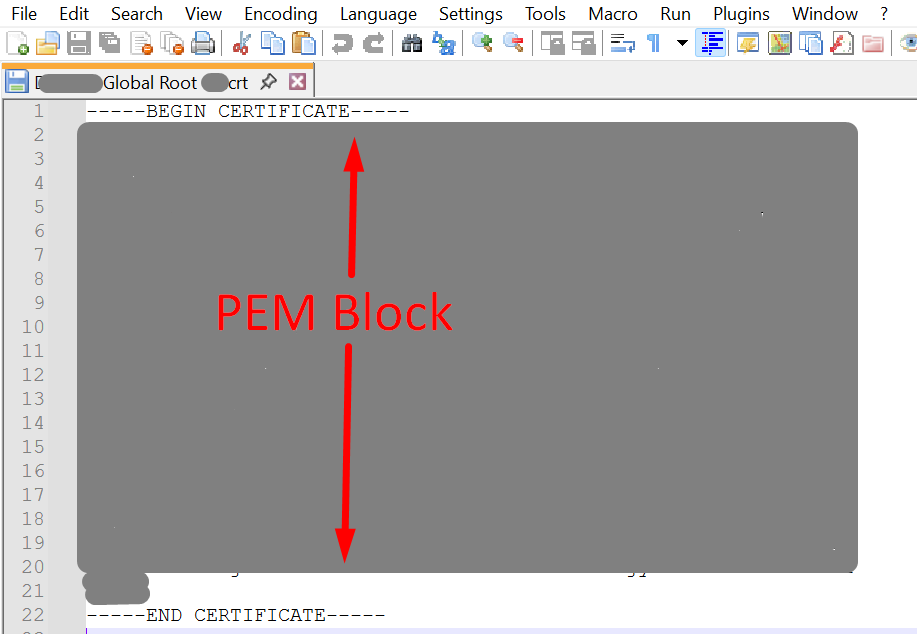
Copying the full PEM block of the root certificate includes the lines —–BEGIN CERTIFICATE—– and —–END CERTIFICATE—–.
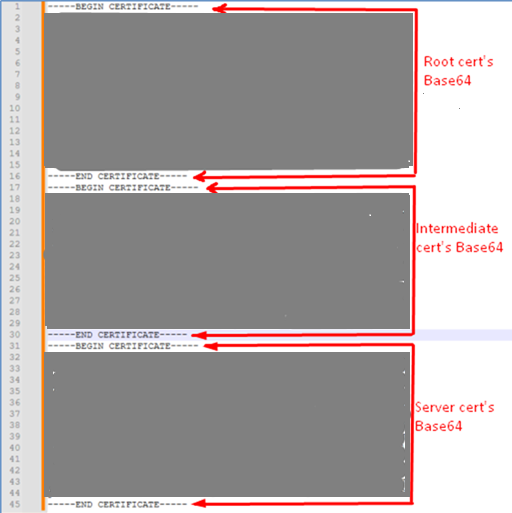
- Open a new text file and paste the root certificate block.
- Open the intermediate certificate with Notepad, copy its full PEM block, and paste it directly under the root block.
- Open the server certificate with Notepad, copy its full PEM block, and paste it directly under the intermediate block.
The new file should now contain all three PEM-encoded X.509 blocks in this order: root intermediate server. Keep the headers/footers intact, avoid extra space or altered dashes, and leave a single newline between blocks > Save the file as a .CER or .CRT or. PEM extension (i.e., UMS cert chain).
Register IGEL OS Onboarding in IGEL Customer Portal
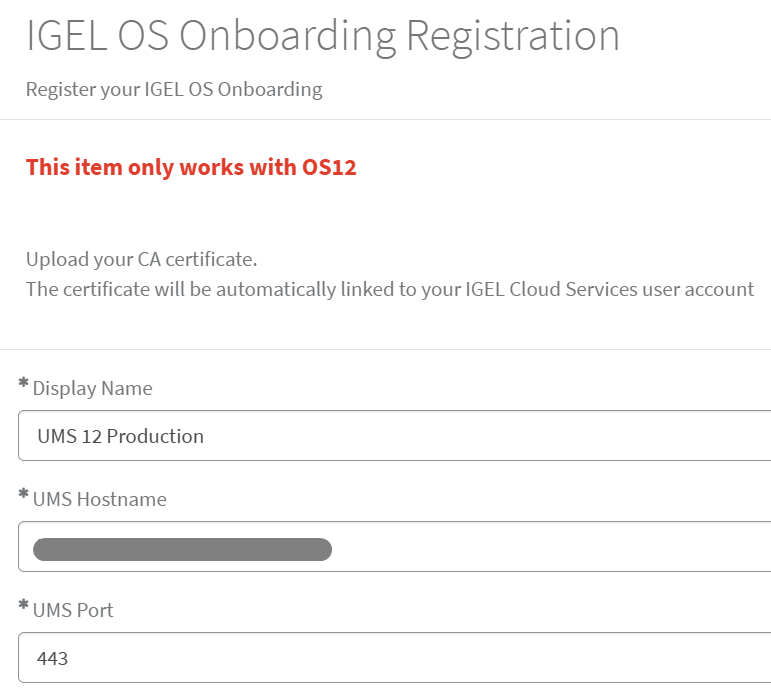
- Access IGEL Customer Portal > Configure Services > IGEL OS Onboarding > Register IGEL OS Onboarding.

On the IGEL OS Onboarding Registration page, input the data collected earlier into the respective fields and verify each entry for accuracy:
- Display Name: UMS 12 Production or a preferred name of your choice.
- UMS Hostname: The reverse proxy clustered address collected earlier from UMS console.
- UMS Port: The reverse proxy port collected earlier from the USM console (in this blog, it is 443, but the recommended IGEL architecture is 8443, and depending upon your UMS environment).
2) Scroll to the Mapped Domain section, select Add, and enter the Entra ID domain used in users’ email addresses (e.g., contoso.com) > Add.
3) Click Required – Upload button > Upload the UMS cert chain created in the previous step > Submit.

The IGEL OS Onboarding registration is complete!
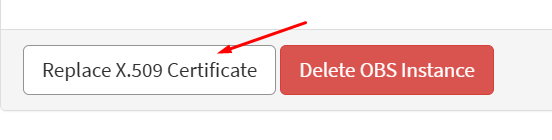
Note: When the reverse proxy’s SSL certificate expires and is renewed, rebuild the full chain (root>intermediate>server) using this process and re-upload it in the IGEL OS Onboarding configuration via the “Replace X.509 Certificate” button.
Testing and Validation
Please refer to the IGEL OS 12 device registration with Entra ID authentication via the IGEL OBS workflow and architecture diagram in the Objectives, Architecture, and Prerequisite section as a reference to conduct the test. The test IGEL OS 12 device onboarding will perform these exact steps. If/when encountering any issues, an administrator can use the following recommendations to identify probable cause and/or root cause:
- IGEL KB is available here: Troubleshooting: Possible Error Code During Onboarding.
- If the IGEL device fails to complete the OBS workflow and triggers an error, press Ctrl+Alt+F11 (TTY1) or Ctrl+Alt+F12 (TTY2) to open a local terminal.
- Run “journalctl” to review logs. Use “journalctl -f” to follow live output or press Shift+G to jump to the newest entries for faster troubleshooting.
- To exit the Terminal screen, use CTRL+Alt+F1 to go back to the IGEL device UI.
- Other useful Linux commands are summarized here: IGEL Community Docs.
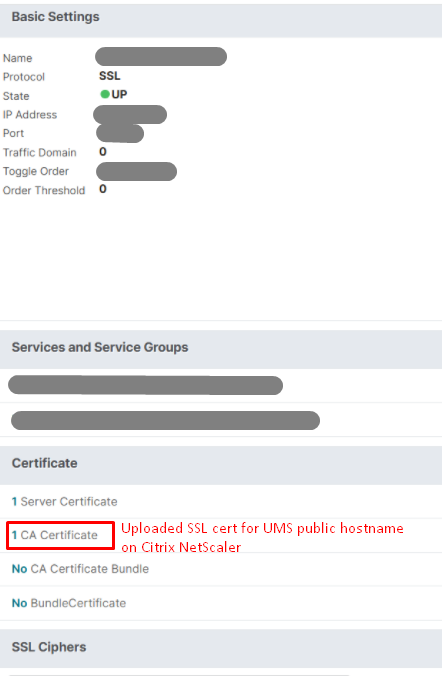
- Error 30 is the most common onboarding error and can stem from multiple causes. If the user successfully authenticates with Entra ID but the IGEL device still returns Error 30, confirm with the Citrix NetScaler (reverse proxy) administrator that the SSL certificate for the UMS public hostname has been uploaded to the device’s Certificates store (screenshot below). Without this certificate on the reverse proxy, the IGEL OBS service cannot establish a secure connection to UMS through the proxy, resulting in Error 30.
In Conclusion…
The IGEL OS 12 Onboarding Service (OBS) streamlines endpoint device onboarding and provides enhanced security and scalability by enabling organizations to deliver IGEL endpoint devices directly to users, who can then authenticate via the organization’s standard identity provider (IdP) to automatically register their device with IGEL UMS and apply baseline policies, etc.
This blog reviewed doing so with Microsoft Entra ID and NetScaler; however, as mentioned, IGEL OBS can also be paired with several other common IdP and reverse proxy solutions (e.g., Okta, Ping Identity, F5, Azure Application Gateway, etc.), to align with the organization’s technology standards.
Ferroque Systems has expertise and experience in configuring endpoint solutions using IGEL (and other common endpoint technologies), and we would be more than happy to speak with you to talk through how we can assist.